2010 MERCEDES-BENZ C350S odometer
[x] Cancel search: odometerPage 15 of 364

N
Navigation system see Separate operating instructions
Navi menu .......................................... 126
NECK-PRO active front head
restraints ............................................. 52
Resetting ....................................... 311
Nets, parcel ....................................... 203
Normal occupant weight .................. 251
Number, vehicle identification
(VIN) ................................................... 333
O
Occupant Classification System see OCS (Occupant Classification
System)
Occupant distribution ....................... 251
Occupant safety
Air bags ........................................... 37
BabySmart™ .................................... 46
Children and air bags .......................37
Children in the vehicle .....................54
Child seat anchors – LATCH-type
(ISOFIX) ........................................... 58
Fastening the seat belts ................... 50
Front passenger front air bag off
indicator lamp (Canada
only) ........................................ 46, 307
Front passenger front air bag off
indicator lamp (USA only) ........42, 308
Infant and child restraint systems .... 55
Introduction ..................................... 36
ISOFIX (Child seat anchors –
LATCH-type) ..................................... 58
OCS (Occupant Classification
System) ........................................... 42
Seat belts .................................. 39, 48
OCS (Occupant Classification
System) ................................................ 42
Self-test ........................................... 46
Odometer ........................................... 121
Oil, oil level see Engine oil
On-board computer
see Control system
One-touch gearshifting ..................... 112
Operating safety .................................. 22
Ornamental moldings, cleaning ....... 263
Overhead control panel ...................... 32
P
Paintwork, cleaning .......................... 261
Paintwork code ................................. 333
Panic alarm .......................................... 60
Panorama roof with power tilt/
sliding panel ...................................... 200
Cleaning ......................................... 264
Operation ....................................... 200
Roller sunblinds ............................. 199
Synchronizing ................................ 201
Parcel nets ......................................... 203
Parking ............................................... 105
Parktronic system ..........................185
Parking brake .................................... 105
Messages in the multifunction
display ........................................... 281
Parking position
Exterior rear view mirrors ................87
Transmission position ....................109
Parktronic system
Cleaning system sensors ...............263
Malfunction .................................... 187
Minimum distance .........................186
Sensor range ................................. 185
Switching on/off ........................... 187
System sensors ............................. 185
Warning indicators .........................186
Parts service ...................................... 332
PASS AIR BAG OFF indicator lamp
(Canada only) see Front passenger front air bag
off indicator lamp (Canada only)
PASS AIR BAG OFF indicator lamp
(USA only) see Front passenger front air bag
off indicator lamp (USA only)
Passenger safety
see Occupant safety
Pedals ................................................. 254
Pelvis air bags ..................................... 41
Phone see Telephone
Plastic parts, cleaning ...................... 265
Index13204_AKB; 5; 23, en-USd2ureepe,Version: 2.11.8.12009-07-16T17:54:06+02:00 - Seite 13
Page 23 of 364
Rhode Island, and Vermont Emission
Control System Warranty
R State Warranty Enforcement Laws (Lemon
Laws)
Important notice for California retail
buyers and lessees of Mercedes-Benz
automobiles
Under California law you may be entitled to a
replacement of your vehicle or a refund of the
purchase price or lease price, if after a
reasonable number of repair attempts
Mercedes-Benz USA, LLC and/or its
authorized repair or service facilities fail to fix
one or more substantial defects or
malfunctions in the vehicle that are covered
by its express warranty. During the period of
18 months from original delivery of the
vehicle or the accumulation of 18 000 miles
(approximately 29 000 km) on the odometer
of the vehicle, whichever occurs first, a
reasonable number of repair attempts is
presumed for a retail buyer or lessee if one or
more of the following occurs:
(1)the same substantial defect or
malfunction results in a condition that is
likely to cause death or serious bodily
injury if the vehicle is driven, that defect
or malfunction has been subject to repair
two or more times, and you have directly
notified Mercedes-Benz USA, LLC in
writing of the need for its repair,(2)the same substantial defect or
malfunction of a less serious nature than
category (1) has been subject to repair
four or more times and you have directly
notified us in writing of the need for its
repair, or(3)the vehicle is out of service by reason of
repair of the same or different substantial
defects or malfunctions for a cumulative
total of more than 30 calendar days.
Written notification should not be sent to a
dealer, it should be addressed to
Mercedes-Benz USA, LLC
Customer Assistance Center
One Mercedes Drive
Montvale, NJ 07645-0350
Maintenance
The Maintenance Booklet describes all the
necessary maintenance work which should
be performed at regular intervals.
Always have the Maintenance Booklet with
you when you take the vehicle to an
authorized Mercedes-Benz Center for
service. The service advisor will record each
service in the booklet for you.
Roadside Assistance
The Mercedes-Benz Roadside Assistance
Program provides factory-trained technical
help in the event of a breakdown. Calls to the
toll-free Roadside Assistance number
1-800-FOR-MERCedes (1-800-367-6372)
(in the USA) 1-800-387-0100 (in Canada)
will be answered by Mercedes-Benz
Customer Assistance Representatives
24 hours a day, 365 days a year.
For additional information refer to the
Mercedes-Benz Roadside Assistance
Program brochure (in the USA) or the
Roadside Assistance section of the Service
and Warranty Information Booklet (in
Canada) in your vehicle literature portfolio.
Change of address or ownership
If you change your address, be sure to send
in the “Change of Address Notice” found in
the Service and Warranty Information
Booklet, or simply call the Mercedes-Benz
Customer Assistance Center (in the USA) at
1-800-FOR-MERCedes (1-800-367-6372), or
Customer Service (in Canada) at
1-800-387-0100. This will assist us in
Introduction21204_AKB; 5; 23, en-USd2ureepe,Version: 2.11.8.12009-07-16T17:54:06+02:00 - Seite 21Z
Page 122 of 364
Using the control systemXTo select a menu: Press button =
or ;.
XTo select a submenu: Press button :
or 9.
XTo go to the next higher menu level:
Press button %.
XTo select the standard display: Press
button % repeatedly until the standard
display featuring the odometer and
speedometer appears.
or
XPress and hold button % until the
standard display featuring the trip
odometer and the main odometer appears.
XTo confirm selection: Press button a.XTo confirm display message: Press
button a or %.
The control system saves certain display
messages. Calling up display messages
(Y page 129).
For information about warning and
malfunction messages appearing in the
multifunction display (Y page 270).
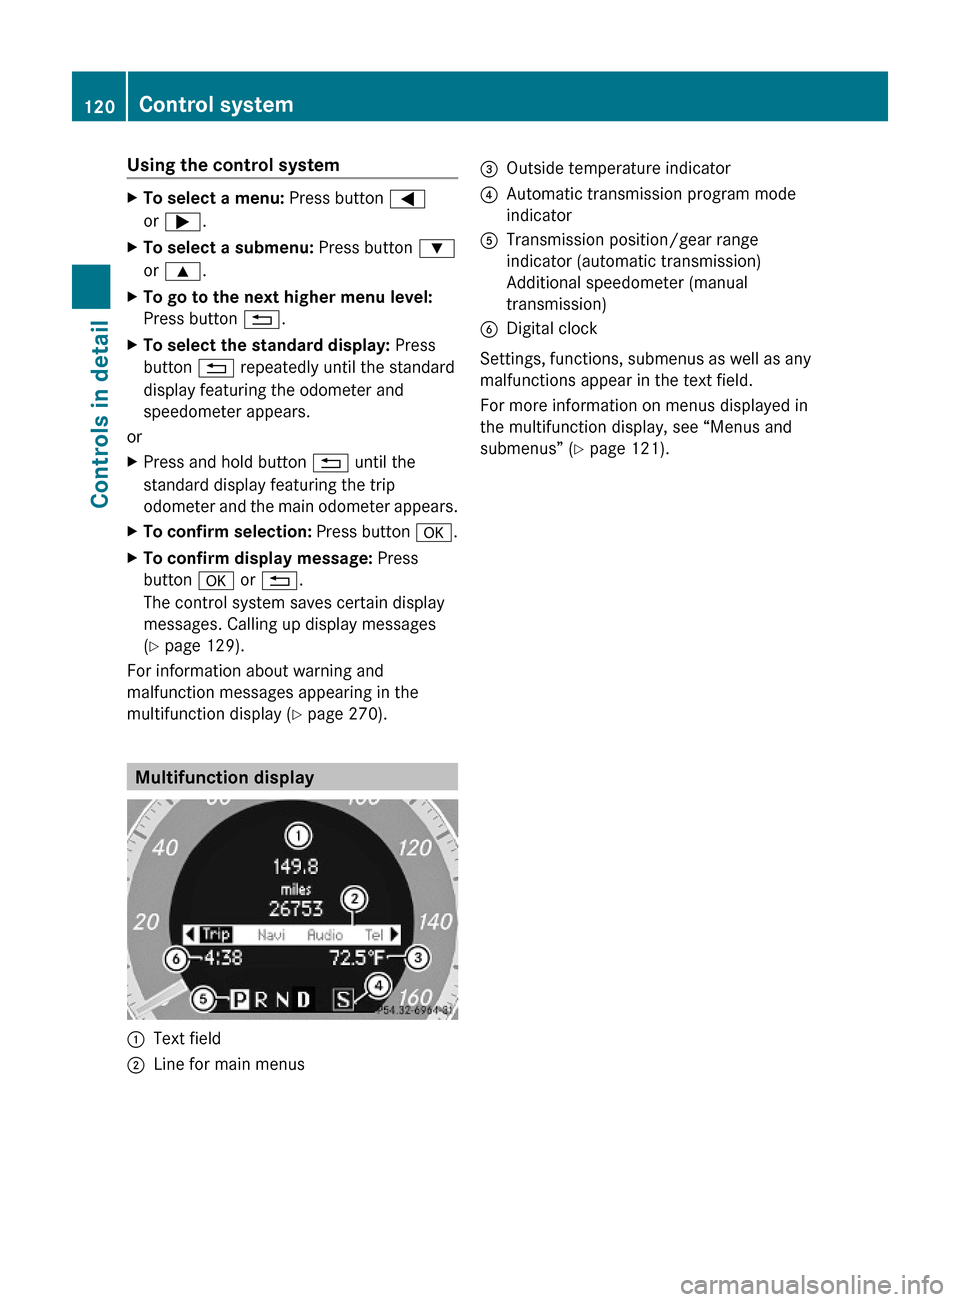
Multifunction display
:Text field;Line for main menus=Outside temperature indicator?Automatic transmission program mode
indicator
ATransmission position/gear range
indicator (automatic transmission)
Additional speedometer (manual
transmission)
BDigital clock
Settings, functions, submenus as well as any
malfunctions appear in the text field.
For more information on menus displayed in
the multifunction display, see “Menus and
submenus” (Y page 121).
120Control systemControls in detail
204_AKB; 5; 23, en-USd2ureepe,Version: 2.11.8.12009-07-16T17:54:06+02:00 - Seite 120
Page 123 of 364
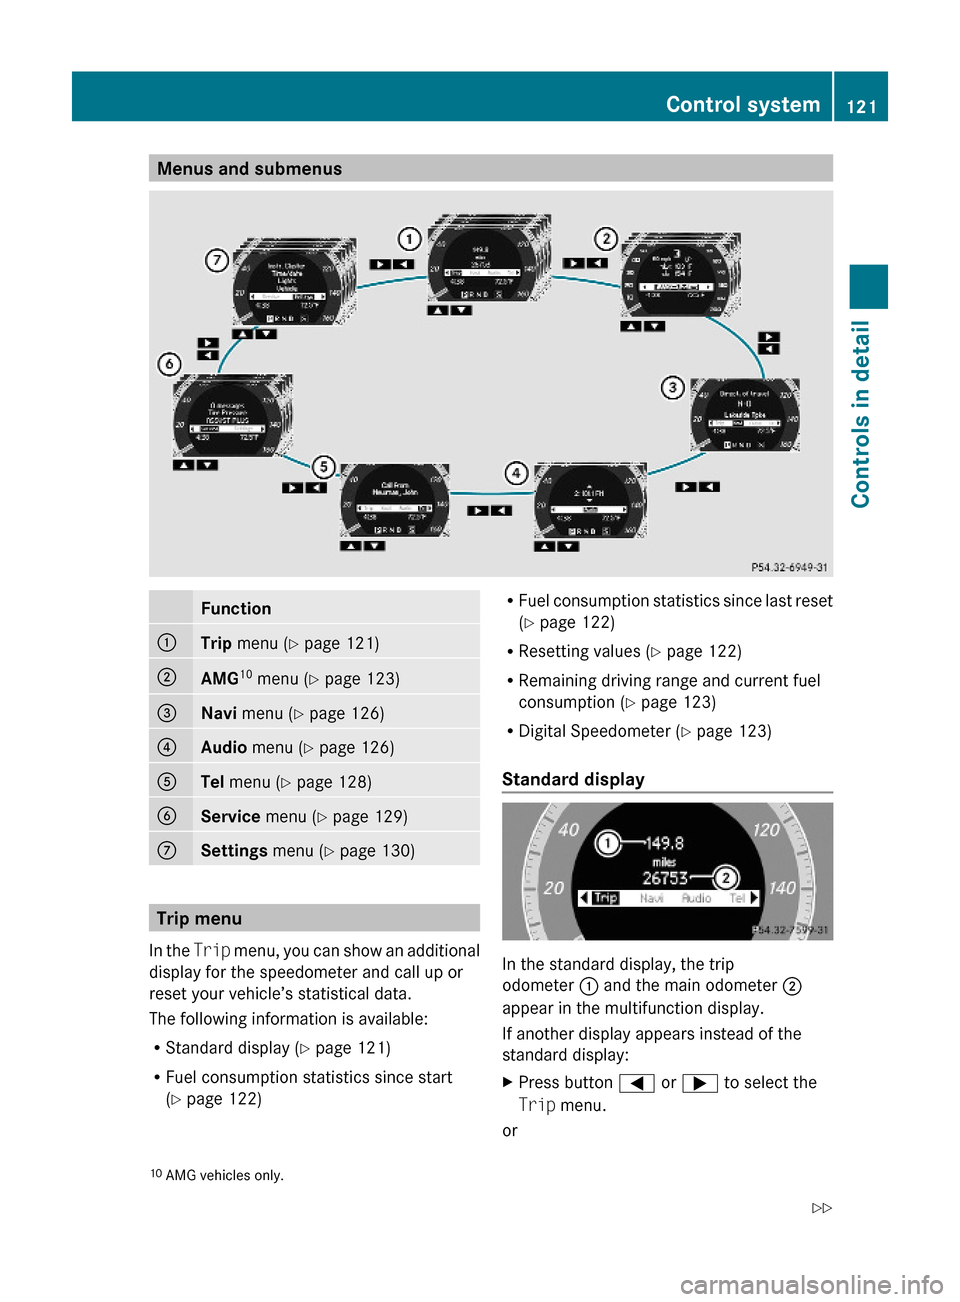
Menus and submenusFunction:Trip menu (Y page 121);AMG10 menu (Y page 123)=Navi menu (Y page 126)?Audio menu (Y page 126)ATel menu (Y page 128)BService menu (Y page 129)CSettings menu (Y page 130)
Trip menu
In the Trip menu, you can show an additional
display for the speedometer and call up or
reset your vehicle’s statistical data.
The following information is available:
RStandard display (Y page 121)
RFuel consumption statistics since start
(Y page 122)
RFuel consumption statistics since last reset
(Y page 122)
RResetting values (Y page 122)
RRemaining driving range and current fuel
consumption (Y page 123)
RDigital Speedometer (Y page 123)
Standard display
In the standard display, the trip
odometer : and the main odometer ;
appear in the multifunction display.
If another display appears instead of the
standard display:
XPress button = or ; to select the
Trip menu.
or
10AMG vehicles only.Control system121Controls in detail204_AKB; 5; 23, en-USd2ureepe,Version: 2.11.8.12009-07-16T17:54:06+02:00 - Seite 121Z
Page 124 of 364
XPress button % repeatedly until the
standard display appears.
or
XPress and hold button % until the
standard display appears.
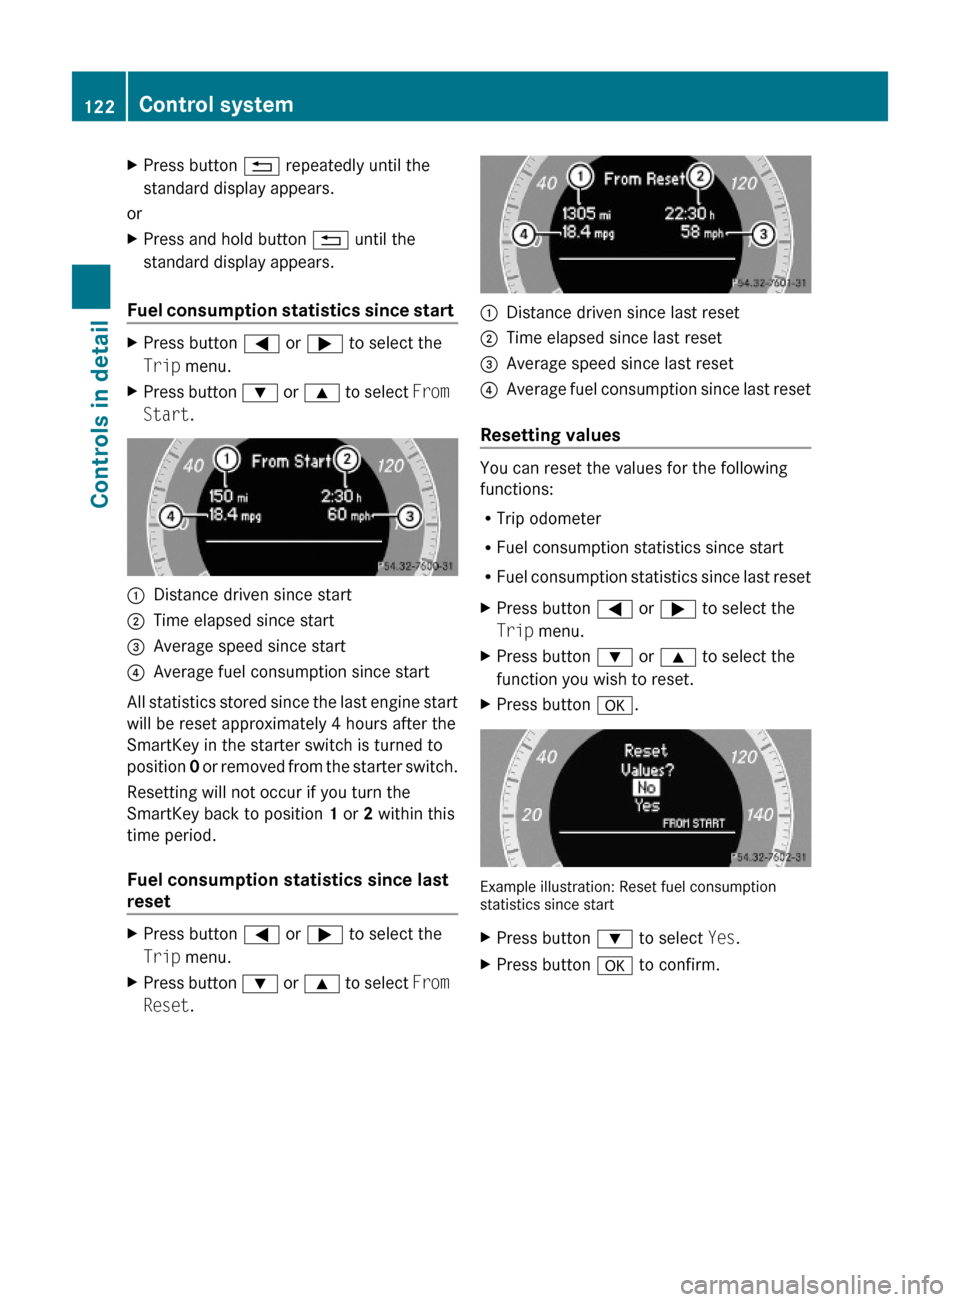
Fuel consumption statistics since start
XPress button = or ; to select the
Trip menu.
XPress button : or 9 to select From
Start.
:Distance driven since start;Time elapsed since start=Average speed since start?Average fuel consumption since start
All statistics stored since the last engine start
will be reset approximately 4 hours after the
SmartKey in the starter switch is turned to
position 0 or removed from the starter switch.
Resetting will not occur if you turn the
SmartKey back to position 1 or 2 within this
time period.
Fuel consumption statistics since last
reset
XPress button = or ; to select the
Trip menu.
XPress button : or 9 to select From
Reset.
:Distance driven since last reset;Time elapsed since last reset=Average speed since last reset?Average fuel consumption since last reset
Resetting values
You can reset the values for the following
functions:
RTrip odometer
RFuel consumption statistics since start
RFuel consumption statistics since last reset
XPress button = or ; to select the
Trip menu.
XPress button : or 9 to select the
function you wish to reset.
XPress button a.
Example illustration: Reset fuel consumptionstatistics since start
XPress button : to select Yes.XPress button a to confirm.122Control systemControls in detail
204_AKB; 5; 23, en-USd2ureepe,Version: 2.11.8.12009-07-16T17:54:06+02:00 - Seite 122
Page 133 of 364
XPress button : or 9 to select a
submenu.
Scroll down with button :, scroll up with
button 9.
With the selection marker on the desired
submenu, use the button a to access the
individual functions within that submenu.
Once within the submenu, you can use button
9 to move to the next function or
button : to move to the previous function
within that submenu.
The following lists show what settings can be
changed within the various menus. Detailed
instructions on making individual settings can
be found on the following pages.
Instrument cluster submenu
RSelecting speedometer display mode
(Y page 131)
RShowing or hiding additional
speedometer13 (Y page 132)
RPermanent display14 (speed display or
outside temperature) (Y page 132)
Time/Date submenu
RSetting the time (Y page 132)
RSetting the date (Y page 133)
Lights submenu
RSwitching daytime running lamp mode on
or off (USA only) (Y page 133)
RSwitching locator lighting on or off
(Y page 134)
RSwitching interior lighting delayed shut-off
on or off (Y page 135)
Vehicle submenu
RSwitching automatic central locking on or
off (Y page 135)
Convenience submenu
RActivating easy-entry/exit feature
(Y page 136)
RSwitching fold-in function for exterior rear
view mirrors on or off (Canada only)
(Y page 136)
Instrument cluster submenu
Access the Instr. Cluster submenu via
the Settings menu. Use the Instr.
Cluster submenu to change the instrument
cluster display settings.
The following functions are available:
RSelecting speedometer display mode
(Y page 131)
RShowing or hiding additional
speedometer15 (Y page 132)
RPermanent display16 (speed display or
outside temperature) (Y page 132)
Selecting speedometer display mode
XPress = or ; to select the
Settings menu.
XPress button : or 9 to select the
Instr. Cluster submenu.
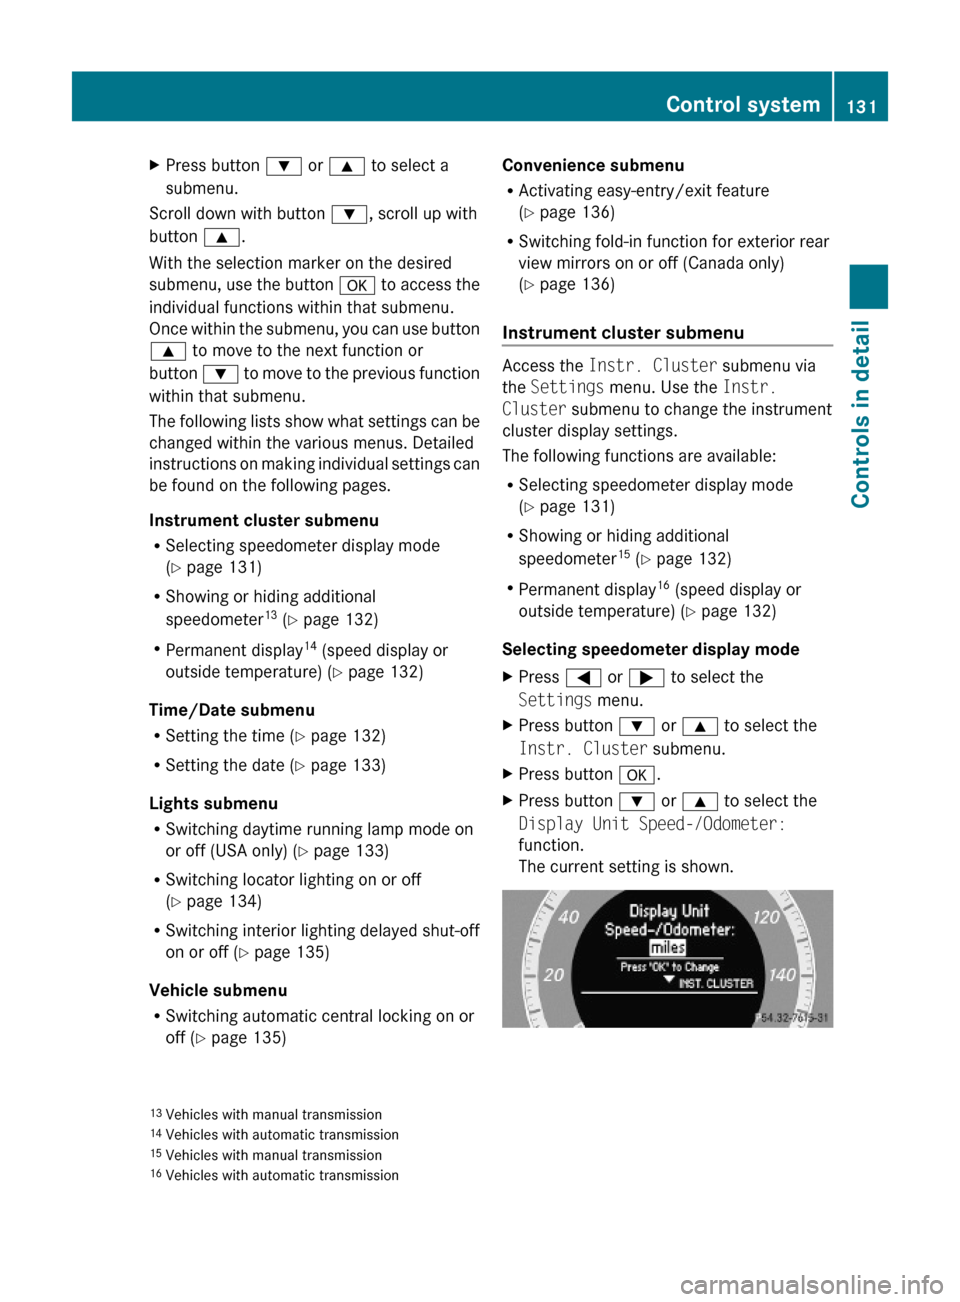
XPress button a.XPress button : or 9 to select the
Display Unit Speed-/Odometer:
function.
The current setting is shown.
13Vehicles with manual transmission14Vehicles with automatic transmission15Vehicles with manual transmission16Vehicles with automatic transmission
Control system131Controls in detail204_AKB; 5; 23, en-USd2ureepe,Version: 2.11.8.12009-07-16T17:54:06+02:00 - Seite 131Z
Page 134 of 364

XPress button a to change the setting.
Depending on the previous setting the
Display Unit Speed-/Odometer: will be
set to miles or km.
The selected display unit is valid for:
ROdometer and trip odometer
RTrip computer
RDigital speedometer in the trip menu
RCruise control
RNavigation displays
Showing or hiding additional
speedometer (vehicles with manual
transmission)
You can have an additional digital
speedometer shown on the multifunction
display. The speed is shown in the unit of
kilometers/hour (USA) or miles/hour
(Canada).
XPress button = or ; to select the
Settings menu.
XPress button : or 9 to select the
Instr. Cluster submenu.
XPress button a.XPress button : or 9 to select the
Additional Speedometer function.
The current setting is shown.
XPress button a to change the current
status.
Depending on the previous status, the
additional speedometer will be switched
On or Off.
Permanent display (vehicles with
automatic transmission)
You can use the Permanent Display:
function to choose to display either the
outside temperature or the speed in
kilometers (USA) or miles (Canada)
permanently.
XPress button = or ; to select the
Settings menu.
XPress button : or 9 to select the
Instr. Cluster submenu.
XPress button a.XPress button : or 9 to select the
Permanent Display: function.
The current setting is shown.
XPress button a to change the current
status.
Depending on the previous status, the
Permanent Display: will be switched
between Outside temperature or
Speedometer (km/h) (USA)/
Speedometer (miles) (Canada).
Time/Date submenu
Access the Time/Date submenu via the
Settings menu. Use the Time/Date
submenu to change the time and date display
settings.
The following functions are available:
RSetting the time (Y page 132)
RSetting the date (Y page 133)
Setting the time
This function is not available if your vehicle is
equipped with the COMAND system and
navigation module.
132Control systemControls in detail
204_AKB; 5; 23, en-USd2ureepe,Version: 2.11.8.12009-07-16T17:54:06+02:00 - Seite 132