2010 MERCEDES-BENZ C350S headlamp
[x] Cancel search: headlampPage 265 of 364
After running the vehicle through an
automatic car wash, wipe any wax off of the
windshield and the wiper blade inserts. This
will prevent smears and reduce wiping noise
which can be caused by residual wax on the
windshield.
Ornamental moldings
XFor regular cleaning and care of ornamental
moldings, use a damp cloth.
! Do not use chrome cleaner on ornamental
moldings. Although ornamental moldings
may have chrome appearance, they could
be made of anodized aluminum that will be
damaged when cleaned with chrome
cleaner. Instead, use a damp cloth to clean
those ornamental moldings.
For very dirty ornamental moldings of
which you are sure are chrome-plated, use
a chrome cleaner. If in doubt whether an
ornamental molding is chrome-plated,
contact an authorized Mercedes-Benz
Center.
Headlamps, brake lamps, tail lamps,
side markers, turn signal lenses
XUse a mild vehicle wash detergent, such as
Mercedes-Benz approved Car Shampoo,
with plenty of water.
! Only use window cleaning solutions that
are suitable for plastic lamp lenses.
Window cleaning solutions which are not
suitable may damage the plastic lamp
lenses of the headlamps. Therefore, do not
use abrasives, solvents or cleaners that
contain solvents.
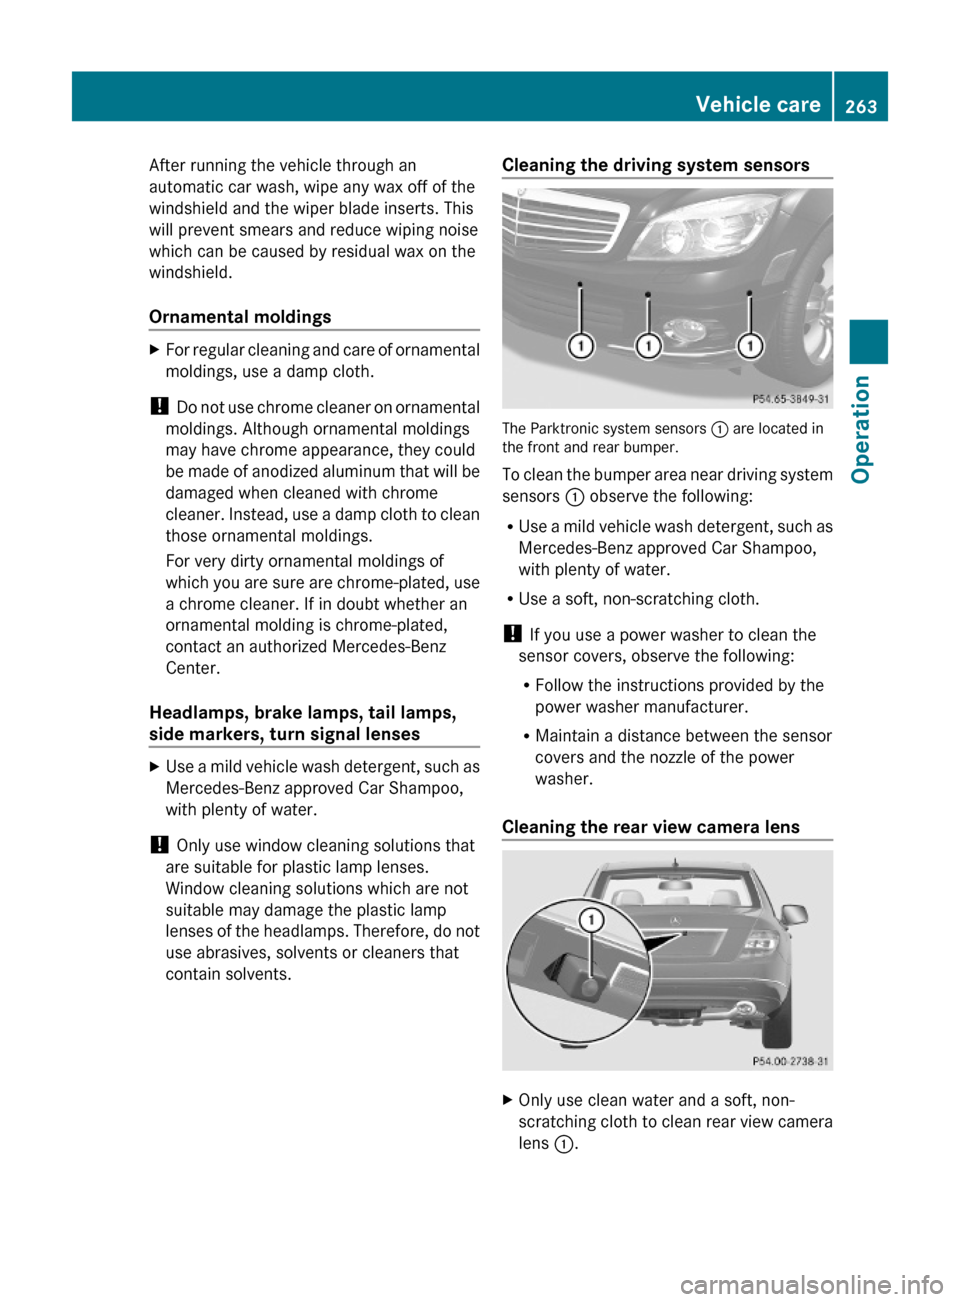
Cleaning the driving system sensors
The Parktronic system sensors : are located inthe front and rear bumper.
To clean the bumper area near driving system
sensors : observe the following:
RUse a mild vehicle wash detergent, such as
Mercedes-Benz approved Car Shampoo,
with plenty of water.
RUse a soft, non-scratching cloth.
! If you use a power washer to clean the
sensor covers, observe the following:
RFollow the instructions provided by the
power washer manufacturer.
RMaintain a distance between the sensor
covers and the nozzle of the power
washer.
Cleaning the rear view camera lens
XOnly use clean water and a soft, non-
scratching cloth to clean rear view camera
lens :.
Vehicle care263Operation204_AKB; 5; 23, en-USd2ureepe,Version: 2.11.8.12009-07-16T17:54:06+02:00 - Seite 263Z
Page 294 of 364
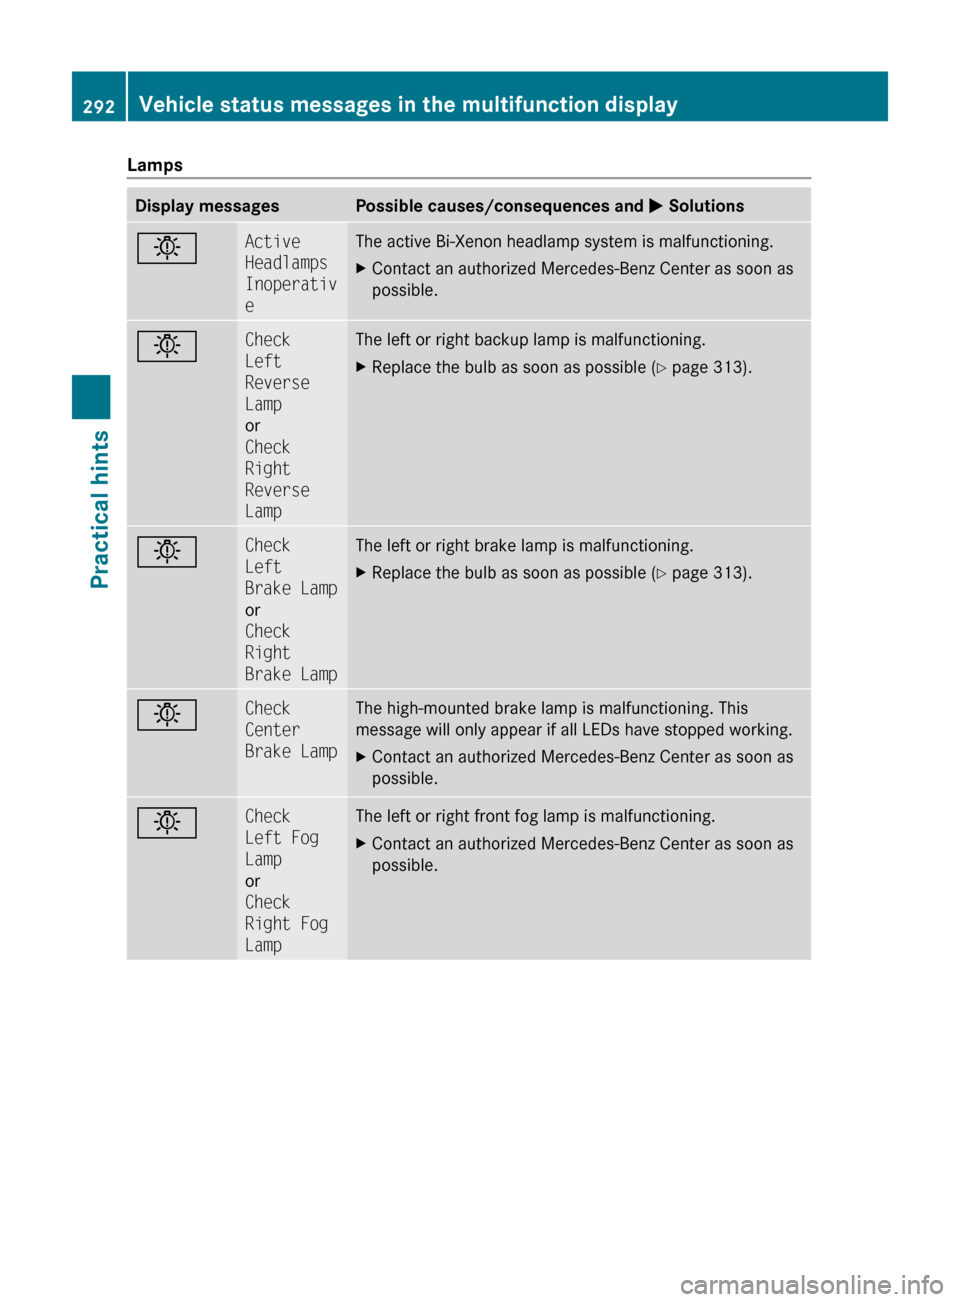
LampsDisplay messagesPossible causes/consequences and M SolutionsbActive
Headlamps
Inoperativ
eThe active Bi-Xenon headlamp system is malfunctioning.XContact an authorized Mercedes-Benz Center as soon as
possible.bCheck
Left
Reverse
Lamp
or
Check
Right
Reverse
LampThe left or right backup lamp is malfunctioning.XReplace the bulb as soon as possible ( Y page 313).bCheck
Left
Brake Lamp
or
Check
Right
Brake LampThe left or right brake lamp is malfunctioning.XReplace the bulb as soon as possible ( Y page 313).bCheck
Center
Brake LampThe high-mounted brake lamp is malfunctioning. This
message will only appear if all LEDs have stopped working.XContact an authorized Mercedes-Benz Center as soon as
possible.bCheck
Left Fog
Lamp
or
Check
Right Fog
LampThe left or right front fog lamp is malfunctioning.XContact an authorized Mercedes-Benz Center as soon as
possible.292Vehicle status messages in the multifunction displayPractical hints
204_AKB; 5; 23, en-USd2ureepe,Version: 2.11.8.12009-07-16T17:54:06+02:00 - Seite 292
Page 296 of 364
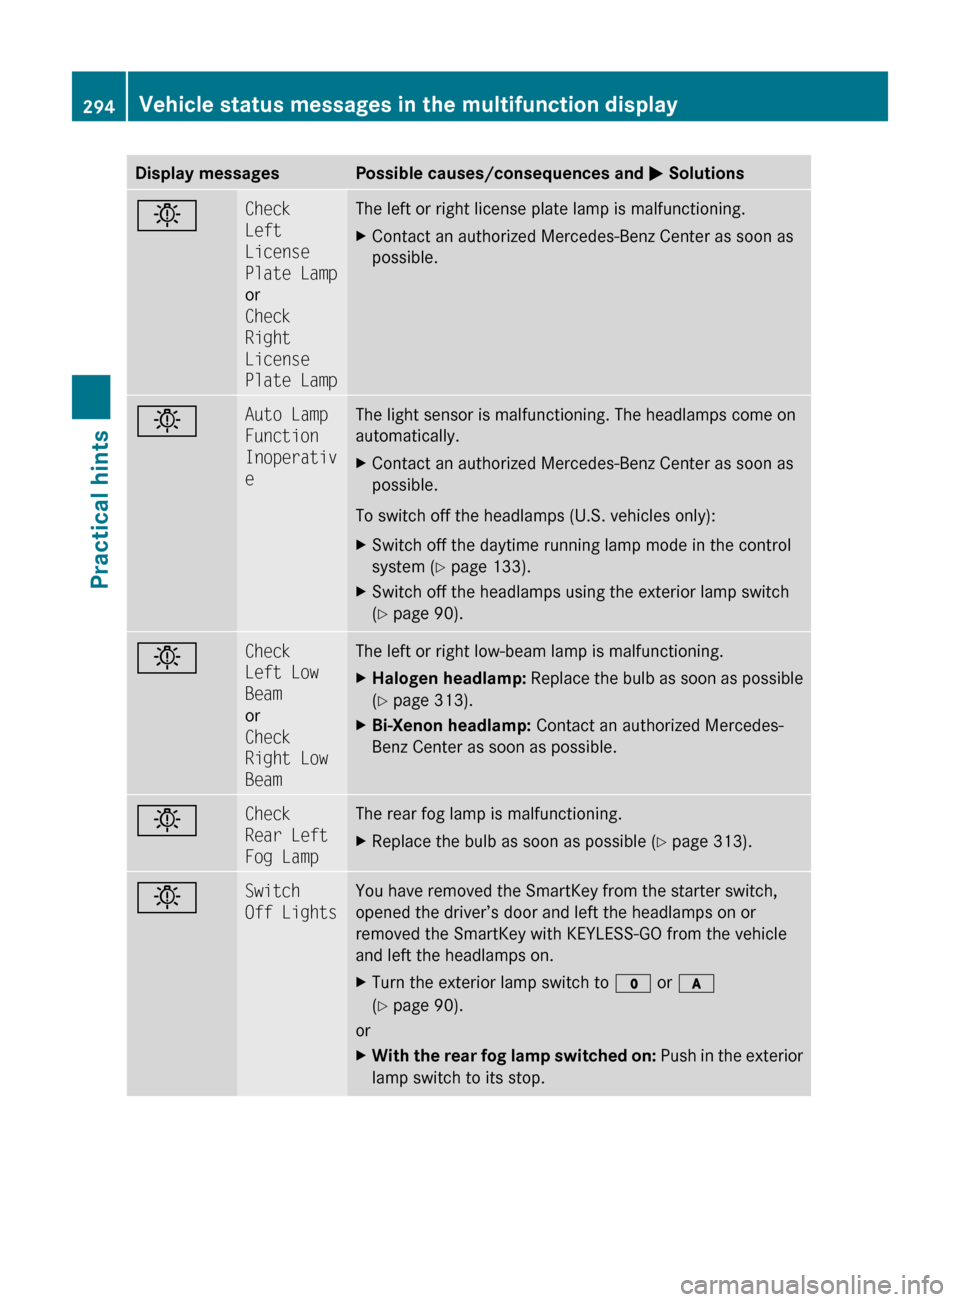
Display messagesPossible causes/consequences and M SolutionsbCheck
Left
License
Plate Lamp
or
Check
Right
License
Plate LampThe left or right license plate lamp is malfunctioning.XContact an authorized Mercedes-Benz Center as soon as
possible.bAuto Lamp
Function
Inoperativ
eThe light sensor is malfunctioning. The headlamps come on
automatically.XContact an authorized Mercedes-Benz Center as soon as
possible.
To switch off the headlamps (U.S. vehicles only):
XSwitch off the daytime running lamp mode in the control
system ( Y page 133).XSwitch off the headlamps using the exterior lamp switch
( Y page 90).bCheck
Left Low
Beam
or
Check
Right Low
BeamThe left or right low-beam lamp is malfunctioning.XHalogen headlamp: Replace the bulb as soon as possible
( Y page 313).XBi-Xenon headlamp: Contact an authorized Mercedes-
Benz Center as soon as possible.bCheck
Rear Left
Fog LampThe rear fog lamp is malfunctioning.XReplace the bulb as soon as possible ( Y page 313).bSwitch
Off LightsYou have removed the SmartKey from the starter switch,
opened the driver’s door and left the headlamps on or
removed the SmartKey with KEYLESS-GO from the vehicle
and left the headlamps on.XTurn the exterior lamp switch to $ or c
( Y page 90).
or
XWith the rear fog lamp switched on: Push in the exterior
lamp switch to its stop.294Vehicle status messages in the multifunction displayPractical hints
204_AKB; 5; 23, en-USd2ureepe,Version: 2.11.8.12009-07-16T17:54:06+02:00 - Seite 294
Page 299 of 364
GWarning!
Do not drive with a flat tire. A flat tire affects the ability to steer or brake the vehicle. You may
lose control of the vehicle. Continued driving with a flat tire will cause excessive heat build-up
and possibly a fire.
GWarning!
Follow recommended tire inflation pressures.
Do not underinflate tires. Underinflated tires wear excessively and/or unevenly, adversely affect
handling and fuel economy, and are more likely to fail from being overheated.
Do not overinflate tires. Overinflated tires can adversely affect handling and ride comfort, wear
unevenly, increase stopping distance, and result in sudden deflation (blowout) because they are
more likely to become punctured or damaged by road debris, potholes etc.
What to do if …
Lamps in instrument cluster
Notes
If any of the following lamps in the instrument
cluster fails to come on during the bulb self-
check when switching on the ignition, have
the respective bulb checked and replaced if
necessary.
When you switch on the ignition, all lamps in
the instrument cluster come on. The low-
beam headlamp indicator lamp, high-beam
headlamp indicator lamp, turn signal
indicator lamps, and the indicator lamps for
the fog lamps will only come on if activated.
If a lamp in the instrument cluster fails to
come on when the ignition is switched on,
have it checked and replaced if necessary.What to do if …297Practical hints204_AKB; 5; 23, en-USd2ureepe,Version: 2.11.8.12009-07-16T17:54:06+02:00 - Seite 297Z
Page 315 of 364

Replacing bulbs
Safety notes
Safe vehicle operation depends on proper
exterior lighting and signaling to a large
degree.
Correct headlamp adjustment is extremely
important. Have headlamps checked and
readjusted at regular intervals and when a
bulb has been replaced. Contact an
authorized Mercedes-Benz Center for
headlamp adjustment.
GWarning!
Bulbs and bulb sockets can be very hot. Allow
the lamp to cool down before changing a bulb.
Keep bulbs out of reach of children.
Halogen lamps contain pressurized gas. A
bulb can explode if you
R touch or move it when hot
R drop the bulb
R scratch the bulb
Wear eye and hand protection.
Because of high voltage in Xenon lamps, it is
dangerous to replace the bulb or repair the
lamp and its components. We recommend
that you have such work done by a qualified
technician.
i Since replacing bulbs is a technically
highly demanding process, we recommend
to have them replaced at an authorized
Mercedes-Benz Center.
i If the headlamps or front fog lamps are
fogged up on the inside as a result of high
humidity, driving the vehicle a distance with
the lights on should clear up the fogging.Replacing bulbs313Practical hints204_AKB; 5; 23, en-USd2ureepe,Version: 2.11.8.12009-07-16T17:54:06+02:00 - Seite 313Z
Page 316 of 364
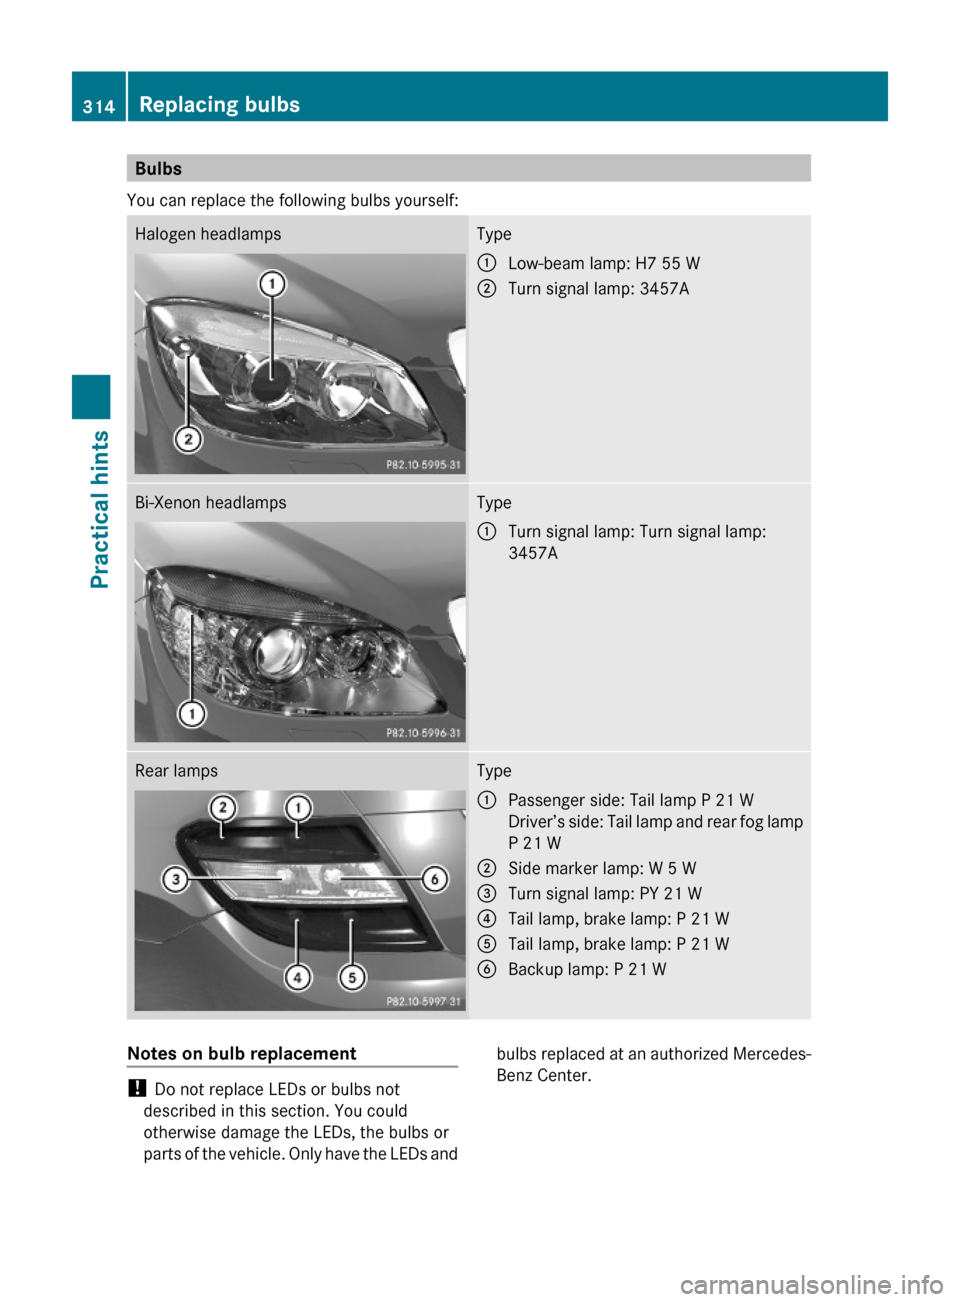
Bulbs
You can replace the following bulbs yourself:
Halogen headlampsType:Low-beam lamp: H7 55 W;Turn signal lamp: 3457ABi-Xenon headlampsType:Turn signal lamp: Turn signal lamp:
3457A
Rear lampsType:Passenger side: Tail lamp P 21 W
Driver’s side: Tail lamp and rear fog lamp
P 21 W
;Side marker lamp: W 5 W=Turn signal lamp: PY 21 W?Tail lamp, brake lamp: P 21 WATail lamp, brake lamp: P 21 WBBackup lamp: P 21 WNotes on bulb replacement
! Do not replace LEDs or bulbs not
described in this section. You could
otherwise damage the LEDs, the bulbs or
parts of the vehicle. Only have the LEDs and
bulbs replaced at an authorized Mercedes-
Benz Center.
314Replacing bulbsPractical hints
204_AKB; 5; 23, en-USd2ureepe,Version: 2.11.8.12009-07-16T17:54:06+02:00 - Seite 314
Page 317 of 364

GObserve Safety notes, see page 313.
ROnly use 12-volt bulbs of the same type and
with the specified watt rating.
RSwitch the lights off before changing a bulb
to prevent short circuits.
RAlways use a clean lint-free cloth when
handling bulbs.
RYour hands should be dry and free of oil and
grease.
RIf the newly installed bulb does not come
on, contact an authorized Mercedes-Benz
Center.
iMercedes-Benz recommends using
Longlife (LL) bulbs.
Replacing bulbs for front lamps
XSwitch off the ignition.XTurn the exterior lamp switch to position
$.
XOpen the hood (Y page 224).GWarning!
Do not remove the cover for the Bi-Xenon
headlamp. Because of high voltage in Xenon
lamps, it is dangerous to replace the bulb or
repair the lamp and its components. It is
recommended to have such work done by a
qualified technician.
Low-beam bulb (halogen headlamps
only)
XTurn housing cover : counterclockwise
and remove it.
XPull electric plug ; off the bulb ?.XRemove wire clip = from bulb holder by
pushing down and release from arrestor
hook.
XPull bulb ? at its socket out of bulb holder.XInsert the new bulb so that its socket
locates in the recess of bulb holder and is
level to it.
XFold wire clip = back and press it down on
bulb holder to engage it in the arrestor
hook.
XConnect electric plug ; on bulb ?.XAlign housing cover and turn it clockwise.
Front turn signal lamp bulb
XTurn bulb socket = with handle ;
counterclockwise and remove it.
XPull bulb out of bulb socket =.XGently press the new bulb into bulb socket
= until the bulb engages.
XPlace bulb socket = back into the housing.
Handle ; must be in a horizontal line and
mark : must be on the upper part (driver’s
side headlamp) or lower part (passenger-
side headlamp).
XTurn bulb socket = clockwise until it
engages.
Replacing bulbs315Practical hints204_AKB; 5; 23, en-USd2ureepe,Version: 2.11.8.12009-07-16T17:54:06+02:00 - Seite 315Z
Page 327 of 364
XConnect negative terminal ? of charged
battery B with negative terminal A with
a jumper cable. Clamp the cable to
negative terminal ? of charged battery
B first.XStart engine of the vehicle with the
discharged battery and run at idle speed.
You can now turn on the electrical
consumers. Do not switch on the
headlamps under any circumstances.XRemove the jumper cables from negative
terminals ? and A first.XRemove the jumper cables from positive
terminals ; and =.
You can now switch on the headlamps.XSlide cover : from positive terminal =
back.XHave the battery checked at the nearest
authorized Mercedes-Benz Center.
Towing the vehicle
Safety notes
Mercedes-Benz recommends that the vehicle
be transported with all wheels off the ground
using flatbed or appropriate wheel lift/dolly
equipment. This method is preferable to other
types of towing.
! To prevent damage during transport, do
not tie down vehicle by its chassis or
suspension parts.
If circumstances do not permit the
recommended towing methods, the vehicle
may be towed with all wheels on the ground
or front axle raised (except vehicles with
4MATIC) only so far as necessary to have the
vehicle moved to a safe location where the
recommended towing methods can be
employed.
! Before towing the vehicle observe the
following instructions:
R Vehicles with automatic transmission
and/or 4MATIC: Do not tow-start the
vehicle. You could otherwise seriously
damage the automatic transmission
which is not covered by the Mercedes-
Benz Limited Warranty.
R Do not tow with sling-type equipment.
Towing with sling-type equipment over
bumpy roads will damage radiator and
supports.
R Towing of the vehicle should only be
done using the properly installed towing
eye bolt. Never attach a tow cable, tow
rope or tow rod to the vehicle chassis,
frame or suspension parts.GWarning!
With the engine not running, there is no power
assistance for the brake and steering
systems. In this case, it is important to keep
in mind that a considerably higher degree of
effort is necessary to brake and steer the
vehicle. Adapt your driving accordingly.
! Avoid pulling the vehicle abruptly or
diagonally, since it could result in damage
to the chassis alignment.
! Do not use the towing eye bolt for
recovery, as this could damage the vehicle.
If in doubt, recover the vehicle with a crane.
i If the battery is disconnected or
discharged
R the SmartKey will not turn in the starter
switch
R Vehicles with automatic transmission:
the automatic transmission will remain in
park position P
For more information see “Battery”
( Y page 321) or “Jump starting”
( Y page 323).
Vehicles with automatic transmission: For
information on manually unlocking the gear
selector lever, see ( Y page 311).
Towing the vehicle325Practical hints204_AKB; 5; 23, en-USd2ureepe,Version: 2.11.8.12009-07-16T17:54:06+02:00 - Seite 325Z