2010 MERCEDES-BENZ C350S sensor
[x] Cancel search: sensorPage 89 of 364

XSwitch on the ignition.XPress button : for the driver’s side
exterior rear view mirror or button ; for
the passenger-side exterior rear view
mirror.
The indicator lamp in the respective button
comes on.
If you do not make adjustments to the
selected exterior rear view mirror within
15 seconds, the indicator lamp goes out.
You will then have to select the desired
exterior rear view mirror again before
adjustments can be made. Adjustments
can only be made with the indicator lamp
for the respective exterior rear view mirror
button illuminated.
XPress adjustment button = up, down, left
or right according to the desired setting.
! If an exterior rear view mirror was forcibly
hit from the front, manually snap it back
into place.
iAt low ambient temperatures, the exterior
rear view mirrors will be heated
automatically.
Auto-dimming rear view mirrors
The exterior rear view mirror on the driver’s
side and the interior rear view mirror will
respond automatically to glare when the
ignition is switched on and incoming light
from headlamps falls on the sensor in the
interior rear view mirror.
The rear view mirrors will not react if the
automatic transmission is set to reverse gear
R (manual transmission to reverse gear) or
the interior lighting is switched on.
GWarning!
The auto dimming function does not react if
incoming light is not aimed directly at sensors
in the interior rear view mirror.
The interior rear view mirror and the exterior
rear view mirror on the driver’s side do not
react, for example, if the rear window
sunshade is in raised position.
Light hitting the mirror(s) at certain angles
(incident light) could blind you. As a result,
you may not be able to observe traffic
conditions and could cause an accident.
Exterior rear view mirror parking
position
To assist during parking maneuvers, you can
set the passenger-side exterior rear view
mirror so that you can see the rear wheel and
the road curb.
Setting and storing the parking position
XSwitch on the ignition.XPress button ;, to select the passenger-
side exterior rear view mirror.
Mirrors87Controls in detail204_AKB; 5; 23, en-USd2ureepe,Version: 2.11.8.12009-07-16T17:54:06+02:00 - Seite 87Z
Page 98 of 364
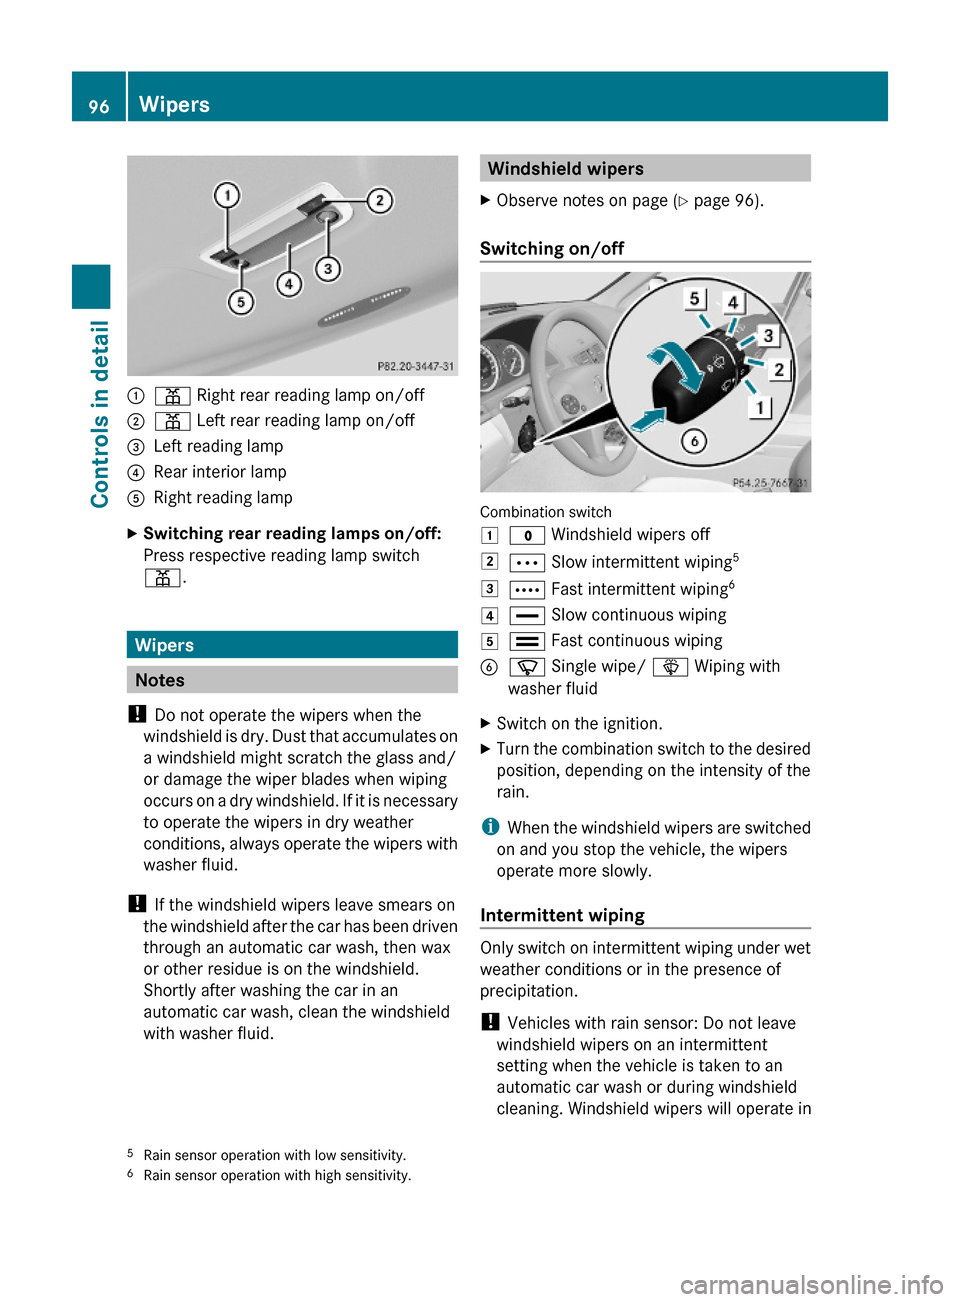
:p Right rear reading lamp on/off;p Left rear reading lamp on/off=Left reading lamp?Rear interior lampARight reading lampXSwitching rear reading lamps on/off:
Press respective reading lamp switch
p.
Wipers
Notes
! Do not operate the wipers when the
windshield is dry. Dust that accumulates on
a windshield might scratch the glass and/
or damage the wiper blades when wiping
occurs on a dry windshield. If it is necessary
to operate the wipers in dry weather
conditions, always operate the wipers with
washer fluid.
! If the windshield wipers leave smears on
the windshield after the car has been driven
through an automatic car wash, then wax
or other residue is on the windshield.
Shortly after washing the car in an
automatic car wash, clean the windshield
with washer fluid.
Windshield wipersXObserve notes on page (Y page 96).
Switching on/off
Combination switch
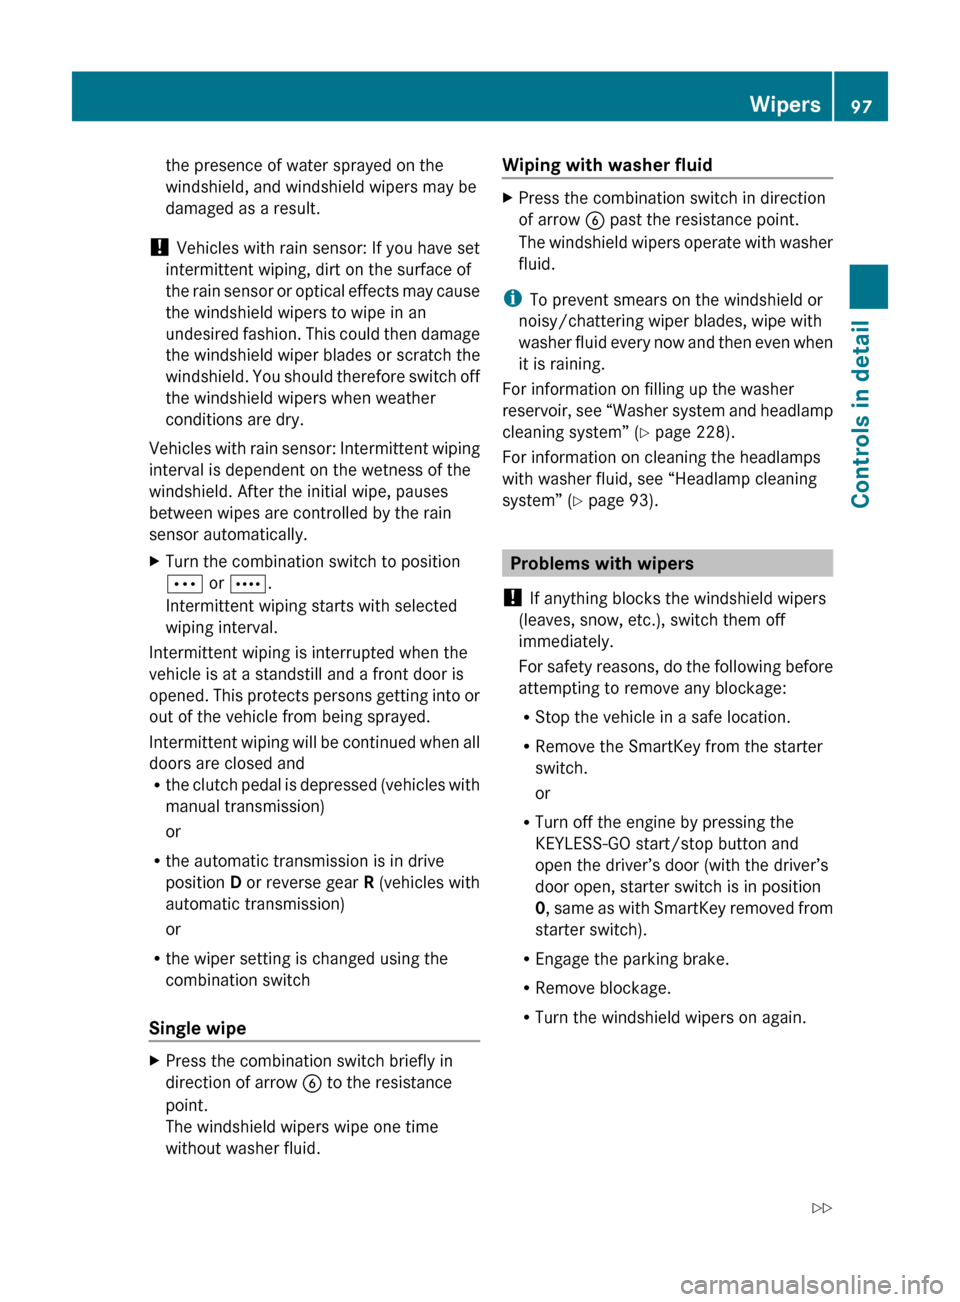
1$ Windshield wipers off2Ä Slow intermittent wiping53Å Fast intermittent wiping64° Slow continuous wiping5¯ Fast continuous wipingBí Single wipe/ î Wiping with
washer fluid
XSwitch on the ignition.XTurn the combination switch to the desired
position, depending on the intensity of the
rain.
iWhen the windshield wipers are switched
on and you stop the vehicle, the wipers
operate more slowly.
Intermittent wiping
Only switch on intermittent wiping under wet
weather conditions or in the presence of
precipitation.
! Vehicles with rain sensor: Do not leave
windshield wipers on an intermittent
setting when the vehicle is taken to an
automatic car wash or during windshield
cleaning. Windshield wipers will operate in
5Rain sensor operation with low sensitivity.6Rain sensor operation with high sensitivity.
96WipersControls in detail
204_AKB; 5; 23, en-USd2ureepe,Version: 2.11.8.12009-07-16T17:54:06+02:00 - Seite 96
Page 99 of 364
the presence of water sprayed on the
windshield, and windshield wipers may be
damaged as a result.
! Vehicles with rain sensor: If you have set
intermittent wiping, dirt on the surface of
the rain sensor or optical effects may cause
the windshield wipers to wipe in an
undesired fashion. This could then damage
the windshield wiper blades or scratch the
windshield. You should therefore switch off
the windshield wipers when weather
conditions are dry.
Vehicles with rain sensor: Intermittent wiping
interval is dependent on the wetness of the
windshield. After the initial wipe, pauses
between wipes are controlled by the rain
sensor automatically.XTurn the combination switch to position
Ä or Å .
Intermittent wiping starts with selected
wiping interval.
Intermittent wiping is interrupted when the
vehicle is at a standstill and a front door is
opened. This protects persons getting into or
out of the vehicle from being sprayed.
Intermittent wiping will be continued when all
doors are closed and
R the clutch pedal is depressed (vehicles with
manual transmission)
or
R the automatic transmission is in drive
position D or reverse gear R (vehicles with
automatic transmission)
or
R the wiper setting is changed using the
combination switch
Single wipe
XPress the combination switch briefly in
direction of arrow B to the resistance
point.
The windshield wipers wipe one time
without washer fluid.Wiping with washer fluidXPress the combination switch in direction
of arrow B past the resistance point.
The windshield wipers operate with washer
fluid.
i To prevent smears on the windshield or
noisy/chattering wiper blades, wipe with
washer fluid every now and then even when
it is raining.
For information on filling up the washer
reservoir, see “Washer system and headlamp
cleaning system” ( Y page 228).
For information on cleaning the headlamps
with washer fluid, see “Headlamp cleaning
system” ( Y page 93).
Problems with wipers
! If anything blocks the windshield wipers
(leaves, snow, etc.), switch them off
immediately.
For safety reasons, do the following before
attempting to remove any blockage:
R Stop the vehicle in a safe location.
R Remove the SmartKey from the starter
switch.
or
R Turn off the engine by pressing the
KEYLESS-GO start/stop button and
open the driver’s door (with the driver’s
door open, starter switch is in position
0 , same as with SmartKey removed from
starter switch).
R Engage the parking brake.
R Remove blockage.
R Turn the windshield wipers on again.
Wipers97Controls in detail204_AKB; 5; 23, en-USd2ureepe,Version: 2.11.8.12009-07-16T17:54:06+02:00 - Seite 97Z
Page 100 of 364
If the windshield wipers fail to function at
all with the combination switch in position
Ä or Å,
Rset the combination switch to the next
higher wiper speed
Rhave the windshield wipers checked at
the nearest authorized Mercedes-Benz
Center
Power windows
Opening and closing
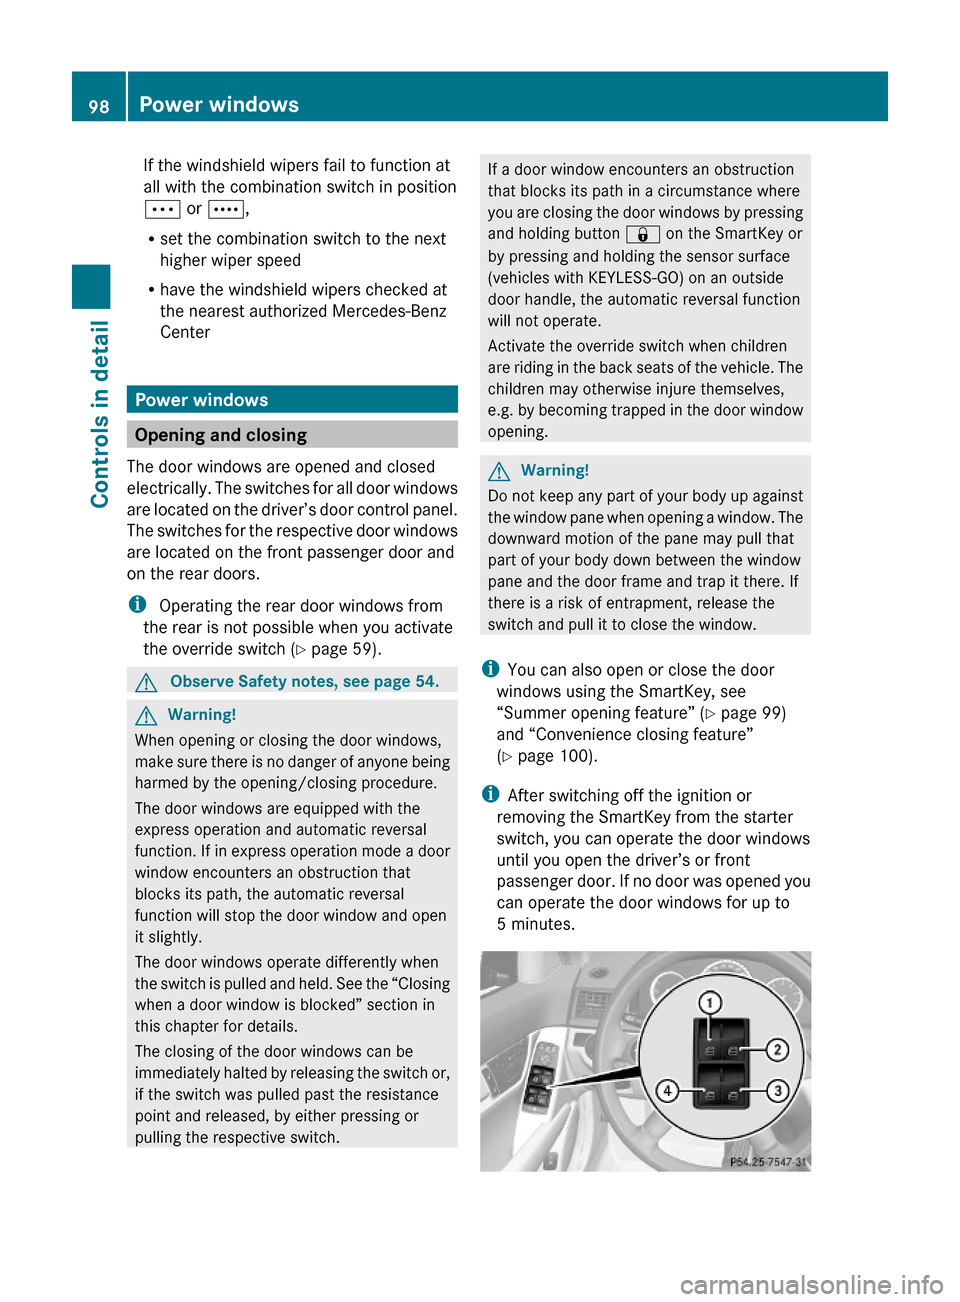
The door windows are opened and closed
electrically. The switches for all door windows
are located on the driver’s door control panel.
The switches for the respective door windows
are located on the front passenger door and
on the rear doors.
i Operating the rear door windows from
the rear is not possible when you activate
the override switch (Y page 59).
GObserve Safety notes, see page 54.GWarning!
When opening or closing the door windows,
make sure there is no danger of anyone being
harmed by the opening/closing procedure.
The door windows are equipped with the
express operation and automatic reversal
function. If in express operation mode a door
window encounters an obstruction that
blocks its path, the automatic reversal
function will stop the door window and open
it slightly.
The door windows operate differently when
the switch is pulled and held. See the “Closing
when a door window is blocked” section in
this chapter for details.
The closing of the door windows can be
immediately halted by releasing the switch or,
if the switch was pulled past the resistance
point and released, by either pressing or
pulling the respective switch.
If a door window encounters an obstruction
that blocks its path in a circumstance where
you are closing the door windows by pressing
and holding button & on the SmartKey or
by pressing and holding the sensor surface
(vehicles with KEYLESS-GO) on an outside
door handle, the automatic reversal function
will not operate.
Activate the override switch when children
are riding in the back seats of the vehicle. The
children may otherwise injure themselves,
e.g. by becoming trapped in the door window
opening.
GWarning!
Do not keep any part of your body up against
the window pane when opening a window. The
downward motion of the pane may pull that
part of your body down between the window
pane and the door frame and trap it there. If
there is a risk of entrapment, release the
switch and pull it to close the window.
iYou can also open or close the door
windows using the SmartKey, see
“Summer opening feature” (Y page 99)
and “Convenience closing feature”
(Y page 100).
iAfter switching off the ignition or
removing the SmartKey from the starter
switch, you can operate the door windows
until you open the driver’s or front
passenger door. If no door was opened you
can operate the door windows for up to
5 minutes.
98Power windowsControls in detail
204_AKB; 5; 23, en-USd2ureepe,Version: 2.11.8.12009-07-16T17:54:06+02:00 - Seite 98
Page 102 of 364
tilt/sliding sunroof have reached the
desired position.
The vehicle unlocks.XRelease button % on the SmartKey to
interrupt the opening procedure.
Vehicles with panorama roof with
power tilt/sliding panel
When roller sunblinds are extended:
XPress and hold button % on the
SmartKey.
The vehicle unlocks.
The door windows open and the roller
sunblinds begin to retract after
approximately 1 second.XWith the door windows opened and the
roller sunblinds fully retracted, press and
hold button % on the SmartKey again.
The tilt/sliding panel opens.XRelease button % on the SmartKey to
interrupt the opening procedure.
When roller sunblinds are retracted:
XPress and hold button % on the
SmartKey.
The door windows and the tilt/sliding panel
opens after approximately 1 second.XRelease button % on the SmartKey to
interrupt the opening procedure.
Convenience closing feature
When locking the vehicle, you can
simultaneously close
R the door windows
R the tilt/sliding sunroof
R the panorama roof with power tilt/sliding
panel
Afterward, you can extend the roller
sunblinds of the panorama roof with power
tilt/sliding panel.
GWarning!
When closing the door windows and the tilt/
sliding sunroof or panorama roof with power
tilt/sliding panel, make sure there is no
danger of anyone being harmed by the closing
procedure.
If potential danger exists, proceed as follows:
R Release button & to stop the closing
procedure. To open, press and hold button
% . To continue the closing procedure
after making sure that there is no danger of
anyone being harmed by the closing
procedure, press and hold button &.
Vehicles with KEYLESS-GO:
R Release the sensor surface on the outside
door handle to stop the closing procedure.
R Immediately pull on the same outside door
handle and hold firmly. The door windows
and the tilt/sliding sunroof or panorama
roof with power tilt/sliding panel will open
for as long as the door handle is held but
the door not opened.
With SmartKey
The SmartKey must be in close proximity to
the driver’s outside door handle.
XAim transmitter eye of the SmartKey at the
driver’s outside door handle.XPress and hold button & on the
SmartKey until the door windows and the
tilt/sliding sunroof or panorama roof with
power tilt/sliding panel are closed
completely.XRelease button & on the SmartKey to
interrupt the closing procedure.XVehicles with panorama roof with
power tilt/sliding panel: Press and hold
button & on the SmartKey once more.
The roller sunblinds extend.XRelease button & on the SmartKey to
interrupt the extending procedure.100Power windowsControls in detail
204_AKB; 5; 23, en-USd2ureepe,Version: 2.11.8.12009-07-16T17:54:06+02:00 - Seite 100
Page 103 of 364
With KEYLESS-GO
The SmartKey with KEYLESS-GO must be
located outside the vehicle within
approximately 3 ft (1 m) of a door.
XClose all doors.XTouch and hold the sensor surface on an
outside door handle (Y page 71) until the
door windows and the tilt/sliding sunroof
or panorama roof with power tilt/sliding
panel are closed completely.
iMake sure you are only touching the
sensor surface.
XRelease the sensor surface to interrupt the
closing procedure.
XVehicles with panorama roof with
power tilt/sliding panel: Touch and hold
the sensor surface once more.
The roller sunblinds extend.
XRelease the sensor surface to interrupt the
extending procedure.
Driving and parking
Safety notes
GWarning!
Make sure absolutely no objects are
obstructing the pedals’ range of movement.
Keep the driver’s footwell clear of all
obstacles. If there are any floormats or
carpets in the footwell, make sure the pedals
still have sufficient clearance.
During sudden driving or braking maneuvers
the objects could get caught between or
under the pedals. You could then no longer
brake or accelerate. This could lead to
accidents and injury.
GWarning!
With the engine not running, there is no power
assistance for the brake and steering
systems. In this case, it is important to keep
in mind that a considerably higher degree of
effort is necessary to brake and steer the
vehicle. Adapt your driving accordingly.
Starting the engine
GWarning!
Inhalation of exhaust gas is hazardous to your
health. All exhaust gas contains carbon
monoxide (CO), and inhaling it can cause
unconsciousness and possible death.
Do not run the engine in confined areas (such
as a garage) which are not properly ventilated.
If you think that exhaust gas fumes are
entering the vehicle while driving, have the
cause determined and corrected
immediately. If you must drive under these
conditions, drive only with at least one
window fully open at all times.
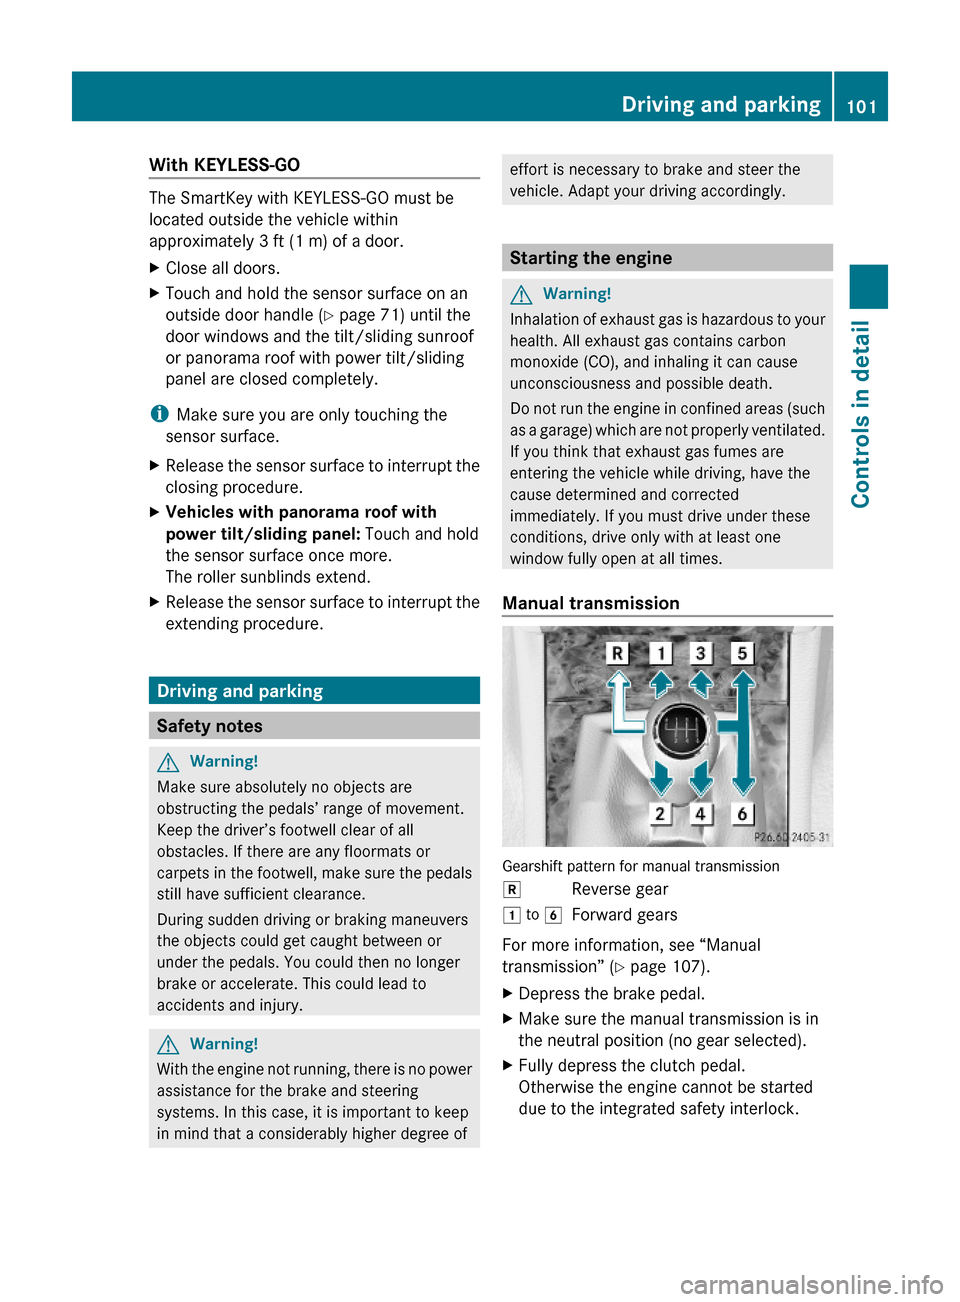
Manual transmission
Gearshift pattern for manual transmission
kReverse gear1 to 6Forward gears
For more information, see “Manual
transmission” (Y page 107).
XDepress the brake pedal.XMake sure the manual transmission is in
the neutral position (no gear selected).
XFully depress the clutch pedal.
Otherwise the engine cannot be started
due to the integrated safety interlock.
Driving and parking101Controls in detail204_AKB; 5; 23, en-USd2ureepe,Version: 2.11.8.12009-07-16T17:54:06+02:00 - Seite 101Z
Page 149 of 364

deviate from conventional stereo
playback.
SYS menu
System settings menu overview
MenuSystemDisplay (Y page 147)BrightnessDay ModeNight ModeAutomaticActivate Bluetooth®
(Y page 147)
Reset (Y page 147)Language (Y page 148)
Display settings
You can adapt the brightness of the audio
display to the prevailing light conditions.
Setting the display design
Xi Q System Q Display.XSelect Brightness, Day Mode, Night
Mode or Automatic.
iWhen you select Brightness, a scale
appears on which you can set the
brightness manually.
In the Automatic setting, the audio system
analyzes the automatic vehicle light sensor
and switches between the display designs
automatically.
Bluetooth® settings
General information about Bluetooth®
Bluetooth® technology is the standard for
short-range wireless technologies, suitable
for transmitting voice and data. It is possible
to connect Bluetooth® devices wirelessly.
Bluetooth® can be used to exchange vCards
or to make calls using a hands-free device.
Bluetooth® technology uses the freely
available ISM (Industrial Scientific Medical)
wave band that works at 2.45 GHz.
Bluetooth® works within a range of up to 33 ft
(10 m).
Activate or deactivate Bluetooth®
Xi Q System Q Activate
Bluetooth.
You have activated or deactivated
Bluetooth®. A checkmark O appears when
Bluetooth® is activated.
Reset
iYou can reset the audio system back to
its factory settings. In this case, all personal
data (e.g. address book entries, call lists,
paired mobile phones, and presets) are
deleted. We recommend that you reset the
values before selling your vehicle.
Audio system147Controls in detail204_AKB; 5; 23, en-USd2ureepe,Version: 2.11.8.12009-07-16T17:54:06+02:00 - Seite 147Z
Page 187 of 364

Parktronic system (Parking assist)
This feature is only available in Canada
vehicles.
The Parktronic system is an electronic
parking aid with ultrasonic sensors designed
to assist the driver during parking maneuvers.
The Parktronic system indicates the relative
distance between the vehicle and an obstacle
visually and audibly.
The Parktronic system is activated
automatically when
Ryou switch on the ignition
and
Ryou release the parking brake
and
Rvehicles with automatic transmission: the
automatic transmission is in drive position
D, reverse gear R, or neutral position N
The Parktronic system deactivates at speeds
above approximately 11 mph (18 km/h). At
lower speeds, the Parktronic system
activates again.
The Parktronic system also deactivates when
you shift the automatic transmission into
park position P or engage the parking brake.
The Parktronic system monitors the
surroundings of your vehicle with six sensors
in the front bumper and four sensors in the
rear bumper.
Example illustration, sensors in the front bumper
To function properly, sensors : must be free
of dirt, ice, snow and slush. Clean
sensors : regularly. Be careful not to
scratch or damage sensors :, see “Cleaning
the driving systems sensors” (Y page 263).
GWarning!
The Parktronic is a supplemental system. It is
not intended to, nor does it replace, the need
for extreme care. The responsibility during
parking and other critical maneuvers always
remains with the driver.
GWarning!
Make sure no persons or animals are in or
near the area in which you are parking/
maneuvering. Otherwise, they could be
injured.
! Special attention must be paid to objects
with smooth surfaces or low silhouettes
(e.g. trailer couplings, painted posts,
elevated crossbars or road curbs). Such
objects may not be detected by the system
and can damage the vehicle.
During parking maneuvers, pay special
attention to objects located above or below
the height of the sensors (e.g. street curbs,
painted posts, or trailer hitches etc.). The
Parktronic system will not detect such
objects at close range and damage to your
vehicle or the object may result.
! Ultrasonic signals from outside sources
(e.g. truck air brakes, car wash, or
jackhammers) may impair the operation of
the Parktronic system.
Range of the sensors
Driving systems185Controls in detail204_AKB; 5; 23, en-USd2ureepe,Version: 2.11.8.12009-07-16T17:54:06+02:00 - Seite 185Z