2010 MERCEDES-BENZ C350S brakes
[x] Cancel search: brakesPage 105 of 364

Carry out the following steps:XIf you are starting the engine with the
SmartKey: Turn the SmartKey in the starter
switch to position 0 and repeat the starting
procedure.XIf you are starting the engine with KEYLESS-
GO: Close any doors that may be open to
allow for better detection of the SmartKey.
or
XRemove the KEYLESS-GO start/stop
button from the starter switch.XStart the engine with the SmartKey as radio
signals from another source may be
interfering with the KEYLESS-GO function.XRepeat the starting procedure.
If the engine does not start after several
starting attempts:
XContact an authorized Mercedes-Benz
Center or call Roadside Assistance.
The engine does not start. You cannot
hear the starter.
The battery may not be charged sufficiently.
XGet a jump start ( Y page 323).
If the engine will not start despite a jump
start:
XContact an authorized Mercedes-Benz
Center or call Roadside Assistance.
The starter has been exposed to excessive
temperatures.
XLet the starter cool for about 2 minutes.XRepeat the starting procedure.
If the engine does not start after several
starting attempts:
XContact an authorized Mercedes-Benz
Center or call Roadside Assistance.Driving offGWarning!
On slippery road surfaces, never downshift in
order to obtain braking action. This could
result in drive wheel slip and reduced vehicle
control. Your vehicle’s ABS will not prevent
this type of loss of control.
! Do not run a cold engine at high engine
speeds. Running a cold engine at high
engine speeds may shorten the service life
of the engine. This is not covered by the
Mercedes-Benz Limited Warranty.
C 63 AMG: At engine temperatures below
68‡ (20†), the engine’s maximum speed
is restricted in order to protect it from
damage. Avoid driving your vehicle at full
speed when the engine is cold to prevent
premature engine wear and/or diminished
comfort.
! If an acoustic warning sounds and the
message Release Parking Brake
appears in the multifunction display when
driving off, you have forgotten to release
the parking brake.
Release the parking brake.
! Avoid spinning of a drive wheel. This may
cause serious damage to the drivetrain
which is not covered by the Mercedes-Benz
Limited Warranty.
! Simultaneously depressing the
accelerator pedal and applying the brakes
reduces engine performance and causes
premature brake and drivetrain wear which
is not covered by the Mercedes-Benz
Limited Warranty.
i Once the vehicle is in motion, the
automatic central locking function engages
and the locking knobs in the doors move
down.
Driving and parking103Controls in detail204_AKB; 5; 23, en-USd2ureepe,Version: 2.11.8.12009-07-16T17:54:06+02:00 - Seite 103Z
Page 112 of 364

EffectBPark position
Shift the automatic transmission
into park position P only when the
vehicle is stopped. The park position
is not intended to serve as a brake
when the vehicle is parked. Rather,
the driver should always engage the
parking brake in addition to shifting
the automatic transmission into
park position P to secure the
vehicle.
The SmartKey can only be removed
from the starter switch with the gear
selector lever in park position P.
With the SmartKey removed from
the starter switch, the gear selector
lever is locked in park position P.
If the vehicle’s electrical system is
malfunctioning, the gear selector
lever could remain locked in park
position P. To unlock the gear
selector lever manually, see
“Manually unlocking the gear
selector lever” ( Y page 311).CReverse gear
Shift the automatic transmission
into reverse gear R only when the
vehicle is stopped.EffectANeutral position
No power is transmitted from the
engine to the drive axle. When the
brakes are released, the vehicle can
be moved freely (pushed or towed).
To avoid damage to the
transmission, never shift the
automatic transmission into neutral
position N while driving.
Exception: If the ESP ®
is switched
off or malfunctioning, shift the
automatic transmission into neutral
position N if the vehicle is in danger
of skidding.
! Coasting the vehicle, or driving
for any other reason with the
automatic transmission in neutral
position N can result in
transmission damage that is not
covered by the Mercedes-Benz
Limited Warranty.7Drive position
The automatic transmission shifts
automatically. All forward gears are
available.
Driving tips
Kickdown
Use the kickdown when you want maximum
acceleration.
XU.S. vehicles except AMG vehicles:
Fully depress the accelerator pedal.
Depending on the engine speed the
automatic transmission shifts into a lower
gear.XCanada vehicles and AMG vehicles:
Depress the accelerator pedal past the
point of resistance.
Depending on the engine speed the
automatic transmission shifts into a lower
gear.110Automatic transmissionControls in detail
204_AKB; 5; 23, en-USd2ureepe,Version: 2.11.8.12009-07-16T17:54:06+02:00 - Seite 110
Page 183 of 364

The “Resume” function should only be
operated if the driver is fully aware of the
previously set speed and wishes to resume
this particular preset speed.
GWarning!
The cruise control brakes automatically so
that the set speed is not exceeded.
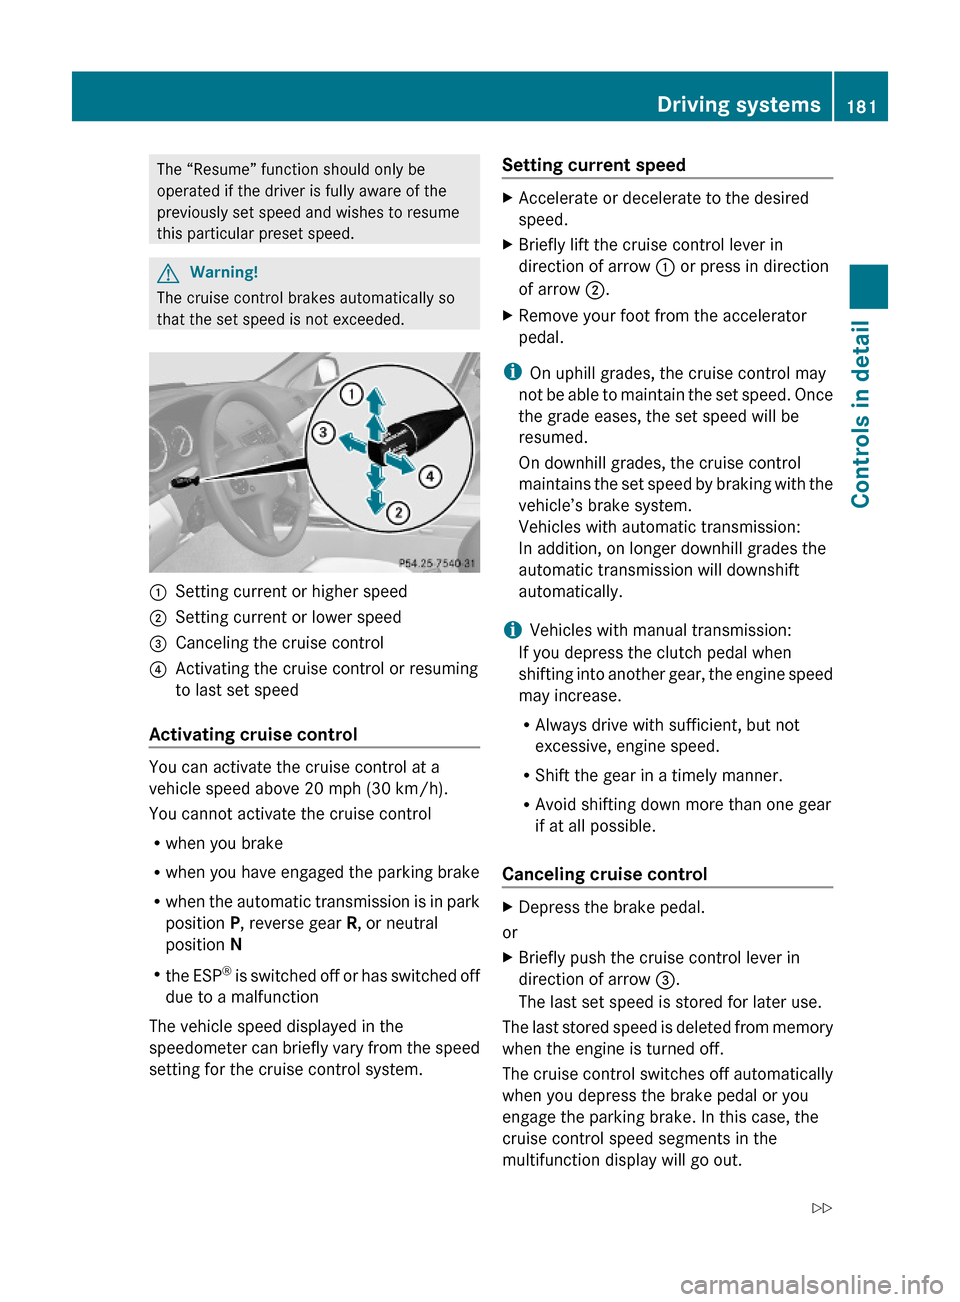
:Setting current or higher speed ;Setting current or lower speed=Canceling the cruise control?Activating the cruise control or resuming
to last set speed
Activating cruise control
You can activate the cruise control at a
vehicle speed above 20 mph (30 km/h).
You cannot activate the cruise control
Rwhen you brake
Rwhen you have engaged the parking brake
Rwhen the automatic transmission is in park
position P, reverse gear R, or neutral
position N
Rthe ESP® is switched off or has switched off
due to a malfunction
The vehicle speed displayed in the
speedometer can briefly vary from the speed
setting for the cruise control system.
Setting current speed XAccelerate or decelerate to the desired
speed.
XBriefly lift the cruise control lever in
direction of arrow : or press in direction
of arrow ;.
XRemove your foot from the accelerator
pedal.
iOn uphill grades, the cruise control may
not be able to maintain the set speed. Once
the grade eases, the set speed will be
resumed.
On downhill grades, the cruise control
maintains the set speed by braking with the
vehicle’s brake system.
Vehicles with automatic transmission:
In addition, on longer downhill grades the
automatic transmission will downshift
automatically.
iVehicles with manual transmission:
If you depress the clutch pedal when
shifting into another gear, the engine speed
may increase.
RAlways drive with sufficient, but not
excessive, engine speed.
RShift the gear in a timely manner.
RAvoid shifting down more than one gear
if at all possible.
Canceling cruise control
XDepress the brake pedal.
or
XBriefly push the cruise control lever in
direction of arrow =.
The last set speed is stored for later use.
The last stored speed is deleted from memory
when the engine is turned off.
The cruise control switches off automatically
when you depress the brake pedal or you
engage the parking brake. In this case, the
cruise control speed segments in the
multifunction display will go out.
Driving systems181Controls in detail204_AKB; 5; 23, en-USd2ureepe,Version: 2.11.8.12009-07-16T17:54:06+02:00 - Seite 181Z
Page 187 of 364

Parktronic system (Parking assist)
This feature is only available in Canada
vehicles.
The Parktronic system is an electronic
parking aid with ultrasonic sensors designed
to assist the driver during parking maneuvers.
The Parktronic system indicates the relative
distance between the vehicle and an obstacle
visually and audibly.
The Parktronic system is activated
automatically when
Ryou switch on the ignition
and
Ryou release the parking brake
and
Rvehicles with automatic transmission: the
automatic transmission is in drive position
D, reverse gear R, or neutral position N
The Parktronic system deactivates at speeds
above approximately 11 mph (18 km/h). At
lower speeds, the Parktronic system
activates again.
The Parktronic system also deactivates when
you shift the automatic transmission into
park position P or engage the parking brake.
The Parktronic system monitors the
surroundings of your vehicle with six sensors
in the front bumper and four sensors in the
rear bumper.
Example illustration, sensors in the front bumper
To function properly, sensors : must be free
of dirt, ice, snow and slush. Clean
sensors : regularly. Be careful not to
scratch or damage sensors :, see “Cleaning
the driving systems sensors” (Y page 263).
GWarning!
The Parktronic is a supplemental system. It is
not intended to, nor does it replace, the need
for extreme care. The responsibility during
parking and other critical maneuvers always
remains with the driver.
GWarning!
Make sure no persons or animals are in or
near the area in which you are parking/
maneuvering. Otherwise, they could be
injured.
! Special attention must be paid to objects
with smooth surfaces or low silhouettes
(e.g. trailer couplings, painted posts,
elevated crossbars or road curbs). Such
objects may not be detected by the system
and can damage the vehicle.
During parking maneuvers, pay special
attention to objects located above or below
the height of the sensors (e.g. street curbs,
painted posts, or trailer hitches etc.). The
Parktronic system will not detect such
objects at close range and damage to your
vehicle or the object may result.
! Ultrasonic signals from outside sources
(e.g. truck air brakes, car wash, or
jackhammers) may impair the operation of
the Parktronic system.
Range of the sensors
Driving systems185Controls in detail204_AKB; 5; 23, en-USd2ureepe,Version: 2.11.8.12009-07-16T17:54:06+02:00 - Seite 185Z
Page 189 of 364

Automatic transmission:Current
transmission
position
Warning indicatorDFront area activatedR or NFront and rear area
activated
As your vehicle approaches an object, one or
more distance segments will illuminate,
depending on the distance. When the seventh
distance segment illuminates, you have
reached the minimum distance.
RFront area: An intermittent acoustic
warning will sound as the first red distance
segment illuminates and a constant
acoustic warning lasting a maximum of
2 seconds will sound for the second red
distance segment. Vehicles with automatic
transmission: The signal is canceled when
the automatic transmission is shifted into
park position P or the parking brake is
engaged. Vehicles with manual
transmission: The signal is canceled when
the parking brake is engaged.
RRear area: An intermittent acoustic
warning will sound as the first red distance
segment illuminates and a constant
acoustic warning lasting a maximum of
2 seconds will sound for the second red
distance segment. Vehicles with automatic
transmission: The signal is canceled when
the automatic transmission is shifted into
drive position D, or park position P, or the
parking brake is engaged. Vehicles with
manual transmission: The signal is
canceled when the manual transmission is
shifted into neutral position, or in a forward
gear, or the parking brake is engaged.
Switching the Parktronic system on/
off
The Parktronic system switches on
automatically when the ignition is switched
on.
XSwitching off: Press Parktronic
switch :.
Indicator lamp ; comes on.
XSwitching on: Press Parktronic switch :
again.
Parktronic system malfunction
There is a malfunction in the Parktronic
system, if only the red distance segments
illuminate and an acoustic warning sounds.
The Parktronic system will switch off
automatically after 20 seconds and indicator
lamp ; in Parktronic switch : comes on.
XHave the Parktronic system checked at an
authorized Mercedes-Benz Center as soon
as possible.
If only the red distance segments illuminate
and no acoustic warning sounds, the
Parktronic system sensors are dirty (e.g. dirt,
ice, snow and slush). Another cause could be
interference from other radio or ultrasonic
signals (e.g. truck air brakes, car wash, or
jackhammers). The Parktronic system will
switch off automatically after 20 seconds and
indicator lamp ; in Parktronic switch :
comes on.
Driving systems187Controls in detail204_AKB; 5; 23, en-USd2ureepe,Version: 2.11.8.12009-07-16T17:54:06+02:00 - Seite 187Z
Page 231 of 364

The brake fluid level is correct when it is
between lower mark (MIN) ; and upper
mark (MAX) : of the brake fluid reservoir.
Tires and wheels
Safety notes
Contact an authorized Mercedes-Benz Center
for information on tested and recommended
rims and tires for summer and winter
operation. They can also offer advice
concerning tire service and purchase.
GWarning!
Replace rims or tires with the same
designation, manufacturer and type as shown
on the original part. For further information
contact an authorized Mercedes-Benz Center.
If incorrectly sized rims and tires are
mounted, the wheel brakes or suspension
components can be damaged. Also, the
operating clearance of the wheels and the
tires may no longer be correct.
GWarning!
Worn, old tires can cause accidents. If the tire
tread is worn to minimum tread depth, or if
the tires have sustained damage, replace
them.
When replacing rims, only use genuine
Mercedes-Benz wheel bolts specified for the
particular rim type. Failure to do so can result
in the bolts loosening and possibly an
accident.
Retreaded tires are not tested or
recommended by Mercedes-Benz, since
previous damage cannot always be
recognized on retreads. The operating safety
of the vehicle cannot be assured when such
tires are used.
GWarning!
If you feel a sudden significant vibration or
ride disturbance, or you suspect that possible
damage to your vehicle has occurred, you
should turn on the hazard warning flashers,
carefully slow down, and drive with caution to
an area which is a safe distance from the road.
Inspect the tires and the vehicle underbody
for possible damage. If the vehicle or tires
appear unsafe, have the vehicle towed to the
nearest authorized Mercedes-Benz Center or
tire dealer for repairs.GWarning!
Do not drive with a flat tire. A flat tire affects
the ability to steer or brake the vehicle. You
could lose control of the vehicle. Continued
driving with a flat tire or driving at high speed
with a flat tire will cause excessive heat build-
up and possibly a fire.
Important guidelines
R Only use sets of tires and rims of the same
type and make.
R Tires must be of the correct size for the rim.
R Break in new tires for approximately
60 miles (100 km) at moderate speeds.
R Regularly check the tires and rims for
damage. Dented or bent rims can cause tire
inflation pressure loss and damage to the
tire beads.
R If the vehicle is heavily loaded, check tire
inflation pressure and correct as required.
R Do not allow your tires to wear down too
far. Adhesion properties on wet roads are
sharply reduced at tread depths of less
than 1
/ 8 in (3 mm).
R When replacing individual tires, you should
mount new tires on the front wheels first
(on vehicles with same-sized wheels all
around).
Tires and wheels229Operation204_AKB; 5; 23, en-USd2ureepe,Version: 2.11.8.12009-07-16T17:54:06+02:00 - Seite 229Z
Page 236 of 364

tire blowout caused by a foreign object). In
this case bring the vehicle to a halt by carefully
applying the brakes and avoiding abrupt
steering maneuvers.
Restarting the tire pressure loss warning
system
The tire pressure loss warning system must
be restarted in the following situations:
R after you have changed the tire inflation
pressure
R after you have replaced the wheels or tires
R after you have installed new wheels or tiresXUsing the Tire and Loading Information
placard on the driver’s door B-pillar or, if
available, the tire inflation pressure label on
the inside of the fuel filler flap, make sure
the tire inflation pressure of all four tires is
correct.GWarning!
The tire pressure loss warning system can
only warn you in a reliable manner if you have
set the correct tire inflation pressures for
each tire.
If an incorrect tire inflation pressure was set,
the system will monitor the pressure
according to the incorrect value.
XSwitch on the ignition.XPress button = or ; on the
multifunction steering wheel to select the
Service menu (Y page 129).XPress button 9 or : on the
multifunction steering wheel to select
Tire Pressure .XPress button a on the multifunction
steering wheel to confirm.
The following message appears in the
multifunction display:
Run Flat Indicator
Active
Press 'OK' to RestartXPress button a.
The following message will appear in the
multifunction display:
Tire Pressure
Now OK?
Cancel
YesXIf you wish to confirm: Press button
9 or : to select Yes.XPress button a.
The following message will appear in the
multifunction display:
Run Flat
Indicator
Restarted
After a certain “learning phase”, the tire
pressure loss warning system checks the
set pressure values for all four tires.XIf you wish to cancel: Press button 9
or : to select Cancel.XPress button a to confirm.
The previous settings remain unchanged.
Advanced Tire Pressure Monitoring
System (Advanced TPMS), (USA only)
Your vehicle is equipped with the Advanced
Tire Pressure Monitoring System (Advanced
TPMS). It measures the tire inflation pressure
in the vehicle’s tires and issues warnings in
case of pressure loss in one or more of the
tires.
The TPMS is equipped with a combination low
tire pressure/TPMS malfunction telltale in
the instrument cluster. Depending on how the
telltale illuminates, it indicates a low tire
pressure condition or a malfunction in the
TPMS system itself:
R If the telltale illuminates continuously, one
or more of your tires is significantly
underinflated. There is no malfunction in
the TPMS.
R If the telltale flashes for 60 seconds and
then stays illuminated, the TPMS system
itself is not operating properly.
234Tires and wheelsOperation
204_AKB; 5; 23, en-USd2ureepe,Version: 2.11.8.12009-07-16T17:54:06+02:00 - Seite 234
Page 237 of 364

The TPMS only functions on wheels that are
equipped with the proper electronic sensors.GWarning!
The TPMS does not indicate a warning for
wrongly selected inflation pressures. Always
adjust tire inflation pressure according to the
Tire and Loading Information placard or the
supplemental tire inflation pressure
information on the inside of the fuel filler flap.
The TPMS is not able to issue a warning due
to a sudden dramatic loss of pressure (e.g. tire
blowout caused by a foreign object). In this
case bring the vehicle to a halt by carefully
applying the brakes and avoiding abrupt
steering maneuvers.
GWarning!
Each tire, including the spare (if provided),
should be checked at least once a month
when cold and inflated to the inflation
pressure recommended by the vehicle
manufacturer on the Tire and Loading
Information placard on the driver’s door B-
pillar or the tire inflation pressure label on the
inside of the fuel filler flap. If your vehicle has
tires of a different size than the size indicated
on the Tire and Loading Information placard
or the tire inflation pressure label, you should
determine the proper tire inflation pressure
for those tires.
As an added safety feature, your vehicle has
been equipped with a tire pressure monitoring
system (TPMS) that illuminates a low tire
pressure telltale when one or more of your
tires are significantly underinflated.
Accordingly, when the low tire pressure
telltale illuminates, you should stop and check
your tires as soon as possible, and inflate
them to the proper pressure. Driving on a
significantly underinflated tire causes the tire
to overheat and can lead to tire failure.
Underinflation also reduces fuel efficiency
and tire tread life, and may affect the vehicle’s
handling and stopping ability. Please note that
the TPMS is not a substitute for proper tire
maintenance, and it is the driver’s
responsibility to maintain correct tire
pressure, even if underinflation has not
reached the level to trigger illumination of the
TPMS low tire pressure telltale.
Your vehicle has also been equipped with a
TPMS malfunction indicator to indicate when
the system is not operating properly. The
TPMS malfunction indicator is combined with
the low tire pressure telltale. When the
system detects a malfunction, the telltale will
flash for approximately 1 minute and then
remain continuously illuminated. This
sequence will continue upon subsequent
vehicle start-ups as long as the malfunction
exists. When the malfunction indicator is
illuminated, the system may not be able to
detect or signal low tire pressure as intended.
TPMS malfunctions may occur for a variety of
reasons, including the installation of
incompatible replacement or alternate tires
or wheels on the vehicle that prevent the
TPMS from functioning properly. Always
check the TPMS malfunction telltale after
replacing one or more tires or wheels on your
vehicle to ensure that the replacement or
alternate tires and wheels allow the TPMS to
continue to function properly.
i If a condition causing the TPMS to
malfunction develops, it may take up to
10 minutes for the system to signal a
malfunction using the TPMS telltale
flashing and illumination sequence.
The telltale extinguishes after a few
minutes driving if the malfunction has been
corrected.
Tire pressure inquiries are made using the
multifunction display. The current tire
inflation pressure for each tire appears in the
multifunction display after a few minutes of
driving.
i Possible differences between the
readings of a tire pressure gauge of an air
hose, e.g. gas station equipment, and the
vehicle’s control system can occur. The tireTires and wheels235Operation204_AKB; 5; 23, en-USd2ureepe,Version: 2.11.8.12009-07-16T17:54:06+02:00 - Seite 235Z