2010 MERCEDES-BENZ C300 4MATIC service reset
[x] Cancel search: service resetPage 8 of 364

Locking/unlocking from inside ........75
SmartKey ......................................... 70
Central locking/unlocking switch ..... 75
Certification label .............................. 332
Children in the vehicle
Air bags ........................................... 37
BabySmart™ air bag deactivation
system ............................................. 46
Child safety locks (rear doors) .........59
Child seat anchors – LATCH-type
(ISOFIX) ........................................... 58
Indicator lamp, front passenger
front air bag off (Canada only) .........46
Indicator lamp, front passenger
front air bag off (USA only) ..............42
Infant and child restraint systems .... 55
ISOFIX (Child seat anchors –
LATCH-type) ..................................... 58
OCS (Occupant Classification
System) ........................................... 42
Override switch ................................ 59
Safety notes ..................................... 54
Tether anchorage points ..................57
Top tether ........................................ 57
Child safety
see Children in the vehicle
Child seat anchors – LATCH-type
(ISOFIX) see Children in the vehicle
Chrome-plated exhaust tip,
cleaning .............................................. 266
Cigarette lighter ................................ 209
Clear button ....................................... 142
Climate control system
Air conditioning ............................. 191
Air conditioning refrigerant ............354
Air distribution ............................... 194
Air recirculation mode ...................195
Air volume ..................................... 194
Automatic mode ............................ 192
Deactivating system ......................191
Front defroster .............................. 194
Maximum cooling MAX COOL ........195
Temperature .................................. 192
Clock ............................................ 29, 132
Cockpit ................................................. 27
Cold tire inflation pressure .............. 250
Collapsible wheel chock ................... 269COMAND system
see separate COMAND system
operating instructions
Combination gauge ............................. 28
Combination switch ............................ 93
Compass ............................................ 210
Control system .................................. 118
Multifunction display .....................120
Multifunction steering wheel .........118
Resetting to factory settings ..........130
Control system menus ...................... 121
AMG ............................................... 123
Audio ............................................. 126
Navi ............................................... 126
Service ........................................... 129
Settings ......................................... 130
Telephone ...................................... 128
Trip ................................................ 121
Control system submenus
Convenience .................................. 135
Instrument cluster .........................131
Lighting .......................................... 133
Time/Date ..................................... 132
Vehicle ........................................... 135
Convenience submenu
Easy-entry/exit feature .................. 136
Fold-in function for exterior rear
view mirrors ................................... 136
Coolant
Anticorrosion/antifreeze ...............357
Capacities ...................................... 351
Checking level ............................... 227
Messages in the multifunction
display ........................................... 288
Temperature gauge ........................ 117
Warning lamp ................................. 305
Coolant temperature gauge ............... 28
Corner-illuminating front fog
lamps .................................................... 94
Cruise control .................................... 180
Activating ....................................... 181
Canceling ....................................... 181
Changing the set speed .................182
Last stored speed ..........................183
Lever .............................................. 181
Messages in the multifunction
display ........................................... 2756Index204_AKB; 5; 23, en-USd2ureepe,Version: 2.11.8.12009-07-16T17:54:06+02:00 - Seite 6
Page 15 of 364

N
Navigation system see Separate operating instructions
Navi menu .......................................... 126
NECK-PRO active front head
restraints ............................................. 52
Resetting ....................................... 311
Nets, parcel ....................................... 203
Normal occupant weight .................. 251
Number, vehicle identification
(VIN) ................................................... 333
O
Occupant Classification System see OCS (Occupant Classification
System)
Occupant distribution ....................... 251
Occupant safety
Air bags ........................................... 37
BabySmart™ .................................... 46
Children and air bags .......................37
Children in the vehicle .....................54
Child seat anchors – LATCH-type
(ISOFIX) ........................................... 58
Fastening the seat belts ................... 50
Front passenger front air bag off
indicator lamp (Canada
only) ........................................ 46, 307
Front passenger front air bag off
indicator lamp (USA only) ........42, 308
Infant and child restraint systems .... 55
Introduction ..................................... 36
ISOFIX (Child seat anchors –
LATCH-type) ..................................... 58
OCS (Occupant Classification
System) ........................................... 42
Seat belts .................................. 39, 48
OCS (Occupant Classification
System) ................................................ 42
Self-test ........................................... 46
Odometer ........................................... 121
Oil, oil level see Engine oil
On-board computer
see Control system
One-touch gearshifting ..................... 112
Operating safety .................................. 22
Ornamental moldings, cleaning ....... 263
Overhead control panel ...................... 32
P
Paintwork, cleaning .......................... 261
Paintwork code ................................. 333
Panic alarm .......................................... 60
Panorama roof with power tilt/
sliding panel ...................................... 200
Cleaning ......................................... 264
Operation ....................................... 200
Roller sunblinds ............................. 199
Synchronizing ................................ 201
Parcel nets ......................................... 203
Parking ............................................... 105
Parktronic system ..........................185
Parking brake .................................... 105
Messages in the multifunction
display ........................................... 281
Parking position
Exterior rear view mirrors ................87
Transmission position ....................109
Parktronic system
Cleaning system sensors ...............263
Malfunction .................................... 187
Minimum distance .........................186
Sensor range ................................. 185
Switching on/off ........................... 187
System sensors ............................. 185
Warning indicators .........................186
Parts service ...................................... 332
PASS AIR BAG OFF indicator lamp
(Canada only) see Front passenger front air bag
off indicator lamp (Canada only)
PASS AIR BAG OFF indicator lamp
(USA only) see Front passenger front air bag
off indicator lamp (USA only)
Passenger safety
see Occupant safety
Pedals ................................................. 254
Pelvis air bags ..................................... 41
Phone see Telephone
Plastic parts, cleaning ...................... 265
Index13204_AKB; 5; 23, en-USd2ureepe,Version: 2.11.8.12009-07-16T17:54:06+02:00 - Seite 13
Page 123 of 364
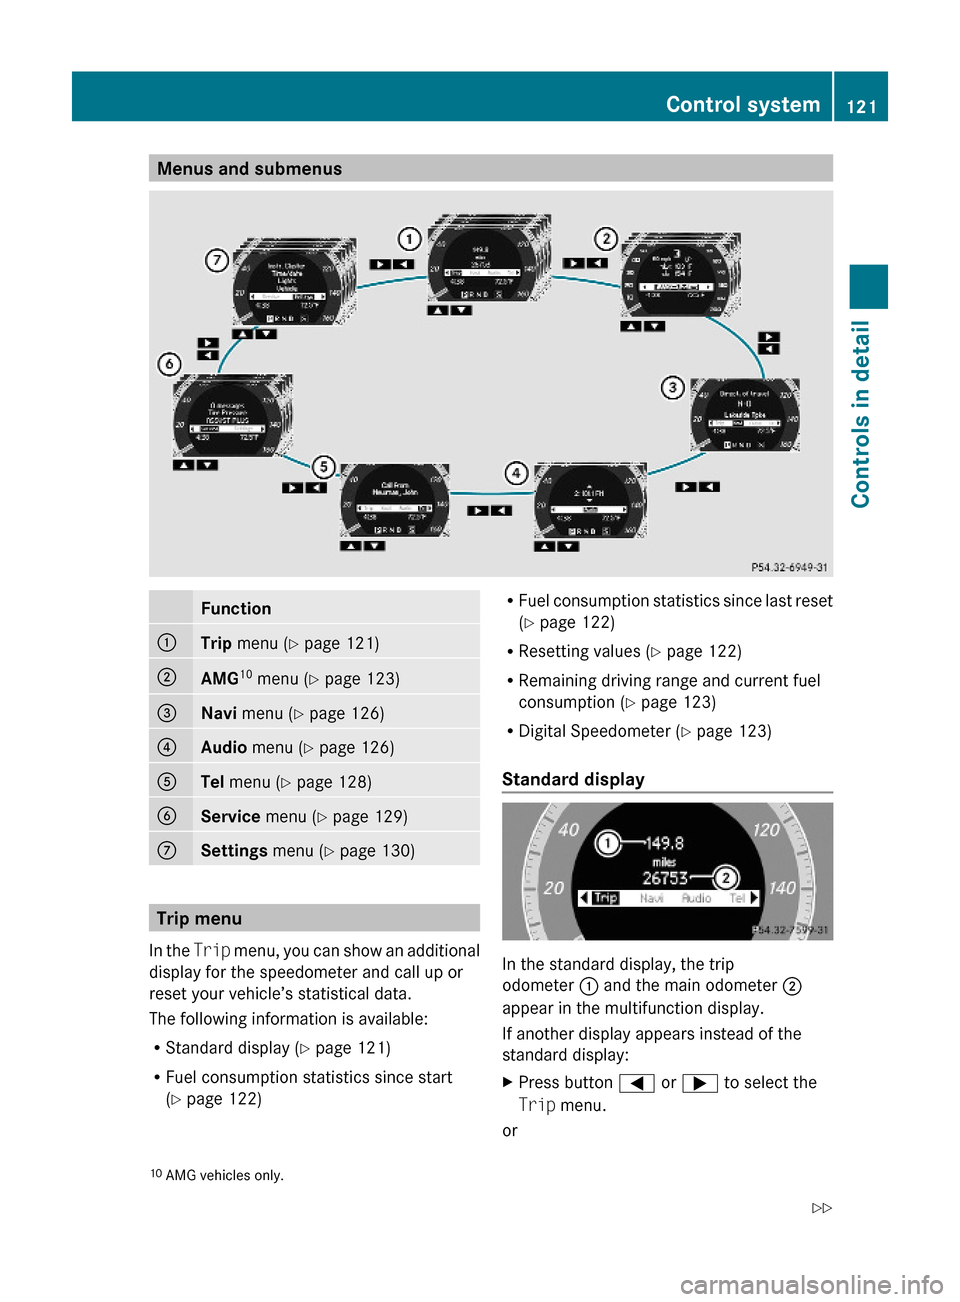
Menus and submenusFunction:Trip menu (Y page 121);AMG10 menu (Y page 123)=Navi menu (Y page 126)?Audio menu (Y page 126)ATel menu (Y page 128)BService menu (Y page 129)CSettings menu (Y page 130)
Trip menu
In the Trip menu, you can show an additional
display for the speedometer and call up or
reset your vehicle’s statistical data.
The following information is available:
RStandard display (Y page 121)
RFuel consumption statistics since start
(Y page 122)
RFuel consumption statistics since last reset
(Y page 122)
RResetting values (Y page 122)
RRemaining driving range and current fuel
consumption (Y page 123)
RDigital Speedometer (Y page 123)
Standard display
In the standard display, the trip
odometer : and the main odometer ;
appear in the multifunction display.
If another display appears instead of the
standard display:
XPress button = or ; to select the
Trip menu.
or
10AMG vehicles only.Control system121Controls in detail204_AKB; 5; 23, en-USd2ureepe,Version: 2.11.8.12009-07-16T17:54:06+02:00 - Seite 121Z
Page 132 of 364
operation of certain systems. They do not
replace the owner’s and/or driver’s
responsibility to maintain the vehicle’s
operating safety. Have all required
maintenance and safety checks performed on
the vehicle. Bring the vehicle to an authorized
Mercedes-Benz Center to address the
malfunction and warning messages.
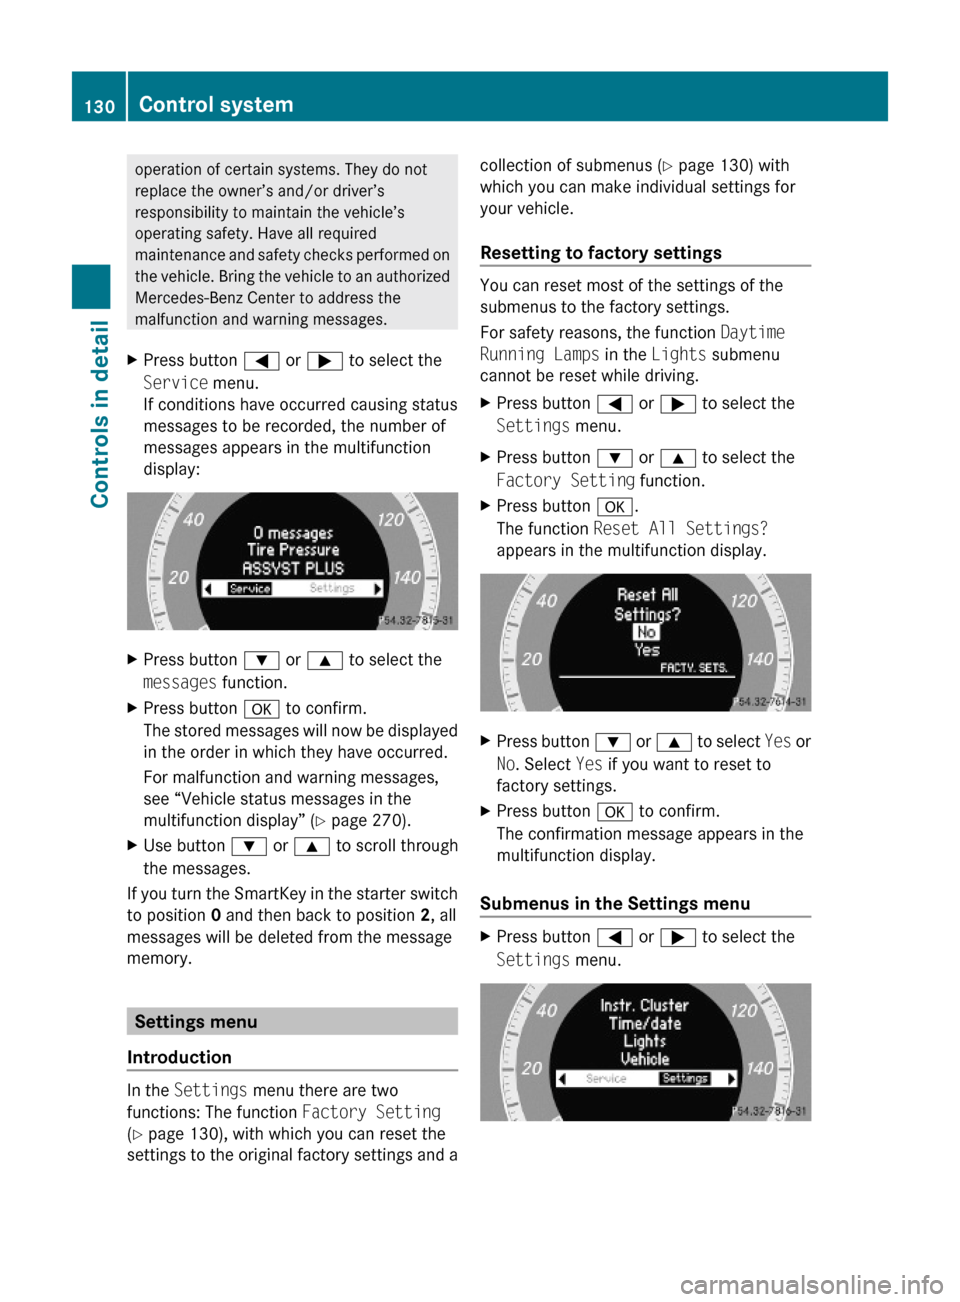
XPress button = or ; to select the
Service menu.
If conditions have occurred causing status
messages to be recorded, the number of
messages appears in the multifunction
display:
XPress button : or 9 to select the
messages function.
XPress button a to confirm.
The stored messages will now be displayed
in the order in which they have occurred.
For malfunction and warning messages,
see “Vehicle status messages in the
multifunction display” (Y page 270).
XUse button : or 9 to scroll through
the messages.
If you turn the SmartKey in the starter switch
to position 0 and then back to position 2, all
messages will be deleted from the message
memory.
Settings menu
Introduction
In the Settings menu there are two
functions: The function Factory Setting
(Y page 130), with which you can reset the
settings to the original factory settings and a
collection of submenus (Y page 130) with
which you can make individual settings for
your vehicle.
Resetting to factory settings
You can reset most of the settings of the
submenus to the factory settings.
For safety reasons, the function Daytime
Running Lamps in the Lights submenu
cannot be reset while driving.
XPress button = or ; to select the
Settings menu.
XPress button : or 9 to select the
Factory Setting function.
XPress button a.
The function Reset All Settings?
appears in the multifunction display.
XPress button : or 9 to select Yes or
No. Select Yes if you want to reset to
factory settings.
XPress button a to confirm.
The confirmation message appears in the
multifunction display.
Submenus in the Settings menu
XPress button = or ; to select the
Settings menu.
130Control systemControls in detail
204_AKB; 5; 23, en-USd2ureepe,Version: 2.11.8.12009-07-16T17:54:06+02:00 - Seite 130
Page 154 of 364
XPress button $ on audio control unit
repeatedly until desired wave band has
been selected.
The basic menu appears in the audio
display.XPress W when the main area is active.
or
XSelect Presets .
The station memory display appears in the
audio display.XSlide ZV Æ or rotate cV d to select
Autostore .XPress W.
The audio system searches for receivable
stations. A corresponding message is
displayed. The available stations are
automatically stored in the station
memory. The first received station will be
automatically played.XCanceling storage procedure: Select
Cancel and press W while the message
Rewriting Memory... is being displayed.
Displaying information
You can display program information or other
additional information when provided by the
radio station you are listening to.
X$ Q Info (if available).
The available information appears. The
content and scope of the information
depends on the radio station.XClosing screen: Slide XV Y, rotate cV d,
press W or press button k.
Satellite radio
GWarning!
Please devote your attention first and
foremost to the traffic situation you are in.
Before your journey, please familiarize
yourself with the radio functions.
Only use the audio system when road and
traffic conditions permit you to do so.
Otherwise you could be involved in an
accident in which you or others could be
injured.
Submenu overview
i The components and operating principles
of the audio system can be found on
( Y page 137) and ( Y page 143).
MenuSubmenuSatChannel ListEnter ChannelServicePresetsStation presetsInfoInformation menu (if
available)Category (Cat.)All channelsSelect categorySoundTrebleBassBalance/FaderSurround Sound
Satellite radio
i Additional satellite radio equipment and a
subscription to SIRIUS XM Satellite Radio
service provider are required for the
satellite radio operation described in this
chapter.
Contact an authorized Mercedes-Benz
Center for details and availability for your
vehicle.
SIRIUS XM Satellite Radio provides over
130 channels of digital-quality radio,
including 100 % commercial-free music,
sports, news and entertainment. SIRIUS XM
Satellite Radio uses a fleet of high-power
152Audio systemControls in detail
204_AKB; 5; 23, en-USd2ureepe,Version: 2.11.8.12009-07-16T17:54:06+02:00 - Seite 152
Page 156 of 364
If a satellite receiver is not installed or not
properly installed: The message Device
Unavailable will appear.
iIt is also possible to activate the satellite
radio service online. To do so please visit
SIRIUS XM Satellite Radio’s website at
www.sirius.com (USA) or
www.siriuscanada.ca (Canada).
Preview Channel
iIf the satellite radio service has not been
subscribed to, only the preview channel is
available. You cannot tune in another
channel. If you try to do this, the message
Call SIRIUS to activate: appears.
Satellite radio service is activated
The basic satellite radio menu appears. You
will hear the last tuned channel, provided that
it can be received.
Switching on Sat mode
For important subscription information see
“Subscribing to satellite radio” (Y page 153).
XPress button $ on audio control unit
repeatedly until Sat is selected.
The message No Service will appear when
the signal is not available. After the audio
system acquires the signal, the satellite
radio basic menu will appear. The last
tuned station will begin to play.
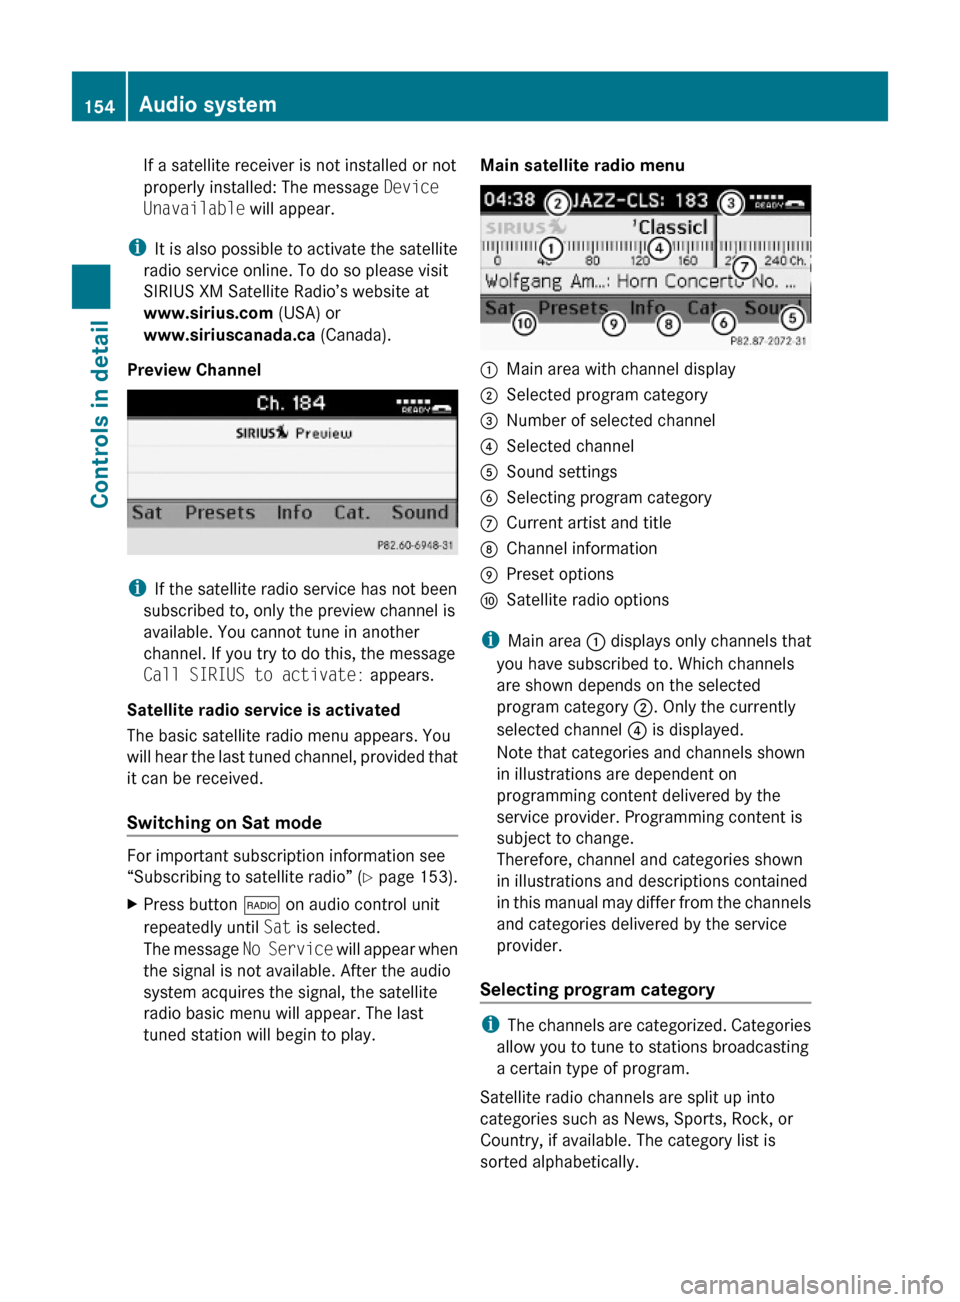
Main satellite radio menu:Main area with channel display;Selected program category=Number of selected channel?Selected channelASound settingsBSelecting program categoryCCurrent artist and titleDChannel informationEPreset optionsFSatellite radio options
iMain area : displays only channels that
you have subscribed to. Which channels
are shown depends on the selected
program category ;. Only the currently
selected channel ? is displayed.
Note that categories and channels shown
in illustrations are dependent on
programming content delivered by the
service provider. Programming content is
subject to change.
Therefore, channel and categories shown
in illustrations and descriptions contained
in this manual may differ from the channels
and categories delivered by the service
provider.
Selecting program category
iThe channels are categorized. Categories
allow you to tune to stations broadcasting
a certain type of program.
Satellite radio channels are split up into
categories such as News, Sports, Rock, or
Country, if available. The category list is
sorted alphabetically.
154Audio systemControls in detail
204_AKB; 5; 23, en-USd2ureepe,Version: 2.11.8.12009-07-16T17:54:06+02:00 - Seite 154
Page 158 of 364
Tuning in channels using the satellite
radio channel list
X$ (repeatedly, if necessary) Q Sat
Q Channel List.
The channel list appears. The dot # in
front of a list entry indicates the currently
selected channel.
XSelect channel by rotating cVd or sliding
ZVÆ.
XPress W to confirm.
iThe contents of the channel list depends
on which channels are included in your
subscription and which program category
you have selected (Y page 154). The
channel list contains only the preview
channel if the satellite radio service has not
been subscribed to.
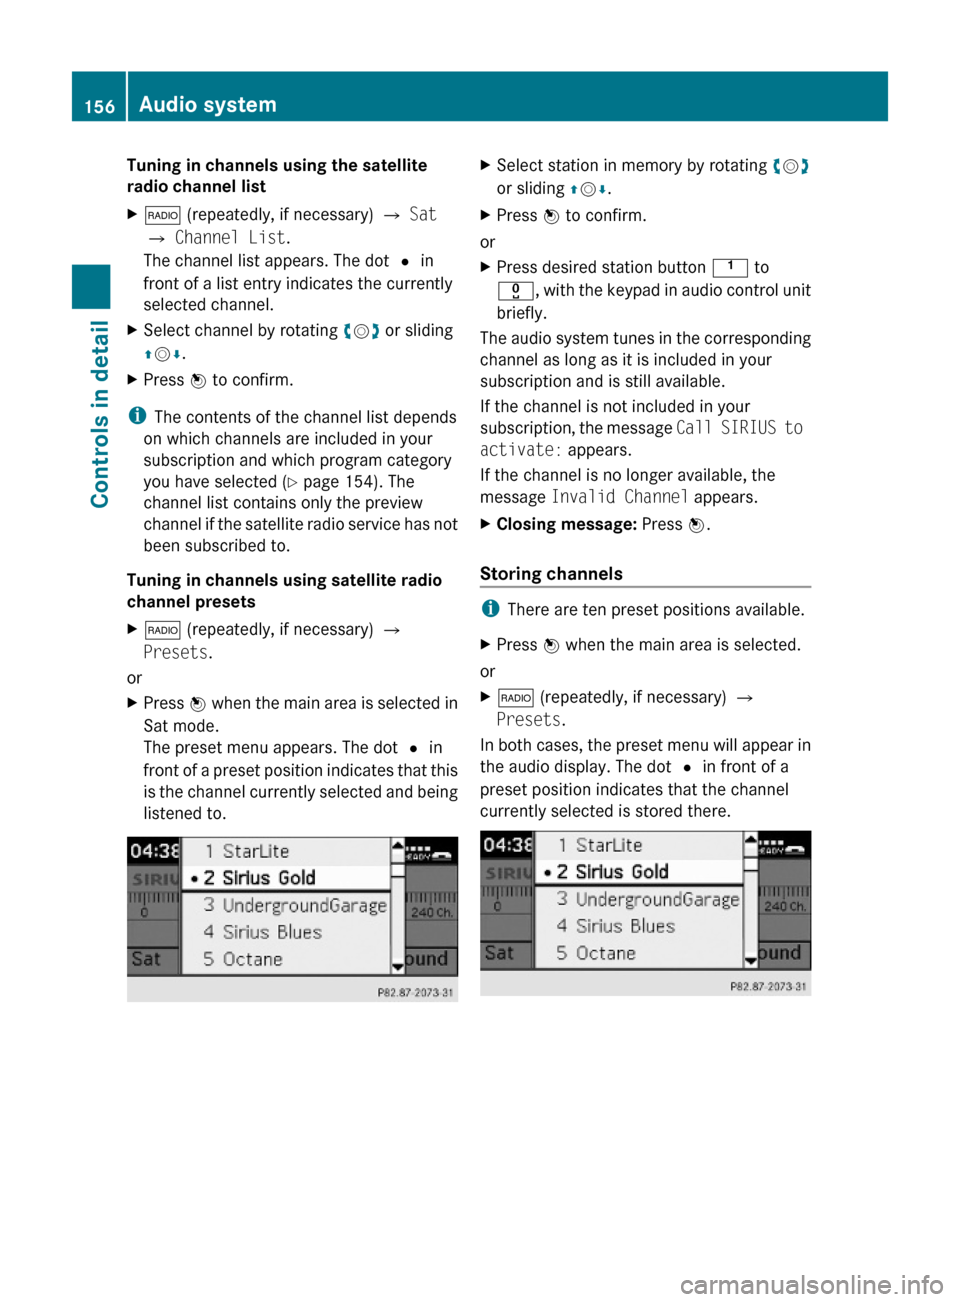
Tuning in channels using satellite radio
channel presets
X$ (repeatedly, if necessary) Q
Presets.
or
XPress W when the main area is selected in
Sat mode.
The preset menu appears. The dot # in
front of a preset position indicates that this
is the channel currently selected and being
listened to.
XSelect station in memory by rotating cVd
or sliding ZVÆ.
XPress W to confirm.
or
XPress desired station button k to
x, with the keypad in audio control unit
briefly.
The audio system tunes in the corresponding
channel as long as it is included in your
subscription and is still available.
If the channel is not included in your
subscription, the message Call SIRIUS to
activate: appears.
If the channel is no longer available, the
message Invalid Channel appears.
XClosing message: Press W.
Storing channels
iThere are ten preset positions available.
XPress W when the main area is selected.
or
X$ (repeatedly, if necessary) Q
Presets.
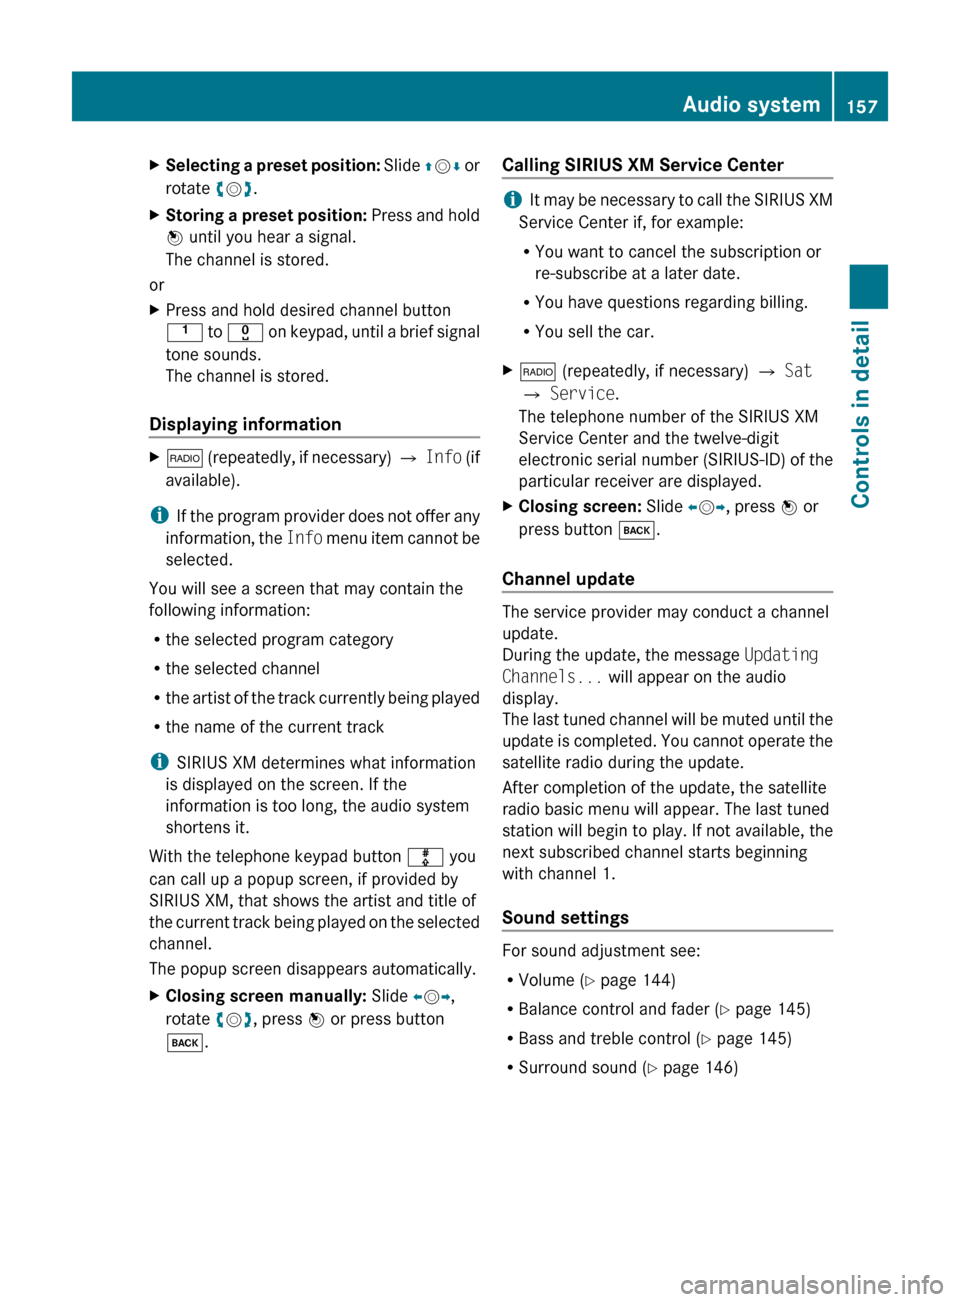
In both cases, the preset menu will appear in
the audio display. The dot # in front of a
preset position indicates that the channel
currently selected is stored there.
156Audio systemControls in detail
204_AKB; 5; 23, en-USd2ureepe,Version: 2.11.8.12009-07-16T17:54:06+02:00 - Seite 156
Page 159 of 364
XSelecting a preset position: Slide ZV Æ or
rotate cV d.XStoring a preset position: Press and hold
W until you hear a signal.
The channel is stored.
or
XPress and hold desired channel button
k to x on keypad, until a brief signal
tone sounds.
The channel is stored.
Displaying information
X$ (repeatedly, if necessary) Q Info (if
available).
i If the program provider does not offer any
information, the Info menu item cannot be
selected.
You will see a screen that may contain the
following information:
R the selected program category
R the selected channel
R the artist of the track currently being played
R the name of the current track
i SIRIUS XM determines what information
is displayed on the screen. If the
information is too long, the audio system
shortens it.
With the telephone keypad button m you
can call up a popup screen, if provided by
SIRIUS XM, that shows the artist and title of
the current track being played on the selected
channel.
The popup screen disappears automatically.
XClosing screen manually: Slide XV Y,
rotate cV d, press W or press button
k .Calling SIRIUS XM Service Center
iIt may be necessary to call the SIRIUS XM
Service Center if, for example:
R You want to cancel the subscription or
re-subscribe at a later date.
R You have questions regarding billing.
R You sell the car.
X$ (repeatedly, if necessary) Q Sat
Q Service .
The telephone number of the SIRIUS XM
Service Center and the twelve-digit
electronic serial number (SIRIUS-ID) of the
particular receiver are displayed.XClosing screen: Slide XV Y, press W or
press button k.
Channel update
The service provider may conduct a channel
update.
During the update, the message Updating
Channels... will appear on the audio
display.
The last tuned channel will be muted until the
update is completed. You cannot operate the
satellite radio during the update.
After completion of the update, the satellite
radio basic menu will appear. The last tuned
station will begin to play. If not available, the
next subscribed channel starts beginning
with channel 1.
Sound settings
For sound adjustment see:
R Volume ( Y page 144)
R Balance control and fader ( Y page 145)
R Bass and treble control ( Y page 145)
R Surround sound ( Y page 146)
Audio system157Controls in detail204_AKB; 5; 23, en-USd2ureepe,Version: 2.11.8.12009-07-16T17:54:06+02:00 - Seite 157Z