2010 MERCEDES-BENZ C300 4MATIC Steering wheel malfunction
[x] Cancel search: Steering wheel malfunctionPage 39 of 364

GWarning!
The SRS self-check has detected a
malfunction when the SRS indicator lamp
6
R does not come on at all
R fails to go out after approximately
4 seconds after the engine was started
R comes on after the engine was started or
while driving
For your safety, we strongly recommend that
you contact an authorized Mercedes-Benz
Center immediately to have the system
checked. Otherwise the SRS may not be
activated when needed in an accident, which
could result in serious or fatal injury. The SRS
might also deploy unexpectedly and
unnecessarily which could also result in injury
as well.
In addition, improper work on the SRS creates
a risk of rendering the SRS inoperative or
causing unintended air bag deployment. Work
on the SRS must therefore only be performed
by qualified technicians. Contact an
authorized Mercedes-Benz Center.
If it is necessary to modify an air bag system
to accommodate a person with disabilities,
contact an authorized Mercedes-Benz Center.
USA only: Call our Customer Assistance
Center at 1-800-FOR-MERCedes
(1-800-367-6372) for details.
Air bags
GWarning!
Air bags are designed to reduce the potential
of injury and fatality in certain
R frontal impacts (front air bags and driver’s
side knee bag)
R side impacts (side impact air bags, window
curtain air bags and pelvis air bags)
However, no system available today can
completely eliminate injuries and fatalities.
Deployment of the air bags temporarily
releases a small amount of dust from the air
bags. This dust, however, is neither harmful
to your health, nor does it indicate a fire in the
vehicle. The dust might cause some
temporary breathing difficulty for people with
asthma or other breathing trouble. To avoid
this, you may wish to get out of the vehicle as
soon as it is safe to do so. If you have any
breathing difficulty but cannot get out of the
vehicle after the air bag inflates, then get fresh
air by opening a window or door.GWarning!
To reduce the risk of injury when the front air
bags inflate, it is very important for the driver
and front passenger to always be in a properly
seated position and to wear their respective
seat belt.
For maximum protection in the event of a
collision always be in normal seated position
with your back against the seat backrest.
Fasten your seat belt and make sure it is
properly positioned on your body.
Since the air bag inflates with considerable
speed and force, a proper seating position
and correct positioning of the hands on the
steering wheel will help to keep you at a safe
distance from the air bag. Occupants who are
not wearing their seat belt, are not seated
properly or are too close to the air bag can be
seriously injured or killed by an air bag as it
inflates with great force instantaneously:
R Sit with the seat belt properly fastened in a
position that is as upright as possible with
your back against the seat backrest.
R Move the driver’s seat as far back as
possible, still permitting proper operation
of vehicle controls. The distance from the
center of the driver’s chest to the center of
the air bag cover on the steering wheel
must be at least 10 inches (25 cm) or more.
You should be able to accomplish this by
adjusting the seat and steering wheel. If
Occupant safety37Safety and security204_AKB; 5; 23, en-USd2ureepe,Version: 2.11.8.12009-07-16T17:54:06+02:00 - Seite 37Z
Page 41 of 364
replaced and to have any malfunctioning air
bags repaired. This will help to make sure the
air bags will continue to provide supplemental
crash protection for occupants.
Safety guidelines for the seat belt,
Emergency Tensioning Device (ETD)
and air bag GWarning!
R Damaged seat belts or seat belts that have
been subjected to stress in an accident
must be replaced. Their anchoring points
must also be checked. Only use seat belts
installed or supplied by an authorized
Mercedes-Benz Center.
R Air bags and pyrotechnic Emergency
Tensioning Devices (ETDs) contain
perchlorate material, which may require
special handling and regard for the
environment. Check with your local
government’s disposal guidelines.
California residents, see
www.dtsc.ca.gov/HazardousWaste/
Perchlorate/index.cfm .
R Air bags and ETDs are designed to function
on a one-time-only basis. An air bag or ETD
that has deployed must be replaced.
R Do not pass seat belts over sharp edges.
They could tear.
R Do not make any modification that could
change the effectiveness of the seat belts.
R Do not bleach or dye seat belts as this may
severely weaken them. In a crash they may
not be able to provide adequate protection.
R No modifications of any kind may be made
to any components or wiring of the SRS.
R Do no change or remove any component or
part of the SRS.
R Do not install additional trim material, seat
covers, badges, etc. over the steering
wheel hub, front passenger front air bag
cover, outboard sides of the seat
backrests, door trim panels, or door frame
trims.
R Do not install additional electrical/
electronic equipment on or near SRS
components and wiring.
R Keep area between air bags and occupants
free of objects (e.g. packages, purses,
umbrellas, etc.).
R Do not hang items such as coat hangers
from the coat hooks or handles over the
door. These items may be thrown around in
the vehicle and cause head and other
injuries when the window curtain air bag is
deployed.
R Air bag system components will be hot after
an air bag has inflated. Do not touch them.
R Never place your feet on the instrument
panel, dashboard, or on the seat. Always
keep both feet on the floor in front of the
seat.
R Improper repair work on the SRS creates a
risk of rendering the SRS inoperative or
causing unintended air bag deployment.
Work on the SRS must therefore only be
performed by qualified technicians.
Contact an authorized Mercedes-Benz
Center.
R For your protection and the protection of
others, when scrapping the air bag unit or
ETD, our safety instructions must be
followed. These instructions are available
from any authorized Mercedes-Benz
Center.
R Given the considerable deployment speed,
required inflation volume, and the material
of the air bags, there is the possibility of
abrasions or other, potentially more serious
injuries resulting from air bag deployment.
If you sell your vehicle, we strongly
recommend that you inform the subsequent
owner that the vehicle is equipped with SRS.
Also refer them to the applicable section in
the Operator’s Manual.Occupant safety39Safety and security204_AKB; 5; 23, en-USd2ureepe,Version: 2.11.8.12009-07-16T17:54:06+02:00 - Seite 39Z
Page 55 of 364

NECK-PRO active front head restraints and/
or the deployment of the front side impact air
bags or pelvis air bags.
Contact an authorized Mercedes-Benz Center
for availability.
When the NECK-PRO active front head
restraints have been triggered in an accident,
the NECK-PRO active front head restraints
must be reset. Otherwise, the NECK-PRO
active front head restraints cannot offer any
additional protection in the event of another
rear-end collision.
For information on resetting the activated
NECK-PRO active front head restraints, see
“Resetting activated head restraints”
(Y page 311).
You cannot remove the NECK-PRO active
front head restraints.
GWarning!
For your protection, drive only with properly
positioned head restraints.
Adjust the head restraint so that it is as close
to the head as possible and the center of the
head restraint supports the back of the head
at eye level. This will reduce the potential for
injury to the head and neck in the event of an
accident or similar situation.
For information on head restraint adjustment,
see “Head restraint height” (Y page 82), or
see “Head restraint fore and aft adjustment”
(Y page 82).
Correct driver seat adjustment
GWarning!
In order to avoid possible loss of vehicle
control the following must be done before the
vehicle is put into motion:
Rseat adjustment
Rhead restraint adjustment
Rsteering wheel adjustment
Rrear view mirror adjustment
Rfastening of seat belts
Steering wheel
GObserve Safety notes, see page 84.XPosition steering wheel : properly. See
(Y page 85) for manual adjustment and
(Y page 85) for electrical adjustment.
Make sure:
RYou can reach the steering wheel with your
arms slightly bent at the elbows.
RYou can move your legs freely.
RAll displays (including malfunction and
indicator lamps) on the instrument cluster
are clearly visible.
Seat belt
GObserve Safety notes, see page 48.XFasten and position your seat belt ;
correctly (Y page 50).
Occupant safety53Safety and security204_AKB; 5; 23, en-USd2ureepe,Version: 2.11.8.12009-07-16T17:54:06+02:00 - Seite 53Z
Page 63 of 364
vehicle. They cannot increase braking or
steering efficiency beyond that afforded by
the condition of the vehicle brakes and tires
or the traction afforded.
Only a safe, attentive, and skillful driver can
prevent accidents.
The capabilities of a vehicle equipped with the
driving safety systems described in this
section must never be exploited in a reckless
or dangerous manner which could jeopardize
the user’s safety or the safety of others.
Always adjust your driving style to the
prevailing road and weather conditions and
keep a safe distance to other road users and
objects on the street.
If a driving system malfunctions, other driving
safety systems may also switch off. Observe
indicator and warning lamps that may come
on as well as messages in the multifunction
display that may appear.
ABS
GObserve Safety notes, see page 60.GWarning!
Do not pump the brake pedal. Use firm, steady
brake pedal pressure instead. Pumping the
brake pedal defeats the purpose of the ABS
and significantly reduces braking
effectiveness.
The Antilock Brake System (ABS) regulates
the brake pressure so that the wheels do not
lock during braking. This allows you to
maintain the ability to steer your vehicle.
The ABS is functional above a speed of
approximately 5 mph (8 km/h) independent
of road surface conditions.
On slippery road surfaces, the ABS will
respond even to light brake pressure.
The ABS indicator lamp ! in the
instrument cluster comes on when you switch
on the ignition. It goes out when the engine
is running.
Braking
At the instant one of the wheels is about to
lock up, a slight pulsation can be felt in the
brake pedal. The pulsation indicates that the
ABS is in the regulating mode.
XKeep firm and steady pressure on the brake
pedal while you feel the pulsation.
Continuous, steady brake pedal pressure
yields the advantages provided by the ABS,
namely braking power and the ability to steer
the vehicle.
The pulsating brake pedal can be an
indication of hazardous road conditions and
functions as a reminder to take extra care
while driving.
Emergency brake maneuver
XKeep continuous full pressure on the brake
pedal.GWarning!
If the ABS malfunctions, other driving safety
systems such as the BAS or the ESP ®
are also
switched off. Observe indicator and warning
lamps that may come on as well as messages
in the multifunction display that may appear.
If the ABS malfunctions, the wheels may lock
during hard braking, reducing steering
capability and extending the braking distance.
BAS
GObserve Safety notes, see page 60.
The Brake Assist System (BAS) operates in
emergency situations. If you apply the brakes
very quickly, the BAS provides full brake
boost automatically, thereby potentially
reducing the braking distance.
XApply continuous full braking pressure until
the emergency braking situation is over.
The ABS will prevent the wheels from
locking.Driving safety systems61Safety and security204_AKB; 5; 23, en-USd2ureepe,Version: 2.11.8.12009-07-16T17:54:06+02:00 - Seite 61Z
Page 64 of 364

When you release the brake pedal, the brakes
function again as normal. The BAS is then
deactivated.GWarning!
If the BAS malfunctions, the brake system still
functions, but without the additional brake
boost available that the BAS would normally
provide in an emergency braking maneuver.
Therefore, the braking distance may increase.
Adaptive Brake
Adaptive Brake provides a high level of
braking safety as well as increased braking
comfort. Adaptive Brake takes driver and
vehicle characteristics into consideration,
thus achieving an optimal braking effect.
In addiditon, Adaptive Brake provides the hill-
start assist system ( Y page 183).
For more information on the brake system,
see ( Y page 255).
EBP
GObserve Safety notes, see page 60.
The Electronic Brake Proportioning (EBP)
enhances braking effectiveness by allowing
the rear brakes to supply a greater proportion
of the braking effort in straight-line braking
without a loss of vehicle stability.
GWarning!
If the EBP malfunctions, the brake system will
still function with full brake boost. However,
the rear wheels could lock up during
emergency braking situations, for example.
You could lose control of the vehicle and
cause an accident.
Adapt your driving style to the changed
driving characteristics.
ESP ®GObserve Safety notes, see page 60.
The Electronic Stability Program (ESP
®
) is
operational as soon as the engine is running.
It monitors the vehicle’s traction (force of
adhesive friction between the tires and the
road surface) and handling.
The ESP ®
recognizes that the vehicle deviates
from the direction of travel as intended by the
driver. By applying brakes to individual
wheels and by limiting the engine output, the
ESP ®
works to stabilize the vehicle. The
ESP ®
is especially useful while driving off and
on wet or slippery road surfaces. The ESP ®
also stabilizes the vehicle during braking and
steering maneuvers.
The ESP ®
warning lamp d in the
instrument cluster comes on when you switch
on the ignition. It goes out when the engine
is running.
The ESP ®
warning lamp d in the
instrument cluster flashes when the ESP ®
is
engaged.
GWarning!
Never switch off the ESP ®
when you see the
ESP ®
warning lamp d flashing in the
instrument cluster. In this case proceed as
follows:
R When driving off, apply as little throttle as
possible.
R While driving, ease up on the accelerator
pedal.
R Adapt your speed and driving style to the
prevailing road conditions.
Failure to observe these guidelines could
cause the vehicle to skid. The ESP ®
cannot
prevent accidents resulting from excessive
speed.
i Vehicle status messages in the
multifunction display ( Y page 270) will
refer to the ESP ®
as ESC.
62Driving safety systemsSafety and security
204_AKB; 5; 23, en-USd2ureepe,Version: 2.11.8.12009-07-16T17:54:06+02:00 - Seite 62
Page 87 of 364
Make sure
Ryou can reach the steering wheel with your
arms slightly bent at the elbows
Ryou can move your legs freely
Rall displays (including malfunction and
indicator lamps) on the instrument cluster
are clearly visible
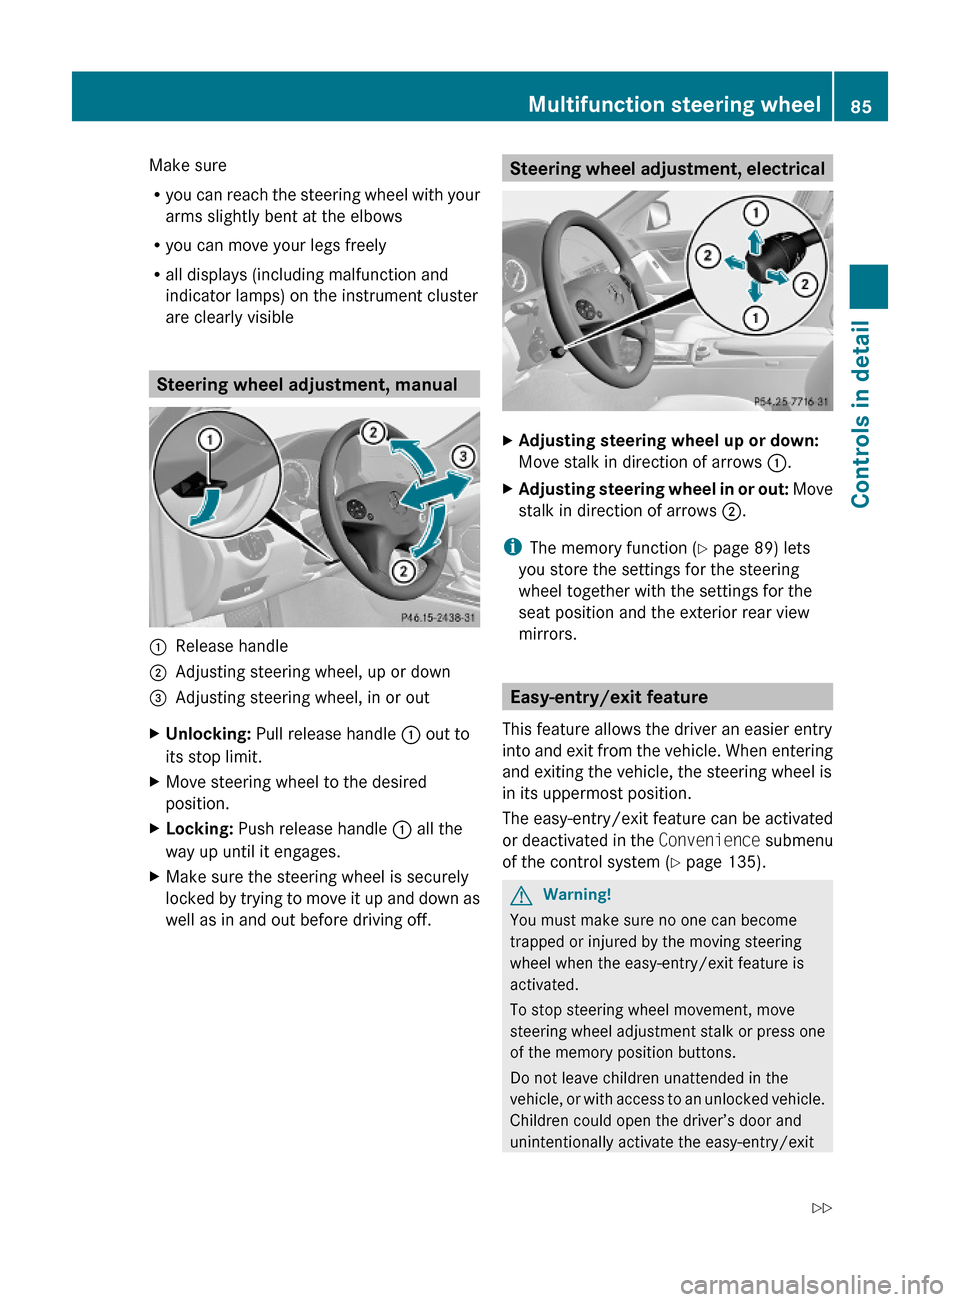
Steering wheel adjustment, manual
:Release handle;Adjusting steering wheel, up or down=Adjusting steering wheel, in or outXUnlocking: Pull release handle : out to
its stop limit.
XMove steering wheel to the desired
position.
XLocking: Push release handle : all the
way up until it engages.
XMake sure the steering wheel is securely
locked by trying to move it up and down as
well as in and out before driving off.
Steering wheel adjustment, electricalXAdjusting steering wheel up or down:
Move stalk in direction of arrows :.
XAdjusting steering wheel in or out: Move
stalk in direction of arrows ;.
iThe memory function (Y page 89) lets
you store the settings for the steering
wheel together with the settings for the
seat position and the exterior rear view
mirrors.
Easy-entry/exit feature
This feature allows the driver an easier entry
into and exit from the vehicle. When entering
and exiting the vehicle, the steering wheel is
in its uppermost position.
The easy-entry/exit feature can be activated
or deactivated in the Convenience submenu
of the control system (Y page 135).
GWarning!
You must make sure no one can become
trapped or injured by the moving steering
wheel when the easy-entry/exit feature is
activated.
To stop steering wheel movement, move
steering wheel adjustment stalk or press one
of the memory position buttons.
Do not leave children unattended in the
vehicle, or with access to an unlocked vehicle.
Children could open the driver’s door and
unintentionally activate the easy-entry/exit
Multifunction steering wheel85Controls in detail204_AKB; 5; 23, en-USd2ureepe,Version: 2.11.8.12009-07-16T17:54:06+02:00 - Seite 85Z
Page 214 of 364

access to account information, remote door
unlock and more.
The Tele Aid system is available if
R it has been activated and is operational.
Activation requires a subscription for
monitoring services, connection and
cellular air time
R vehicle battery power is available
R the relevant cellular phone network and
GPS signals are available and pass the
information on to the Customer Assistance
Center
i Location of the vehicle on a map is only
possible if the vehicle is able to receive
signals from the GPS satellite network and
pass the information on to the Customer
Assistance Center.
The Tele Aid system
(Telematic Alarm Identification on Demand)
The Tele Aid system consists of three types
of response:
R Automatic and manual emergency
R Roadside Assistance
R Information
To adjust the speaker volume during a Tele
Aid call do the following:
XPress button W or X on the
multifunction steering wheel.
or
XUse the rotary control on the audio system
( Y page 144).
Be sure to check “Owner’s Online” at
www.mbusa.com (USA only) for more
information and a description of all available
features.
System self-test
The system performs a self-test after you
have switched on the ignition.
GWarning!
A malfunction in the system has been
detected if any or all of the following
conditions occur:
R The indicator lamp in the SOS button does
not come on during the system self-test.
R The indicator lamp in the Roadside
Assistance button F does not come on
during the system self-test.
R The indicator lamp in the Information
button ï does not come on during the
system self-test.
R The indicator lamp in the SOS button,
Roadside Assistance button F, or
Information button ï remains
illuminated constantly in red after the
system self-test.
R The message Tele Aid Inoperative or
Tele Aid Not Activated appears in the
multifunction display after the system self-
test
If a malfunction is indicated as outlined above,
the system may not operate as expected. In
case of an emergency, help will have to be
summoned by other means.
Have the system checked at the nearest
Mercedes-Benz Center or contact the
Customer Assistance Center at
1-800-FOR-MERCedes (1-800-367-6372)
(USA only) or 1-888-923-8367 (Canada only)
as soon as possible.
Emergency calls
! In order to activate the Tele Aid system, a
subscriber agreement must be completed.
To ensure your system is activated and
operational, please press Information
button ï to perform the acquaintance
call. Failure to complete either of these
steps may result in a system that is not
activated.
If you have any questions regarding
activation, please call the Customer
Assistance Center at
212Useful featuresControls in detail
204_AKB; 5; 23, en-USd2ureepe,Version: 2.11.8.12009-07-16T17:54:06+02:00 - Seite 212
Page 236 of 364

tire blowout caused by a foreign object). In
this case bring the vehicle to a halt by carefully
applying the brakes and avoiding abrupt
steering maneuvers.
Restarting the tire pressure loss warning
system
The tire pressure loss warning system must
be restarted in the following situations:
R after you have changed the tire inflation
pressure
R after you have replaced the wheels or tires
R after you have installed new wheels or tiresXUsing the Tire and Loading Information
placard on the driver’s door B-pillar or, if
available, the tire inflation pressure label on
the inside of the fuel filler flap, make sure
the tire inflation pressure of all four tires is
correct.GWarning!
The tire pressure loss warning system can
only warn you in a reliable manner if you have
set the correct tire inflation pressures for
each tire.
If an incorrect tire inflation pressure was set,
the system will monitor the pressure
according to the incorrect value.
XSwitch on the ignition.XPress button = or ; on the
multifunction steering wheel to select the
Service menu (Y page 129).XPress button 9 or : on the
multifunction steering wheel to select
Tire Pressure .XPress button a on the multifunction
steering wheel to confirm.
The following message appears in the
multifunction display:
Run Flat Indicator
Active
Press 'OK' to RestartXPress button a.
The following message will appear in the
multifunction display:
Tire Pressure
Now OK?
Cancel
YesXIf you wish to confirm: Press button
9 or : to select Yes.XPress button a.
The following message will appear in the
multifunction display:
Run Flat
Indicator
Restarted
After a certain “learning phase”, the tire
pressure loss warning system checks the
set pressure values for all four tires.XIf you wish to cancel: Press button 9
or : to select Cancel.XPress button a to confirm.
The previous settings remain unchanged.
Advanced Tire Pressure Monitoring
System (Advanced TPMS), (USA only)
Your vehicle is equipped with the Advanced
Tire Pressure Monitoring System (Advanced
TPMS). It measures the tire inflation pressure
in the vehicle’s tires and issues warnings in
case of pressure loss in one or more of the
tires.
The TPMS is equipped with a combination low
tire pressure/TPMS malfunction telltale in
the instrument cluster. Depending on how the
telltale illuminates, it indicates a low tire
pressure condition or a malfunction in the
TPMS system itself:
R If the telltale illuminates continuously, one
or more of your tires is significantly
underinflated. There is no malfunction in
the TPMS.
R If the telltale flashes for 60 seconds and
then stays illuminated, the TPMS system
itself is not operating properly.
234Tires and wheelsOperation
204_AKB; 5; 23, en-USd2ureepe,Version: 2.11.8.12009-07-16T17:54:06+02:00 - Seite 234