2010 MERCEDES-BENZ C300 4MATIC Hood
[x] Cancel search: HoodPage 12 of 364

Delayed shut-off ............................ 134
Halogen ......................................... 314
High-beam flasher ............................ 93
High-beam headlamps .....................93
Low-beam headlamps ......................91
Messages in the multifunction
display ........................................... 292
Replacing bulbs ............................. 313
Switch .............................................. 90
Headliner and shelf below rear
window, cleaning and care of .......... 265
Head restraints .................................... 79
Adjustment ................................ 79, 82
Folding back .................................... 83
NECK-PRO active front head
restraints ......................................... 52
Rear seat head restraints ................. 83
Height adjustment
Seat belt outlet ................................ 51
Seats ............................................... 79
High-beam flasher ............................... 93
High-beam headlamps ................ 93, 314
High-performance brake system ..... 256
Hill-start assist system ..................... 183
Hood ................................................... 224
Messages in the multifunction
display ........................................... 286
Horn ...................................................... 27
Hydroplaning ..................................... 257
I
Identification labels .......................... 332
Identification number, vehicle
(VIN) ................................................... 333
Ignition ......................................... 78, 102
Immobilizer .......................................... 66
Infant and child restraint systems see Children in the vehicle
Inflation pressure
see Tires, Inflation pressure
Inside door handle .............................. 74
Instrument cluster ...................... 28, 116
Illumination .................................... 117
Lamps ............................................ 297
Multifunction display .....................120
Instrument lighting
see Instrument cluster, Illumination
Instrument panel
see Instrument cluster
Instruments and controls
see Cockpit
Interior lighting
Delayed shut-off ............................ 135
Emergency lighting ..........................95
Front ................................................ 95
Front reading lamps .........................95
Rear ................................................. 95
Rear reading lamps ..........................95
Interior rear view mirror ..................... 86
Auto-dimming rear view mirrors ....... 87
Interior storage spaces
see Storage compartments
Intermittent wiping ............................. 96
Rain sensor ...................................... 96
ISOFIX (Child seat anchors –
LATCH-type) see Children in the vehicle
J
Jack ..................................................... 269
Jump starting ..................................... 323
K
Key, Mechanical
Loss of ............................................. 73
Replacing ......................................... 74
Unlocking/locking manually ..........309
Valet locking .................................... 77
Key, SmartKey
Battery check lamp ..........................73
Checking batteries ...........................73
Factory setting ........................... 71, 73
Global locking (KEYLESS-
GO) .................................................. 73
Global locking (SmartKey) ................ 71
Global unlocking (KEYLESS-
GO) .................................................. 73
Global unlocking
(SmartKey) ....................................... 71
Important notes on KEYLESS-GO .....72
Locking/unlocking ........................... 70
Loss of ............................................. 73
10Index204_AKB; 5; 23, en-USd2ureepe,Version: 2.11.8.12009-07-16T17:54:06+02:00 - Seite 10
Page 14 of 364

M
Maintenance ........................................ 21
Maintenance System
Service indicator display ................259
Service indicator message .............259
Service term exceeded ..................259
Manual headlamp mode (Low-
beam headlamps) ................................ 91
Manual shift program ....................... 113
Manual transmission ........................ 107
Gearshift lever ............................... 107
Hill-start assist system ..................183
Maximum engine speed
see Vehicle specification
Maximum loaded vehicle weight ..... 251
Maximum load rating (tires) ............. 251
Maximum permissible tire
inflation pressure .............................. 251
Mechanical key see Key, Mechanical
Media interface ................................. 205
Memory function ................................. 89
Menus see Control system menus
Minispare wheel
see Spare wheel
Mirrors .................................................. 86
Auto-dimming rear view mirrors ....... 87
Exterior rear view mirror parking
position ............................................ 87
Exterior rear view mirrors ................86
Interior rear view mirror ...................86
Memory function .............................. 89
Power-folding exterior rear view
mirrors ............................................. 88
Vanity mirror .................................. 208
MON (Motor Octane Number) .......... 354
Motor Octane Number see MON
MP3 mode .......................................... 158
Multifunction display ........................ 120
Symbol messages ..........................279
Text messages ............................... 272
Vehicle status messages ...............270
Multifunction display messages
ABS ....................................... 280, 281
Active headlamps .......................... 292Advanced TPMS ............................. 277
Air bags ......................................... 272
Alternator ...................................... 290
Backrests ....................................... 286
Battery ........................................... 290
Brake fluid ..................................... 282
Brake pads ..................................... 279
Child seat ...................................... 275
Coolant .......................................... 288
Corner-illuminating front fog
lamps ............................................. 295
Cruise control ................................ 275
Doors ............................................. 286
EBP ................................................ 281
Engine oil ....................................... 291
ESP ®
............................. 280, 281, 283
Fog lamps .............................. 292, 294
Front passenger front air bag ........272
Gas cap .......................................... 291
High-beam lamps ........................... 293
Hood .............................................. 286
License plate lamps .......................294
Light sensor ................................... 294
Low-beam lamps ............................ 294
Parking brake ................................ 281
Parking lamps ................................ 293
Power steering ............................... 288
Reserve fuel ................................... 291
Reverse lamp ................................. 292
Side marker lamps .........................293
SmartKey ....................................... 286
SmartKey with KEYLESS-GO ..........286
SRS ................................................ 284
Tail lamps ...................................... 295
Tele Aid .......................................... 284
Tire inflation pressure ............276, 296
Tire pressure monitor ....................277
Tires ...................................... 276, 296
Trunk ............................................. 286
Turn signals ................................... 296
Multifunction steering wheel
Adjustment ...................................... 84
Buttons .......................................... 118
Cleaning ......................................... 265
Easy-entry/exit feature ...........85, 136
Gearshift control ............................ 112
Memory function .............................. 89
Overview .......................................... 2912Index204_AKB; 5; 23, en-USd2ureepe,Version: 2.11.8.12009-07-16T17:54:06+02:00 - Seite 12
Page 28 of 364

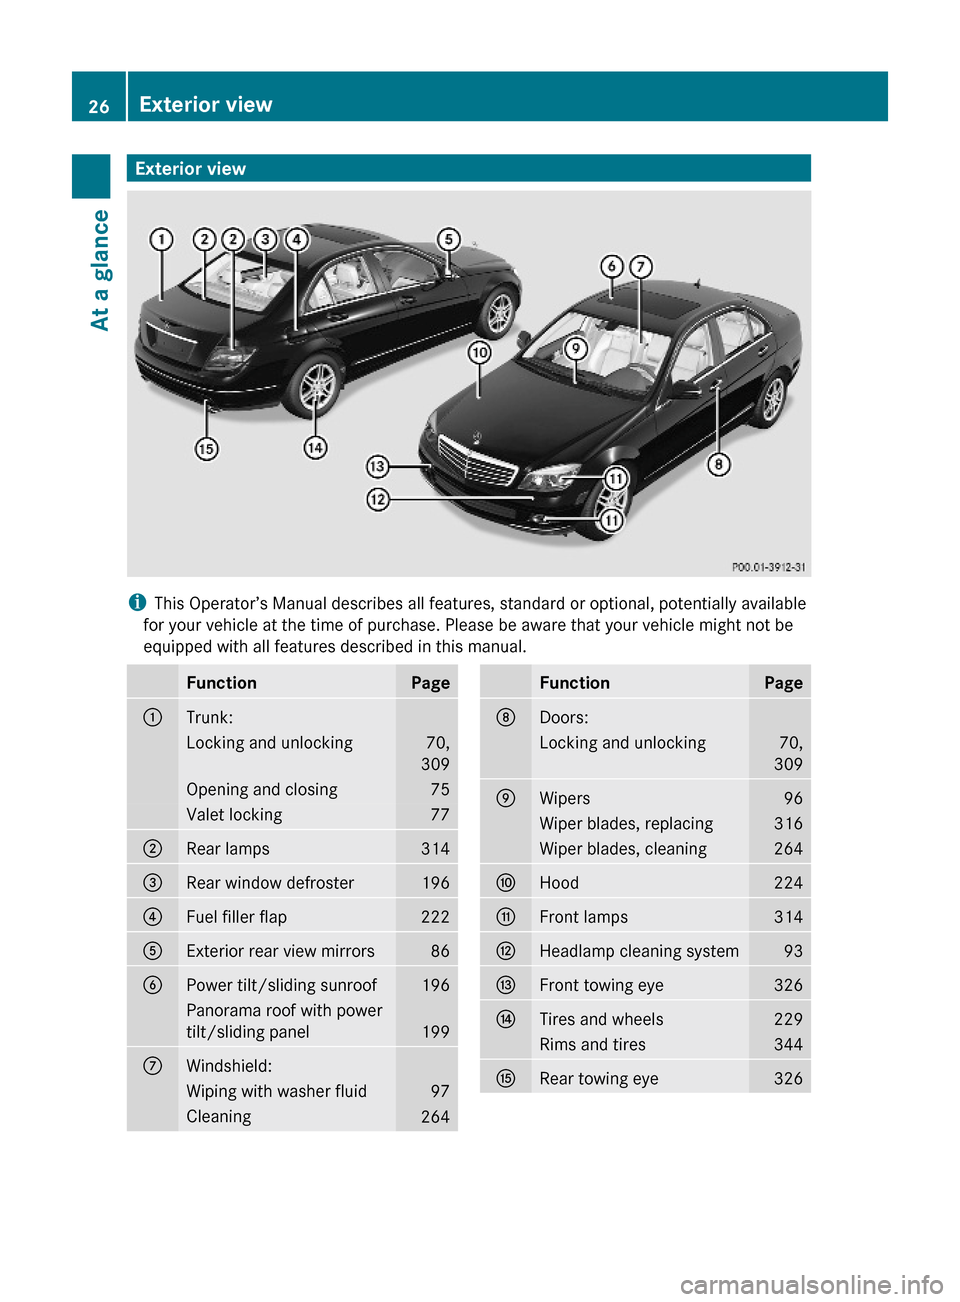
Exterior view
iThis Operator’s Manual describes all features, standard or optional, potentially available
for your vehicle at the time of purchase. Please be aware that your vehicle might not be
equipped with all features described in this manual.
FunctionPage:Trunk:Locking and unlocking70,
309
Opening and closing75Valet locking77;Rear lamps314=Rear window defroster196?Fuel filler flap222AExterior rear view mirrors86BPower tilt/sliding sunroof196Panorama roof with power
tilt/sliding panel199
CWindshield:Wiping with washer fluid97Cleaning264FunctionPageDDoors:Locking and unlocking70,
309
EWipers96Wiper blades, replacing316Wiper blades, cleaning264FHood224GFront lamps314HHeadlamp cleaning system93IFront towing eye326JTires and wheels229Rims and tires344KRear towing eye32626Exterior viewAt a glance
204_AKB; 5; 23, en-USd2ureepe,Version: 2.11.8.12009-07-16T17:54:06+02:00 - Seite 26
Page 29 of 364

CockpitFunctionPage:Steering wheel gearshift
control112
;Cruise control lever180=Instrument cluster116?Multifunction steering
wheel118
AHorn BFront Parktronic warning
indicators, Canada only186
COverhead control panel32DGlove box205EGlove box lock206FCenter console31GStarter switch77KEYLESS-GO start/stop
button78
FunctionPageHSteering wheel release
handle (manual)85
ISteering wheel adjustment
stalk (electrical)85
JCombination switch:Turn signals93Wipers96High beam93KParking brake pedal105LParking brake release105MOn-board diagnostics
(OBD) socket
NHood lock release224OExterior lamp switch90PDoor control panel and seat
adjustment/memory33
Cockpit27At a glance204_AKB; 5; 23, en-USd2ureepe,Version: 2.11.8.12009-07-16T17:54:06+02:00 - Seite 27Z
Page 51 of 364

seat belt provide the best restraint when the
wearer is in a position that is as upright as
possible and the seat belt is properly
positioned on the body.GWarning!
Never let more people ride in the vehicle than
there are seat belts available. Make sure
everyone riding in the vehicle is correctly
restrained with a separate seat belt. Never
use a seat belt for more than one person at a
time.
GWarning!
Damaged seat belts or seat belts that have
been subjected to stress in an accident must
be replaced. Also, the seat belt anchoring
points must be checked.
Only use seat belts which have been approved
by Mercedes-Benz.
Do not make any modifications to the seat
belts. This can lead to unintended activation
of the ETDs or to their failure to activate when
necessary.
Do not bleach or dye seat belts as this may
severely weaken them. In a crash they may
not be able to provide adequate protection.
Have all work carried out only by qualified
technicians. Contact an authorized
Mercedes-Benz Center.
Proper use of seat belts
GWarning!
USE SEAT BELTS PROPERLY
R Seat belts can only protect when used
properly. Never wear seat belts in any other
way than as described in this section, as
that could result in serious injuries in case
of an accident.
R Each occupant should wear their seat belt
at all times, because seat belts help reduce
the likelihood of and potential severity of
injuries in accidents, including rollovers.
The integrated restraint system includes
SRS (driver front air bag, driver side knee
bag, front passenger front air bag, side
impact air bags, pelvis air bags, window
curtain air bags for side windows),
Emergency Tensioning Devices (ETDs),
seat belt force limiters, and front seat knee
bolsters.
The system is designed to enhance the
protection offered to properly belted
occupants in certain frontal (front air bags,
driver’s side knee bag, and ETDs) and side
(side impact air bags, pelvis air bags,
window curtain air bags, and ETDs) impacts
which exceed preset deployment
thresholds.
R Never wear the shoulder belt under your
arm, against your neck or off your shoulder.
In a frontal crash, your body would move
too far forward. That would increase the
chance of head and neck injuries. The seat
belt would also apply too much force to the
ribs or abdomen, which could severely
injure internal organs such as your liver or
spleen.
Adjust the seat belt so that the shoulder
section is located as close as possible to
the middle of the shoulder. It should not
touch the neck. Never pass the shoulder
portion of the seat belt under your arm.
R Position the lap belt as low as possible on
your hips and not across the abdomen. If
the lap belt is positioned across your
abdomen, it could cause serious injuries in
a crash.
R Never wear seat belts over rigid or
breakable objects in or on your clothing,
such as eyeglasses, pens, keys etc., as
these might cause injuries.
R Make sure the seat belt is always fitted
snugly. Take special care of this when
wearing loose clothing.
R Never use a seat belt for more than one
person at a time. Do not fasten a seat beltOccupant safety49Safety and security204_AKB; 5; 23, en-USd2ureepe,Version: 2.11.8.12009-07-16T17:54:06+02:00 - Seite 49Z
Page 69 of 364

DeactivatingXSwitch on the ignition.
iStarting the engine will also deactivate
the immobilizer.
In the event that the engine cannot be
started (yet the vehicle’s battery is
charged), the system is not operational.
Contact an authorized Mercedes-Benz
Center or call 1-800-FOR-MERCedes (in the
USA) or 1-800-387-0100 (in Canada).
Anti-theft alarm system
Once the alarm system has been armed, a
visual and audible alarm is triggered when
someone opens
Ra door
Rthe trunk
Rthe hood
The alarm will stay on even if the activating
element, a door, for example, is closed
immediately.
The alarm system will also be triggered when
Rthe vehicle is opened with the mechanical
key
Ra door is opened from the inside
Rthe trunk is opened with the emergency
release button
To cancel the alarm after it has been
triggered, see “Canceling the alarm”
(Y page 68).
iIf the alarm stays on for more than
30 seconds, the Tele Aid system initiates a
call to the Customer Assistance Center
automatically. The Tele Aid system will
initiate the call provided that
Ryou have subscribed to the Tele Aid
service
Rthe Tele Aid service has been activated
properly
Rthe necessary mobile phone, power
supply and GPS coverage are available
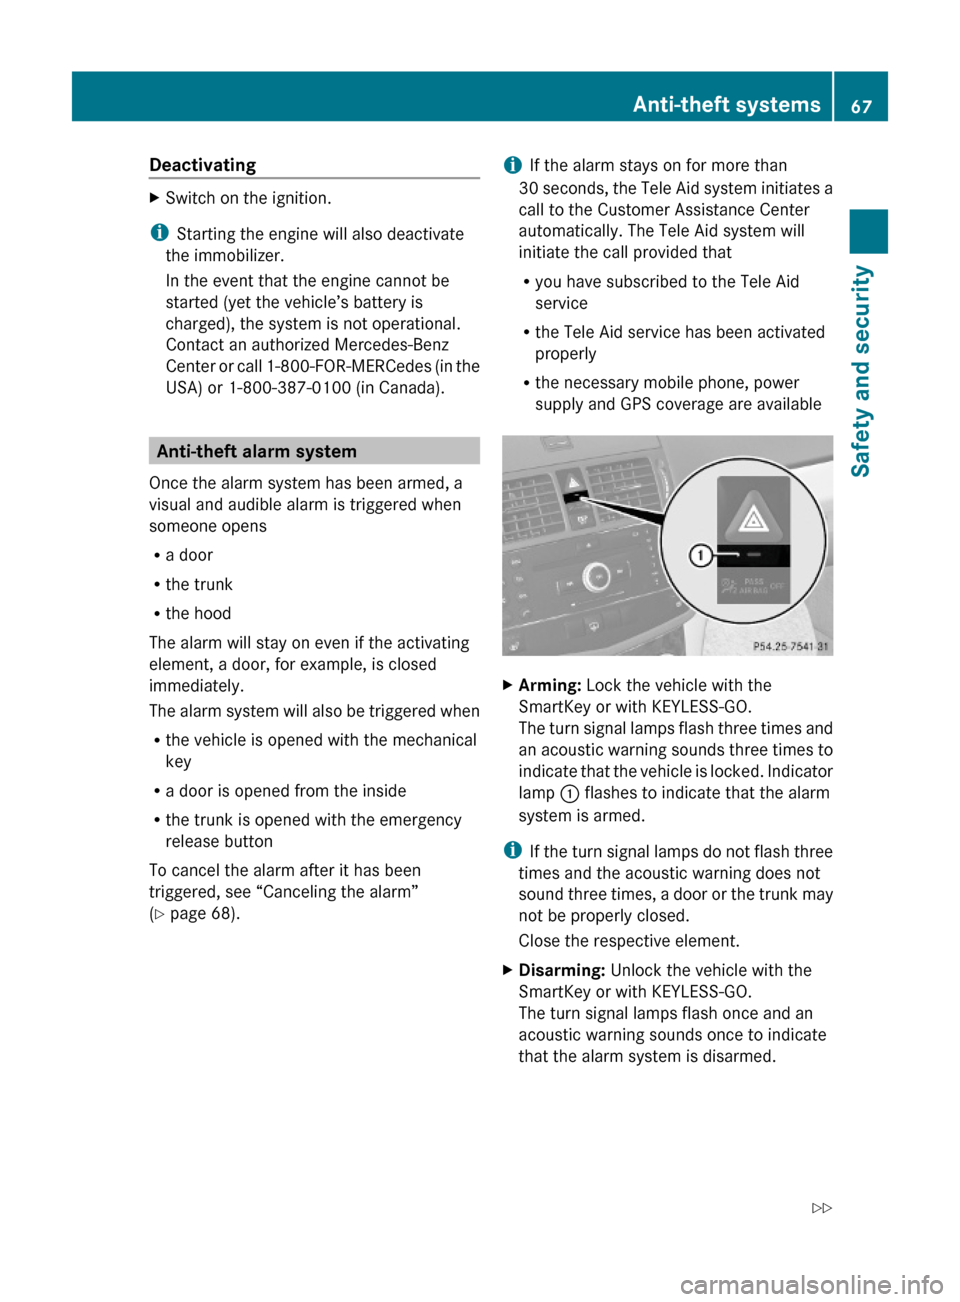
XArming: Lock the vehicle with the
SmartKey or with KEYLESS-GO.
The turn signal lamps flash three times and
an acoustic warning sounds three times to
indicate that the vehicle is locked. Indicator
lamp : flashes to indicate that the alarm
system is armed.
iIf the turn signal lamps do not flash three
times and the acoustic warning does not
sound three times, a door or the trunk may
not be properly closed.
Close the respective element.
XDisarming: Unlock the vehicle with the
SmartKey or with KEYLESS-GO.
The turn signal lamps flash once and an
acoustic warning sounds once to indicate
that the alarm system is disarmed.
Anti-theft systems67Safety and security204_AKB; 5; 23, en-USd2ureepe,Version: 2.11.8.12009-07-16T17:54:06+02:00 - Seite 67Z
Page 119 of 364

Rmalfunction/warning messages
Rfailure of any systems
Driving characteristics may be impaired.
If you must continue to drive, do so with added
caution. Contact an authorized Mercedes-
Benz Center as soon as possible.
The language setting for the multifunction
display can be changed with the audio system
(Y page 148) or with the COMAND system.
Vehicles with COMAND system: Refer to
separate operating instructions.
Activating the instrument cluster
The instrument cluster is activated when you
Ropen the driver’s door
Rswitch on the ignition
Adjusting the instrument cluster
illumination
XTo brighten illumination: Turn
dimmer : clockwise.
XTo dim illumination: Turn dimmer :
counterclockwise.
iThe instrument cluster illumination is
dimmed or brightened automatically to suit
ambient light conditions.
The instrument cluster illumination will also
be adjusted automatically when you switch
on the vehicle’s exterior lamps.
Coolant temperature gauge
The coolant temperature gauge is located on
the left side in the instrument cluster
(Y page 28).
GWarning!
Driving when your engine is overheated can
cause some fluids which may have leaked into
the engine compartment to catch fire. You
could be seriously burned.
Steam from an overheated engine can cause
serious burns which can occur just by opening
the engine hood. Stay away from the engine
if you see or hear steam coming from it.
Stop the vehicle in a safe location away from
other traffic. Turn off the engine, get out of the
vehicle and do not stand near the vehicle until
the engine has cooled down.
During severe operating conditions, e.g. stop-
and-go traffic, the coolant temperature may
rise close to 248‡ (120†), i.e close to the
red zone of the temperature gauge.
! Excessive coolant temperature triggers a
warning in the multifunction display.
The engine should not be operated with a
coolant temperature above 248‡ (120†),
i.e. in the red zone of the coolant
temperature gauge. Doing so may cause
serious engine damage which is not
covered by the Mercedes-Benz Limited
Warranty.
Tachometer
The red marking on the tachometer
(Y page 28) denotes excessive engine speed.
! Avoid driving at excessive engine speeds,
as it may result in serious engine damage
that is not covered by the Mercedes-Benz
Limited Warranty.
To help protect the engine, the fuel supply is
interrupted if the engine is operated within
the red marking.
Instrument cluster117Controls in detail204_AKB; 5; 23, en-USd2ureepe,Version: 2.11.8.12009-07-16T17:54:06+02:00 - Seite 117Z
Page 221 of 364

control, or simply for continued use as a
hand-held remote control to operate the
respective device in other situations.
Reprogramming a single signal
transmitter button
To program a device using a signal
transmitter button previously trained, follow
these steps:
XSwitch on the ignition.XPress and hold the desired signal
transmitter button ( ;, = or ?). Do not
release the button.
Indicator lamp : will begin to flash after
20 seconds.XWithout releasing the signal transmitter
button, proceed with programming starting
with step 3.
Operation of integrated remote control
XSwitch on the ignition.XSelect and press the appropriate
integrated signal transmitter button ( ;,
= or ?) to activate the remote controlled
device.
The integrated remote control transmitter
continues to send the signal as long as the
button is pressed – up to 20 seconds.
Erasing the integrated remote control
memory
i If you sell your vehicle, erase the codes of
all three channels.
XSwitch on the ignition.XSimultaneously press and hold outer signal
transmitter buttons ; and ?, for
approximately 20 seconds, until indicator
lamp : flashes rapidly. Do not hold for
longer than 30 seconds.
The codes of all three channels are erased.Programming tips
If you are having difficulty programming the
integrated remote control, here are some
helpful tips:
R Check the frequency of hand-held remote
control A (typically located on the reverse
side of the remote). The integrated remote
control is compatible with radio-frequency
devices operating between 280-390 MHz.
R Put a new battery in hand-held remote
control A. This will increase the likelihood
of the hand-held remote control sending a
stronger and more accurate signal to the
integrated remote control.
R While performing step 3, hold hand-held
remote control A at different lengths and
angles from the signal transmitter button
( ; , = or ?) you are programming.
Attempt varying angles at the distance of 2
to 12 inches (5 to 30 cm) away or the same
angle at varying distances.
R If another hand-held remote control is
available for the same device, try the
programming steps again using that other
hand-held remote control. Make sure new
batteries are in the hand-held remote
control before beginning the procedure.
R Straighten the antenna wire from the
garage door opener assembly. This may
help improve transmitting and/or receiving
signals.
i Certain types of garage door openers are
incompatible with the integrated remote
control. If you should experience further
difficulties with programming the
integrated remote control, contact an
authorized Mercedes-Benz Center, or call
the Mercedes-Benz Customer Assistance
Center (USA only) at
1-800-FOR-MERCedes (1-800-367-6372),
or the HomeLink ®
Hotline (USA only) at
1-800-355-3515, or the Customer Service
(Canada only) at 1-800-387-0100.
Useful features219Controls in detail204_AKB; 5; 23, en-USd2ureepe,Version: 2.11.8.12009-07-16T17:54:06+02:00 - Seite 219Z