2010 MERCEDES-BENZ C300 4MATIC reset
[x] Cancel search: resetPage 127 of 364
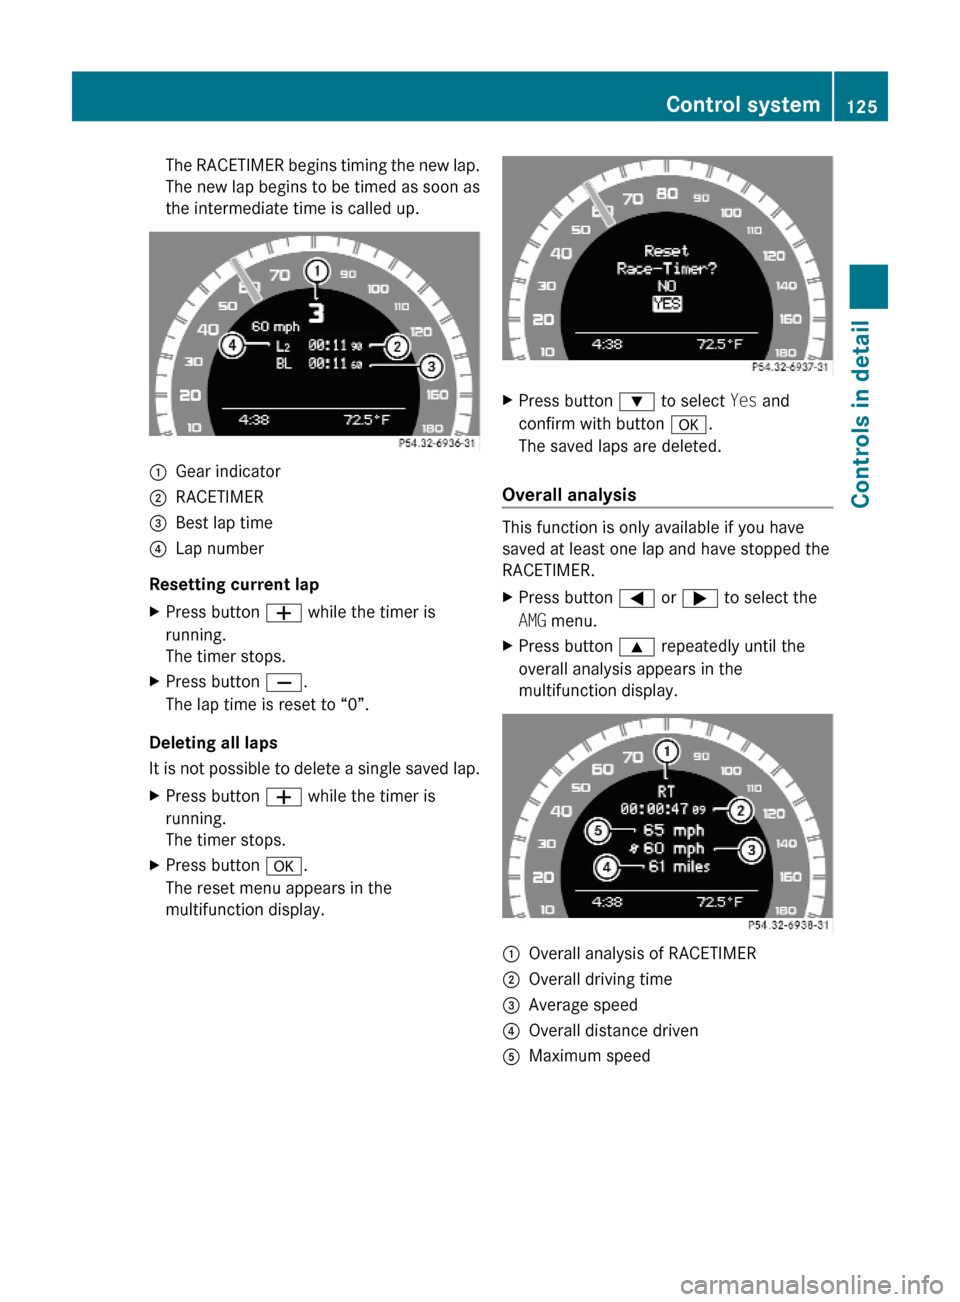
The RACETIMER begins timing the new lap.
The new lap begins to be timed as soon as
the intermediate time is called up.
:Gear indicator;RACETIMER=Best lap time?Lap number
Resetting current lap
XPress button W while the timer is
running.
The timer stops.
XPress button X.
The lap time is reset to “0”.
Deleting all laps
It is not possible to delete a single saved lap.
XPress button W while the timer is
running.
The timer stops.
XPress button a.
The reset menu appears in the
multifunction display.
XPress button : to select Yes and
confirm with button a.
The saved laps are deleted.
Overall analysis
This function is only available if you have
saved at least one lap and have stopped the
RACETIMER.
XPress button = or ; to select the
AMG menu.
XPress button 9 repeatedly until the
overall analysis appears in the
multifunction display.
:Overall analysis of RACETIMER;Overall driving time=Average speed?Overall distance drivenAMaximum speedControl system125Controls in detail204_AKB; 5; 23, en-USd2ureepe,Version: 2.11.8.12009-07-16T17:54:06+02:00 - Seite 125Z
Page 132 of 364
operation of certain systems. They do not
replace the owner’s and/or driver’s
responsibility to maintain the vehicle’s
operating safety. Have all required
maintenance and safety checks performed on
the vehicle. Bring the vehicle to an authorized
Mercedes-Benz Center to address the
malfunction and warning messages.
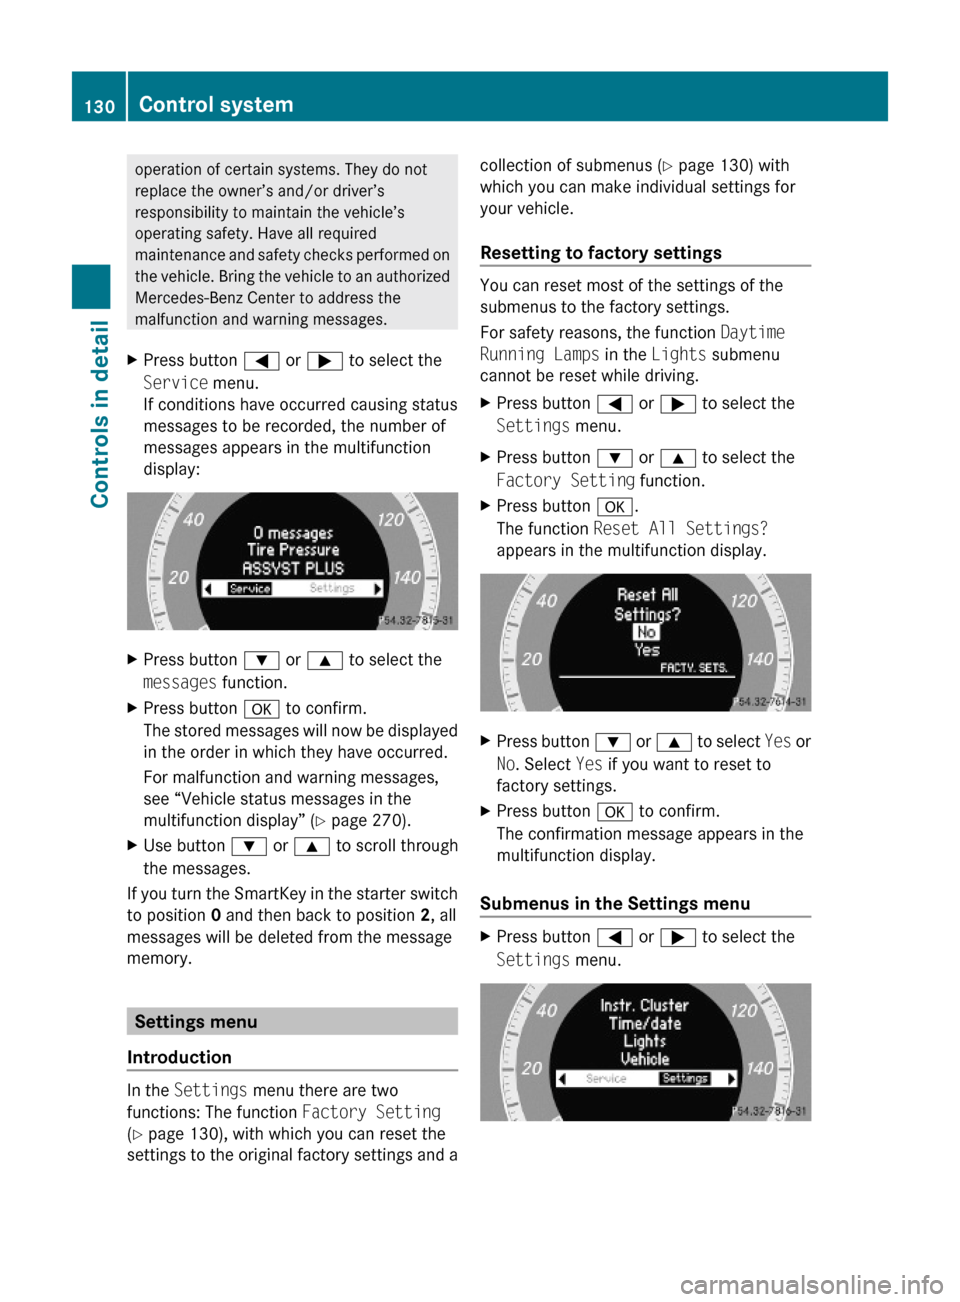
XPress button = or ; to select the
Service menu.
If conditions have occurred causing status
messages to be recorded, the number of
messages appears in the multifunction
display:
XPress button : or 9 to select the
messages function.
XPress button a to confirm.
The stored messages will now be displayed
in the order in which they have occurred.
For malfunction and warning messages,
see “Vehicle status messages in the
multifunction display” (Y page 270).
XUse button : or 9 to scroll through
the messages.
If you turn the SmartKey in the starter switch
to position 0 and then back to position 2, all
messages will be deleted from the message
memory.
Settings menu
Introduction
In the Settings menu there are two
functions: The function Factory Setting
(Y page 130), with which you can reset the
settings to the original factory settings and a
collection of submenus (Y page 130) with
which you can make individual settings for
your vehicle.
Resetting to factory settings
You can reset most of the settings of the
submenus to the factory settings.
For safety reasons, the function Daytime
Running Lamps in the Lights submenu
cannot be reset while driving.
XPress button = or ; to select the
Settings menu.
XPress button : or 9 to select the
Factory Setting function.
XPress button a.
The function Reset All Settings?
appears in the multifunction display.
XPress button : or 9 to select Yes or
No. Select Yes if you want to reset to
factory settings.
XPress button a to confirm.
The confirmation message appears in the
multifunction display.
Submenus in the Settings menu
XPress button = or ; to select the
Settings menu.
130Control systemControls in detail
204_AKB; 5; 23, en-USd2ureepe,Version: 2.11.8.12009-07-16T17:54:06+02:00 - Seite 130
Page 136 of 364
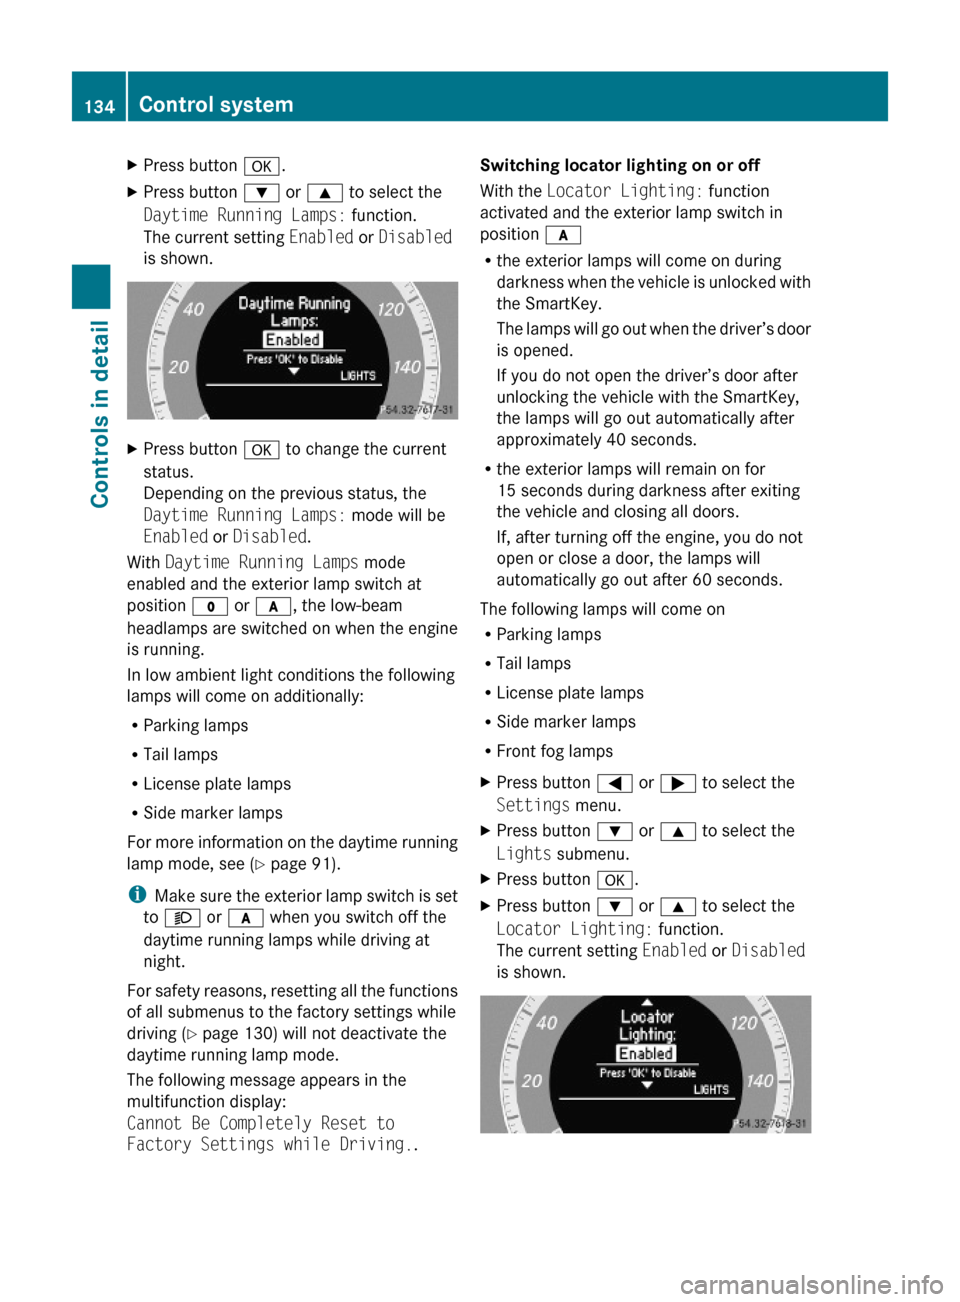
XPress button a.XPress button : or 9 to select the
Daytime Running Lamps: function.
The current setting Enabled or Disabled
is shown.
XPress button a to change the current
status.
Depending on the previous status, the
Daytime Running Lamps: mode will be
Enabled or Disabled.
With Daytime Running Lamps mode
enabled and the exterior lamp switch at
position $ or c, the low-beam
headlamps are switched on when the engine
is running.
In low ambient light conditions the following
lamps will come on additionally:
RParking lamps
RTail lamps
RLicense plate lamps
RSide marker lamps
For more information on the daytime running
lamp mode, see (Y page 91).
iMake sure the exterior lamp switch is set
to M or c when you switch off the
daytime running lamps while driving at
night.
For safety reasons, resetting all the functions
of all submenus to the factory settings while
driving (Y page 130) will not deactivate the
daytime running lamp mode.
The following message appears in the
multifunction display:
Cannot Be Completely Reset to
Factory Settings while Driving..
Switching locator lighting on or off
With the Locator Lighting: function
activated and the exterior lamp switch in
position c
Rthe exterior lamps will come on during
darkness when the vehicle is unlocked with
the SmartKey.
The lamps will go out when the driver’s door
is opened.
If you do not open the driver’s door after
unlocking the vehicle with the SmartKey,
the lamps will go out automatically after
approximately 40 seconds.
Rthe exterior lamps will remain on for
15 seconds during darkness after exiting
the vehicle and closing all doors.
If, after turning off the engine, you do not
open or close a door, the lamps will
automatically go out after 60 seconds.
The following lamps will come on
RParking lamps
RTail lamps
RLicense plate lamps
RSide marker lamps
RFront fog lamps
XPress button = or ; to select the
Settings menu.
XPress button : or 9 to select the
Lights submenu.
XPress button a.XPress button : or 9 to select the
Locator Lighting: function.
The current setting Enabled or Disabled
is shown.
134Control systemControls in detail
204_AKB; 5; 23, en-USd2ureepe,Version: 2.11.8.12009-07-16T17:54:06+02:00 - Seite 134
Page 144 of 364

Clear button XDeleting an individual digit: Briefly press
button 2.
XDeleting an entire entry: Press and hold
button 2 until the entry is deleted.
Menu
The table below shows the structure of the
modes and their menus. Each mode has a
basic menu. Each menu item in turn has
several submenu items.
ButtonMode/Menu$Radio modeRadio (FM/AM) (Y page 148)Weather Band (Y page 149)Satellite radio (Y page 152)Presets (Y page 151)Sound (Y page 145)hDisc modeCD/MP3 (Y page 158)Track list/folder list
(Y page 165)
CD Changer (Y page 162)Sound (Y page 145)%Telephone modeButtonMode/MenuTelephone (Y page 167)Name (Y page 174)Call lists (Y page 176)iSystem settings menuSystem (Y page 147)Language (Y page 148)
Calling up an operating mode
XPress the respective button ($, h,
%, or i) on the audio control unit.
The basic menu of the selected mode
appears in the audio display. The main area
is active. The active area is highlighted.
iThe following screens show the audio
display’s day design. The appearance of the
highlighted items in the menu will vary
depending on the display design.
Illustration: Radio function basic menu
XMoving to the menu bar: Slide VÆ.
Horizontal menus
142Audio systemControls in detail
204_AKB; 5; 23, en-USd2ureepe,Version: 2.11.8.12009-07-16T17:54:06+02:00 - Seite 142
Page 149 of 364

deviate from conventional stereo
playback.
SYS menu
System settings menu overview
MenuSystemDisplay (Y page 147)BrightnessDay ModeNight ModeAutomaticActivate Bluetooth®
(Y page 147)
Reset (Y page 147)Language (Y page 148)
Display settings
You can adapt the brightness of the audio
display to the prevailing light conditions.
Setting the display design
Xi Q System Q Display.XSelect Brightness, Day Mode, Night
Mode or Automatic.
iWhen you select Brightness, a scale
appears on which you can set the
brightness manually.
In the Automatic setting, the audio system
analyzes the automatic vehicle light sensor
and switches between the display designs
automatically.
Bluetooth® settings
General information about Bluetooth®
Bluetooth® technology is the standard for
short-range wireless technologies, suitable
for transmitting voice and data. It is possible
to connect Bluetooth® devices wirelessly.
Bluetooth® can be used to exchange vCards
or to make calls using a hands-free device.
Bluetooth® technology uses the freely
available ISM (Industrial Scientific Medical)
wave band that works at 2.45 GHz.
Bluetooth® works within a range of up to 33 ft
(10 m).
Activate or deactivate Bluetooth®
Xi Q System Q Activate
Bluetooth.
You have activated or deactivated
Bluetooth®. A checkmark O appears when
Bluetooth® is activated.
Reset
iYou can reset the audio system back to
its factory settings. In this case, all personal
data (e.g. address book entries, call lists,
paired mobile phones, and presets) are
deleted. We recommend that you reset the
values before selling your vehicle.
Audio system147Controls in detail204_AKB; 5; 23, en-USd2ureepe,Version: 2.11.8.12009-07-16T17:54:06+02:00 - Seite 147Z
Page 150 of 364

Xi Q System Q Reset.
A prompt appears asking whether you
really want to reset.
XSelect Yes or No.
If you select Yes another prompt will
appear asking whether you really want to
reset.
XSelect Yes or No.
If you select Yes, the audio system will be
reset and restarted.
Setting the system language
Xi Q Language.
The language list appears. A dot # in front
of an entry indicates the current setting.
XChanging setting: Slide ÆVZ or rotate
cVd and select desired language.
XSaving setting: Press W.
The setting is stored and the menu is
exited.
XExiting menu without saving: Press
button k or slide XVY.
iThe language selected in the Audio
system is also used for the displays and
messages in the multifunction display.
Radio operation
GWarning!
Please devote your attention first and
foremost to the traffic situation you are in.
Before your journey, please familiarize
yourself with the radio functions.
Only use the audio system when road and
traffic conditions permit you to do so.
Otherwise you could be involved in an
accident in which you or others could be
injured.
! Do not attach metallic window tinting film
to the inside or outside of windows which
are fitted with an aerial. Obstructing the
metallic aerial structure on the window will
interfere with radio reception. Cutting the
film on the window can permanently
damage the aerial wires.
iThe radio mode is interrupted by an
incoming call on the mobile phone
(Y page 167).
Menu overview
iThe components and operating principles
of the audio system can be found on
(Y page 137) and (Y page 143). Information
about sound settings can be found on
(Y page 145).
MenuFunctionRadio
(except Weather
Band/satellite
radio)
Enter frequencyStation information
(in FM wave band
only)
Presets
(except Weather
Band)
Autostore (except
satellite radio)
List of stored
stations
InfoInformation menu (if
available)
Channel
(only Weather Band)
List of channelsSoundTrebleBass148Audio systemControls in detail
204_AKB; 5; 23, en-USd2ureepe,Version: 2.11.8.12009-07-16T17:54:06+02:00 - Seite 148
Page 152 of 364
Selecting a station/channel
The following functions are available:
RStation search function
RChannel list (Weather Band/satellite radio)
RStation memory (except Weather Band)
RManual frequency entry (except Weather
Band/satellite radio)
For using satellite radio see (Y page 152).
The station search proceeds in the following
frequency increments:
R200 kHz in FM range
R10 kHz in AM range
Tuning to a station/channel via station/
channel search function
iThe search function searches for the next
receivable station in the FM or AM wave
band. In Weather Band (WB) the search
function switches to the next channel in the
channel list. For tuning to a station/
channel you can also use the buttons on
the multifunction steering wheel, see
Audio menu (Y page 126).
XPress button $ on audio control unit
repeatedly until the FM/AM/WB wave
band is selected.
XSlide XVY or rotate cVd when the main
area in the basic menu is active.
Depending on the direction in which the
controller is being slid or rotated, the
system searches upward or downward and
stops at the next station/channel.
or
XPress button E or F on audio control
unit.
Depending on the pressed button, the
system searches downward or upward and
stops at the next station/channel.
Selecting a station using station memory
iThis function is not available for Weather
Band.
XPress button $ on audio control unit
repeatedly until desired wave band has
been selected.
XSelect Presets.
or
XPress W when the main area is selected.
The memory menu appears. The dot # in
front of a memory position indicates that
the currently selected station is saved
there.
XSelect a station in the memory menu by
rotating cVd or sliding ZVÆ and press
W.
or
XPress desired station button k to
x, with the keypad in audio control unit
briefly.
Tuning to a station by entering the
frequency manually
iThis function is not available for Weather
Band/satellite radio.
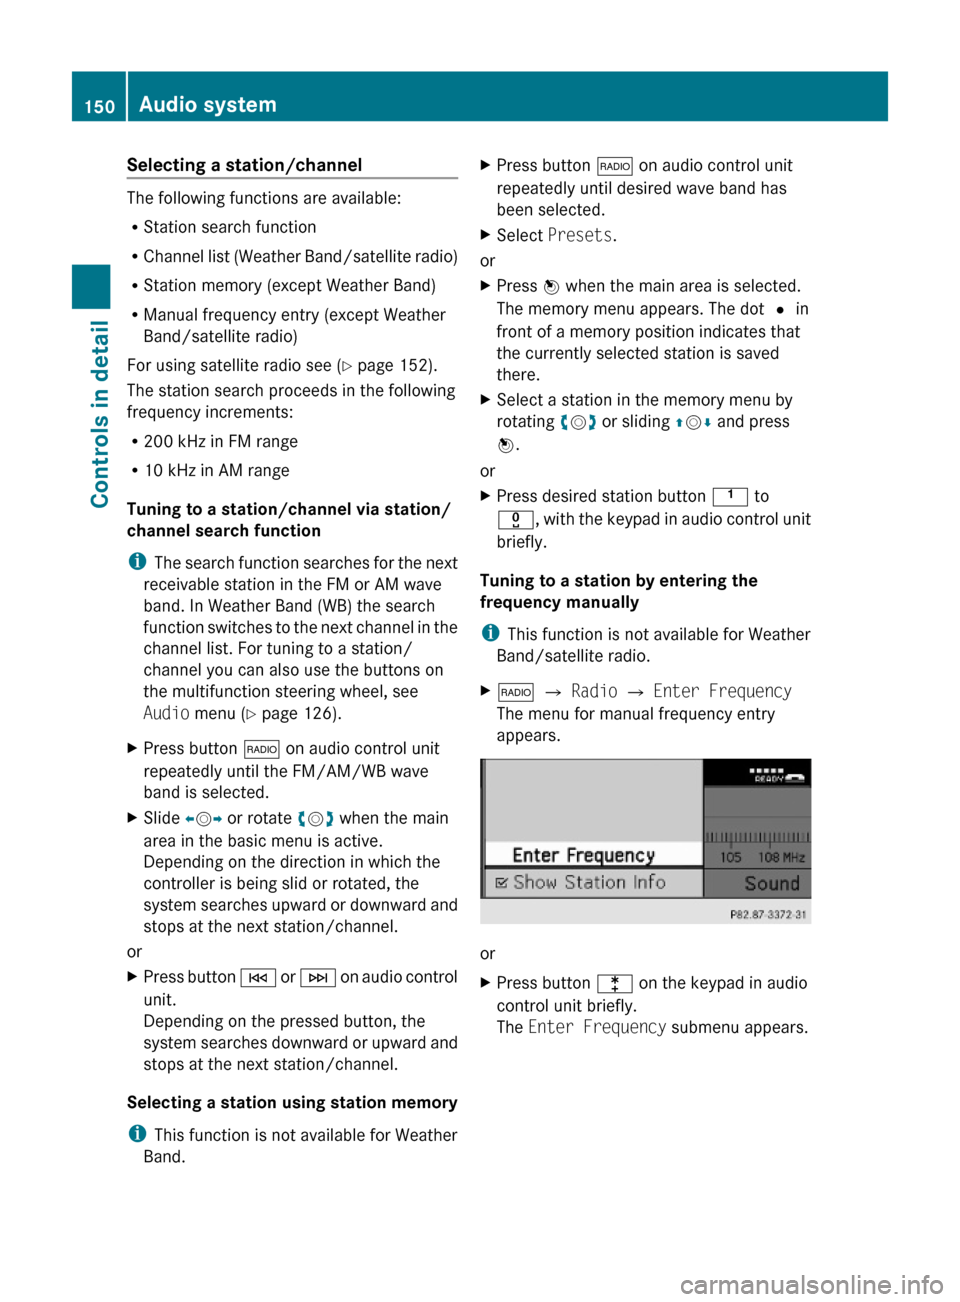
X$ Q Radio Q Enter Frequency
The menu for manual frequency entry
appears.
or
XPress button l on the keypad in audio
control unit briefly.
The Enter Frequency submenu appears.
150Audio systemControls in detail
204_AKB; 5; 23, en-USd2ureepe,Version: 2.11.8.12009-07-16T17:54:06+02:00 - Seite 150
Page 153 of 364
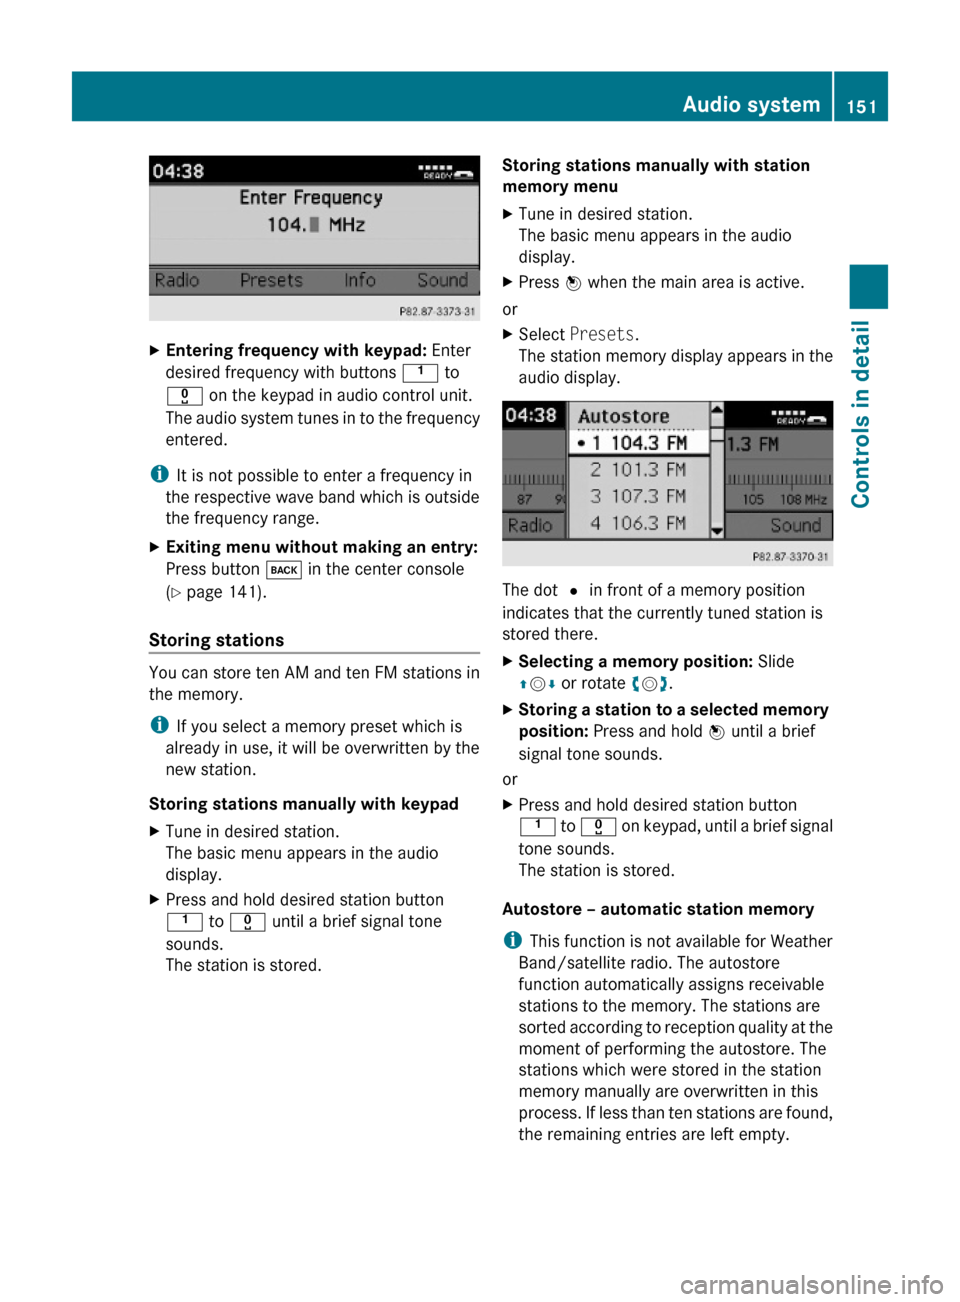
XEntering frequency with keypad: Enter
desired frequency with buttons k to
x on the keypad in audio control unit.
The audio system tunes in to the frequency
entered.
iIt is not possible to enter a frequency in
the respective wave band which is outside
the frequency range.
XExiting menu without making an entry:
Press button k in the center console
(Y page 141).
Storing stations
You can store ten AM and ten FM stations in
the memory.
iIf you select a memory preset which is
already in use, it will be overwritten by the
new station.
Storing stations manually with keypad
XTune in desired station.
The basic menu appears in the audio
display.
XPress and hold desired station button
k to x until a brief signal tone
sounds.
The station is stored.
Storing stations manually with station
memory menu
XTune in desired station.
The basic menu appears in the audio
display.
XPress W when the main area is active.
or
XSelect Presets.
The station memory display appears in the
audio display.
The dot # in front of a memory position
indicates that the currently tuned station is
stored there.
XSelecting a memory position: Slide
ZVÆ or rotate cVd.
XStoring a station to a selected memory
position: Press and hold W until a brief
signal tone sounds.
or
XPress and hold desired station button
k to x on keypad, until a brief signal
tone sounds.
The station is stored.
Autostore – automatic station memory
iThis function is not available for Weather
Band/satellite radio. The autostore
function automatically assigns receivable
stations to the memory. The stations are
sorted according to reception quality at the
moment of performing the autostore. The
stations which were stored in the station
memory manually are overwritten in this
process. If less than ten stations are found,
the remaining entries are left empty.
Audio system151Controls in detail204_AKB; 5; 23, en-USd2ureepe,Version: 2.11.8.12009-07-16T17:54:06+02:00 - Seite 151Z