2010 MERCEDES-BENZ C300 4MATIC fuel
[x] Cancel search: fuelPage 19 of 364

Tire inflation pressure
Checking ........................................ 232
Important notes on ........................231
Label on the inside of fuel filler
flap ................................................ 231
Placard on driver’s door B-pillar .....238
Tire labeling ....................................... 246
Tire load rating .................................. 251
Tire ply composition and material
used .................................................... 252
Tire pressure loss warning system . 233
Tires ........................................... 229, 344
Advanced Tire Pressure
Monitoring System (Advanced
TPMS) ............................................ 234
Air pressure ................................... 230
Care and maintenance ...................243
Cleaning ......................................... 244
Direction of rotation, spinning .......242
Important notes on tire inflation
pressure ........................................ 231
Inflation pressure ........................... 232
Information placard .......................238
Inspection ...................................... 243
Labeling ......................................... 246
Load index ............................. 246, 251
Load rating .................................... 251
Messages in the multifunction
display ................................... 276, 296
Ply composition and material
used ............................................... 252
Problems under-/overinflation ......232
Retreads ........................................ 229
Rims and tires (technical data) ......344
Rotation ......................................... 245
Service life ..................................... 243
Sizes .............................................. 344
Snow chains .................................. 253
Speed rating .......................... 247, 252
Storing ........................................... 244
Temperature .......................... 231, 245
Terminology ................................... 250
Tire Identification Number .............252
Tire pressure loss warning system . 233
TPMS low tire pressure/
malfunction telltale ........................306
Traction ................................. 244, 252
Tread ............................................. 252Tread depth ........................... 243, 252
Treadwear ...................................... 244
Treadwear indicators .............243, 252
Vehicle maximum load on ..............252
Wear pattern .................................. 245
Winter tires ............................ 252, 344
Tire speed rating ....................... 247, 252
Top tether see Children in the vehicle
Total load limit ................................... 252
Towing
Towing eye bolt .............................. 326
Vehicle ........................................... 325
Towing eye bolt ................................. 326
Traction ...................................... 244, 252
Transfer case ..................................... 116
Transmission see Automatic transmission or
Manual transmission
Transmission fluid level .................... 227
Transmission gear selector lever see Gear selector lever
Transmission positions .................... 109
Traveling abroad ............................... 257
Tread (tires) ....................................... 252
Tread depth (tires) .................... 243, 252
Treadwear .......................................... 244
Treadwear indicators (tires) .... 243, 252
Trip menu ........................................... 121
Trunk
Closing ............................................. 76
Fuse box ........................................ 329
Messages in the multifunction
display ........................................... 286
Opening ........................................... 75
Tie-down rings ............................... 203
Trunk lid emergency release ............76
Unlocking manually .......................309
Valet locking .................................... 77
Turning off the engine ...................... 106
Turn signals ......................................... 93
Cleaning lenses ............................. 263
Indicator lamps ................................ 28
Messages in the multifunction
display ........................................... 296
Replacing bulbs ............................. 314Index17204_AKB; 5; 23, en-USd2ureepe,Version: 2.11.8.12009-07-16T17:54:06+02:00 - Seite 17
Page 24 of 364

contacting you in a timely manner should the
need arise.
If you sell your Mercedes, please leave all
literature with the vehicle to make it available
to the next operator.
If you bought this vehicle used, be sure to
send in the “Notice of Purchase of Used Car”
found in the Service and Warranty
Information Booklet, or call the Mercedes-
Benz Customer Assistance Center (in the
USA) at 1-800-FOR-MERCedes
(1-800-367-6372), or Customer Service (in
Canada) at 1-800-387-0100.
Operating your vehicle outside the
USA or Canada
If you plan to operate your vehicle in foreign
countries, please be aware that:
R Service facilities or replacement parts may
not be readily available.
R Unleaded gasoline for vehicles with
catalytic converters may not be available;
the use of leaded fuels will damage the
catalysts.
R Gasoline may have a considerably lower
octane rating, and improper fuel can cause
engine damage.
Certain Mercedes-Benz models are available
for delivery in Europe under our European
Delivery Program. For details, consult an
authorized Mercedes-Benz Center or write to:
In the USA:
Mercedes-Benz USA, LLC
European Delivery Department
One Mercedes Drive
Montvale, NJ 07645-0350
In Canada:
Mercedes-Benz Canada, Inc.
European Delivery Department
98 Vanderhoof Avenue
Toronto, Ontario M4G 4C9
Operating safetyGWarning!
Work improperly carried out on electronic
components and associated software could
cause them to cease functioning. Because the
vehicle’s electronic components are
interconnected, any modifications made may
produce an undesired effect on other
systems. Electronic malfunctions could
seriously impair the operating safety of your
vehicle.
Contact an authorized Mercedes-Benz Center
for repairs or modifications to electronic
components.
Other improper work or modifications on the
vehicle could also have a negative impact on
the operating safety of the vehicle.
Some safety systems only function while the
engine is running. You should therefore never
turn off the engine while driving.
GWarning!
Heavy blows against the vehicle underbody or
tires/wheels may cause serious damage and
impair the operating safety of your vehicle.
Such blows can be caused, for example, by
running over an obstacle, road debris or a
pothole. If you feel a sudden significant
vibration or ride disturbance, or you suspect
that damage to your vehicle as occurred:
R turn on your hazard warning flashers
R slow down carefully
R drive with caution to an area which is a safe
distance from the road
Inspect the vehicle underbody and tires/
wheels for possible damage. If the vehicle
appears unsafe, have it towed to the nearest
authorized Mercedes-Benz Center or other
qualified maintenance or repair facility for
further inspection or repairs.
22Introduction204_AKB; 5; 23, en-USd2ureepe,Version: 2.11.8.12009-07-16T17:54:06+02:00 - Seite 22
Page 28 of 364
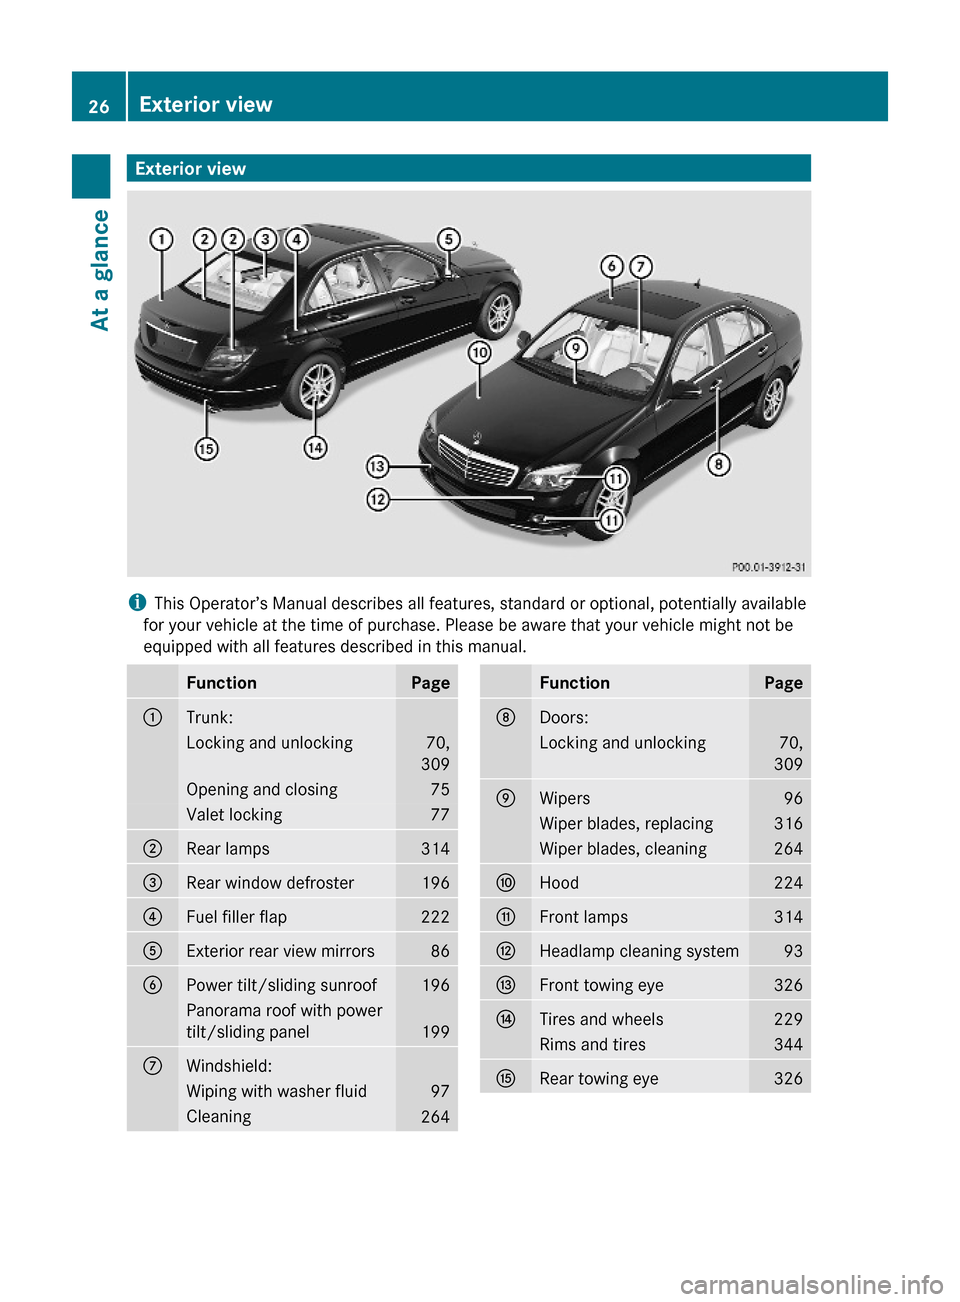
Exterior view
iThis Operator’s Manual describes all features, standard or optional, potentially available
for your vehicle at the time of purchase. Please be aware that your vehicle might not be
equipped with all features described in this manual.
FunctionPage:Trunk:Locking and unlocking70,
309
Opening and closing75Valet locking77;Rear lamps314=Rear window defroster196?Fuel filler flap222AExterior rear view mirrors86BPower tilt/sliding sunroof196Panorama roof with power
tilt/sliding panel199
CWindshield:Wiping with washer fluid97Cleaning264FunctionPageDDoors:Locking and unlocking70,
309
EWipers96Wiper blades, replacing316Wiper blades, cleaning264FHood224GFront lamps314HHeadlamp cleaning system93IFront towing eye326JTires and wheels229Rims and tires344KRear towing eye32626Exterior viewAt a glance
204_AKB; 5; 23, en-USd2ureepe,Version: 2.11.8.12009-07-16T17:54:06+02:00 - Seite 26
Page 30 of 364

Instrument clusterFunctionPage:Combination gauge with: Fuel gauge1188 Fuel tank reserve
warning lamp 304
Coolant temperature gauge117? Coolant temperature
warning lamp 305
Indicator/warning lamps:K High-beam headlamp
indicator lamp 93
L Low-beam headlamp
indicator lamp 91
; Engine malfunction
indicator lamp 305
$ Brake warning lamp,
USA only 300
J Brake warning lamp,
Canada only300
;# Left turn signal
indicator lamp 93
FunctionPage=d ESP® warning lamp 62,
302
?Speedometer AMultifunction display120B! Right turn signal
indicator lamp93
CTachometer with: N Front fog lamps
indicator lamp 92
R Rear fog lamp
indicator lamp 92
å ESP OFF warning
lamp, C 63 AMG only
64,
302
h Combination low tire
pressure/TPMS
malfunction telltale, USA
only
234,
306
6 Supplemental
Restraint System (SRS)
indicator lamp
36,
302
28Instrument clusterAt a glance
204_AKB; 5; 23, en-USd2ureepe,Version: 2.11.8.12009-07-16T17:54:06+02:00 - Seite 28
Page 72 of 364
Vehicle equipment
iThis Operator’s Manual describes all
features, standard or optional, potentially
available for your vehicle at the time of
purchase. Please be aware that your
vehicle might not be equipped with all
features described in this manual.
Locking and unlocking
Notes
GObserve Safety notes, see page 54.
When unlocking or locking the vehicle with
the SmartKey an acoustic signal sounds. The
acoustic signal is activated at the factory. If
you wish to deactivate the feature, or adjust
its signal volume, contact an authorized
Mercedes-Benz Center.
When unlocking the vehicle, all turn signal
lamps flash once. An acoustic signal sounds
once, and the locking knobs in the doors
move up. The anti-theft alarm system is
disarmed.
When locking the vehicle, all turn signal lamps
flash three times. An acoustic signal sounds
three times, and the locking knobs in the
doors move down. The anti-theft alarm
system is armed.
All doors and the trunk must be closed.
If you cannot lock or unlock the vehicle with
the SmartKey, the batteries in the SmartKey
are discharged, the SmartKey is
malfunctioning, or the vehicle battery is
drained.
XCheck the batteries in the SmartKey
(Y page 73) and replace them if
necessary.
XUse the mechanical key to unlock the
driver’s door and the trunk (Y page 309).
XUse the mechanical key to lock the vehicle
(Y page 310).
XHave the vehicle battery and the vehicle
battery connections checked at an
authorized Mercedes-Benz Center.
If the SmartKey is malfunctioning, contact
Roadside Assistance or an authorized
Mercedes-Benz Center.
SmartKey
Your vehicle comes supplied with two
SmartKeys, each with remote control and a
removable mechanical key.
The SmartKey centrally locks and unlocks
Rthe doors
Rthe trunk lid
Rthe fuel filler flap
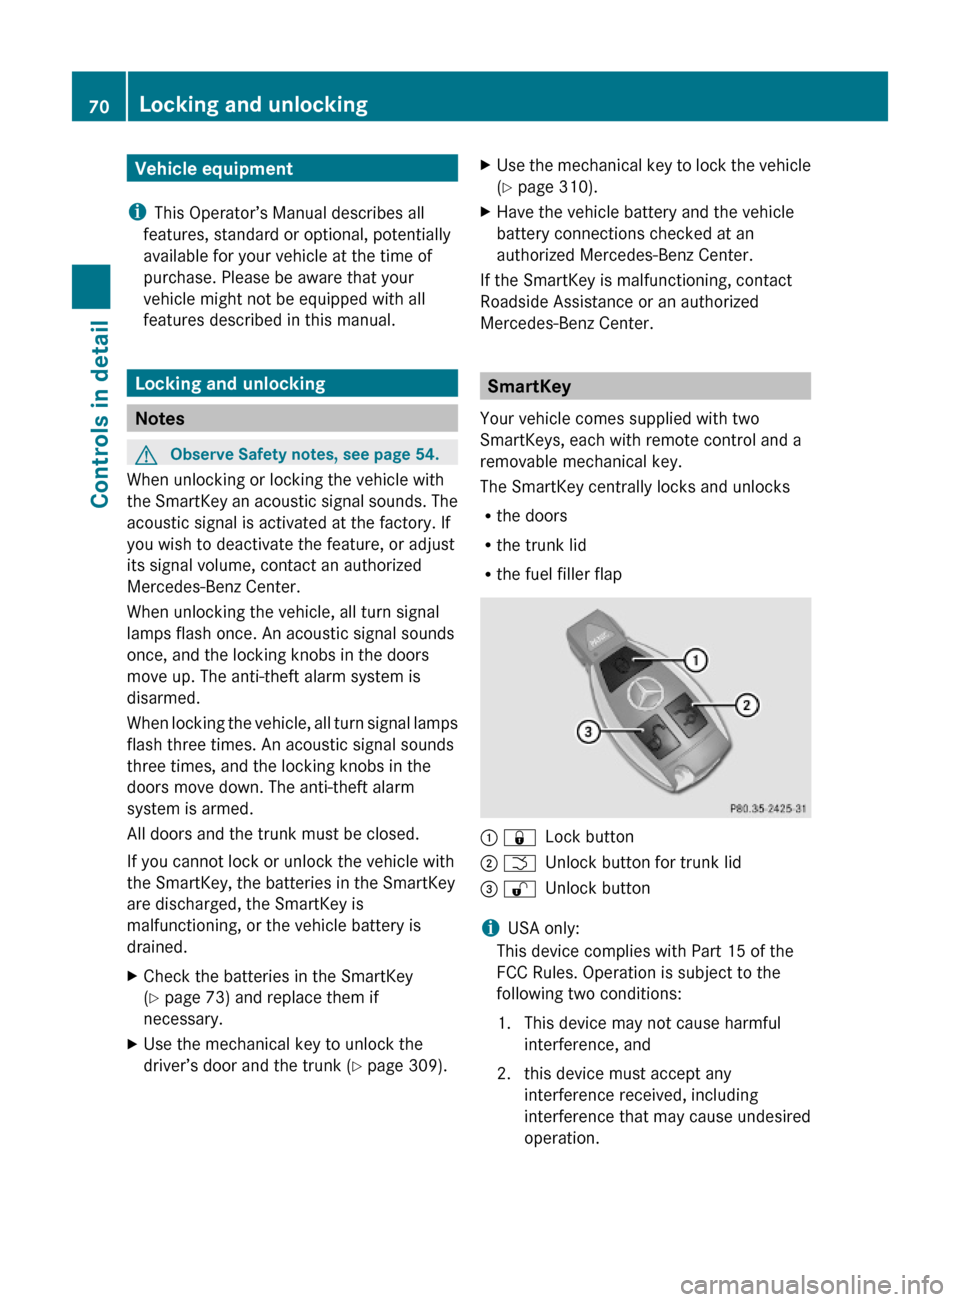
: &Lock button; FUnlock button for trunk lid= %Unlock button
iUSA only:
This device complies with Part 15 of the
FCC Rules. Operation is subject to the
following two conditions:
1. This device may not cause harmful
interference, and
2. this device must accept any
interference received, including
interference that may cause undesired
operation.
70Locking and unlockingControls in detail
204_AKB; 5; 23, en-USd2ureepe,Version: 2.11.8.12009-07-16T17:54:06+02:00 - Seite 70
Page 73 of 364
Any unauthorized modification to this
device could void the user’s authority to
operate the equipment.
i Canada only:
This device complies with RSS-210 of
Industry Canada. Operation is subject to
the following two conditions:
1. This device may not cause interference,
and
2. this device must accept any interference received, including
interference that may cause undesired
operation of the device.
Any unauthorized modification to this
device could void the user’s authority to
operate the equipment.
Factory setting XGlobal unlocking: Press button %.
Unless you open a door or the trunk within
approximately 40 seconds after unlocking
the vehicle:
R The vehicle will be locked again.
R The anti-theft alarm system will be
rearmed.
XGlobal locking: Press button &.
Selective setting
If you frequently travel alone, you may wish
to reprogramm the SmartKey. Pressing
button % will then only unlock the driver’s
door and the fuel filler flap.
XSwitching on/off: Press and hold buttons
% and & simultaneously for
approximately 6 seconds until the battery
check lamp ( Y page 73) flashes twice.
The SmartKey will then function as follows:
XUnlocking driver’s door and fuel filler
flap: Press button % once.XGlobal unlocking: Press button %
twice.XGlobal locking: Press button &.
KEYLESS-GO
Vehicles equipped with KEYLESS-GO come
with two SmartKeys with KEYLESS-GO, each
with remote control and a removable
mechanical key.
The KEYLESS-GO function is integrated into
the SmartKey. The validity of the SmartKey is
checked every time you grasp an outside door
handle.
When the SmartKey is valid, your vehicle
unlocks
R the doors
R the trunk lid
R the fuel filler flap
i USA only:
This device complies with Part 15 of the
FCC Rules. Operation is subject to the
following two conditions:
1. This device may not cause harmful interference, and
2. this device must accept any interference received, including
interference that may cause undesired
operation.
Any unauthorized modification to this
device could void the user’s authority to
operate the equipment.
Locking and unlocking71Controls in detail204_AKB; 5; 23, en-USd2ureepe,Version: 2.11.8.12009-07-16T17:54:06+02:00 - Seite 71Z
Page 75 of 364
Possibility 2 (One SmartKey in the vehicle,
no SmartKey outside the vehicle):
When exiting and trying to lock the vehicle,
the message Key Detected in Vehicle
appears in the multifunction display. The
vehicle will not be locked.
Factory setting
XGlobal unlocking: Grasp an outside door
handle.
Unless you open a door or the trunk within
approximately 40 seconds after unlocking
the vehicle:
RThe vehicle will be locked again.
RThe anti-theft alarm system will be
rearmed.
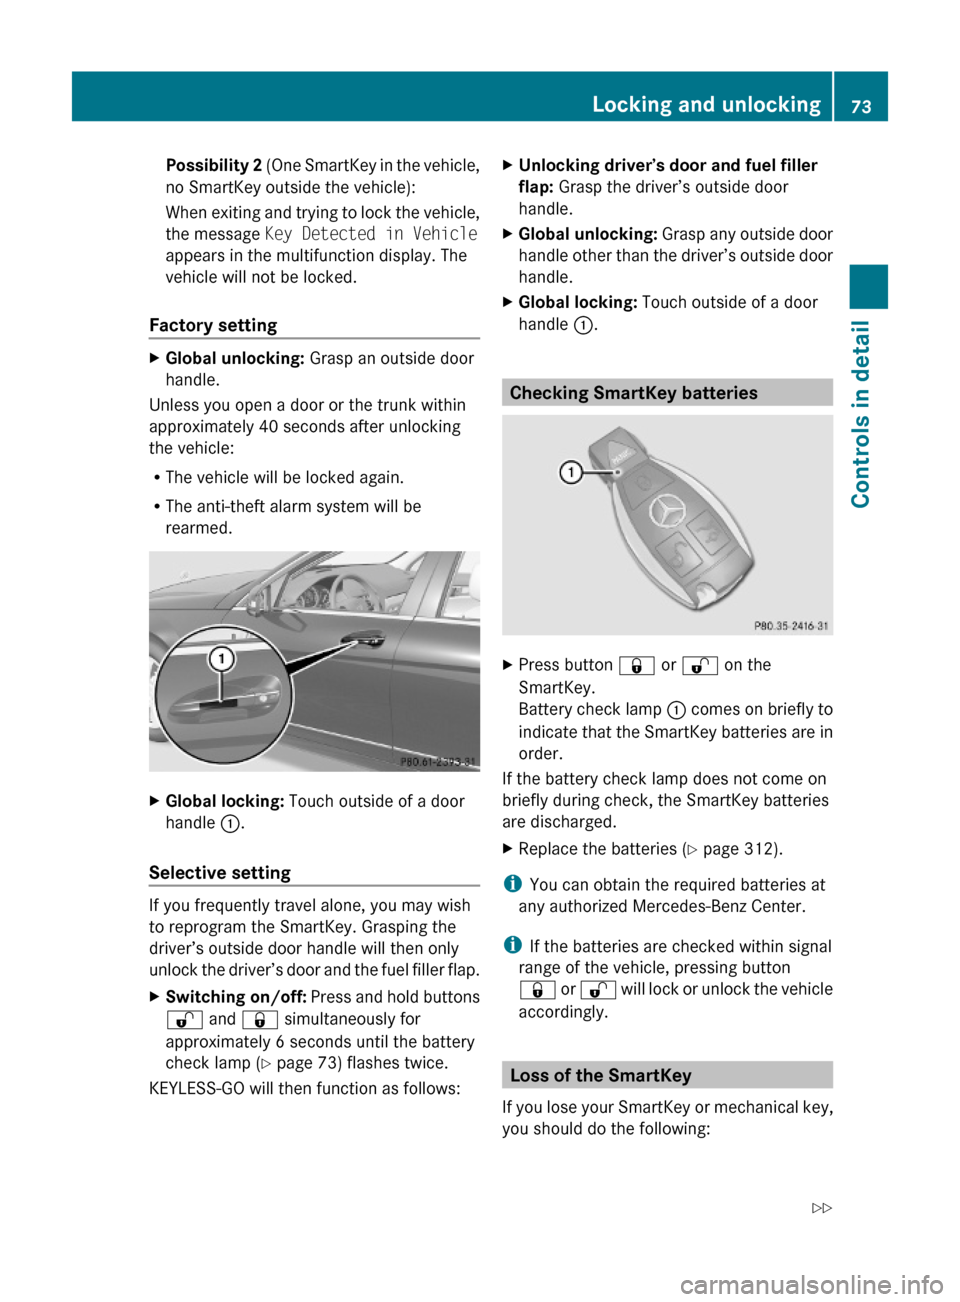
XGlobal locking: Touch outside of a door
handle :.
Selective setting
If you frequently travel alone, you may wish
to reprogram the SmartKey. Grasping the
driver’s outside door handle will then only
unlock the driver’s door and the fuel filler flap.
XSwitching on/off: Press and hold buttons
% and & simultaneously for
approximately 6 seconds until the battery
check lamp (Y page 73) flashes twice.
KEYLESS-GO will then function as follows:
XUnlocking driver’s door and fuel filler
flap: Grasp the driver’s outside door
handle.
XGlobal unlocking: Grasp any outside door
handle other than the driver’s outside door
handle.
XGlobal locking: Touch outside of a door
handle :.
Checking SmartKey batteries
XPress button & or % on the
SmartKey.
Battery check lamp : comes on briefly to
indicate that the SmartKey batteries are in
order.
If the battery check lamp does not come on
briefly during check, the SmartKey batteries
are discharged.
XReplace the batteries (Y page 312).
iYou can obtain the required batteries at
any authorized Mercedes-Benz Center.
iIf the batteries are checked within signal
range of the vehicle, pressing button
& or % will lock or unlock the vehicle
accordingly.
Loss of the SmartKey
If you lose your SmartKey or mechanical key,
you should do the following:
Locking and unlocking73Controls in detail204_AKB; 5; 23, en-USd2ureepe,Version: 2.11.8.12009-07-16T17:54:06+02:00 - Seite 73Z
Page 77 of 364
turning at a vehicle speed of above 9 mph
(15 km/h). You could therefore lock yourself
out when the vehicle is pushed or towed or is
on a test stand.
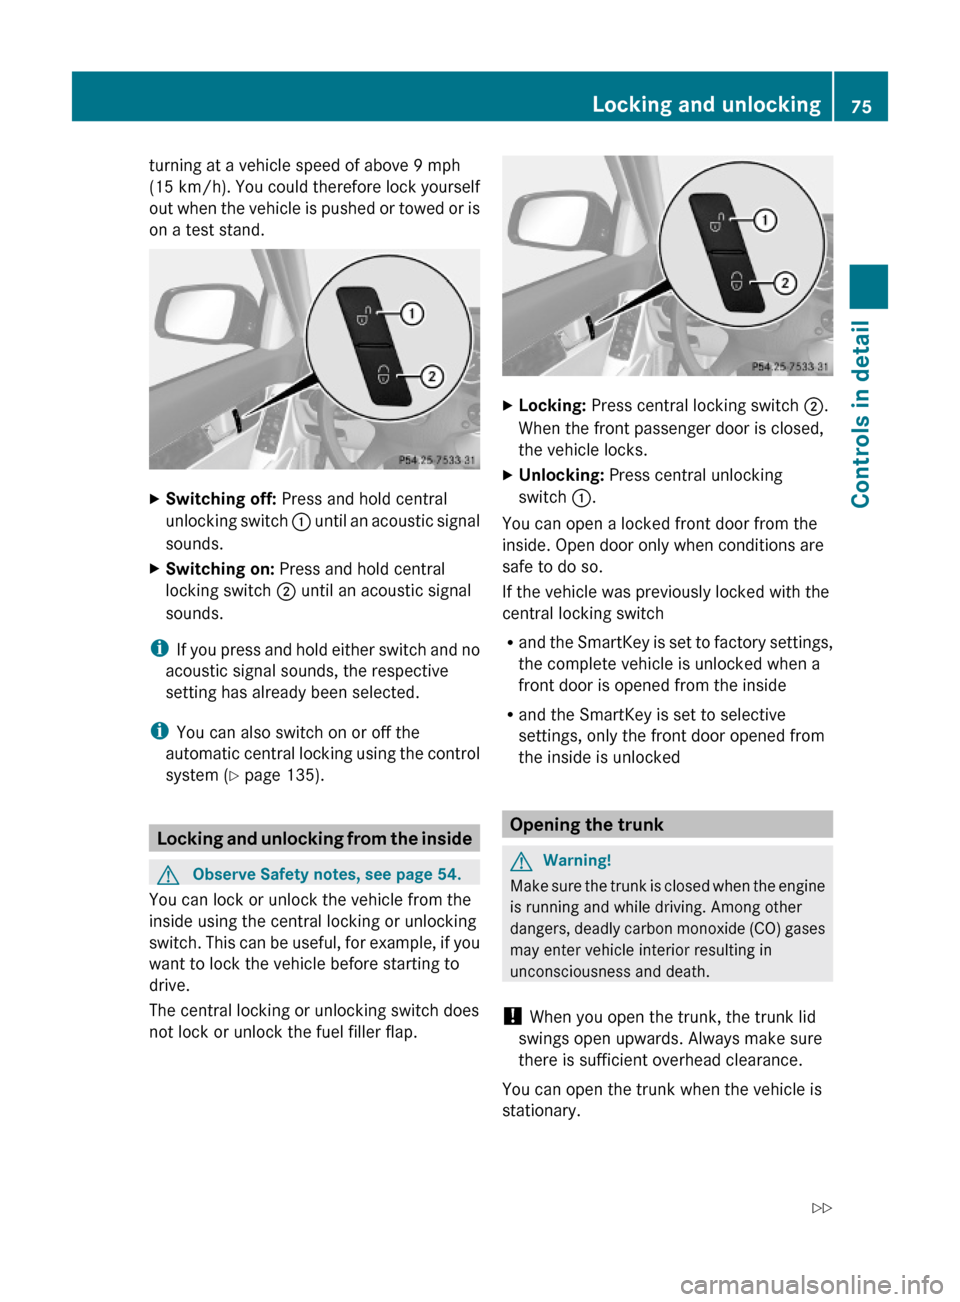
XSwitching off: Press and hold central
unlocking switch : until an acoustic signal
sounds.
XSwitching on: Press and hold central
locking switch ; until an acoustic signal
sounds.
iIf you press and hold either switch and no
acoustic signal sounds, the respective
setting has already been selected.
iYou can also switch on or off the
automatic central locking using the control
system (Y page 135).
Locking and unlocking from the inside
GObserve Safety notes, see page 54.
You can lock or unlock the vehicle from the
inside using the central locking or unlocking
switch. This can be useful, for example, if you
want to lock the vehicle before starting to
drive.
The central locking or unlocking switch does
not lock or unlock the fuel filler flap.
XLocking: Press central locking switch ;.
When the front passenger door is closed,
the vehicle locks.
XUnlocking: Press central unlocking
switch :.
You can open a locked front door from the
inside. Open door only when conditions are
safe to do so.
If the vehicle was previously locked with the
central locking switch
Rand the SmartKey is set to factory settings,
the complete vehicle is unlocked when a
front door is opened from the inside
Rand the SmartKey is set to selective
settings, only the front door opened from
the inside is unlocked
Opening the trunk
GWarning!
Make sure the trunk is closed when the engine
is running and while driving. Among other
dangers, deadly carbon monoxide (CO) gases
may enter vehicle interior resulting in
unconsciousness and death.
! When you open the trunk, the trunk lid
swings open upwards. Always make sure
there is sufficient overhead clearance.
You can open the trunk when the vehicle is
stationary.
Locking and unlocking75Controls in detail204_AKB; 5; 23, en-USd2ureepe,Version: 2.11.8.12009-07-16T17:54:06+02:00 - Seite 75Z