2010 MERCEDES-BENZ C300 4MATIC Exterior Lamp
[x] Cancel search: Exterior LampPage 29 of 364

CockpitFunctionPage:Steering wheel gearshift
control112
;Cruise control lever180=Instrument cluster116?Multifunction steering
wheel118
AHorn BFront Parktronic warning
indicators, Canada only186
COverhead control panel32DGlove box205EGlove box lock206FCenter console31GStarter switch77KEYLESS-GO start/stop
button78
FunctionPageHSteering wheel release
handle (manual)85
ISteering wheel adjustment
stalk (electrical)85
JCombination switch:Turn signals93Wipers96High beam93KParking brake pedal105LParking brake release105MOn-board diagnostics
(OBD) socket
NHood lock release224OExterior lamp switch90PDoor control panel and seat
adjustment/memory33
Cockpit27At a glance204_AKB; 5; 23, en-USd2ureepe,Version: 2.11.8.12009-07-16T17:54:06+02:00 - Seite 27Z
Page 35 of 364
FunctionPageFHands-free microphone for
Tele Aid (emergency call
system), telephone and
Voice Control System4
GRoadside Assistance
button (Tele Aid system)214
HLeft reading lamp on/off95IFront interior lighting on/
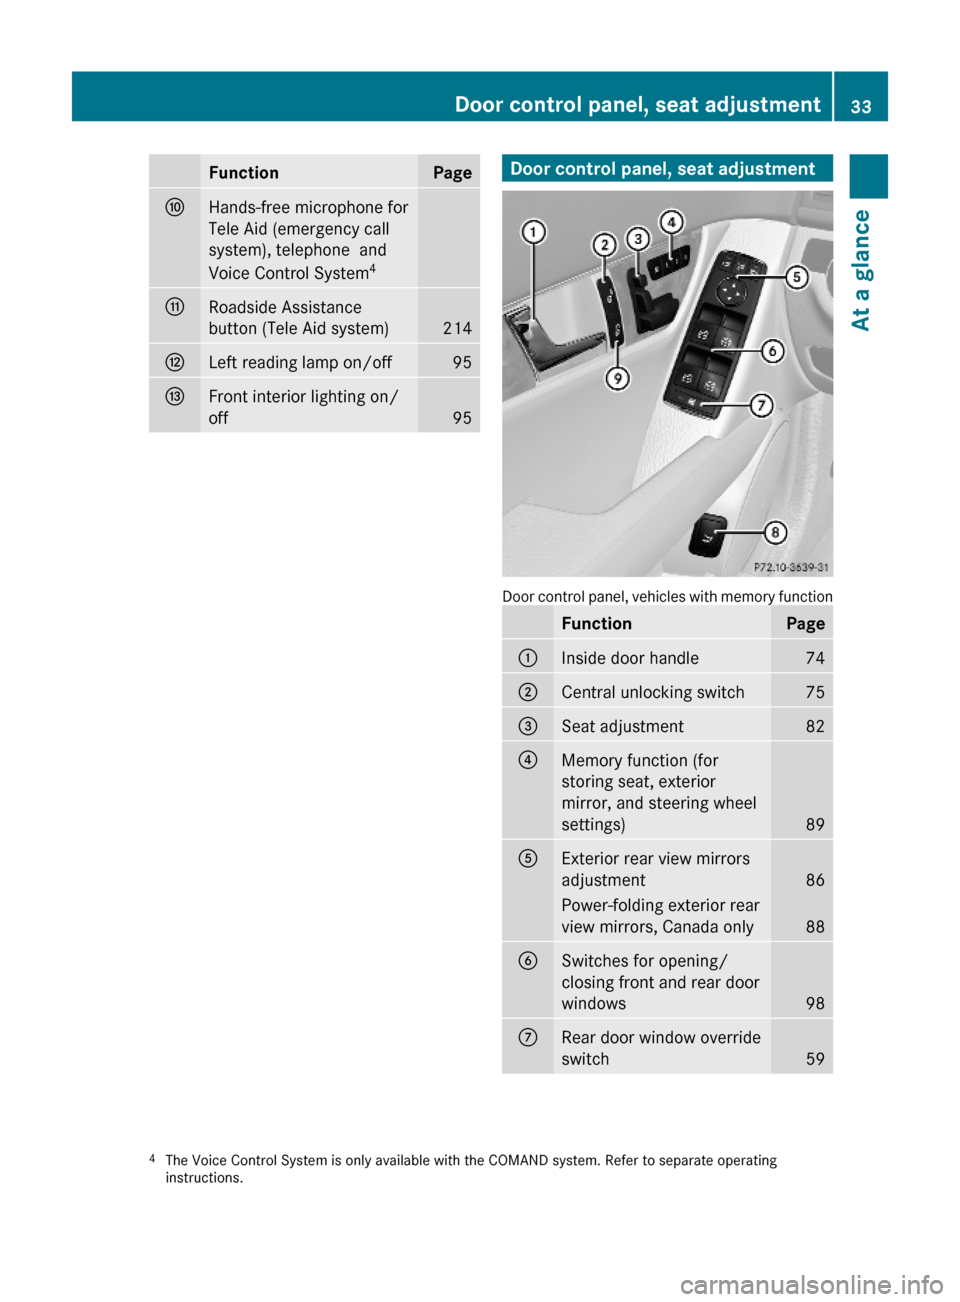
off95Door control panel, seat adjustment
Door control panel, vehicles with memory function
FunctionPage:Inside door handle 74;Central unlocking switch75=Seat adjustment82?Memory function (for
storing seat, exterior
mirror, and steering wheel
settings)89
AExterior rear view mirrors
adjustment86
Power-folding exterior rear
view mirrors, Canada only88
BSwitches for opening/
closing front and rear door
windows98
CRear door window override
switch594The Voice Control System is only available with the COMAND system. Refer to separate operatinginstructions.
Door control panel, seat adjustment33At a glance204_AKB; 5; 23, en-USd2ureepe,Version: 2.11.8.12009-07-16T17:54:06+02:00 - Seite 33Z
Page 62 of 364

Panic alarmXActivating: Press and hold !
button : for at least 1 second.
An audible alarm and flashing exterior
lamps will operate.
XDeactivating: Press ! button : again.
or
XInsert the SmartKey into the starter switch.
or
XPress the KEYLESS-GO start/stop button.
The SmartKey with KEYLESS-GO must be
inside the vehicle.
iUSA only:
This device complies with Part 15 of the
FCC Rules. Operation is subject to the
following two conditions:
1. This device may not cause harmful
interference, and
2. this device must accept any
interference received, including
interference that may cause undesired
operation.
Any unauthorized modification to this
device could void the user’s authority to
operate the equipment.
iCanada only:
This device complies with RSS-210 of
Industry Canada. Operation is subject to
the following two conditions:
1.This device may not cause interference,
and
2. this device must accept any
interference received, including
interference that may cause undesired
operation of the device.
Any unauthorized modification to this
device could void the user’s authority to
operate the equipment.
Driving safety systems
Introduction
This section contains information about the
following driving safety systems:
RABS (Antilock Brake System)
RAdaptive Brake
RBAS (Brake Assist System)
REBP (Electronic Brake Proportioning)
RESP® (Electronic Stability Program)
iIn winter operation, the maximum
effectiveness of most of the driving
systems described in this section is only
achieved with winter tires, or snow chains
as required.
Safety notes
GWarning!
The following factors increase the risk of
accidents:
RExcessive speed, especially in turns
RWet and slippery road surfaces
RFollowing another vehicle too closely
The driving safety systems described in this
section cannot reduce these risks or prevent
the natural laws of physics from acting on the
60Driving safety systemsSafety and security
204_AKB; 5; 23, en-USd2ureepe,Version: 2.11.8.12009-07-16T17:54:06+02:00 - Seite 60
Page 87 of 364
Make sure
Ryou can reach the steering wheel with your
arms slightly bent at the elbows
Ryou can move your legs freely
Rall displays (including malfunction and
indicator lamps) on the instrument cluster
are clearly visible
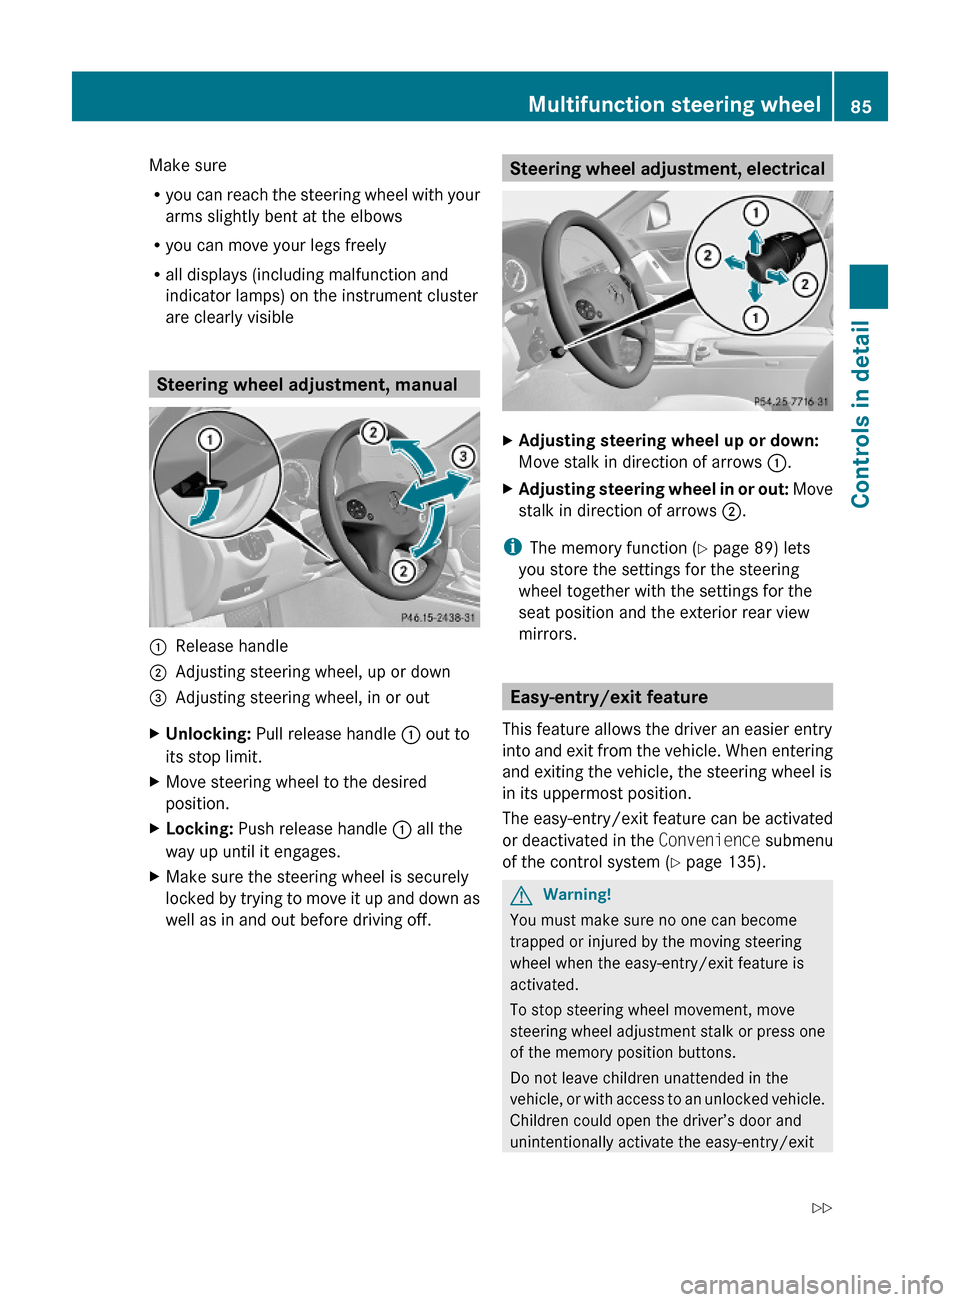
Steering wheel adjustment, manual
:Release handle;Adjusting steering wheel, up or down=Adjusting steering wheel, in or outXUnlocking: Pull release handle : out to
its stop limit.
XMove steering wheel to the desired
position.
XLocking: Push release handle : all the
way up until it engages.
XMake sure the steering wheel is securely
locked by trying to move it up and down as
well as in and out before driving off.
Steering wheel adjustment, electricalXAdjusting steering wheel up or down:
Move stalk in direction of arrows :.
XAdjusting steering wheel in or out: Move
stalk in direction of arrows ;.
iThe memory function (Y page 89) lets
you store the settings for the steering
wheel together with the settings for the
seat position and the exterior rear view
mirrors.
Easy-entry/exit feature
This feature allows the driver an easier entry
into and exit from the vehicle. When entering
and exiting the vehicle, the steering wheel is
in its uppermost position.
The easy-entry/exit feature can be activated
or deactivated in the Convenience submenu
of the control system (Y page 135).
GWarning!
You must make sure no one can become
trapped or injured by the moving steering
wheel when the easy-entry/exit feature is
activated.
To stop steering wheel movement, move
steering wheel adjustment stalk or press one
of the memory position buttons.
Do not leave children unattended in the
vehicle, or with access to an unlocked vehicle.
Children could open the driver’s door and
unintentionally activate the easy-entry/exit
Multifunction steering wheel85Controls in detail204_AKB; 5; 23, en-USd2ureepe,Version: 2.11.8.12009-07-16T17:54:06+02:00 - Seite 85Z
Page 89 of 364

XSwitch on the ignition.XPress button : for the driver’s side
exterior rear view mirror or button ; for
the passenger-side exterior rear view
mirror.
The indicator lamp in the respective button
comes on.
If you do not make adjustments to the
selected exterior rear view mirror within
15 seconds, the indicator lamp goes out.
You will then have to select the desired
exterior rear view mirror again before
adjustments can be made. Adjustments
can only be made with the indicator lamp
for the respective exterior rear view mirror
button illuminated.
XPress adjustment button = up, down, left
or right according to the desired setting.
! If an exterior rear view mirror was forcibly
hit from the front, manually snap it back
into place.
iAt low ambient temperatures, the exterior
rear view mirrors will be heated
automatically.
Auto-dimming rear view mirrors
The exterior rear view mirror on the driver’s
side and the interior rear view mirror will
respond automatically to glare when the
ignition is switched on and incoming light
from headlamps falls on the sensor in the
interior rear view mirror.
The rear view mirrors will not react if the
automatic transmission is set to reverse gear
R (manual transmission to reverse gear) or
the interior lighting is switched on.
GWarning!
The auto dimming function does not react if
incoming light is not aimed directly at sensors
in the interior rear view mirror.
The interior rear view mirror and the exterior
rear view mirror on the driver’s side do not
react, for example, if the rear window
sunshade is in raised position.
Light hitting the mirror(s) at certain angles
(incident light) could blind you. As a result,
you may not be able to observe traffic
conditions and could cause an accident.
Exterior rear view mirror parking
position
To assist during parking maneuvers, you can
set the passenger-side exterior rear view
mirror so that you can see the rear wheel and
the road curb.
Setting and storing the parking position
XSwitch on the ignition.XPress button ;, to select the passenger-
side exterior rear view mirror.
Mirrors87Controls in detail204_AKB; 5; 23, en-USd2ureepe,Version: 2.11.8.12009-07-16T17:54:06+02:00 - Seite 87Z
Page 92 of 364
Recalling positions from memoryXPress and hold desired memory position
button 1, 2 or 3 until the seat has moved
to the stored position completely. On the
driver’s side, also wait for the steering
wheel and exterior rear view mirrors to
move to the stored position.
iReleasing the memory position button
stops movement to the stored positions
immediately.
Lighting
Notes
iIf you drive in countries with left-hand
driving, you must have the headlamps
modified for symmetrical low beams.
Relevant information can be obtained at
any authorized Mercedes-Benz Center.
iVehicles equipped with active Bi-Xenon
headlamps:
The active Bi-Xenon headlamps increase
usable illumination over conventional
headlamps because they follow the
curvature of the road ahead. The beams of
the active Bi-Xenon headlamps shift to
either side according to the vehicle’s
steering angle and speed.
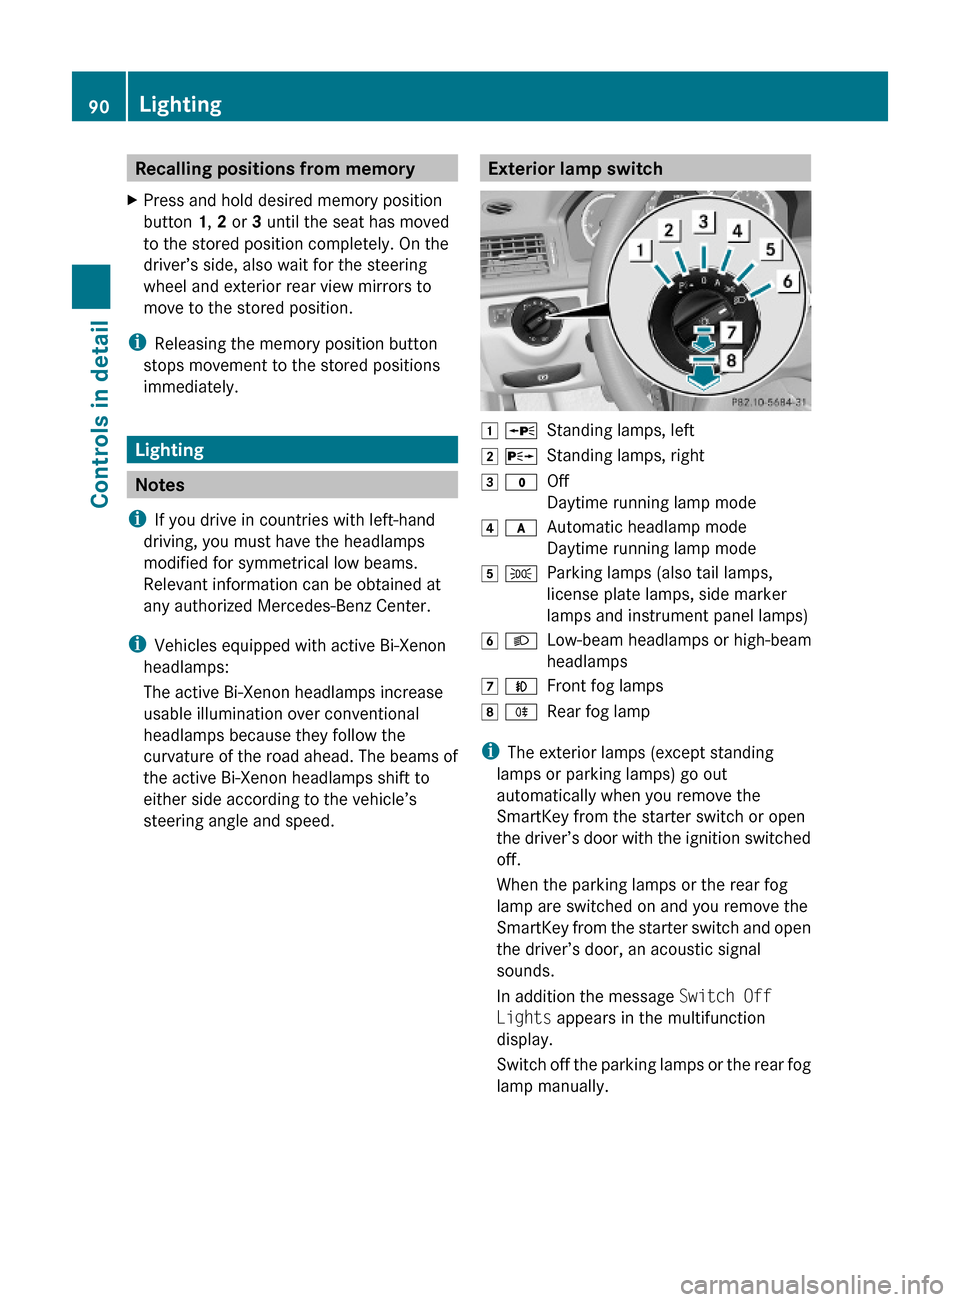
Exterior lamp switch1 WStanding lamps, left2 XStanding lamps, right3 $Off
Daytime running lamp mode
4 cAutomatic headlamp mode
Daytime running lamp mode
5 TParking lamps (also tail lamps,
license plate lamps, side marker
lamps and instrument panel lamps)
6 LLow-beam headlamps or high-beam
headlamps
7 NFront fog lamps8 RRear fog lamp
iThe exterior lamps (except standing
lamps or parking lamps) go out
automatically when you remove the
SmartKey from the starter switch or open
the driver’s door with the ignition switched
off.
When the parking lamps or the rear fog
lamp are switched on and you remove the
SmartKey from the starter switch and open
the driver’s door, an acoustic signal
sounds.
In addition the message Switch Off
Lights appears in the multifunction
display.
Switch off the parking lamps or the rear fog
lamp manually.
90LightingControls in detail
204_AKB; 5; 23, en-USd2ureepe,Version: 2.11.8.12009-07-16T17:54:06+02:00 - Seite 90
Page 93 of 364
! Failure to switch off the parking lamps
when leaving the vehicle may result in a
discharged battery.
Low-beam headlamps
The low-beam headlamps can be switched on
and off with the exterior lamp switch.
XSwitch on the ignition.XSwitching on: Turn the exterior lamp
switch to position L.
The following lamps come on:
R Low-beam headlamps
R Tail lamps
R Parking lamps
R License plate lamps
R Side marker lamps
R Instrument panel lamps
R Green indicator lamp L in the
instrument clusterXSwitching off: Turn the exterior lamp
switch to position $.
Automatic headlamp mode
The following lamps come on and go out
automatically depending on the brightness of
the ambient light:
R Low-beam headlamps
R Tail lamps
R Parking lamps
R License plate lamps
R Side marker lamps
GWarning!
If the exterior lamp switch is set to c, the
headlamps will not automatically come on
under foggy conditions.
To minimize risk to you and to others, activate
headlamps by turning exterior lamp switch to
L when driving or when traffic and/or
ambient lighting conditions require you to do
so.
In low ambient lighting conditions, only switch
from position c to L with the vehicle
at a standstill in a safe location. Switching
from c to L will briefly switch off the
headlamps. Doing so while driving in low
ambient lighting conditions may result in an
accident.
The automatic headlamp feature is only an aid
to the driver. The driver is responsible for the
operation of the vehicle’s lights at all times.XSwitching on: Turn the exterior lamp
switch to position c.
The following lamps come on and go out
depending on the brightness of the ambient
light with the SmartKey in starter switch
position 1 or the KEYLESS-GO start/stop
button pressed once:
R Tail lamps
R Parking lamps
R License plate lamps
R Side marker lamps
When the engine is running, the low-beam
headlamps will also come on and turn off
automatically.
Canada only: High-beam headlamps are only
available in low ambient lighting conditions.
Daytime running lamp mode
In Canada, the daytime running lamp mode is
mandatory and therefore in a constant mode.
In the USA, the daytime running lamp mode
is deactivated by default.
XActivate the daytime running lamp mode
using the control system, see “Switching
daytime running lamp mode on or off (USA
only)” ( Y page 133).XTurn the exterior lamp switch to position
$ or c .
When the engine is running, the low-beam
headlamps come on.Lighting91Controls in detail204_AKB; 5; 23, en-USd2ureepe,Version: 2.11.8.12009-07-16T17:54:06+02:00 - Seite 91Z
Page 94 of 364

In low ambient lighting conditions, the
following lamps will come on additionally:
R Tail lamps
R Parking lamps
R License plate lamps
R Side marker lamps
With the daytime running lamp mode
activated and the engine running, you cannot
switch off the low-beam headlamps manually.
Canada only
You can only switch on the high-beam
headlamps in low ambient lighting conditions.
The high-beam flasher is available at all times.
When the engine is running, and you
R shift from a driving position to park
position P with the vehicle at a standstill
(vehicles with automatic transmission) or
the parking brake is engaged, the low-beam
headlamps will go out with a delay of
3 minutes
R turn the exterior lamp switch to position
T , the low-beam headlamps, the tail
and parking lamps, the license plate lamps
and the side marker lamps come on
R turn the exterior lamp switch to position
L , the manual headlamp mode has
priority over the daytime running lamp
mode
The corresponding exterior lamps come on
( Y page 90).
USA only
You can only switch on the high-beam
headlamps in low ambient lighting conditions.
The high-beam flasher is available at all times.
When the engine is running, and you turn the
exterior lamp switch to position T or
L , the manual headlamp mode has
priority over the daytime running lamp mode.
The corresponding exterior lamps come on
( Y page 90).
Fog lamps
Fog lamps cannot be switched on with the
exterior lamp switch in position c.
GWarning!
In low ambient lighting or foggy conditions,
only switch from position c to L with
the vehicle at a standstill in a safe location.
Switching from c to L will briefly
switch off the headlamps. Doing so while
driving in low ambient lighting conditions may
result in an accident.
Fog lamps will operate with the parking lamps
and/or the low-beam headlamps on. Fog
lamps should only be used in conjunction with
low-beam headlamps. Consult your State or
Province Motor Vehicle Regulations
regarding permissible lamp operation.
XSwitch on the ignition.XTurn the exterior lamp switch to position
T or L (Y page 90).XSwitching on front fog lamps: Pull out the
exterior lamp switch to first stop.
The green indicator lamp N in the
instrument cluster comes on.XSwitching on rear fog lamp: Pull out the
exterior lamp switch to second stop.
The rear fog lamp, the front fog lamps, the
green N and the yellow indicator lamp
R in the instrument cluster come on.XSwitching off front fog lamps/rear fog
lamp: Push in the exterior lamp switch to
its stop.
Locator lighting
The locator lighting is described in the
“Control system” section, see “Switching
locator lighting on or off” ( Y page 134).
92LightingControls in detail
204_AKB; 5; 23, en-USd2ureepe,Version: 2.11.8.12009-07-16T17:54:06+02:00 - Seite 92