2010 MERCEDES-BENZ C300 4MATIC display
[x] Cancel search: displayPage 186 of 364

ground. Observe instructions for towing the
vehicle with all wheels on the ground.
! Only conduct operational or performance
tests on a two-axle dynamometer. If such
tests are necessary, contact an authorized
Mercedes-Benz Center. You could
otherwise seriously damage the brake
system and/or the transfer case which is
not covered by the Mercedes-Benz Limited
Warranty.
iIn winter operation, the maximum
effectiveness of the 4MATIC is only
achieved with winter tires (Y page 252) or
snow chains as required.
Dynamic handling package with sport
driving mode
The most important part of the dynamic
handling package with sport driving mode is
the variable damping system. It adjusts the
damping to the respective driving condition
automatically.
The damping adjustment depends on
Ryour driving style
Rthe road condition
Ryour individual selection, see the following
description
Vehicles with automatic transmission: The
sport driving mode button selects the
automatic shift programs C/S. For
information on the automatic shift programs,
see “Automatic shift programs”
(Y page 111). The automatic transmission
with dynamic handling package with sport
driving mode contains additional steering
wheel gearshift controls, see “One-touch
gearshifting” (Y page 112).
XStart the engine.
Sport driving mode
The firmer suspension tuning in sport driving
mode provides enhanced road contact.
Select this mode for example, on winding
highways.
The setting remains stored until you turn off
the engine.
XPress button ;.
Indicator lamp : comes on. The sport
driving mode is selected. Depending on
engine version, the accelerator pedal may
respond more immediate. In vehicles with
automatic transmission, automatic
program mode S is selected and will be
displayed in the multifunction display
(Y page 112).
Comfort driving mode
Vehicle handling in comfort driving mode is
softer. Select this mode when you prefer a
more comfortable driving style on straight
freeways.
XPress button ;.
Indicator lamp : goes out. The comfort
driving mode is selected. In vehicles with
automatic transmission, automatic
program mode C is selected and will be
displayed in the multifunction display
(Y page 112).
184Driving systemsControls in detail
204_AKB; 5; 23, en-USd2ureepe,Version: 2.11.8.12009-07-16T17:54:06+02:00 - Seite 184
Page 190 of 364

XSwitch off the ignition.XClean the Parktronic system sensors
(Y page 263).
XSwitch on the ignition.
or
XCheck the Parktronic system operation at
another location to rule out interference
from outside radio or ultrasonic signals.
Rear view camera
The rear view camera is an optical parking aid.
The area behind the vehicle appears in the
COMAND system display as a mirror image,
like in the rear view mirror.
GWarning!
Make sure no persons or animals are in or
near the area in which you are parking/
maneuvering. Otherwise, they could be
injured.
GWarning!
The rear view camera is only an aid and may
display obstacles
Rfrom a distorted perspective
Rinaccurately
Rmay not display obstacles at all
The rear view camera does not relieve you of
the responsibility to be cautious. Take care
and pay careful attention. The rear view
camera may not show objects which are
Rvery close to the rear bumper
Runder the rear bumper
Rabove the trunk handle
You are responsible for safety at all times and
must continue to pay attention to the
immediate surroundings when parking and
maneuvering. This includes the area behind,
in front of, and beside the vehicle. Otherwise
you could endanger yourself and/or others.
GWarning!
The rear view camera either will not function
or will not function to its full capability if
Rthe trunk lid is open
Rit is raining very hard, snowing or foggy
Rit is night or you are parking/maneuvering
your vehicle in an area where it is very dark
Rthe camera is exposed to a very bright white
light
Rthe immediate surroundings are
illuminated with fluorescent light (the
COMAND system display can flicker)
Rthere is a sudden change in temperature,
e.g. if you drive into a heated garage from
the cold (lens condensation)
Rthe camera lens is dirty or covered
Rthe rear of your vehicle is damaged
In this case, have the position and setting
of the camera checked by a qualified
specialist workshop. Mercedes-Benz
recommends that you contact a Mercedes-
Benz Center for this purpose.
Do not use the rear view camera in these
situations. Otherwise you could injure
yourself or others and/or damage property
including your vehicle while parking/
maneuvering.
Camera lens : must be free of dirt, ice,
snow, and slush to function properly. Clean
the camera lens regularly. Being careful not
to scratch or damage the camera lens, see
188Driving systemsControls in detail
204_AKB; 5; 23, en-USd2ureepe,Version: 2.11.8.12009-07-16T17:54:06+02:00 - Seite 188
Page 191 of 364
“Cleaning the rear view camera lens”
(Y page 263).
Switching on or off
XSwitching on: Switch on the ignition.XMake sure the rear view camera is switched
on in the COMAND system. For more
information refer to separate COMAND
operating instructions.
XSwitch on the COMAND system.XShift the automatic transmission to reverse
gear R.
The area behind the vehicle appears in the
COMAND system display.
iThe image from the rear view camera will
no longer be displayed if you select another
function on the COMAND system while
reverse gear R is engaged. To display the
image again, disengage and reengage
reverse gear R.
XSwitching off: Shift the automatic
transmission into park position P, neutral
position N, or drive position D.Climate control system
Control panel
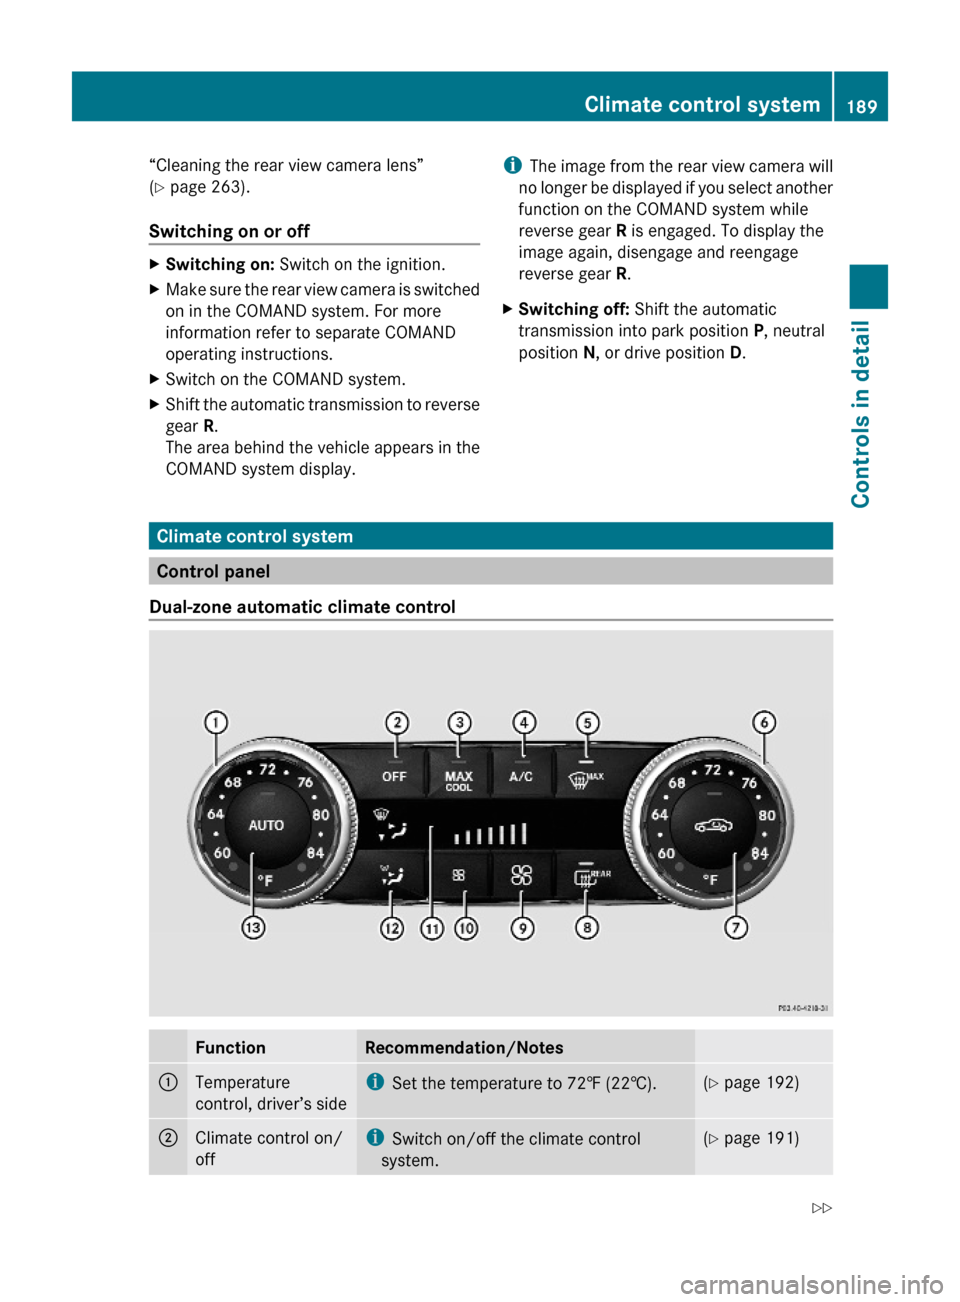
Dual-zone automatic climate control
FunctionRecommendation/Notes:Temperature
control, driver’s side
iSet the temperature to 72‡ (22†).(Y page 192);Climate control on/
off
iSwitch on/off the climate control
system.
(Y page 191)Climate control system189Controls in detail204_AKB; 5; 23, en-USd2ureepe,Version: 2.11.8.12009-07-16T17:54:06+02:00 - Seite 189Z
Page 192 of 364
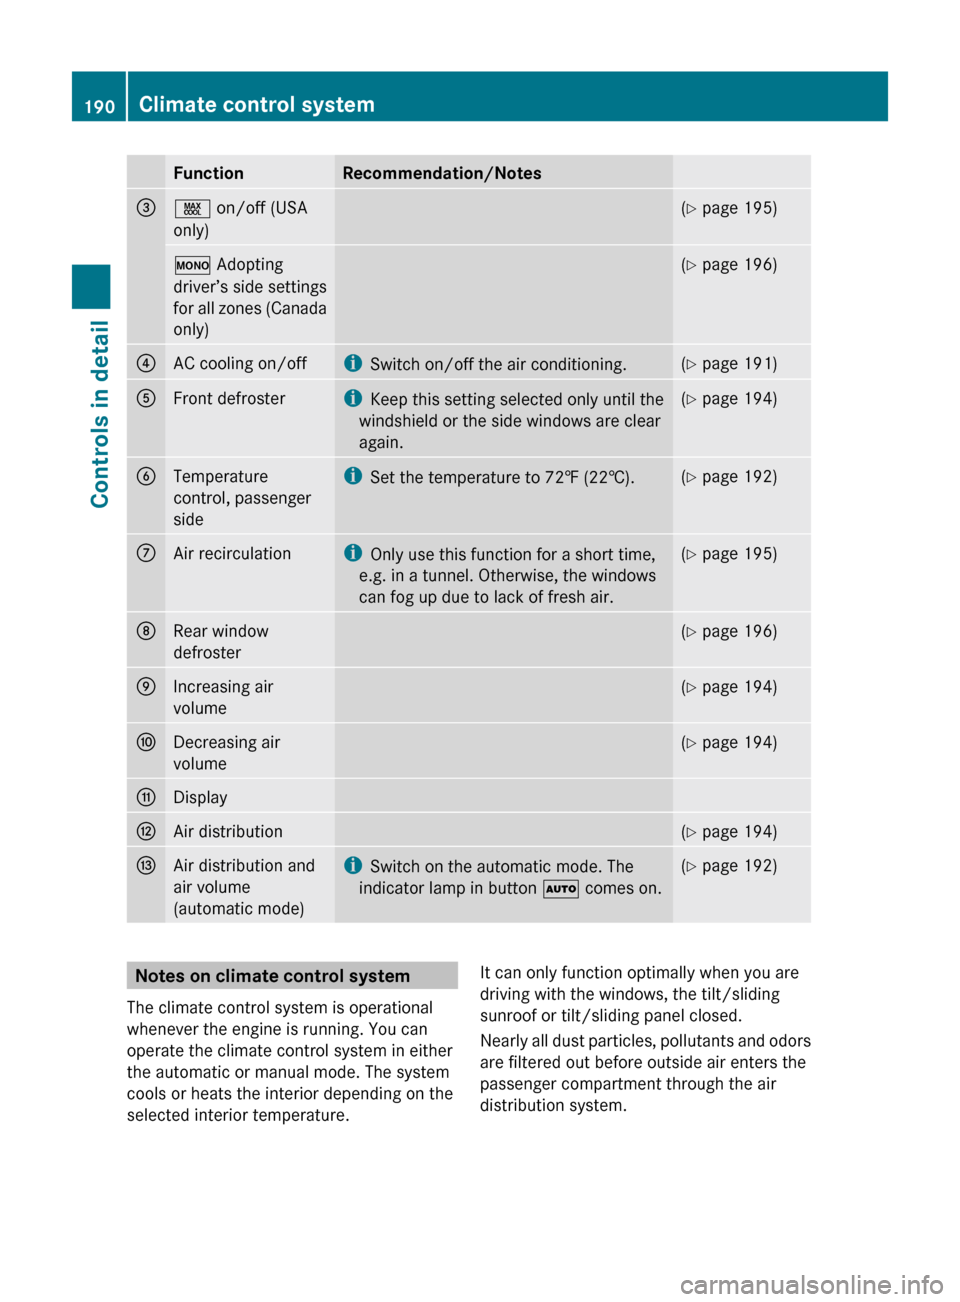
FunctionRecommendation/Notes=Ù on/off (USA
only)( Y page 195)º Adopting
driver’s side settings
for all zones (Canada
only)( Y page 196)?AC cooling on/offi
Switch on/off the air conditioning.(Y page 191)AFront defrosteri
Keep this setting selected only until the
windshield or the side windows are clear
again.( Y page 194)BTemperature
control, passenger
sidei Set the temperature to 72‡ (22†).(Y page 192)CAir recirculationi
Only use this function for a short time,
e.g. in a tunnel. Otherwise, the windows
can fog up due to lack of fresh air.( Y page 195)DRear window
defroster( Y page 196)EIncreasing air
volume( Y page 194)FDecreasing air
volume( Y page 194)GDisplayHAir distribution(Y page 194)IAir distribution and
air volume
(automatic mode)i Switch on the automatic mode. The
indicator lamp in button à comes on.(Y page 192)Notes on climate control system
The climate control system is operational
whenever the engine is running. You can
operate the climate control system in either
the automatic or manual mode. The system
cools or heats the interior depending on the
selected interior temperature.It can only function optimally when you are
driving with the windows, the tilt/sliding
sunroof or tilt/sliding panel closed.
Nearly all dust particles, pollutants and odors
are filtered out before outside air enters the
passenger compartment through the air
distribution system.190Climate control systemControls in detail
204_AKB; 5; 23, en-USd2ureepe,Version: 2.11.8.12009-07-16T17:54:06+02:00 - Seite 190
Page 194 of 364
Activating
Moist air can fog up the windows. You can
dehumidify the interior air with the air
conditioning.
XPress button ¿.
The indicator lamp in the button comes on.
i The evaporator will be vented when the
air conditioning has been in use.
Approximately 1 hour after locking the
vehicle, the blower switches on
automatically. The blower will run for
30 minutes at its lowest level. The blower
noise is normal and not an indication of a
malfunction. When you unlock the vehicle
in the meantime, venting will be
interrupted. If the vehicle battery is low,
automatic evaporator venting will not occur
in order to preserve the battery.
Automatic mode
When operating the climate control system in
automatic mode, the interior air temperature,
air volume and air distribution are adjusted
automatically.
In automatic mode, cooling with
dehumidification is switched on. This function
can be switched off if necessary.
GWarning!
If you deactivate the air conditioning, the
vehicle will not be cooled when weather
conditions are warm. The windows can fog up
more quickly. Window fogging may impair
visibility and endanger you and others.
XSet the desired temperature
( Y page 192).XActivating: Press button Ã.
The indicator lamp in the button comes on.
The air volume and air distribution are
adjusted automatically.XDeactivating: Press button I, K or
_ .
The indicator lamp in button à goes out.
The automatic operation of air volume and
air distribution switches off. The symbols of
air distribution or air volume appear in
display G (Y page 189).XAdjust air distribution ( Y page 194).XAdjust air volume ( Y page 194).
Setting temperature
You can adjust the air temperature on each
side of the passenger compartment. You
should raise or lower the temperature setting
in small increments, preferably starting at
72‡ (22†).
You can adjust the air temperature on each
side of the passenger compartment. You
should raise or lower the temperature setting
in small increments, preferably starting at
72‡ (22†).
XIncreasing/decreasing: Turn
temperature controls : and B
( Y page 189) slightly clockwise or
counterclockwise.
Adjusting air vents
GWarning!
When operating the climate control, the air
that enters the passenger compartment
through the air vents can be very hot or very
cold (depending on the set temperature). This
may cause burns or frostbite to unprotected
skin in the immediate area of the air vents.
Always keep sufficient distance between
unprotected parts of the body and the air
vents. If necessary, use the air distribution
adjustment to direct the air to air vents in the
vehicle interior that are not in the immediate
area of unprotected skin.
192Climate control systemControls in detail
204_AKB; 5; 23, en-USd2ureepe,Version: 2.11.8.12009-07-16T17:54:06+02:00 - Seite 192
Page 196 of 364
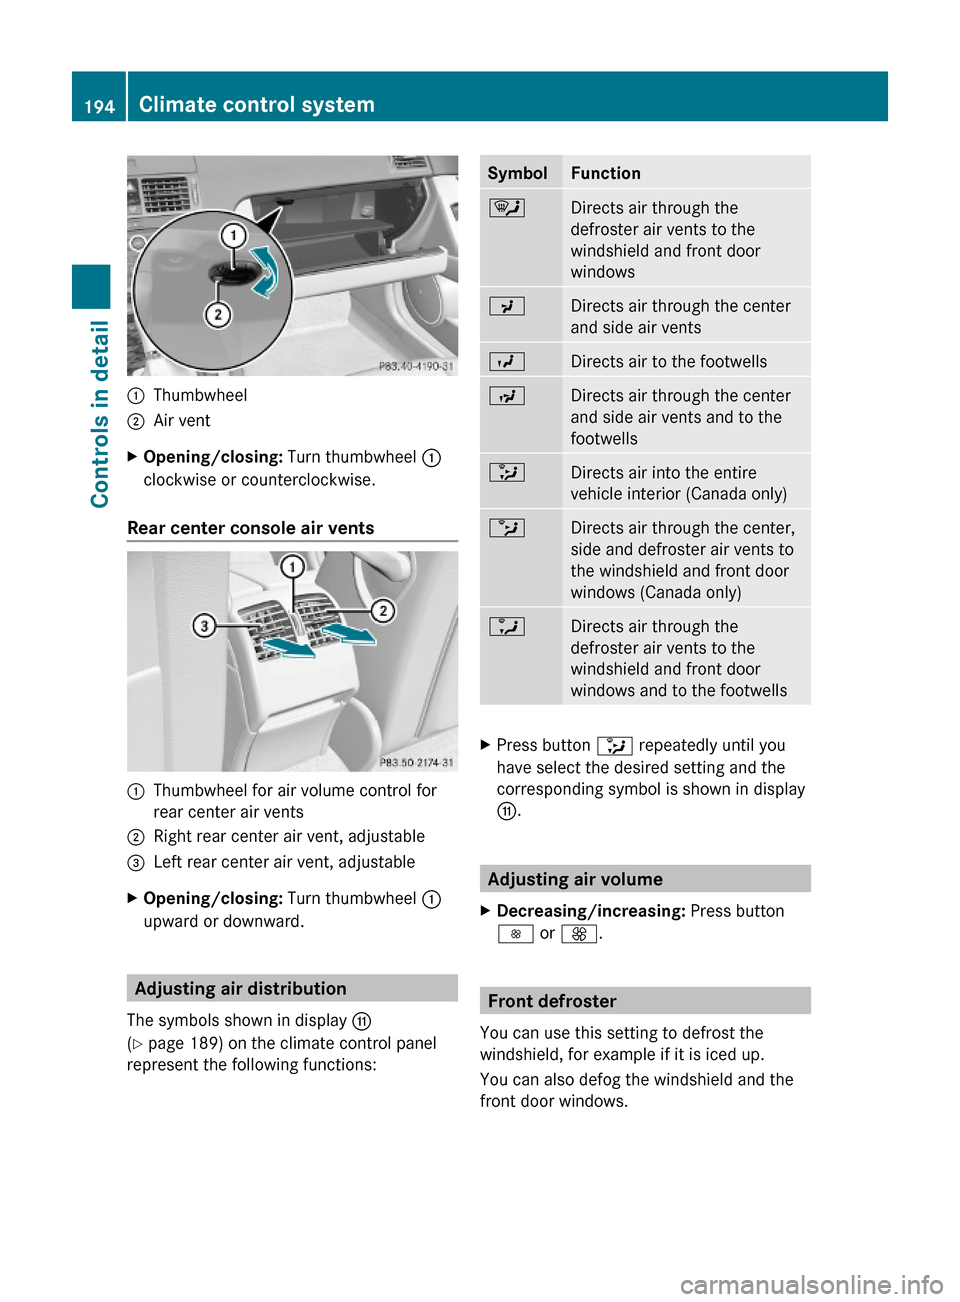
:Thumbwheel;Air ventXOpening/closing: Turn thumbwheel :
clockwise or counterclockwise.
Rear center console air vents
:Thumbwheel for air volume control for
rear center air vents
;Right rear center air vent, adjustable=Left rear center air vent, adjustableXOpening/closing: Turn thumbwheel :
upward or downward.
Adjusting air distribution
The symbols shown in display G
(Y page 189) on the climate control panel
represent the following functions:
SymbolFunction¯Directs air through the
defroster air vents to the
windshield and front door
windows
PDirects air through the center
and side air vents
ODirects air to the footwellsNDirects air through the center
and side air vents and to the
footwells
_Directs air into the entire
vehicle interior (Canada only)
bDirects air through the center,
side and defroster air vents to
the windshield and front door
windows (Canada only)
aDirects air through the
defroster air vents to the
windshield and front door
windows and to the footwells
XPress button _ repeatedly until you
have select the desired setting and the
corresponding symbol is shown in display
G.
Adjusting air volume
XDecreasing/increasing: Press button
I or K.
Front defroster
You can use this setting to defrost the
windshield, for example if it is iced up.
You can also defog the windshield and the
front door windows.
194Climate control systemControls in detail
204_AKB; 5; 23, en-USd2ureepe,Version: 2.11.8.12009-07-16T17:54:06+02:00 - Seite 194
Page 197 of 364
iKeep this setting selected only until the
windshield or the front door windows are
clear again.XActivating: Press button ¬.
The indicator lamp in the button comes on.
The climate control switches to the following
functions automatically:
R cooling on to dehumidify
R most efficient blower speed and heating
power, depending on outside temperature
R air flows onto the windshield and the front
door windows
R the air recirculation mode is switched off
i You can adjust the air volume when the
front defroster is switched on.
XDeactivating: Press button ¬ again.
The indicator lamp in the button goes out.
The previous settings are once again in
effect. The cooling remains switched on.
The air recirculation remains switched off.
or
XPress button Ã.
The indicator lamp in button ¬ goes out.
Air volume and air distribution are adjusted
automatically.
i To deactivate defrosting, you can also
press button ^ or turn temperature
controls.
Windshield fogged on the outside
XSwitch the windshield wipers on
( Y page 96).
If the automatic mode of the climate control
is switched off:
XPress button _ repeatedly until one of
the following symbols appears in display
G (Y page 189) P or O .
Maximum cooling MAX COOL
MAX COOL is only available in U.S. vehicles.
MAX COOL is only operational when the
engine is running.
You can use this setting to provide the fastest
possible cooling of the vehicle interior (when
windows and tilt/sliding sunroof or tilt/
sliding panel are closed).XActivating: Press button Ù.
The indicator lamp in the button comes on.
The climate control switches automatically to
the following functions:
R maximum cooling
R maximum blowing power
R the air recirculation mode is switched on
XDeactivating: Press button Ù again.
The indicator lamp in the button goes out.
The previous settings are once again in
effect.
i To switch the maximum cooling function
off, you can also press button ^, Ã
or ¬ .
Air recirculation mode
Switch to air recirculation mode to prevent
unpleasant odors from entering the vehicle
from the outside (e. g. before driving through
a tunnel). This setting cuts off the intake of
outside air and recirculates the air in the
passenger compartment.
GWarning!
Fogged windows impair visibility,
endangering you and others. If the windows
begin to fog on the inside, switching off the
air recirculation mode immediately should
clear interior window fogging. If interior
window fogging persists, make sure the air
conditioning is activated, or press button
¬ .
XActivating: Press button g.
The indicator lamp in the button comes on.Climate control system195Controls in detail204_AKB; 5; 23, en-USd2ureepe,Version: 2.11.8.12009-07-16T17:54:06+02:00 - Seite 195Z
Page 212 of 364
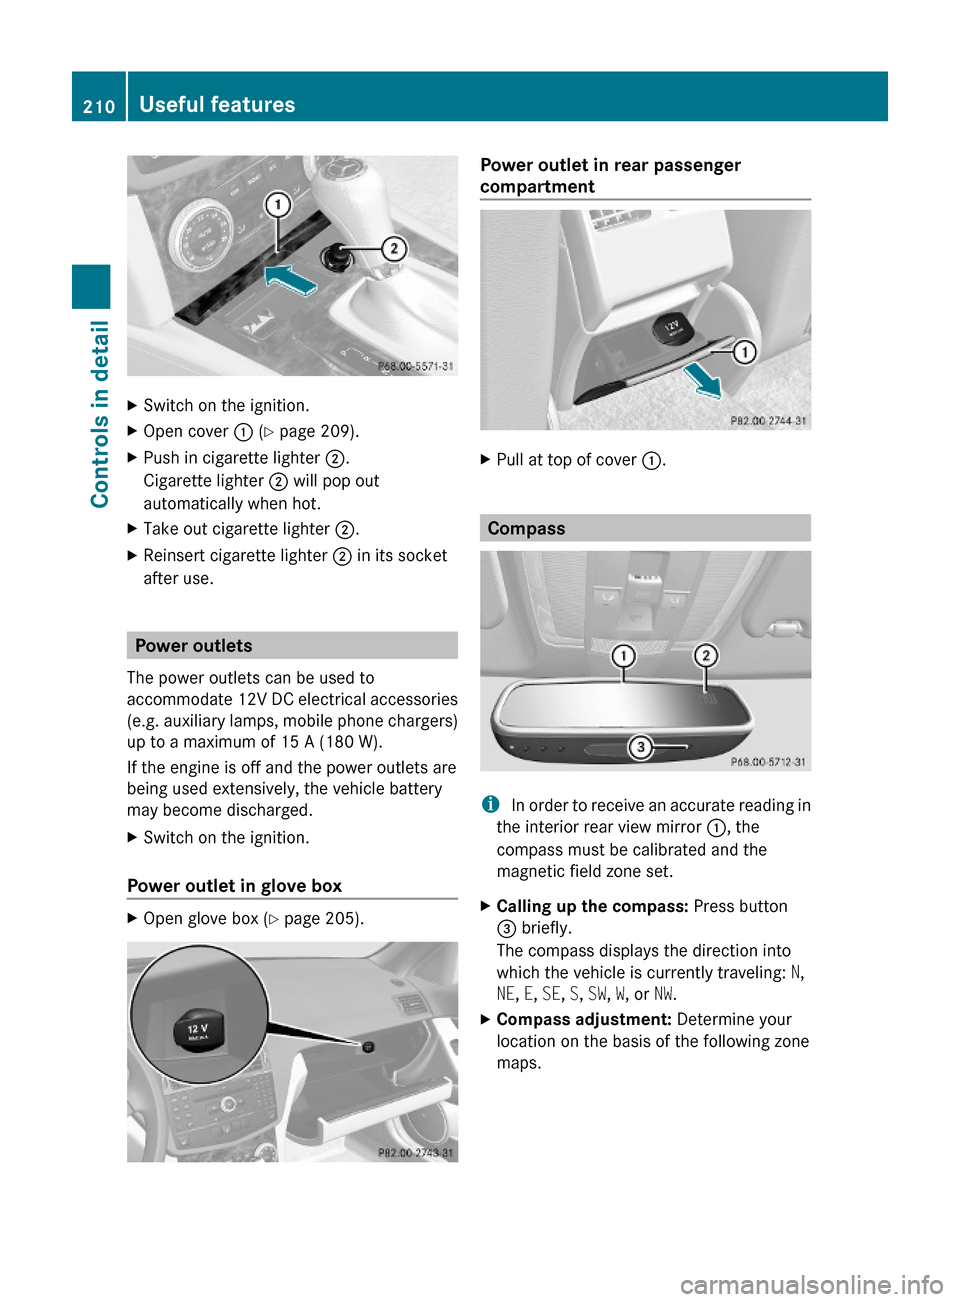
XSwitch on the ignition.XOpen cover : (Y page 209).XPush in cigarette lighter ;.
Cigarette lighter ; will pop out
automatically when hot.
XTake out cigarette lighter ;.XReinsert cigarette lighter ; in its socket
after use.
Power outlets
The power outlets can be used to
accommodate 12V DC electrical accessories
(e.g. auxiliary lamps, mobile phone chargers)
up to a maximum of 15 A (180 W).
If the engine is off and the power outlets are
being used extensively, the vehicle battery
may become discharged.
XSwitch on the ignition.
Power outlet in glove box
XOpen glove box (Y page 205).Power outlet in rear passenger
compartment
XPull at top of cover :.
Compass
i In order to receive an accurate reading in
the interior rear view mirror :, the
compass must be calibrated and the
magnetic field zone set.
XCalling up the compass: Press button
= briefly.
The compass displays the direction into
which the vehicle is currently traveling: N,
NE, E, SE, S, SW, W, or NW.
XCompass adjustment: Determine your
location on the basis of the following zone
maps.
210Useful featuresControls in detail
204_AKB; 5; 23, en-USd2ureepe,Version: 2.11.8.12009-07-16T17:54:06+02:00 - Seite 210