2010 MAZDA MODEL RX 8 battery
[x] Cancel search: batteryPage 244 of 438

Black plate (244,1)
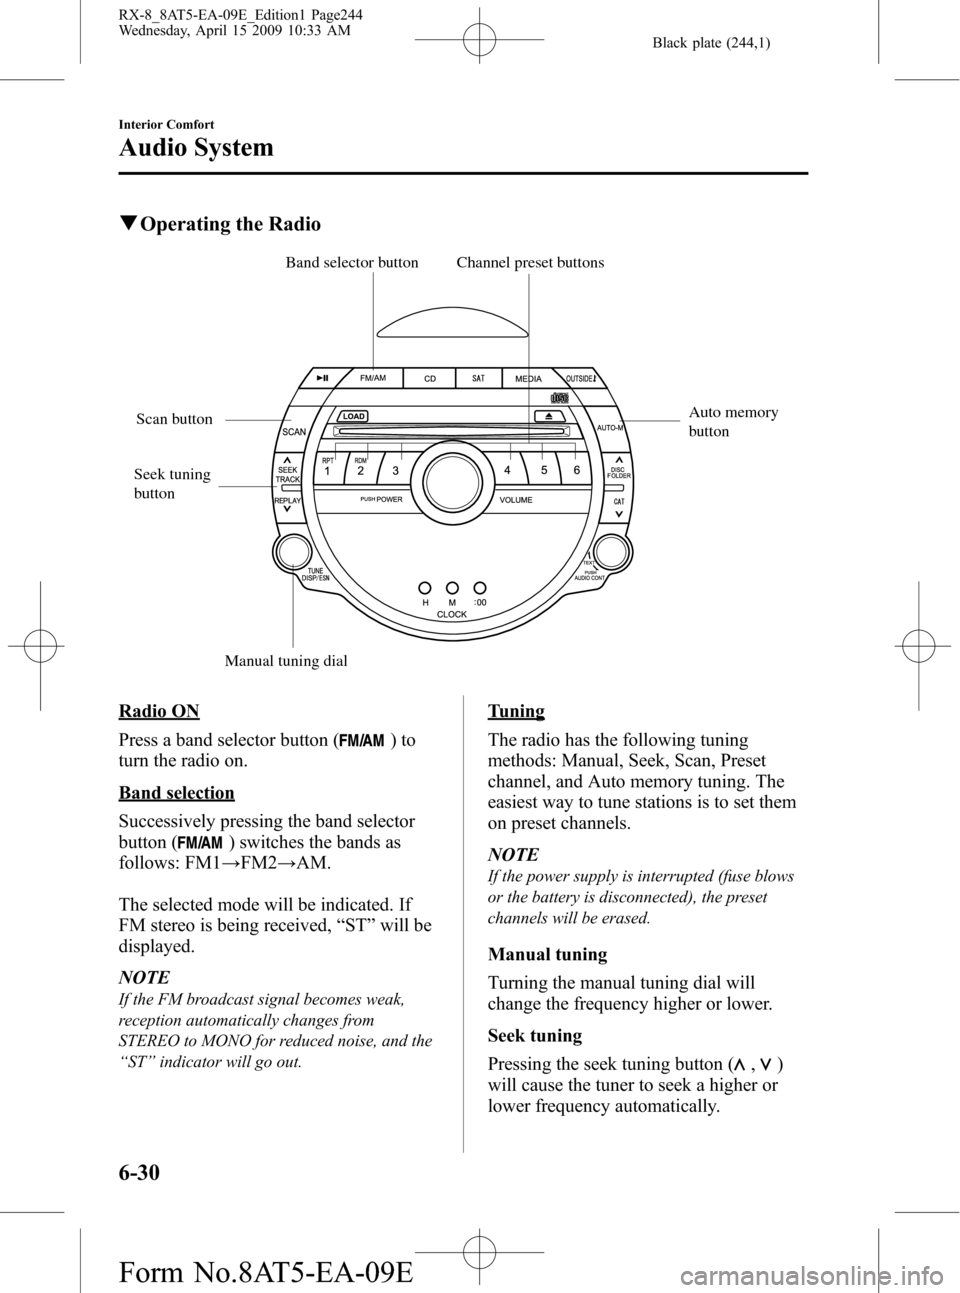
qOperating the Radio
Seek tuning
button
Scan button
Manual tuning dialBand selector button Channel preset buttons
Auto memory
button
Radio ON
Press a band selector button (
)to
turn the radio on.
Band selection
Successively pressing the band selector
button (
) switches the bands as
follows: FM1→FM2→AM.
The selected mode will be indicated. If
FM stereo is being received,“ST”will be
displayed.
NOTE
If the FM broadcast signal becomes weak,
reception automatically changes from
STEREO to MONO for reduced noise, and the
“ST”indicator will go out.
Tuning
The radio has the following tuning
methods: Manual, Seek, Scan, Preset
channel, and Auto memory tuning. The
easiest way to tune stations is to set them
on preset channels.
NOTE
If the power supply is interrupted (fuse blows
or the battery is disconnected), the preset
channels will be erased.
Manual tuning
Turning the manual tuning dial will
change the frequency higher or lower.
Seek tuning
Pressing the seek tuning button (
,)
will cause the tuner to seek a higher or
lower frequency automatically.
6-30
Interior Comfort
Audio System
RX-8_8AT5-EA-09E_Edition1 Page244
Wednesday, April 15 2009 10:33 AM
Form No.8AT5-EA-09E
Page 245 of 438

Black plate (245,1)
NOTE
If you continue to press and hold the button,
the frequency will continue changing without
stopping.
Scan tuning
Press the scan button (
)to
automatically sample strong stations.
Scanning stops at each station for about 5
seconds. To hold a station, press the scan
button (
) again during this interval.
Preset channel tuning
The 6 preset channels can be used to store
6 AM and 12 FM stations.
1. To set a channel first select AM, FM1,
or FM2. Tune to the desired station.
2. Depress a channel preset button for
about 2 seconds until a beep sound is
heard. The preset channel number and
station frequency will be displayed.
The station is now held in the memory.
3. Repeat this operation for the other
stations and bands you want to store.
To tune one in the memory, select AM,
FM1, or FM2 and then press its
channel preset button. The station
frequency and the channel number will
be displayed.
NOTE
If the power supply is interrupted (fuse blows
or the battery is disconnected), the preset
channels will be erased.
Auto memory tuning
This is especially useful when driving in
an area where the local stations are not
known. Additional AM/FM stations can
be stored without disturbing the
previously set channels.Press and hold the auto memory button
(
) for about 2 seconds until a beep
sound is heard; the system will
automatically scan and temporarily store
up to 6 stations with the strongest
frequencies in each selected band in that
area.
After scanning is completed, the station
with the strongest frequency will be tuned
and its frequency displayed.
Press and release the auto memory button
(
) to recall stations from the auto-
stored stations. One stored station will be
selected each time; its frequency and
channel number will be displayed.
NOTE
If no stations can be tuned after scanning
operations,“A”will be displayed.
Interior Comfort
Audio System
6-31
RX-8_8AT5-EA-09E_Edition1 Page245
Wednesday, April 15 2009 10:33 AM
Form No.8AT5-EA-09E
Page 269 of 438

Black plate (269,1)
CAUTION
ØClose the cover when the auxiliary
jack is not in use to prevent
foreign objects and liquids from
penetrating the auxiliary jack.
ØDo not place objects or apply force
to the auxiliary jack with the plug
connected.
ØNoise may occur during playback
if the accessory socket equipped
on the vehicle is used. (If noise
occurs, do not use the accessory
socket.)
NOTE
lBefore using the auxiliary jack, read the
manufacturer's instructions for the product
being connected.
lUse a commercially-available, non-
impedance (3.5
) stereo mini plug for
connecting the portable audio unit to the
auxiliary jack. Before using the auxiliary
jack, read the manufacture's instructions
for connecting a portable audio unit to the
auxiliary jack.
lTo prevent discharging of the battery, do
not use the auxiliary input for long periods
with the engine off or idling.
lNoise may occur depending on the product
connected to the auxiliary jack.
lWith regard to connecting a portable audio
or similar device to a power source, use the
battery for the device, not the accessory
socket.
lInsert the plug to the auxiliary jack
securely.
lInsert or remove the plug with the plug
perpendicular to the auxiliary jack hole.
lInsert or remove the plug by holding its
base.
To listen to a portable audio unit
1. Turn the ignition switch to the ACC or
ON position.
2. Insert the connection plug into the
auxiliary jack.
3. Press the power/volume dial to turn the
audio system on.
4. Press the source change button
(
) of the audio unit or the mode
switch (
) of the audio control
switches on the steering wheel to
change to the AUX mode.
Audio Unit Audio Control
Switches
NOTElSet the volume of the portable audio unit to
the maximum within the range that the
sound does not become distorted, then
adjust the volume using the power/volume
dial of the audio unit or the volume switch
(
,) of the audio control switch.lUse your portable audio unit for operations
other than volume adjustment.
lIf the connection plug is pulled out from the
auxiliary jack while in AUX mode, noise
may occur.
Interior Comfort
Audio System
6-55
RX-8_8AT5-EA-09E_Edition1 Page269
Wednesday, April 15 2009 10:33 AM
Form No.8AT5-EA-09E
Page 289 of 438

Black plate (289,1)
“(888) 555-1212”must be spoken“Eight,
eight, eight, five, five, five, one, two, one,
two.”
Phrase Command
1 0123456789
2 (888) 555-1212
3 Call
4 Dial
5 Setup
6 Cancel
7 Continue
8 Help
NOTE
After user voice registration is completed,
voice guidance“Speaker enrollment is
complete, returning to main menu”is
announced.
qDTMF (Dual Tone Multi-
Frequency Signal) Transmission
This function is used when transmitting
DTMF via the user's voice. The receiver
of a DTMF transmission is generally a
home telephone answering machine or a
company's automated guidance call center
(When you send tone signals back
according to the voice guidance
recording).
1. Press the voice recognition/hands-free
switch with a short press.
2.Say:[Beep]“XXXX... send”(Say
DTMF code)
3.Prompt:“Sending XXXX... (DTMF
code)”
When Bluetooth Hands-
Free cannot be used
Bluetooth Hands-Free cannot be used
under the following conditions:
lThe mobile telephone is outside of the
communication area.
lThe mobile telephone has a
malfunction.
lThe mobile telephone is not connected
to the hands-free unit equipped on the
vehicle.
lThe mobile telephone battery is weak.lThe mobile telephone is turned off.lThe mobile telephone is placed where
radio reception is difficult.
Interior Comfort
Bluetooth Hands-Free
6-75
RX-8_8AT5-EA-09E_Edition1 Page289
Wednesday, April 15 2009 10:33 AM
Form No.8AT5-EA-09E
Page 291 of 438

Black plate (291,1)
Sunvisors
When you need a sunvisor, lower it for
use in front or swing it to the side.
Sunvisor
qVanity Mirrors
To use the vanity mirror, lower the
sunvisor.
The vanity mirror light will illuminate
when you open the cover.
Interior Lights
qIlluminated Entry System
When the illuminated entry system
operates, the overhead light (switch is in
the DOOR position) and the courtesy
lights turn on for:
lAbout 30 seconds after the driver's
door is unlocked and the ignition
switch is in the LOCK position (with
the ignition key removed).
lAbout 15 seconds after all doors are
closed.
(With Advanced key)
About 5 seconds after all doors are
closed when the advanced key is
outside of the vehicle.
lAbout 15 seconds after the ignition
switch is in the LOCK position (with
the ignition key removed) with all
doors closed.
The light also turns off when:
lThe ignition switch is turned to the ON
position and all doors are closed.
lThe driver's door is locked.
NOTE
Battery saver
If any door is left opened, the light turns off
after about 30 minutes to save the battery.
The light turns on again when the ignition
switch is turned to the ON position, or when
any door is opened after all doors have been
closed.
Interior Comfort
Interior Equipment
6-77
RX-8_8AT5-EA-09E_Edition1 Page291
Wednesday, April 15 2009 10:34 AM
Form No.8AT5-EA-09E
Page 301 of 438

Black plate (301,1)
Accessory Socket
The accessory socket can be used
regardless of the position of the ignition
switch.
Only use genuine Mazda accessories or
the equivalent requiring no greater than
120 W (DC 12 V, 10 A).
The accessory socket is in the center
console.
CAUTION
To prevent accessory socket damage
or electrical failure, pay attention to
the following:
ØDo not use accessories that require
more than 120 W (DC 12 V, 10 A).
ØDo not use accessories that are not
genuine Mazda accessories or the
equivalent.
ØClose the cover when the accessory
socket is not in use to prevent
foreign objects and liquids from
getting into the accessory socket.
ØCorrectly insert the plug into the
accessory socket.
Noise may occur on the audio
playback depending on the device
connected to the accessory socket.NOTE
To prevent discharging of the battery, do not
use the socket for long periods with the engine
off or idling.
Interior Comfort
Interior Equipment
6-87
RX-8_8AT5-EA-09E_Edition1 Page301
Wednesday, April 15 2009 10:34 AM
Form No.8AT5-EA-09E
Page 321 of 438

Black plate (321,1)
Starting a Flooded Engine
If the engine does not start the first time,
perform the following procedure to start
the engine.
1. While the accelerator pedal is fully
depressed, turn the ignition switch to
the START position and crank the
engine for about 7 to 8 seconds.
2. Release the ignition switch and
accelerator pedal.
3. Start the engine as normally without
depressing the accelerator.
lThe fuel injection is cut by fully
depressing the accelerator pedal.
lIf the engine starts during Step 1, the
engine will rev up. Release the ignition
switch and accelerator pedal
immediately.
lAvoid racing the engine or driving the
vehicle right after starting the engine.
lDo not hold the ignition switch in the
START position for over 10 seconds. It
may damage the starter and drain the
battery.
lIf the engine still does not start using
the above procedure, have your vehicle
inspected by an Authorized Mazda
Dealer.
In Case of an Emergency
Emergency Starting
7-19
RX-8_8AT5-EA-09E_Edition1 Page321
Wednesday, April 15 2009 10:34 AM
Form No.8AT5-EA-09E
Page 322 of 438

Black plate (322,1)
Jump-Starting
Jump-starting is dangerous if done incorrectly. So follow the procedure carefully. If you
feel unsure about jump-starting, we strongly recommend that you have a competent service
technician do the work.
WARNING
Follow These Precautions Carefully:
To ensure safe and correct handling of the battery, read the following precautions
carefully before using the battery or inspecting it.
Always wear eye protection when working near the battery:
Working without eye protection is dangerous. Battery fluid contains SULFURIC ACID
which could cause blindness if splashed into your eyes. Also, hydrogen gas produced
during normal battery operation, could ignite and cause the battery to explode.
Wear eye protection and protective gloves to prevent contact with battery
fluid:
Spilled battery fluid is dangerous.
Battery fluid contains SULFURIC ACID which could cause serious injuries if it gets in
eyes, skin or clothing. If this happens, immediately flush your eyes with water for 15
minutes or wash your skin thoroughly and get medical attention.
Always keep batteries out of the reach of children:
Allowing children to play near batteries is dangerous. Battery fluid could cause
serious injuries if it gets in the eyes or on the skin.
Do not allow the positive () terminal to contact any other metal object that
could cause sparks:
Flames and sparks near open battery cells are dangerous. Hydrogen gas, produced
during normal battery operation, could ignite and cause the battery to explode. An
exploding battery can cause serious burns and injuries. When working near a
battery, do not allow metal tools to contact the positive (
) or negative ()
terminal of the battery.
7-20
In Case of an Emergency
Emergency Starting
RX-8_8AT5-EA-09E_Edition1 Page322
Wednesday, April 15 2009 10:34 AM
Form No.8AT5-EA-09E