Page 314 of 500
![MAZDA MODEL MAZDASPEED 3 2010 Owners Manual (in English) Black plate (314,1)
5.Prompt:“Are you sure you want to
erase everything from your Hands Free
system phonebook?”
6.Say:[Beep]“Ye s”
7.Prompt:“You are about to delete
everything from your Hand MAZDA MODEL MAZDASPEED 3 2010 Owners Manual (in English) Black plate (314,1)
5.Prompt:“Are you sure you want to
erase everything from your Hands Free
system phonebook?”
6.Say:[Beep]“Ye s”
7.Prompt:“You are about to delete
everything from your Hand](/manual-img/28/15589/w960_15589-313.png)
Black plate (314,1)
5.Prompt:“Are you sure you want to
erase everything from your Hands Free
system phonebook?”
6.Say:[Beep]“Ye s”
7.Prompt:“You are about to delete
everything from your Hands Free
system phonebook. Do you want to
continue?”
8.Say:[Beep]“Ye s”
9.Prompt:“Please wait, erasing the
Hands Free system phonebook.”
10.Prompt:“Hands-Free system
phonebook erased, returning to main
menu.”
Read-out of names registered to the
Bluetooth Hands-Free phonebook
Bluetooth Hands-Free can read out the list
of names registered to its phonebook.
1. Press the pick-up button or talk button
with a short press.
2.Say:[Beep]“Phonebook”
3.Prompt:“Select one of the following:
New entry, edit, list names, delete,
erase all or import contact.”
4.Say:[Beep]“List names”
5.Prompt:“XXXXX..., XXXXX...,
XXXXX... (Ex.“John's phone”, Mary's
phone, Bill's phone)”(Voice guidance
reads out the voice tags registered to
the phonebook.)
Press the talk button with a short press
during the read-out at the desired name,
and then say one of the following voice
commands to execute it.
l“Continue”: Continues the list read-
out.
l“Call”: Calls the registered phonebook
data when the talk button is short-
pressed.
l“Edit”: Edits the registered phonebook
data when the talk button is short-
pressed.
l“Delete”: Deletes the registered
phonebook data when the talk button is
short-pressed.
l“Previous”: Returns to the previous
phonebook data in read-out when the
talk button is short-pressed.
6.Prompt:“End of list, would you like
to start from the beginning?”
7.Say:[Beep]“No”
8.Prompt:“Returning to main menu.”
qDTMF (Dual Tone Multi-
Frequency Signal) Transmission
This function is used when transmitting
DTMF via the user's voice. The receiver
of a DTMF transmission is generally a
home telephone answering machine or a
company's automated guidance call center
(When you send tone signals back
according to the voice guidance
recording).
1. Press the talk button with a short press.
2.Say:[Beep]“XXXX... send”(Say
DTMF code)
3.Prompt:“Sending XXXX... (DTMF
code)”
6-84
Interior Comfort
Bluetooth Hands-Free
Mazda3_8AR3-EA-09E_Edition2 Page314
Monday, June 1 2009 1:18 PM
Form No.8AR3-EA-09E
Page 332 of 500

Black plate (332,1)
qMaintenance Monitor
The periodic inspection and tire rotation
period notification can be displayed by
turning the Maintenance Monitor on.
NOTE
lThis function is inoperable while the
vehicle is being driven.
l(With navigation system)
If the battery cables are disconnected and
then reconnected, the SERVICE DUE item
in the MAINTENANCE setting cannot be
done until the clock resets after receiving a
GPS signal. Perform this setting after the
clock resumes operation.
Initial setting method
1. Press the INFO switch until the
SETTINGS screen is displayed.
2. Select MAINTENANCE by pressing
the Enter (up/down) switch up or
down, and then press the Enter (up/
down) switch.
3. Select the item you want to turn on
(TIRE ROTATION or SERVICE DUE)
by pressing the Enter (up/down) switch
up or down, and then press the Enter
(up/down) switch.
4. Press the Enter (up/down) switch.5. Select SET and press the Enter (up/
down) switch.
NOTElFor the service due notification, either the
number of days or distance can be set.
When selecting one of the two settings, the
setting not selected is set to the initial value
automatically.
lBecause tire rotation can only be set
according to distance, the screen for setting
distance is displayed when SET is selected.
6. Select DISTANCE or DAYS and press
the Enter (up/down) switch. The screen
for setting the distance or days to the
next maintenance period is displayed.
6-102
Interior Comfort
Interior Equipment
Mazda3_8AR3-EA-09E_Edition2 Page332
Monday, June 1 2009 1:18 PM
Form No.8AR3-EA-09E
Page 346 of 500
Black plate (346,1)
Parking in an Emergency
The hazard warning lights should always
be used when you stop on or near a
roadway in an emergency.
The hazard warning lights warn other
drivers that your vehicle is a traffic hazard
and that they must take extreme caution
when near it.
Hazard warning flasher
Depress the hazard warning flasher and all
the turn signals will flash.
NOTE
lThe turn signals do not work when the
hazard warning lights are on.
lCheck local regulations about the use of
hazard warning lights while the vehicle is
being towed to verify that it is not in
violation of the law.
7-2
In Case of an Emergency
Parking in an Emergency
Mazda3_8AR3-EA-09E_Edition2 Page346
Monday, June 1 2009 1:18 PM
Form No.8AR3-EA-09E
Page 354 of 500

Black plate (354,1)
NOTElMake sure the jack is well lubricated before
using it.
(With Tire Pressure Monitoring System)
lBe sure to register the tire pressure sensor
ID signal code whenever tires or wheels are
changed (page 5-33).
1. Park on a level surface off the right-of-
way and firmly set the parking brake.
2. Put a vehicle with an automatic
transaxle in Park (P), a manual
transaxle in Reverse (R) or 1, and turn
off the engine.
3. Turn on the hazard warning flasher.
4. Have everyone get out of the vehicle
and away from the vehicle and traffic.
5. Remove the jack, tool, and spare tire
(page 7-3).
6. Block the wheel diagonally opposite
the flat tire. When blocking a wheel,
place a tire block both in front and
behind the tire.
NOTE
When blocking a tire, use rocks or wood blocks
of sufficient size if possible to hold the tire in
place.
qRemoving a Flat Tire
1. If your vehicle is equipped with a
wheel cover, pry off the wheel cover
with the beveled end of the lug wrench.
NOTE
Force the end of the lug wrench firmly between
wheel and cover, or removal will be difficult.
CAUTION
There is a valve-stem mark inside the
wheel cover. When installing the
wheel cover, align this mark with the
tire's valve stem.
Damage could occur during
installation if the wheel cover is not
properly aligned.
7-10
In Case of an Emergency
Flat Tire
Mazda3_8AR3-EA-09E_Edition2 Page354
Monday, June 1 2009 1:18 PM
Form No.8AR3-EA-09E
Page 409 of 500

Black plate (409,1)
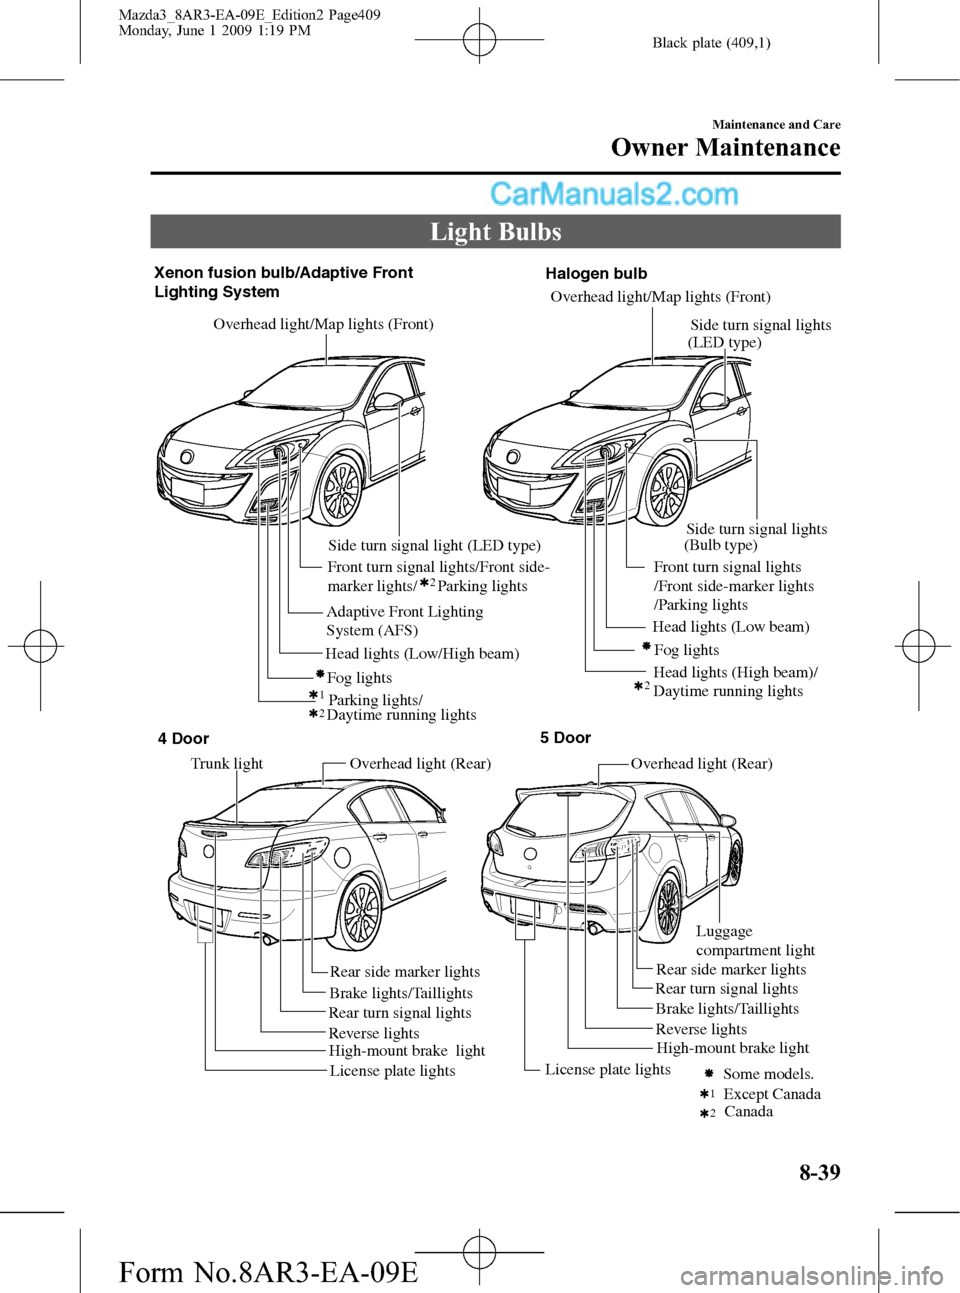
Light Bulbs
Overhead light/Map lights (Front)
Overhead light (Rear) Overhead light (Rear) Front turn signal lights/Front side-
marker lights/ Parking lights Xenon fusion bulb/Adaptive Front
Lighting System
Fog lights
Parking lights/ Adaptive Front Lighting
System (AFS)
Overhead light/Map lights (Front)
Front turn signal lights
/Front side-marker lights
/Parking lights
Head lights (Low beam)
Head lights (High beam)/
Daytime running lights Head lights (Low/High beam)Fog lights
Side turn signal light (LED type)
Trunk light
Brake lights/Taillights
Brake lights/Taillights
Rear turn signal lightsRear turn signal lights Rear side marker lightsRear side marker lights
Except Canada Some models. Reverse lightsReverse lights
License plate lightsLicense plate lights High-mount brake lightHalogen bulb
212
2
1
2
High-mount brake lightSide turn signal lights
(Bulb type)Side turn signal lights
(LED type)
Luggage
compartment light 4 Door5 Door
Canada Daytime running lights
Maintenance and Care
Owner Maintenance
8-39
Mazda3_8AR3-EA-09E_Edition2 Page409
Monday, June 1 2009 1:19 PM
Form No.8AR3-EA-09E
Page 411 of 500

Black plate (411,1)
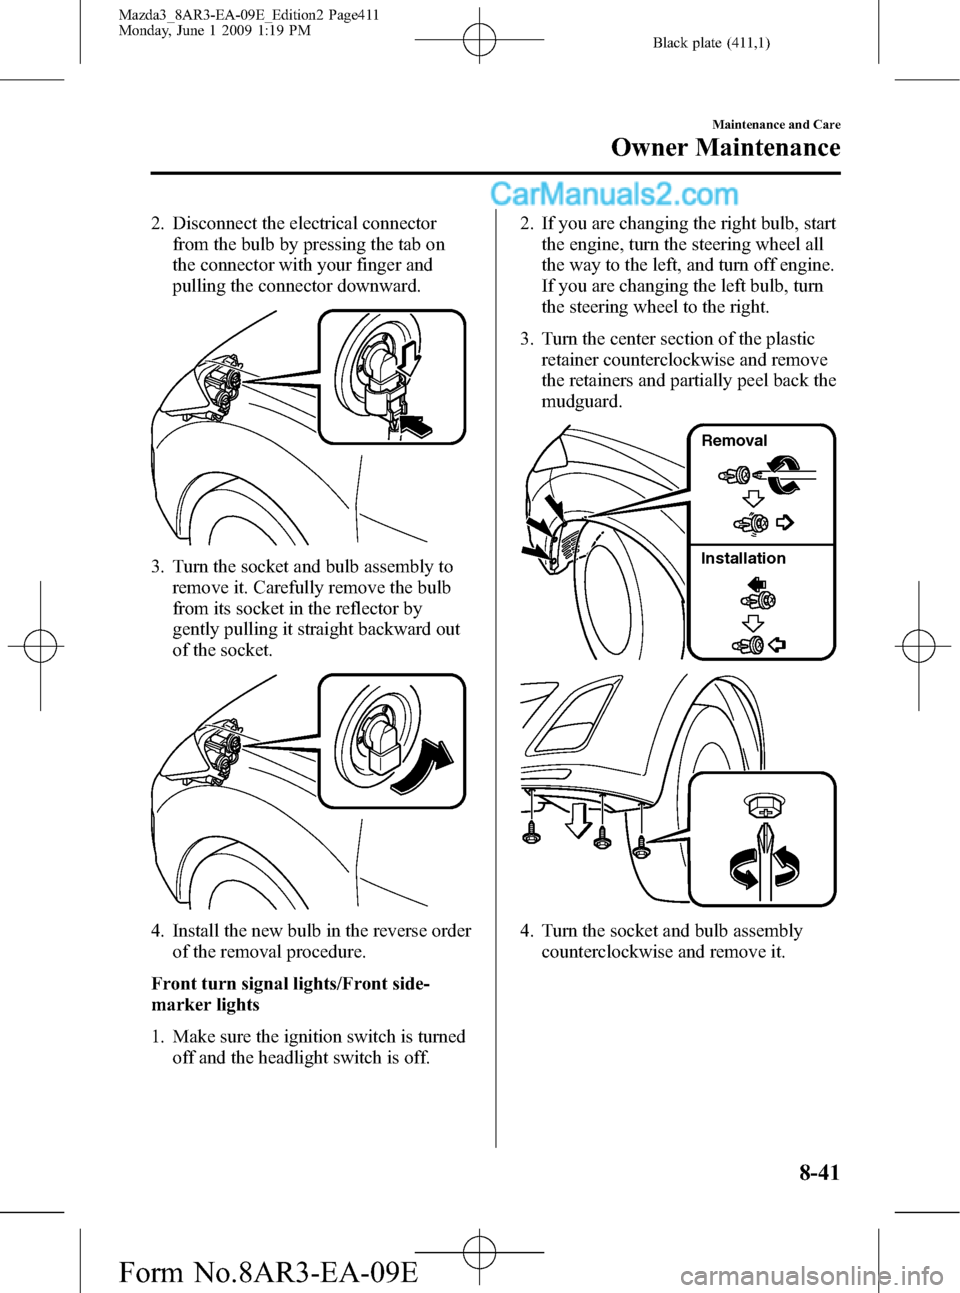
2. Disconnect the electrical connector
from the bulb by pressing the tab on
the connector with your finger and
pulling the connector downward.
3. Turn the socket and bulb assembly to
remove it. Carefully remove the bulb
from its socket in the reflector by
gently pulling it straight backward out
of the socket.
4. Install the new bulb in the reverse order
of the removal procedure.
Front turn signal lights/Front side-
marker lights
1. Make sure the ignition switch is turned
off and the headlight switch is off.2. If you are changing the right bulb, start
the engine, turn the steering wheel all
the way to the left, and turn off engine.
If you are changing the left bulb, turn
the steering wheel to the right.
3. Turn the center section of the plastic
retainer counterclockwise and remove
the retainers and partially peel back the
mudguard.
Installation Removal
4. Turn the socket and bulb assembly
counterclockwise and remove it.
Maintenance and Care
Owner Maintenance
8-41
Mazda3_8AR3-EA-09E_Edition2 Page411
Monday, June 1 2009 1:19 PM
Form No.8AR3-EA-09E
Page 413 of 500

Black plate (413,1)
3. Turn the socket and bulb assembly to
remove it. Carefully remove the bulb
from its socket in the reflector by
gently pulling it straight backward out
of the socket.
4. Install the new bulb in the reverse order
of the removal procedure.
Parking lights/Front turn signal lights/
Front side-marker lights
1. Make sure the ignition is switched off
and the headlight switch is off.
2. If you are changing the right bulb, start
the engine, turn the steering wheel all
the way to the left, and turn off engine.
If you are changing the left bulb, turn
the steering wheel to the right.3. Turn the center section of the plastic
retainer counterclockwise and remove
the retainers and partially peel back the
mudguard.
Installation Removal
4. Turn the socket and bulb assembly
counterclockwise and remove it.
5. Disconnect the bulb from the socket.
Maintenance and Care
Owner Maintenance
8-43
Mazda3_8AR3-EA-09E_Edition2 Page413
Monday, June 1 2009 1:19 PM
Form No.8AR3-EA-09E
Page 414 of 500

Black plate (414,1)
6. Install the new bulb in the reverse order
of the removal procedure.
Fog lightsí
1. Make sure the ignition is switched off,
and the headlight switch is off.
2. Turn the screw counterclockwise and
remove it and then partially peel back
the mudguard.
3. Disconnect the electrical connector
from the bulb by pressing the tab on
the connector with your finger and
pulling the connector downward.
4. Turn the socket and bulb assembly to
remove it. Carefully remove the bulb
from its socket in the reflector by
gently pulling it straight back out of the
socket.
5. Install the new bulb in the reverse order
of removal.
Side-turn signal lights
With LED bulb
Due to the complexity and difficulty of
the procedure, the LED bulbs should be
replaced by an Authorized Mazda Dealer.
NOTE
LED bulb replacement is not possible. The
rear combination component must be replaced.
With Non-LED bulb
1. Make sure the ignition is switched off,
and the turn signal switch is off.
8-44
Maintenance and Care
íSome models.
Owner Maintenance
Mazda3_8AR3-EA-09E_Edition2 Page414
Monday, June 1 2009 1:19 PM
Form No.8AR3-EA-09E