Page 381 of 504

Black plate (381,1)
qSchedule 1
Maintenance Interval Number of months or kilometers, whichever comes first
Months 6 12 18 24 30 36 42 48 54 60 66 72
×1000 km 10 20 30 40 50 60 70 80 90 100 110 120
ENGINE
Engine valve clearance Audibly inspect every 120,000 km, if noisy, adjust
Drive belts III
Engine oil RRRRRRRRRRRR
Engine oil filter RRRRRRRRRRRR
COOLING SYSTEM
Cooling system III
Engine coolant FL22 type
*1Replace at first 190,000 km or 10 years; after that, every
60,000 km or 3 years
Others RRR
FUEL SYSTEM
Air filter RRRRRR
Fuel lines and hoses I
*2I*2I
Hoses and tubes for emission I*2I*2I
Fuel filter R R R
IGNITION SYSTEM
Spark plugs Replace every 60,000 km
CHASSIS and BODY
Brake lines, hoses and connections IIIIII
Brake fluid level I I I I I I I I I
Brake fluid RRR
Disc brakes IIIIIIIIIIII
Tire (Rotation) Rotate every 10,000 km
Tire inflation pressure and tire wear IIIIIIIIIIII
Steering operation and linkages IIIIIIIIIIII
Power steering fluid level IIIIIIIIIIII
Front and rear suspension, ball joints and wheel
bearing axial play IIIIII
Driveshaft dust boots IIIIII
Bolts and nuts on chassis and body TTTTTT
Exhaust system and heat shields IIIIII
All locks and hinges LLLLLLLLLLLL
Washer fluid level IIIIIIIIIIII
Maintenance and Care
Scheduled Maintenance
8-9
Mazda3_8BG3-EA-09J_Edition2 Page381
Tuesday, December 8 2009 1:30 PM
Form No.8BG3-EA-09J
Page 383 of 504

Black plate (383,1)
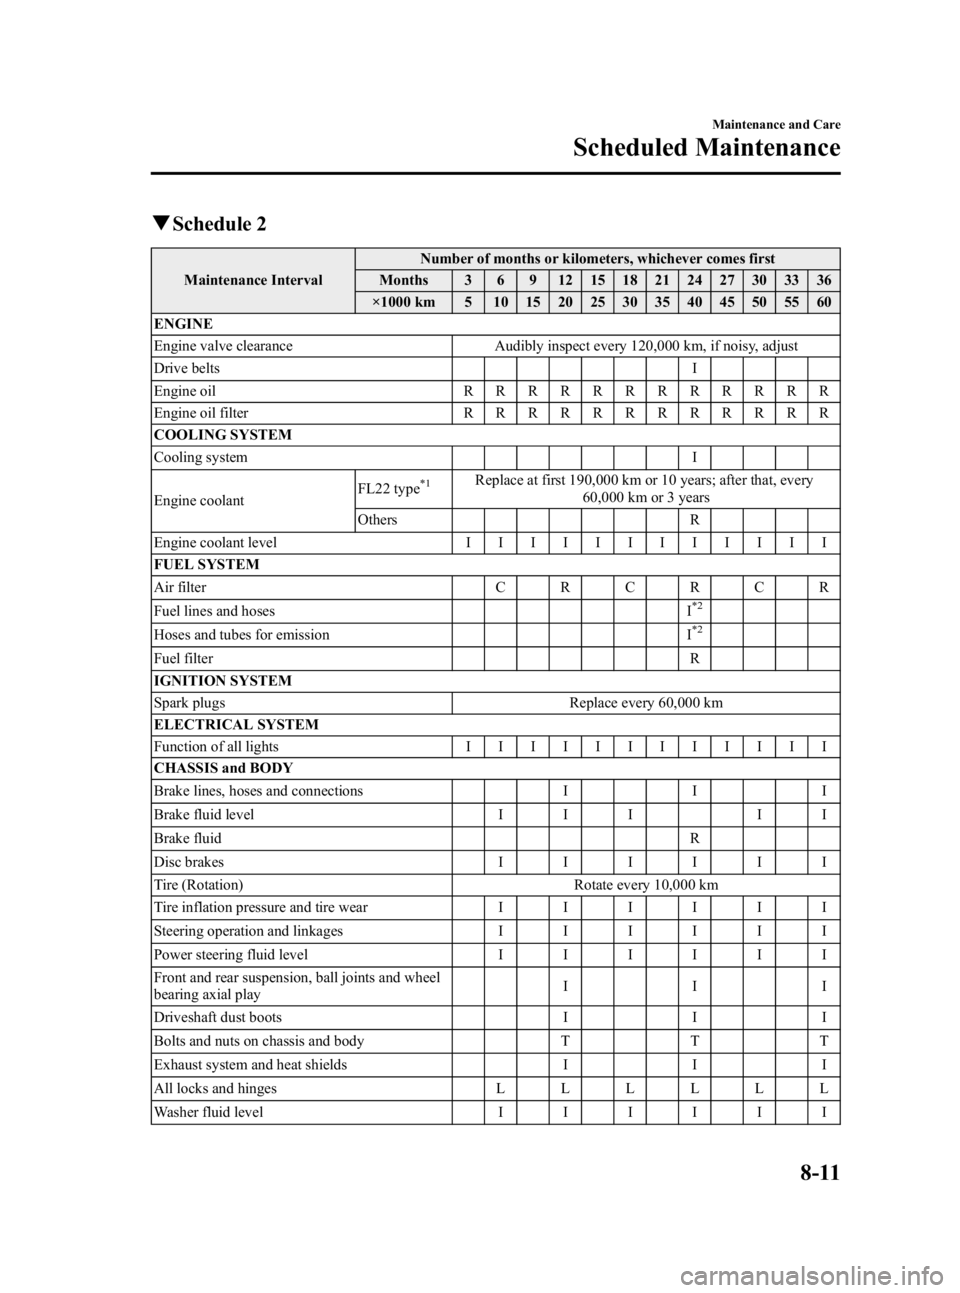
qSchedule 2
Maintenance Interval Number of months or kilometers, whichever comes first
Months 3 6 9 12 15 18 21 24 27 30 33 36
×1000 km 5 10 15 20 25 30 35 40 45 50 55 60
ENGINE
Engine valve clearance Audibly inspect every 120,000 km, if noisy, adjust
Drive belts I
Engine oil RRRRRRRRRRRR
Engine oil filter RRRRRRRRRRRR
COOLING SYSTEM
Cooling system I
Engine coolant FL22 type
*1Replace at first 190,000 km or 10 years; after that, every
60,000 km or 3 years
Others R
Engine coolant level IIIIIIIIIIII
FUEL SYSTEM
Air filter CRCRCR
Fuel lines and hoses I
*2
Hoses and tubes for emissionI*2
Fuel filter R
IGNITION SYSTEM
Spark plugs Replace every 60,000 km
ELECTRICAL SYSTEM
Function of all lights IIIIIIIIIIII
CHASSIS and BODY
Brake lines, hoses and connections III
Brake fluid level I I II I
Brake fluid R
Disc brakes IIIIII
Tire (Rotation) Rotate every 10,000 km
Tire inflation pressure and tire wear IIIIII
Steering operation and linkages IIIIII
Power steering fluid level IIIIII
Front and rear suspension, ball joints and wheel
bearing axial play III
Driveshaft dust boots III
Bolts and nuts on chassis and body TTT
Exhaust system and heat shields III
All locks and hinges LLLLLL
Washer fluid level IIIIII
Maintenance and Care
Scheduled Maintenance
8-11
Mazda3_8BG3-EA-09J_Edition2 Page383
Tuesday, December 8 2009 1:30 PM
Form No.8BG3-EA-09J
Page 385 of 504

Black plate (385,1)
(Cont.)Maintenance Interval Number of months or kilometers, whichever comes first
Months 39 42 45 48 51 54 57 60 63 66 69 72
×1000 km 65 70 75 80 85 90 95 100 105 110 115 120
ENGINE
Engine valve clearance Audibly inspect every 120,000 km, if noisy, adjust
Drive belts II
Engine oil RRRRRRRRRRRR
Engine oil filter RRRRRRRRRRRR
COOLING SYSTEM
Cooling system II
Engine coolant FL22 type
*1Replace at first 190,000 km or 10 years; after that, every
60,000 km or 3 years
Others R R
Engine coolant level IIIIIIIIIIII
FUEL SYSTEM
Air filter CRCRCR
Fuel lines and hoses I
*2I
Hoses and tubes for emission I*2I
Fuel filter R R
IGNITION SYSTEM
Spark plugs Replace every 60,000 km
ELECTRICAL SYSTEM
Function of all lights IIIIIIIIIIII
CHASSIS and BODY
Brake lines, hoses and connections III
Brake fluid level II I I
Brake fluid RR
Disc brakes IIIIII
Tire (Rotation) Rotate every 10,000 km
Tire inflation pressure and tire wear IIIIII
Steering operation and linkages IIIIII
Power steering fluid level IIIIII
Front and rear suspension, ball joints and wheel
bearing axial play III
Driveshaft dust boots III
Bolts and nuts on chassis and body TTT
Exhaust system and heat shields III
All locks and hinges LLLLLL
Washer fluid level IIIIII
Maintenance and Care
Scheduled Maintenance
8-13
Mazda3_8BG3-EA-09J_Edition2 Page385
Tuesday, December 8 2009 1:30 PM
Form No.8BG3-EA-09J
Page 387 of 504

Black plate (387,1)
Owner Maintenance Schedule
The owner or a qualified service technician should make these vehicle inspections at the
indicated intervals to ensure safe and dependable operation.
Bring any problem to the attention of an Authorized Mazda Dealer or qualified service
technician as soon as possible.
qWhen Refueling
lBrake and clutch fluid level (page 8-23)lEngine coolant level (page 8-21)lEngine oil level (page 8-20)lWasher fluid level (page 8-26)
qAt Least Monthly
Tire inflation pressures (page 8-35)
qAt Least Twice a Year (For Example, Every Spring and Fall)
lAutomatic transaxle fluid level (page 8-24)lPower steering fluid level (page 8-24)
You can do the following scheduled maintenance items if you have some mechanical
ability and a few basic tools and if you closely follow the directions in this manual.
lEngine coolant (page 8-21)lEngine oil (page 8-18)
Maintenance and Care
Owner Maintenance
8-15
Mazda3_8BG3-EA-09J_Edition2 Page387
Tuesday, December 8 2009 1:30 PM
Form No.8BG3-EA-09J
Page 389 of 504
Black plate (389,1)
Engine Compartment Overview
Power steering fluid reservoir
Power steering fluid reservoir
Windshield washer fluid reservoir
Windshield washer fluid reservoir
Engine coolant reservoirFuse block
Engine coolant reservoir
Engine oil-filler cap
Engine oil-filler capEngine oil dipstick
Brake/Clutch fluid reservoir
Brake/Clutch fluid reservoir
Battery
Battery
Fuse block
Automatic transaxle fluid-level dipstick
(Only for automatic transaxle)
2.0-liter and 2.5-liter engine
2.3-liter turbocharged engine
Engine oil dipstick
Maintenance and Care
Owner Maintenance
8-17
Mazda3_8BG3-EA-09J_Edition2 Page389
Tuesday, December 8 2009 1:30 PM
Form No.8BG3-EA-09J
Page 396 of 504

Black plate (396,1)
Power Steering Fluid
qInspecting Power Steering Fluid
Level
CAUTION
To avoid damage to the power
steering pump, don't operate the
vehicle for long periods when the
power steering fluid level is low.
NOTE
Use specified power steering fluid (page 10-4).
Inspect the fluid level in the reservoir at
each engine oil change with the engine off
and cold. Add fluid if necessary; it does
not require periodic changing.
The level must be kept between MIN and
MAX.
Visually examine the lines and hoses for
leaks and damage.
If new fluid is required frequently, consult
an Authorized Mazda Dealer.
Automatic Transaxle Fluid
(ATF)
í
q Inspecting Automatic Transaxle
Fluid Level
The automatic transaxle fluid level should
be inspected regularly. Measure it as
described below.
CAUTION
Ø Always check the automatic
transaxle fluid level according to
the following procedure. If the
procedure is not done correctly,
the automatic transaxle fluid level
cannot be measured accurately
which could lead to automatic
transaxle damage.
Ø A low fluid level can cause
transaxle slippage. Overfilling can
cause foaming, loss of fluid, and
transaxle malfunction.
Ø It is recommended to use Mazda
Genuine automatic transaxle fluid
(page 10-4).
1. Park on a level surface and set the parking brake firmly.
2. Make sure there is no ATF leakage from the ATF hose or the housing.
3. Shift the shift lever to the park position (P), start the engine and warm it up.
CAUTION
Do not shift the shift lever while the
engine is warming up. If the ATF level
is extremely low, the automatic
transaxle could be damaged.
8-24
Maintenance and Care
íSome models.
Owner Maintenance
Mazda3_8BG3-EA-09J_Edition2 Page396
Tuesday, December 8 2009 1:30 PM
Form No.8BG3-EA-09J
Page 409 of 504

Black plate (409,1)
lImproper wheel alignmentlOut-of-balance wheellSevere braking
After rotation, inflate all tire pressures to
specification (page 10-9) and inspect the
lug nuts for tightness.
CAUTION
Rotate unidirectional tires and radial
tires that have an asymmetrical tread
pattern or studs only from front to
rear, not from side to side. Tire
performance will be reduced if
rotated from side to side.
CAUTION
Limited-Slip Differential system;
don't use the following:
Ø Tires not of the designated size
Ø Tires of different sizes or types at
the same time
Ø Tires not sufficiently inflated
If these instructions aren't followed,
the rotation of the left and right
wheels will be different and will thus
apply a constant load on the limited-
slip differential.
This will cause a malfunction.
q Replacing a Tire
WARNING
Always use tires that are in good
condition:
Driving with worn tires is dangerous.
Reduced braking, steering, and
traction could result in an accident.
CAUTION
(With Tire Pressure Monitoring
System)
When replacing/repairing the tires or
wheels or both, have the work done
by an Authorized Mazda Dealer, or
the tire pressure sensors may be
damaged.
NOTE
(With Tire Pressure Monitoring System)lWhen tires with steel wire reinforcement in
the sidewalls are used, the system may not
function correctly even with a genuine
wheel.
Refer to System Error Activation on page
5-34.
lBe sure to install the tire pressure sensors
whenever tires or wheels are replaced.
Refer to Tires and Wheels on page 5-34.
If a tire wears evenly, a wear indicator
will appear as a solid band across the
tread.
Replace the tire when this happens.
New tread Tread wear indicator
Worn tread
You should replace it before the band is
across the entire tread.
Maintenance and Care
Owner Maintenance
8-37
Mazda3_8BG3-EA-09J_Edition2 Page409
Tuesday, December 8 2009 1:30 PM
Form No.8BG3-EA-09J
Page 414 of 504

Black plate (414,1)
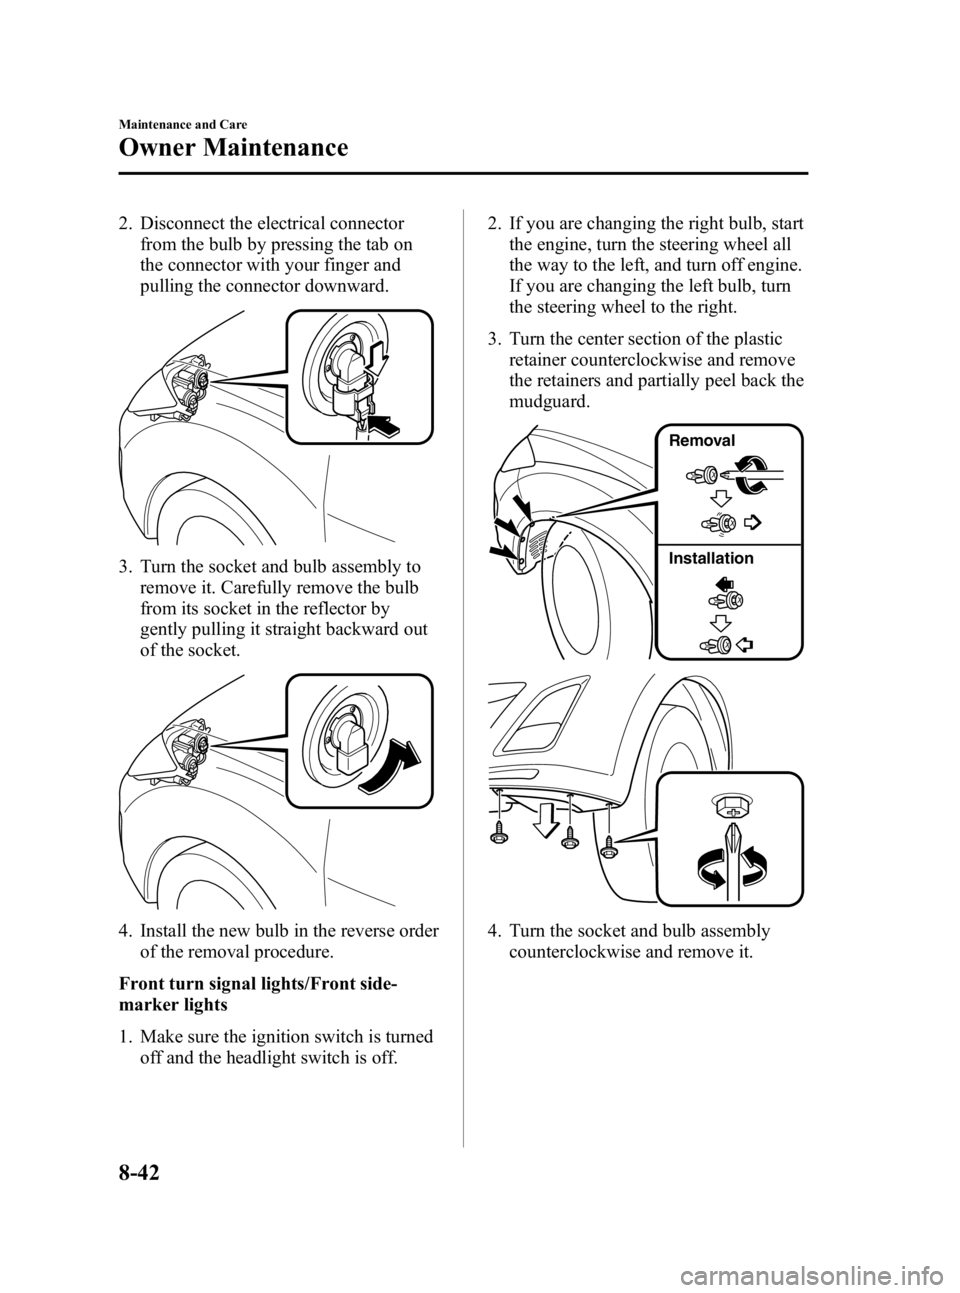
2. Disconnect the electrical connectorfrom the bulb by pressing the tab on
the connector with your finger and
pulling the connector downward.
3. Turn the socket and bulb assembly toremove it. Carefully remove the bulb
from its socket in the reflector by
gently pulling it straight backward out
of the socket.
4. Install the new bulb in the reverse order
of the removal procedure.
Front turn signal lights/Front side-
marker lights
1. Make sure the ignition switch is turned off and the headlight switch is off. 2. If you are changing the right bulb, start
the engine, turn the steering wheel all
the way to the left, and turn off engine.
If you are changing the left bulb, turn
the steering wheel to the right.
3. Turn the center section of the plastic retainer counterclockwise and remove
the retainers and partially peel back the
mudguard.
Installation Removal
4. Turn the socket and bulb assembly
counterclockwise and remove it.
8-42
Maintenance and Care
Owner Maintenance
Mazda3_8BG3-EA-09J_Edition2 Page414
Tuesday, December 8 2009 1:30 PM
Form No.8BG3-EA-09J