Page 388 of 504

Black plate (388,1)
Owner Maintenance Precautions
Improper or incomplete service may result in problems. This section gives instructions only
for items that are easy to perform.
As explained in the Introduction (page 8-2), several procedures can be done only by a
qualified service technician with special tools.
Improper owner maintenance during the warranty period may affect warranty coverage.
For details, read the separate Mazda Warranty statement provided with the vehicle. If
you're unsure about any servicing or maintenance procedure, have it done by an
Authorized Mazda Dealer.
There are strict environmental laws regarding the disposal of waste oil and fluids. Please
dispose of your waste properly and with due regard to the environment.
We recommend that you entrust the oil and fluid changes of your vehicle to an Authorized
Mazda Dealer.
WARNING
Do not perform maintenance work if you lack sufficient knowledge and experience or
the proper tools and equipment to do the work. Have maintenance work done by a
qualified technician:Performing maintenance work on a vehicle is dangerous if not done properly. You
can be seriously injured while performing some maintenance procedures.
If you must run the engine while working under the hood, make certain that you
remove all jewelry (especially rings, bracelets, watches, and necklaces) and all
neckties, scarves, and similar loose clothing before getting near the engine or cooling
fan which may turn on unexpectedly: Working under the hood with the engine running is dangerous. It becomes even
more dangerous when you wear jewelry or loose clothing.
Either can become entangled in moving parts and result in injury.
Switch the ignition to off and make sure the fan is not running before attempting to
work near the cooling fan: Working near the cooling fan when it is running is dangerous. The fan could
continue running indefinitely even if the engine has stopped and the engine
compartment temperature is high. You could be hit by the fan and seriously injured.
Do not leave items in the engine compartment: After you have finished checking or doing servicing in the engine compartment, do
not forget and leave items such as tools or rags in the engine compartment.
Tools or other items left in the engine compartment could cause engine damage or a
fire leading to an unexpected accident.
8-16
Maintenance and Care
Owner Maintenance
Mazda3_8BG3-EA-09J_Edition2 Page388
Tuesday, December 8 2009 1:30 PM
Form No.8BG3-EA-09J
Page 392 of 504
Black plate (392,1)
The quality designation SM, or ILSAC
must be on the label.
–30 –20 –10 0 10 20 30 40 50
–20 0 20 40 60 80 100 120
5W-30
qInspecting Engine Oil Level
1. Be sure the vehicle is on a level
surface.
2. Warm up the engine to normal operating temperature.
3. Turn it off and wait at least 5 minutes for the oil to return to the oil pan.
4. Pull out the dipstick, wipe it clean, and reinsert it fully.
Full
OK
Low
2.0-liter and 2.5-liter
engine
2.3-liter turbocharged
engine
Max
Min OK
5. Pull it out again and examine the level. It's OK between Low or MIN and Full
or MAX.
But if it's near or below Low or MIN,
add enough oil to bring the level to
Full or MAX.
CAUTION
Don't add engine oil over Full or
MAX. This may cause engine
damage.
6. Make sure the O-ring on the dipstick is positioned properly before reinserting
the dipstick.
8-20
Maintenance and Care
Owner Maintenance
Mazda3_8BG3-EA-09J_Edition2 Page392
Tuesday, December 8 2009 1:30 PM
Form No.8BG3-EA-09J
Page 400 of 504
Black plate (400,1)
qReplacing Windshield Wiper Blades
When the wipers no longer clean well, the
blades are probably worn or cracked.
Replace them.
CAUTION
To prevent damage to the wiper arms
and other components, don't try to
sweep the wiper arm by hand.
1. Raise the wiper arm and turn the blade assembly to expose the plastic locking
clip.
Compress the clip and slide the
assembly downward; then lift it off the
arm.
Plastic locking clip
CAUTION
To prevent damage to the windshield
let the wiper arm down easily, don't
let it slap down on the windshield. 2. Hold the end of the rubber and pull
until the tabs are free of the metal
support.
Metal support
Ta b
3. Remove the metal stiffener from each blade rubber and install them in the
new blade.
8-28
Maintenance and Care
Owner Maintenance
Mazda3_8BG3-EA-09J_Edition2 Page400
Tuesday, December 8 2009 1:30 PM
Form No.8BG3-EA-09J
Page 412 of 504

Black plate (412,1)
Light Bulbs
Overhead light/Map lights (Front)Overhead light (Rear) Overhead light (Rear)
Front turn signal lights/Front side-
marker lights/ Parking lights
Xenon fusion bulb/Adaptive Front
Lighting System
Fog lights
Parking lights/
Adaptive Front Lighting
System (AFS)
Overhead light/Map lights (Front)
Front turn signal lights
/Front side-marker lights
/Parking lights
Head lights (Low beam)
Head lights (High beam)/
Daytime running lights
Head lights (Low/High beam)
Fog lights
Side turn signal light (LED type)
Trunk light
Brake lights/Taillights Brake lights/Taillights
Rear turn signal lights Rear turn signal lights
Rear side marker lights
Rear side marker lights
Except Canada
Some models.
Reverse lights
Reverse lights
License plate lights License plate lights
High-mount brake light Halogen bulb
212
2
1
2
High-mount brake light
Side turn signal lights
(Bulb type) Side turn signal lights
(LED type)
Luggage
compartment light
4 Door
5 Door
Canada
Daytime running lights
8-40
Maintenance and Care
Owner Maintenance
Mazda3_8BG3-EA-09J_Edition2 Page412
Tuesday, December 8 2009 1:30 PM
Form No.8BG3-EA-09J
Page 413 of 504

Black plate (413,1)
WARNING
Do not replace the xenon fusion bulbs
yourself:Replacing the xenon fusion bulbs
yourself is dangerous. Because the
xenon fusion bulbs require high
voltage, you could receive an electric
shock if the bulbs are handled
incorrectly. Consult an Authorized
Mazda Dealer when the replacement
is necessary.
Never touch the glass portion of a
halogen bulb with your bare hands and
always wear eye protection when
handling or working around the bulbs: When a halogen bulb breaks, it is
dangerous. These bulbs contain
pressurized gas. If one is broken, it
will explode and serious injuries
could be caused by the flying glass.
If the glass portion is touched with
bare hands, body oil could cause the
bulb to overheat and explode when
lit.
Always keep halogen bulbs out of the
reach of children: Playing with a halogen bulb is
dangerous. Serious injuries could be
caused by dropping a halogen bulb
or breaking it some other way.
qReplacing Exterior Light Bulbs
NOTElTo replace the bulb, contact an Authorized
Mazda Dealer.
lIf the halogen bulb is accidentally touched,
it should be cleaned with rubbing alcohol
before being used.
lUse the protective cover and carton for the
replacement bulb to dispose of the old bulb
promptly and out of the reach of children.
Xenon fusion bulb/Adaptive front
lighting system
Replacing the headlight bulbs
(Low/High beam bulbs)
You cannot replace the low/high beam
bulbs by yourself. The bulbs must be
replaced at an expert repairer, we
recommend an Authorized Mazda Dealer.
Parking lights (Except Canada)
1. Make sure the ignition is switched off,
and the headlight switch is off.
2. Turn the socket and bulb assembly counterclockwise and remove it.
3. Disconnect the bulb from the socket.
4. Install the new bulb in the reverse order of the removal procedure.
Daytime running lights (Canada)
1. Make sure the ignition is switched off, and the headlight switch is off.
Maintenance and Care
Owner Maintenance
8-41
Mazda3_8BG3-EA-09J_Edition2 Page413
Tuesday, December 8 2009 1:30 PM
Form No.8BG3-EA-09J
Page 414 of 504

Black plate (414,1)
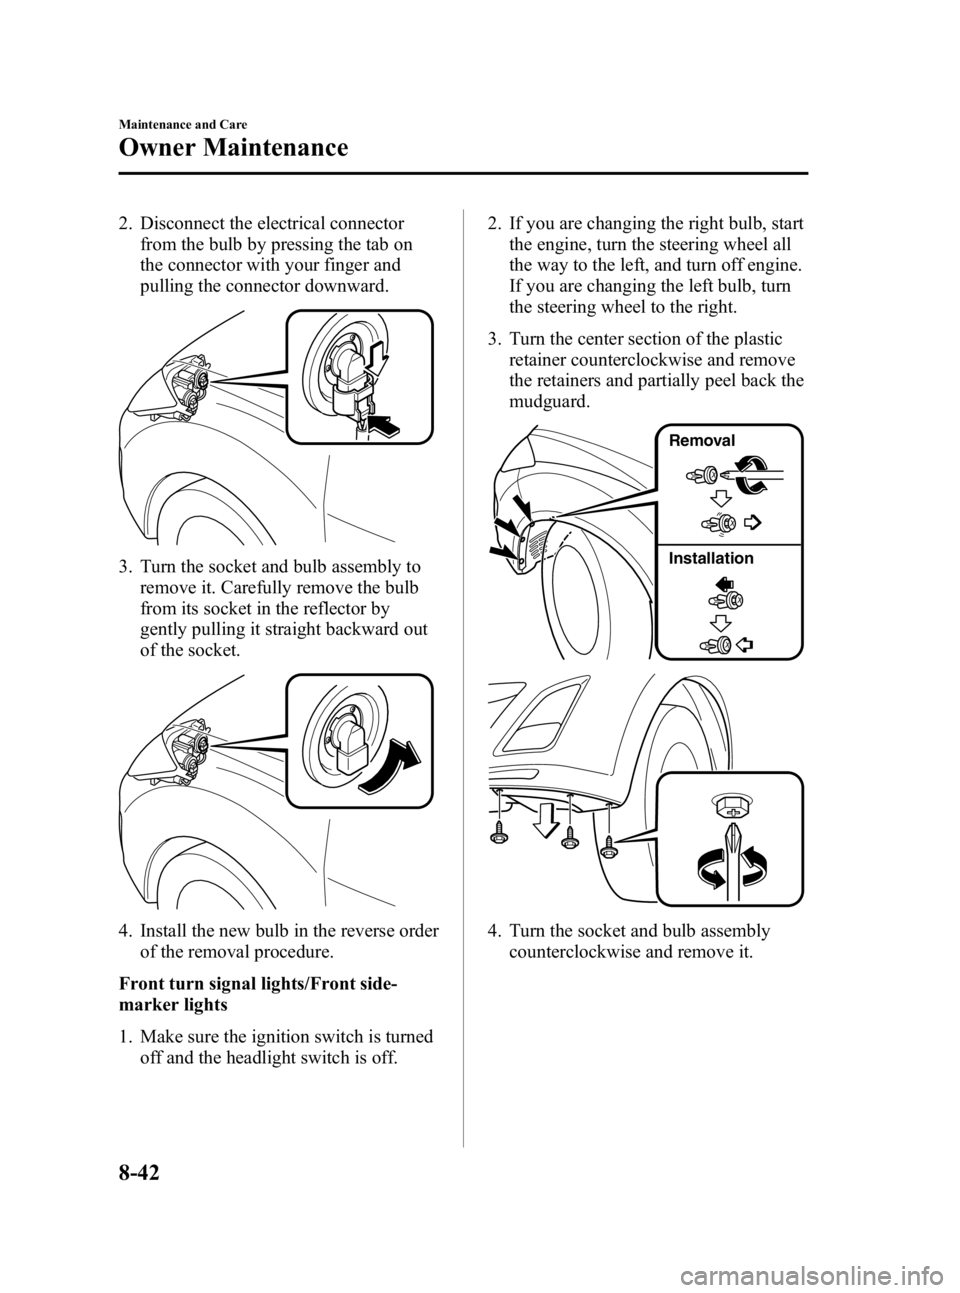
2. Disconnect the electrical connectorfrom the bulb by pressing the tab on
the connector with your finger and
pulling the connector downward.
3. Turn the socket and bulb assembly toremove it. Carefully remove the bulb
from its socket in the reflector by
gently pulling it straight backward out
of the socket.
4. Install the new bulb in the reverse order
of the removal procedure.
Front turn signal lights/Front side-
marker lights
1. Make sure the ignition switch is turned off and the headlight switch is off. 2. If you are changing the right bulb, start
the engine, turn the steering wheel all
the way to the left, and turn off engine.
If you are changing the left bulb, turn
the steering wheel to the right.
3. Turn the center section of the plastic retainer counterclockwise and remove
the retainers and partially peel back the
mudguard.
Installation Removal
4. Turn the socket and bulb assembly
counterclockwise and remove it.
8-42
Maintenance and Care
Owner Maintenance
Mazda3_8BG3-EA-09J_Edition2 Page414
Tuesday, December 8 2009 1:30 PM
Form No.8BG3-EA-09J
Page 415 of 504

Black plate (415,1)
5. Disconnect the bulb from the socket.
6. Install the new bulb in the reverse orderof the removal procedure.
Halogen bulb
High-beam bulbs/Daytime running
lights (Canada)
1. Make sure the ignition is switched off,and the headlight switch is off.
2. Disconnect the electrical connector from the bulb by pressing the tab on
the connector with your finger and
pulling the connector downward.
3. Turn the socket and bulb assembly toremove it. Carefully remove the bulb
from its socket in the reflector by
gently pulling it straight backward out
of the socket.
4. Install the new bulb in the reverse order
of the removal procedure.
Low-beam bulbs
1. Make sure the ignition is switched off, and the headlight switch is off.
2. Disconnect the electrical connector from the bulb by pressing the tab on
the connector with your finger and
pulling the connector downward.
Maintenance and Care
Owner Maintenance
8-43
Mazda3_8BG3-EA-09J_Edition2 Page415
Tuesday, December 8 2009 1:30 PM
Form No.8BG3-EA-09J
Page 416 of 504

Black plate (416,1)
3. Turn the socket and bulb assembly toremove it. Carefully remove the bulb
from its socket in the reflector by
gently pulling it straight backward out
of the socket.
4. Install the new bulb in the reverse order
of the removal procedure.
Parking lights/Front turn signal lights/
Front side-marker lights
1. Make sure the ignition is switched off and the headlight switch is off.
2. If you are changing the right bulb, start the engine, turn the steering wheel all
the way to the left, and turn off engine.
If you are changing the left bulb, turn
the steering wheel to the right. 3. Turn the center section of the plastic
retainer counterclockwise and remove
the retainers and partially peel back the
mudguard.
Installation Removal
4. Turn the socket and bulb assembly
counterclockwise and remove it.
5. Disconnect the bulb from the socket.
8-44
Maintenance and Care
Owner Maintenance
Mazda3_8BG3-EA-09J_Edition2 Page416
Tuesday, December 8 2009 1:30 PM
Form No.8BG3-EA-09J