Page 197 of 285

ROADSIDE ASSISTANCE
Getting roadside assistance
To fully assist you should you have a vehicle concern, Ford Motor
Company offers a complimentary roadside assistance program. This
program is separate from the New Vehicle Limited Warranty. The service
is available:
•24–hours, seven days a week
•for the coverage period listed on the Roadside Assistance Card
included in your Owner Guide portfolio.
Roadside assistance will cover:
•a flat tire change with a good spare (except vehicles that have been
supplied with a tire inflation kit)
•battery jump start
•lock-out assistance (key replacement cost is the customer’s
responsibility)
•fuel delivery – Independent Service Contractors, if not prohibited by
state, local or municipal law shall deliver up to 2.0 gallons (7.5L) of
gasoline or 5 gallons (18.9L) of diesel fuel to a disabled vehicle. Fuel
delivery service is limited to two no-charge occurrences within a
12-month period.
•winch out – available within 100 feet (30.5 meters) of a paved or
county maintained road, no recoveries.
•towing – Ford/Mercury/Lincoln eligible vehicle towed to an authorized
dealer within 35 miles (56.3 km) of the disablement location or to the
nearest authorized dealer. If a member requests to be towed to an
authorized dealer more than 35 miles (56.3 km) from the disablement
location, the member shall be responsible for any mileage costs in
excess of 35 miles (56.3 km).
Trailers shall be covered up to $200 if the disabled eligible vehicle
requires service at the nearest authorized dealer. If the trailer is disabled,
but the towing vehicle is operational, the trailer does not qualify for any
roadside services.
Canadian customers refer to your Customer Information Guide
for information on:
•coverage period
•exact fuel amounts
Roadside Emergencies
197
2010 Town Car(tow)
Owners Guide, 1st Printing
USA(fus)
Page 201 of 285
The fuses are coded as follows.
Fuse/Relay
LocationFuse Amp
RatingProtected Circuits
1 10A Starter relay coil
2 10A Restraint control module (RCM),
Occupant classification sensor
(OCS), Passenger airbag
deactivation indicator (PADI)
3 10A Audio
4 10A Back-up lamps, Anti-lock brake
system (ABS)
5 7.5A Lighting control module (LCM)
6 10A Passive anti-theft system (PATS),
Powertrain control module (PCM)
relay coil, Ignition relay coil, Fuel
relay coil
7 10A Wiper module
Roadside Emergencies
201
2010 Town Car(tow)
Owners Guide, 1st Printing
USA(fus)
Page 202 of 285
Fuse/Relay
LocationFuse Amp
RatingProtected Circuits
8 10A Power decklid module (PDM),
Overdrive cancel switch, Cluster,
Compass module, LCM, Traction
Control™ switch
9 7.5A Door lock switch illumination,
Heated seat switch illumination,
Electrochromatic mirror
10 15A Hazards
11 15A Turn signal
12 15A Audio
13 10A Extended rear park aide module,
Cluster
14 15A Adjustable pedals, Delayed
accessory relay coil
15 10A Dual automatic temperature
control (DATC) module
16 20A OBD II
17 10A A/C cycle switch, Heated seat
modules
18 15A LCM (Interior lighting)
19 7.5A Driver’s door module (DDM)
switches, PDM, Power mirrors,
Driver seat module (DSM), DDM,
PAT S L E D
20 10A LCM (Right-hand low beam)
21 10A Analog clock, LCM (Illumination)
22 10A LCM (Left-hand low beam)
23 10A LCM
24 15A LCM (High beams), Multi-function
switch (Flash-to-pass)
25 10A DATC module, Cluster
Roadside Emergencies
202
2010 Town Car(tow)
Owners Guide, 1st Printing
USA(fus)
Page 209 of 285

Full-size Matching Spare Tire/Wheel Information
This spare tire/wheel will match the road tire/wheel. When driving with
the full size matching spare tire/wheel, do not exceed 70 mph
(113 km/h). It is intended for temporary use only. This means if you
need to use it, you should replace it as soon as possible.
Tire change procedure
Note:If your vehicle is equipped with the tire pressure monitoring
system (TPMS), the system indicator light will illuminate when the spare
is in use. To restore the full functionality of the TPMS system, all road
wheels equipped with the tire pressure monitoring sensors must be
mounted on the vehicle
If your vehicle is equipped with TPMS, have a flat tire serviced by an
authorized dealer in order to prevent damage to the TPMS sensor, refer
toTire pressure monitoring system (TPMS)in theTires, Wheels and
Loadingchapter. Replace the spare tire with a road tire as soon as
possible.
WARNING:When one of the front wheels is off the ground, the
transmission alone will not prevent the vehicle from moving or
slipping off the jack, even if the vehicle is in P (Park).
WARNING:To help prevent the vehicle from moving when you
change a tire, be sure the parking brake is set, then block (in
both directions) the wheel that is diagonally opposite (other side and
end of the vehicle) to the tire being changed.
WARNING:If the vehicle slips off the jack, you or someone else
could be seriously injured.
WARNING:Do not attempt to change a tire on the side of the
vehicle close to moving traffic. Pull far enough off the road to
avoid the danger of being hit when operating the jack or changing the
wheel.
Note:Passengers should not remain in the vehicle when the vehicle is
being jacked.
Roadside Emergencies
209
2010 Town Car(tow)
Owners Guide, 1st Printing
USA(fus)
Page 210 of 285
1. Park on a level surface, activate
hazard flashers and set parking
brake.
2. Place gearshift lever in P (Park),
turn engine off and block the
diagonally opposite wheel.
3. Remove the spare tire and the jack. The jack could be located:
•under the full size spare tire or
•in the trunk, (in a holder
bracket), on the right-hand side,
next to the wheel well.
HOOD
Roadside Emergencies
210
2010 Town Car(tow)
Owners Guide, 1st Printing
USA(fus)
Page 211 of 285
WARNING:On vehicles
equipped with air
suspension, turn off the air
suspension switch prior to jacking,
hoisting or towing your vehicle.
Refer toAir suspension systemin
theDrivingchapter for more
information.
4. Remove the lug wrench (A) from
the jack. Rotate the lug wrench
socket out from the handle.
5. Locate pry off notch (if
equipped) and remove the center
ornament from the aluminum wheel
with the tapered end of the wheel
nut wrench that came with your
vehicle. Insert and twist the handle,
then pry against the wheel.
6. Loosen each wheel lug nut
one-half turn counterclockwise but
do not remove them until the wheel is raised off the ground.
OFF
A
Roadside Emergencies
211
2010 Town Car(tow)
Owners Guide, 1st Printing
USA(fus)
Page 212 of 285
Before placing the jack under the vehicle, NOTE the jack location
markings:
JACK LOCATION-FRONT
The jack location markings can be
foundon the lower outer edge of
the body.
•Locate the jack locator mark
(B -semi-circle) on the body (C)
near the tire you are changing,
then place the jack (D)under
the frame (A) of the vehicle
aligning it with the mark
(B -semi-circle).
JACK LOCATION-REAR
The jack location markings can be
foundon the lower outer edge of
the body.
•Locate the jack locator mark
(B -triangle) on the body (C)
near the tire you are changing,
then place the jack (D)under
the frame (A) of the vehicle
aligning it with the mark
(B -triangle).
•Position the jack according to the
following guides and turn the jack
handle clockwise until the wheel
is completely off the ground.
B
C
D
A
B
C
D
A
Roadside Emergencies
212
2010 Town Car(tow)
Owners Guide, 1st Printing
USA(fus)
Page 213 of 285

WARNING:To lessen risk
of personal injury, do not
put any part of your body under
the vehicle while changing a tire.
Do not start the engine when your
vehicle is on the jack. The jack is
ONLY meant for changing the tire.
•Never use the rear differential
as a jacking point.
7. Remove the lug nuts with the lug wrench.
8. Replace the flat tire with the spare tire, making sure the valve stem is
facing outward. Reinstall lug nuts until the wheel is snug against the hub.
Do not fully tighten the lug nuts until the wheel has been lowered.
9. Lower the vehicle by turning the jack handle counterclockwise.
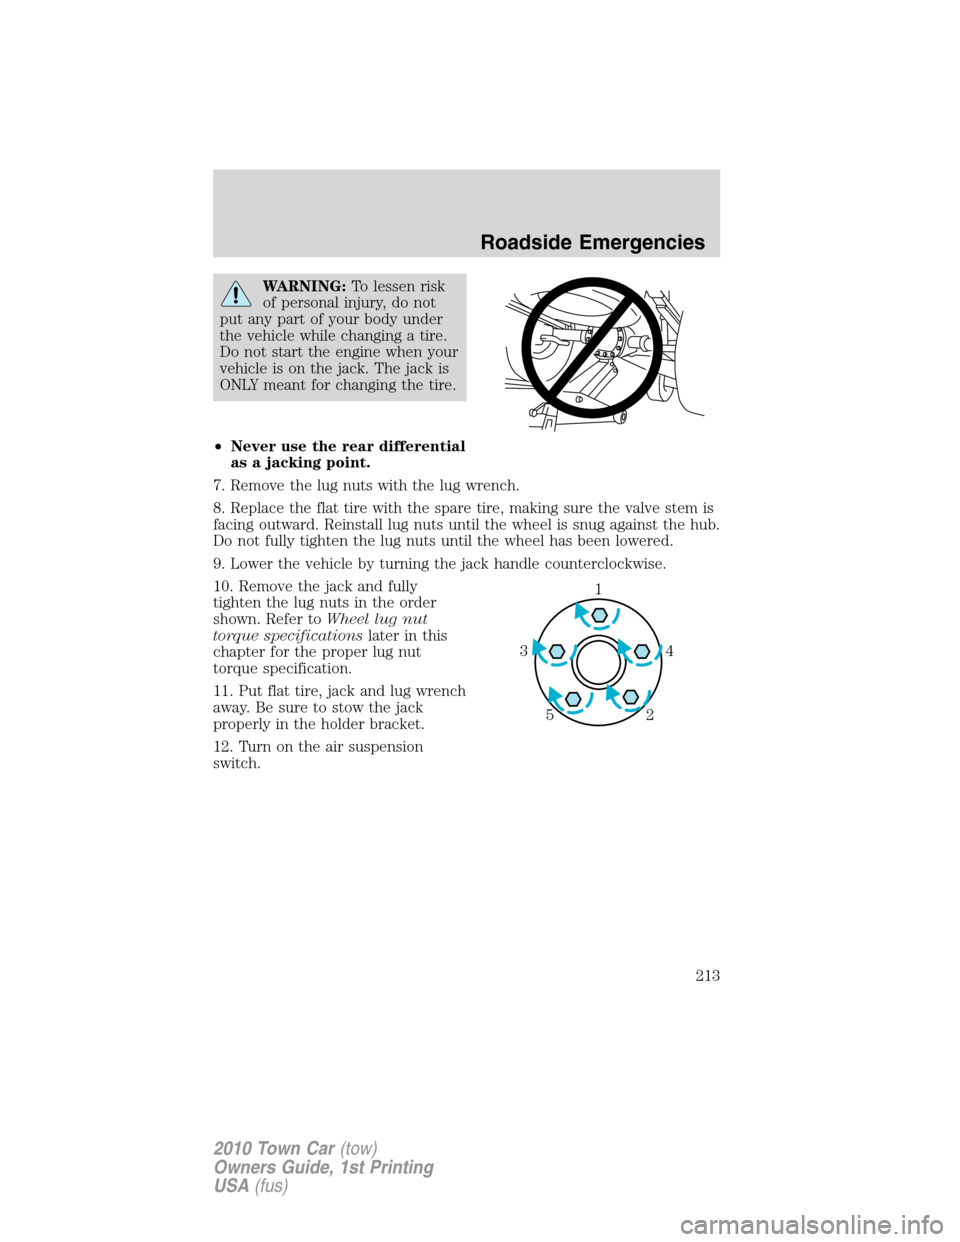
10. Remove the jack and fully
tighten the lug nuts in the order
shown. Refer toWheel lug nut
torque specificationslater in this
chapter for the proper lug nut
torque specification.
11. Put flat tire, jack and lug wrench
away. Be sure to stow the jack
properly in the holder bracket.
12. Turn on the air suspension
switch.
1
4 3
2 5
Roadside Emergencies
213
2010 Town Car(tow)
Owners Guide, 1st Printing
USA(fus)