2010 LINCOLN TOWN CAR tires
[x] Cancel search: tiresPage 174 of 285
Steps for determining the correct load limit:
1. Locate the statement “The combined weight of occupants and cargo
should never exceed XXX kg or XXX lbs.” on your vehicle’s placard.
2. Determine the combined weight of the driver and passengers that will
be riding in your vehicle.
3. Subtract the combined weight of the driver and passengers from XXX
kg or XXX lbs.
4.
The resulting figure equals the available amount of cargo and luggage
load capacity. For example, if the “XXX” amount equals 1,400 lbs. and
there will be five 150 lb. passengers in your vehicle, the amount of
available cargo and luggage load capacity is 650 lbs. (1400–750 (5 x 150) =
650 lb.). In metric units (635–340 (5 x 68) = 295 kg.)
5. Determine the combined weight of luggage and cargo being loaded on
the vehicle. That weight may not safely exceed the available cargo and
luggage load capacity calculated in Step 4.
6. If your vehicle will be towing a trailer, load from your trailer will be
transferred to your vehicle. Consult this manual to determine how this
reduces the available cargo and luggage load capacity of your vehicle.
The following gives you a few examples on how to calculate the available
amount of cargo and luggage load capacity:
•Another example for your vehicle with 1,400 lb. (635 kg) of cargo and
luggage capacity. You decide to go golfing. Is there enough load
capacity to carry you, 4 of your friends and all the golf bags? You and
four friends average 220 lb. (99 kg) each and the golf bags weigh
approximately 30 lb. (13.5 kg) each. The calculation would be: 1,400 -
(5 x 220) - (5 x 30) = 1,400 - 1,100 - 150 = 150 lb. Yes, you have
enough load capacity in your vehicle to transport four friends and
your golf bags. In metric units, the calculation would be: 635 kg - (5 x
99 kg) - (5 x 13.5 kg) = 635 - 495 - 67.5 = 72.5 kg.
•A final example for your vehicle with 1,400 lb. (635 kg) of cargo and
luggage capacity. You and one of your friends decide to pick up
cement from the local home improvement store to finish that patio
you have been planning for the past 2 years. Measuring the inside of
the vehicle with the rear seat folded down, you have room for
12-100 lb. (45 kg) bags of cement. Do you have enough load capacity
to transport the cement to your home? If you and your friend each
weigh 220 lb. (99 kg), the calculation would be: 1,400 - (2 x 220) -
(12 x 100) = 1,400 - 440 - 1,200 = - 240 lb. No, you do not have
enough cargo capacity to carry that much weight. In metric units, the
Tires, Wheels and Loading
174
2010 Town Car(tow)
Owners Guide, 1st Printing
USA(fus)
Page 175 of 285
calculation would be: 635 kg - (2 x 99 kg) - (12 x 45 kg) = 635 - 198 -
540 = -103 kg. You will need to reduce the load weight by at least
240 lb. (104 kg). If you remove 3-100 lb. (45 kg) cement bags, then
the load calculation would be:
1,400 - (2 x 220) - (9 x 100) = 1,400 - 440 - 900 = 60 lb. Now you
have the load capacity to transport the cement and your friend home.
In metric units, the calculation would be: 635 kg - (2 x 99 kg) - (9 x
45 kg) = 635 - 198 - 405 = 32 kg.
The above calculations also assume that the loads are positioned in your
vehicle in a manner that does not overload the Front or the Rear Gross
Axle Weight Rating specified for your vehicle on the Safety Compliance
Certification Label found on the edge of the driver’s door.
TRAILER TOWING
Your vehicle is classified as a light duty towing vehicle. Do not tow a
trailer until your vehicle has been driven at least 1,000 miles (1,600 km).
Note: The L-series Town Car (extended length) is NOT rated for towing.
Towing a trailer places an additional load on your vehicle’s engine,
transmission, brakes, tires and suspension. Inspect these components
carefully after towing.
Your loaded trailer should weigh no more than 1,500 lb. (680 kg).Do
not exceed the GVWR specified on the Safety Compliance
Certification Label.
WARNING:Towing trailers beyond the maximum recommended
gross trailer weight exceeds the limit of the vehicle and could
result in engine damage, transmission damage, structural damage, loss
of vehicle control, vehicle rollover and personal injury.
The GCW of your vehicle and trailer should not exceed 6,600 lb.
(2,993 kg).
Preparing to tow
Use the proper equipment for towing a trailer and make sure it is
properly attached to your vehicle. Contact your authorized dealer or a
reliable trailer dealer as soon as possible if you require assistance.
Hitches
Do not use hitches that clamp onto the vehicle bumper. Use a load
carrying hitch. You must distribute the load in your trailer so that
10–15% of the total weight of the trailer is on the tongue.
Tires, Wheels and Loading
175
2010 Town Car(tow)
Owners Guide, 1st Printing
USA(fus)
Page 176 of 285
Safety chains
Always connect the trailer’s safety chains to the frame or hook retainers
of the vehicle hitch. To connect the trailer’s safety chains, cross the
chains under the trailer tongue and allow slack for turning corners.
If you use a rental trailer, follow the instructions that the rental agency
gives to you.
Do not attach safety chains to the bumper.
Trailer brakes
Electric brakes and manual, automatic or surge-type trailer brakes are
safe if installed properly and adjusted to the manufacturer’s
specifications. The trailer brakes must meet local and Federal
regulations.
WARNING:Do not connect a trailer’s hydraulic brake system
directly to your vehicle’s brake system. Your vehicle may not
have enough braking power and your chances of having a collision
greatly increase.
The braking system of the tow vehicle is rated for operation at the
GVWR not GCWR.
Trailer lamps
Trailer lamps are required on most towed vehicles. Make sure all running
lights, brake lights, turn signals and hazard lights are working. Contact
your authorized dealer or trailer rental agency for proper instructions
and equipment for hooking up trailer lamps.
Driving while you tow
When towing a trailer:
•To ensure proper “break-in” of powertrain components, do not trailer
tow during the first 1,000 miles (1,600 km) of a new vehicle.
•To ensure proper “break-in” of powertrain components during the first
500 miles (800 km) of trailer towing, drive no faster than 70 mph
(113 km/h) with no full throttle starts.
•Turn off the speed control. The speed control may shut off
automatically when you are towing on long, steep grades.
•Consult your local motor vehicle speed regulations for towing a trailer.
Tires, Wheels and Loading
176
2010 Town Car(tow)
Owners Guide, 1st Printing
USA(fus)
Page 177 of 285
•To eliminate excessive shifting, use a lower gear. This will also assist
in transmission cooling. For additional information, refer toAutomatic
transmission operationin theDrivingchapter.
•Anticipate stops and brake gradually.
•Do not exceed the GCWR rating or transmission damage may occur.
Servicing after towing
If you tow a trailer for long distances, your vehicle will require more
frequent service intervals. Refer to yourscheduled maintenance
informationfor more information.
Trailer towing tips
•Practice turning, stopping and backing up before starting on a trip to
get the feel of the vehicle trailer combination. When turning, make
wider turns so the trailer wheels will clear curbs and other obstacles.
•Allow more distance for stopping with a trailer attached.
•If you are driving down a long or steep hill, shift to a lower gear. Do
not apply the brakes continuously, as they may overheat and become
less effective.
•The trailer tongue weight should be 10–15% of the loaded trailer
weight.
•If you will be towing a trailer frequently in hot weather, hilly
conditions, at GCWR, or any combination of these factors, consider
refilling your rear axle with synthetic gear lube if not already so
equipped. Refer to theMaintenance and Specificationschapter for
the lubricant specification. Remember that regardless of the rear axle
lube used, do not tow a trailer for the first 1,000 miles (1,600 km) of a
new vehicle, and that the first 500 miles (800 km) of towing be done
at no faster than 70 mph (113 km/h) with no full throttle starts.
•After you have traveled 50 miles (80 km), thoroughly check your
hitch, electrical connections and trailer wheel lug nuts.
•To aid in engine/transmission cooling and A/C efficiency during hot
weather while stopped in traffic, place the gearshift lever in P (Park).
•Vehicles with trailers should not be parked on a grade. If you must
park on a grade, place wheel chocks under the trailer’s wheels.
Tires, Wheels and Loading
177
2010 Town Car(tow)
Owners Guide, 1st Printing
USA(fus)
Page 178 of 285
Launching or retrieving a boat
Disconnect the wiring to the trailer before backing the trailer
into the water. Reconnect the wiring to the trailer after the
trailer is removed from the water.
When backing down a ramp during boat launching or retrieval:
•do not allow the static water level to rise above the bottom edge of
the rear bumper.
•do not allow waves to break higher than 6 inches (15 cm) above the
bottom edge of the rear bumper.
Exceeding these limits may allow water to enter vehicle components:
•causing internal damage to the components.
•affecting driveability, emissions and reliability.
Replace the rear axle lubricant any time the axle has been submerged in
water. Rear axle lubricant quantities are not to be checked or changed
unless a leak is suspected or repair required.
RECREATIONAL TOWING
Follow these guidelines if you have a need for recreational (RV) towing.
An example of recreational towing would be towing your vehicle behind
a motorhome. These guidelines are designed to ensure that your
transmission is not damaged.
All vehicles:Do not tow your vehicle with any wheels on the ground, as
vehicle or transmission damage may occur. It is recommended to tow
your vehicle with all four (4) wheels off the ground such as when using a
car-hauling trailer. Otherwise, no recreational towing is permitted.
In case of a roadside emergency with a disabled vehicle, seeWrecker
towingin theRoadside Emergencieschapter.
Tires, Wheels and Loading
178
2010 Town Car(tow)
Owners Guide, 1st Printing
USA(fus)
Page 187 of 285
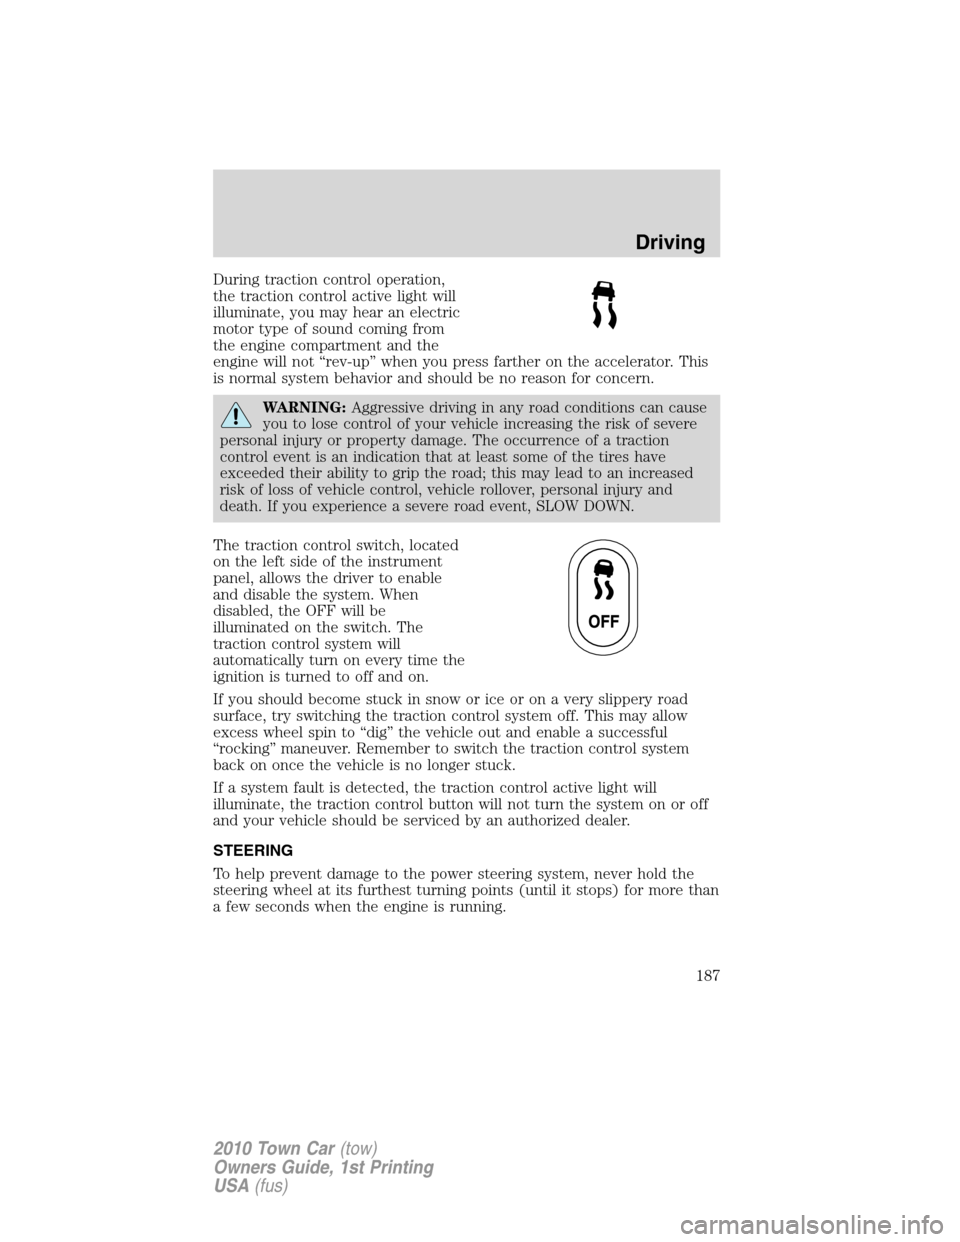
During traction control operation,
the traction control active light will
illuminate, you may hear an electric
motor type of sound coming from
the engine compartment and the
engine will not “rev-up” when you press farther on the accelerator. This
is normal system behavior and should be no reason for concern.
WARNING:Aggressive driving in any road conditions can cause
you to lose control of your vehicle increasing the risk of severe
personal injury or property damage. The occurrence of a traction
control event is an indication that at least some of the tires have
exceeded their ability to grip the road; this may lead to an increased
risk of loss of vehicle control, vehicle rollover, personal injury and
death. If you experience a severe road event, SLOW DOWN.
The traction control switch, located
on the left side of the instrument
panel, allows the driver to enable
and disable the system. When
disabled, the OFF will be
illuminated on the switch. The
traction control system will
automatically turn on every time the
ignition is turned to off and on.
If you should become stuck in snow or ice or on a very slippery road
surface, try switching the traction control system off. This may allow
excess wheel spin to “dig” the vehicle out and enable a successful
“rocking” maneuver. Remember to switch the traction control system
back on once the vehicle is no longer stuck.
If a system fault is detected, the traction control active light will
illuminate, the traction control button will not turn the system on or off
and your vehicle should be serviced by an authorized dealer.
STEERING
To help prevent damage to the power steering system, never hold the
steering wheel at its furthest turning points (until it stops) for more than
a few seconds when the engine is running.
Driving
187
2010 Town Car(tow)
Owners Guide, 1st Printing
USA(fus)
Page 192 of 285
•To return to O/D (overdrive mode), press the transmission control
switch. The O/D OFF lamp will not be illuminated.
•O/D (Overdrive) is automatically returned each time the key is turned
off.
2 (Second)
This position allows for second gear only.
•Provides engine braking.
•Use to start-up on slippery roads.
•To return to
(Overdrive), move the gearshift lever into the
(Overdrive) position.
•Selecting 2 (Second) at higher speeds will cause the transmission to
downshift to second gear at the appropriate vehicle speed.
1 (First)
•Provides maximum engine braking.
•Allows upshifts by moving gearshift lever.
•Will not downshift into 1 (First) at high speeds; allows for 1 (First)
when vehicle reaches slower speeds.
Forced downshifts
•Allowed in
(Overdrive) or Drive.
•Press the accelerator to the floor.
•Allows transmission to select an appropriate gear.
If your vehicle gets stuck in mud or snow
If your vehicle gets stuck in mud or snow, it may be rocked out by
shifting between forward and reverse gears, stopping between shifts in a
steady pattern. Press lightly on the accelerator in each gear.
If necessary, try turning the Traction Control™ system off. This will
allow the wheels to spin, which may help to free your stuck vehicle. For
more information, refer toTraction Control™in this chapter.
Do not rock the vehicle if the engine is not at normal operating
temperature or damage to the transmission may occur.
Do not rock the vehicle for more than a minute or damage to the
transmission and tires may occur, or the engine may overheat.
Driving
192
2010 Town Car(tow)
Owners Guide, 1st Printing
USA(fus)
Page 206 of 285
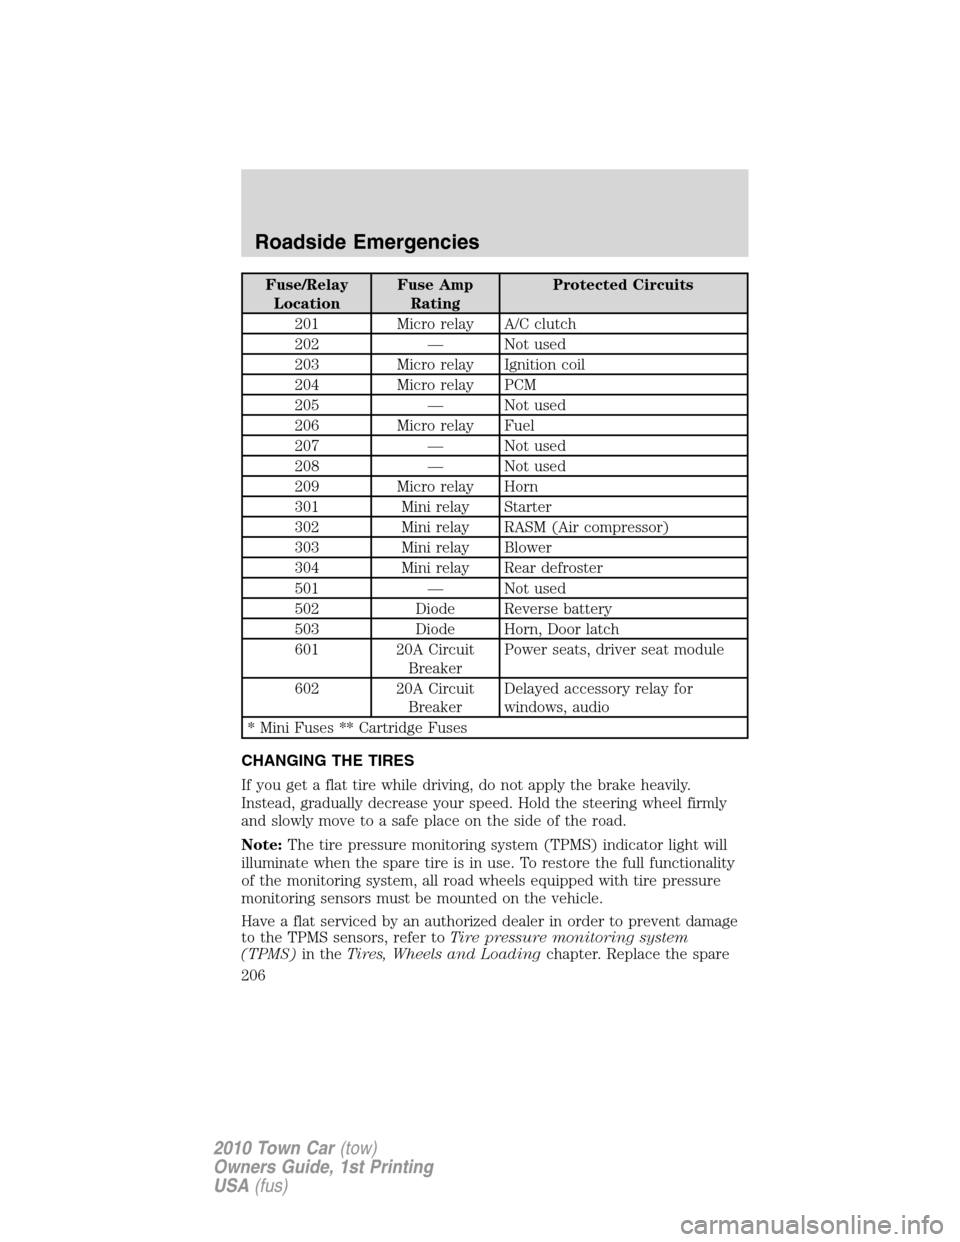
Fuse/Relay
LocationFuse Amp
RatingProtected Circuits
201 Micro relay A/C clutch
202 — Not used
203 Micro relay Ignition coil
204 Micro relay PCM
205 — Not used
206 Micro relay Fuel
207 — Not used
208 — Not used
209 Micro relay Horn
301 Mini relay Starter
302 Mini relay RASM (Air compressor)
303 Mini relay Blower
304 Mini relay Rear defroster
501 — Not used
502 Diode Reverse battery
503 Diode Horn, Door latch
601 20A Circuit
BreakerPower seats, driver seat module
602 20A Circuit
BreakerDelayed accessory relay for
windows, audio
* Mini Fuses ** Cartridge Fuses
CHANGING THE TIRES
If you get a flat tire while driving, do not apply the brake heavily.
Instead, gradually decrease your speed. Hold the steering wheel firmly
and slowly move to a safe place on the side of the road.
Note:The tire pressure monitoring system (TPMS) indicator light will
illuminate when the spare tire is in use. To restore the full functionality
of the monitoring system, all road wheels equipped with tire pressure
monitoring sensors must be mounted on the vehicle.
Have a flat serviced by an authorized dealer in order to prevent damage
to the TPMS sensors, refer toTire pressure monitoring system
(TPMS)in theTires, Wheels and Loadingchapter. Replace the spare
Roadside Emergencies
206
2010 Town Car(tow)
Owners Guide, 1st Printing
USA(fus)