Page 195 of 391
AUDIO/VIDEO SYSTEM
194
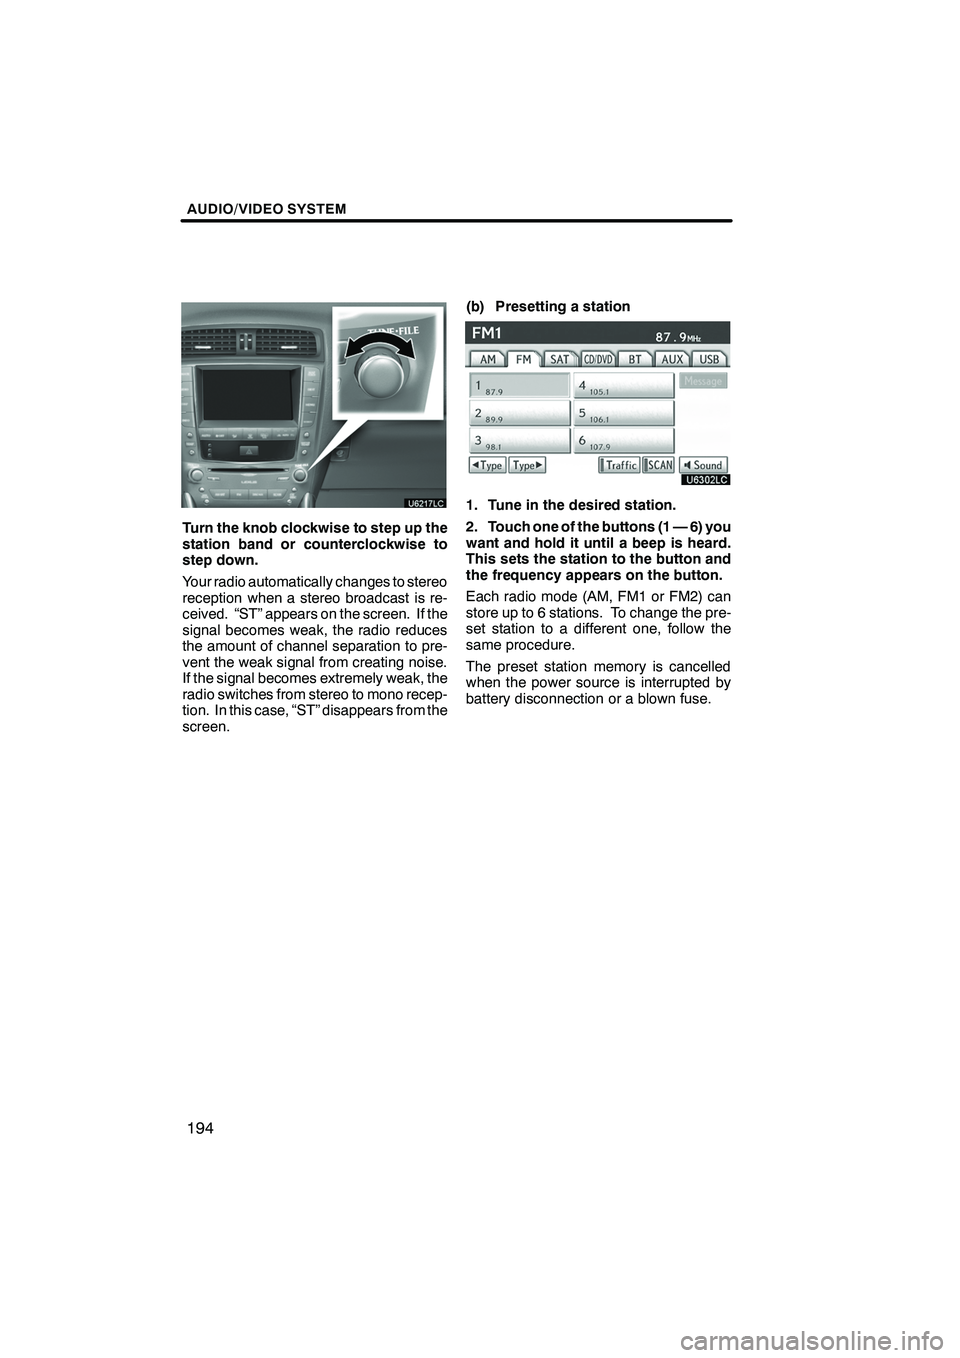
Turn the knob clockwise to step up the
station band or counterclockwise to
step down.
Your radio automatically changes to stereo
reception when a stereo broadcast is re-
ceived. “ST” appears on the screen. If the
signal becomes weak, the radio reduces
the amount of channel separation to pre-
vent the weak signal from creating noise.
If the signal becomes extremely weak, the
radio switches from stereo to mono recep-
tion. In this case, “ST” disappears from the
screen.(b) Presetting a station
1. Tune in the desired station.
2. Touch one of the buttons (1 — 6) you
want and hold it until a beep is heard.
This sets the station to the button and
the frequency appears on the button.
Each radio mode (AM, FM1 or FM2) can
store up to 6 stations. To change the pre-
set station to a different one, follow the
same procedure.
The preset station memory is cancelled
when the power source is interrupted by
battery disconnection or a blown fuse.
ISF/IS NAVI (U)
Finish
Page 196 of 391
AUDIO/VIDEO SYSTEM
195
(c) Selecting a station
Tune in the desired station using one of the
following methods.
Preset tuning:Touch the button (1 — 6) or
push the “
”or “”button of “CH/DISC”
for the station you want. The button is
highlighted and the station frequency ap-
pears on the screen.
Seek tuning: Push the“
”or “”but-
ton of “SEEK/TRACK” . The radio will be-
gin seeking up or down for a station of the
nearest frequency and will stop on recep-
tion. Each time you push the button, the
stations will be searched automatically
one after another.
To scan all the frequencies: Touch
“SCAN” briefly. “SCAN” appears on the
screen. The radio will find the next station
and stay there for a few seconds, and then
scan again. To select a station, touch
“SCAN” again.
To scan the preset stations: Touch
“SCAN” for longer than a second. “P.
SCAN” appears on the screen. The radio
will tune in the next preset station, stay
there for a few seconds, and then move to
the next preset station. To select a station,
touch “SCAN” again. (d) Radio Data System
Your audio system is equipped with Radio
Data Systems (RDS). RDS mode pro-
vides you to receive text messages from
radio stations that utilize RDS transmit-
ters.
When RDS is on, the radio can
— only select stations of a particular pro-
gram type,
— display messages from radio stations,
— search for a stronger signal station.
RDS features are available for use only on
FM stations which broadcast RDS infor-
mation.
ISF/IS NAVI (U)
Finish
7
Page 228 of 391
AUDIO/VIDEO SYSTEM
227
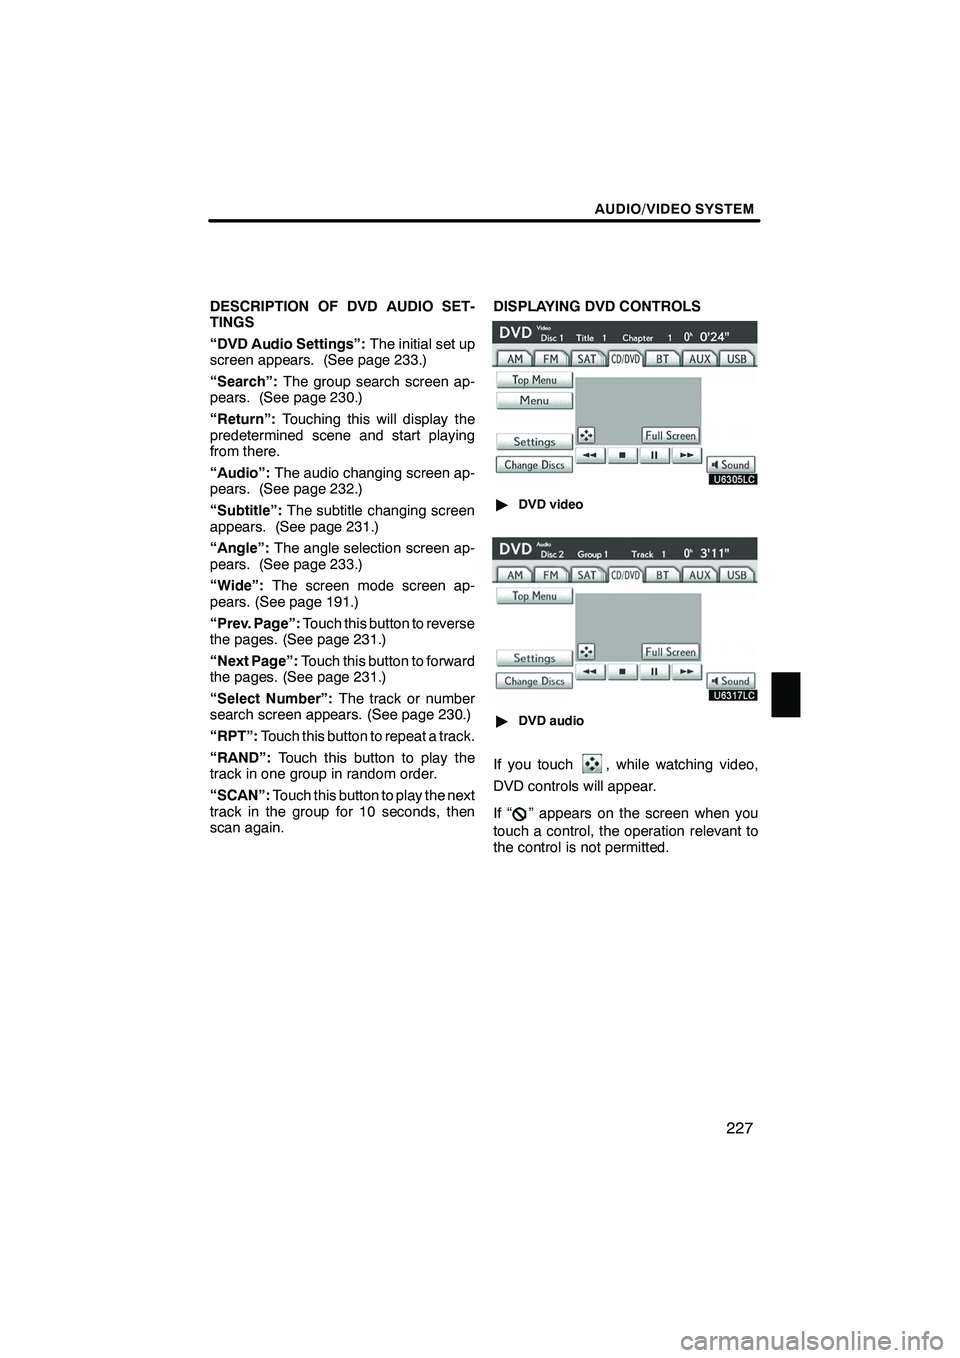
DESCRIPTION OF DVD AUDIO SET-
TINGS
“DVD Audio Settings”:The initial set up
screen appears. (See page 233.)
“Search”: The group search screen ap-
pears. (See page 230.)
“Return”: Touching this will display the
predetermined scene and start playing
from there.
“Audio”: The audio changing screen ap-
pears. (See page 232.)
“Subtitle”: The subtitle changing screen
appears. (See page 231.)
“Angle”: The angle selection screen ap-
pears. (See page 233.)
“Wide”: The screen mode screen ap-
pears. (See page 191.)
“Prev. Page”: Touch this button to reverse
the pages. (See page 231.)
“Next Page”: Touch this button to forward
the pages. (See page 231.)
“Select Number”: The track or number
search screen appears. (See page 230.)
“RPT”: Touch this button to repeat a track.
“RAND”: Touch this button to play the
track in one group in random order.
“SCAN”: Touch this button to play the next
track in the group for 10 seconds, then
scan again. DISPLAYING DVD CONTROLS
"
DVD video
"DVD audio
If you touch, while watching video,
DVD controls will appear.
If “
” appears on the screen when you
touch a control, the operation relevant to
the control is not permitted.
ISF/IS NAVI (U)
Finish
7
Page 248 of 391
AUDIO/VIDEO SYSTEM
247
D
When the connection method is
“From Portable Player”
Operate the portable player and con-
nect it to the Bluetooth raudio system.
For the operation procedure for the
portable player, see the instruction
manual that comes with it.
Touch “Connect”.
Connect the portable audio player to the
Bluetooth raudio system.
This screen will appear when the connec-
tion has been successfully established.
DReconnecting the portable player
If the portable player is disconnected with
a poor reception from the Bluetooth rnet-
work when the “ENGINE START STOP”
switch is in ACCESSORY or IGNITION
ON mode, the system automatically re-
connects the portable player.
If the Bluetooth ris disconnected on pur-
pose such as you turned your portable
player off, this does not happen.
Reconnect it by the following method.
DSelect the portable player again.
DEnter the portable player.
ISF/IS NAVI (U)
Finish
7
Page 259 of 391
AUDIO/VIDEO SYSTEM
258
Repeating a folder (USB memory only)
—
While the folder is playing, touch “RPT”
for longer than a second.
“FLD.RPT” appears on the screen. When
the folder is finished, the changer will auto-
matically go back to the beginning of the
folder and play the folder again. To cancel
it, touch“RPT”once again.
“RAND”: Use this for automatic and ran-
dom selection of files or tracks on the al-
bum that you are currently listening to.
Playing the file or track in random or-
der—
While the file or track is playing, touch
“RAND” briefly.
“RAND” appears on the screen. The sys-
tem selects a file or track you are currently
listening to. To cancel this function, touch
“RAND” once again.
Playing the files in all files in random or-
der —
Touch “RAND” for longer than a second
while the music is playing. “FLD.RAND”
appears on the screen. The system se-
lects a file in all files. To cancel it, touch
“RAND” once again.
When a file is skipped or the system is in-
operative, touch “RAND”to reset.
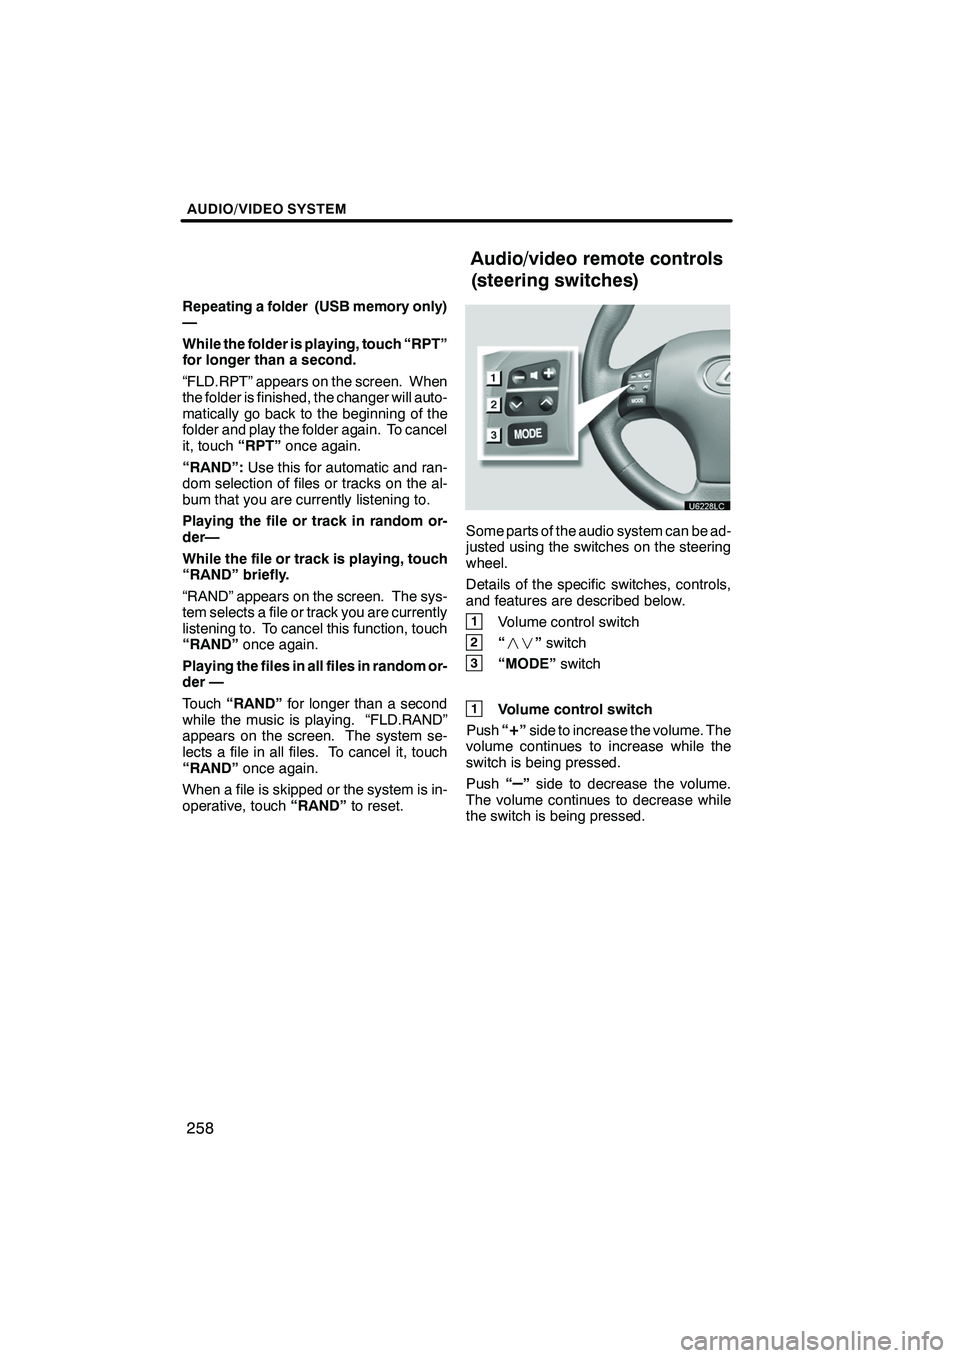
Some parts of the audio system can be ad-
justed using the switches on the steering
wheel.
Details of the specific switches, controls,
and features are described below.
1Volume control switch
2“” switch
3“MODE” switch
1Volume control switch
Push “
+”side to increase the volume. The
volume continues to increase while the
switch is being pressed.
Push “
–”side to decrease the volume.
The volume continues to decrease while
the switch is being pressed.
ISF/IS NAVI (U)
Finish
Audio/video remote controls
(steering switches)
Page 271 of 391
AIR CONDITIONING
270
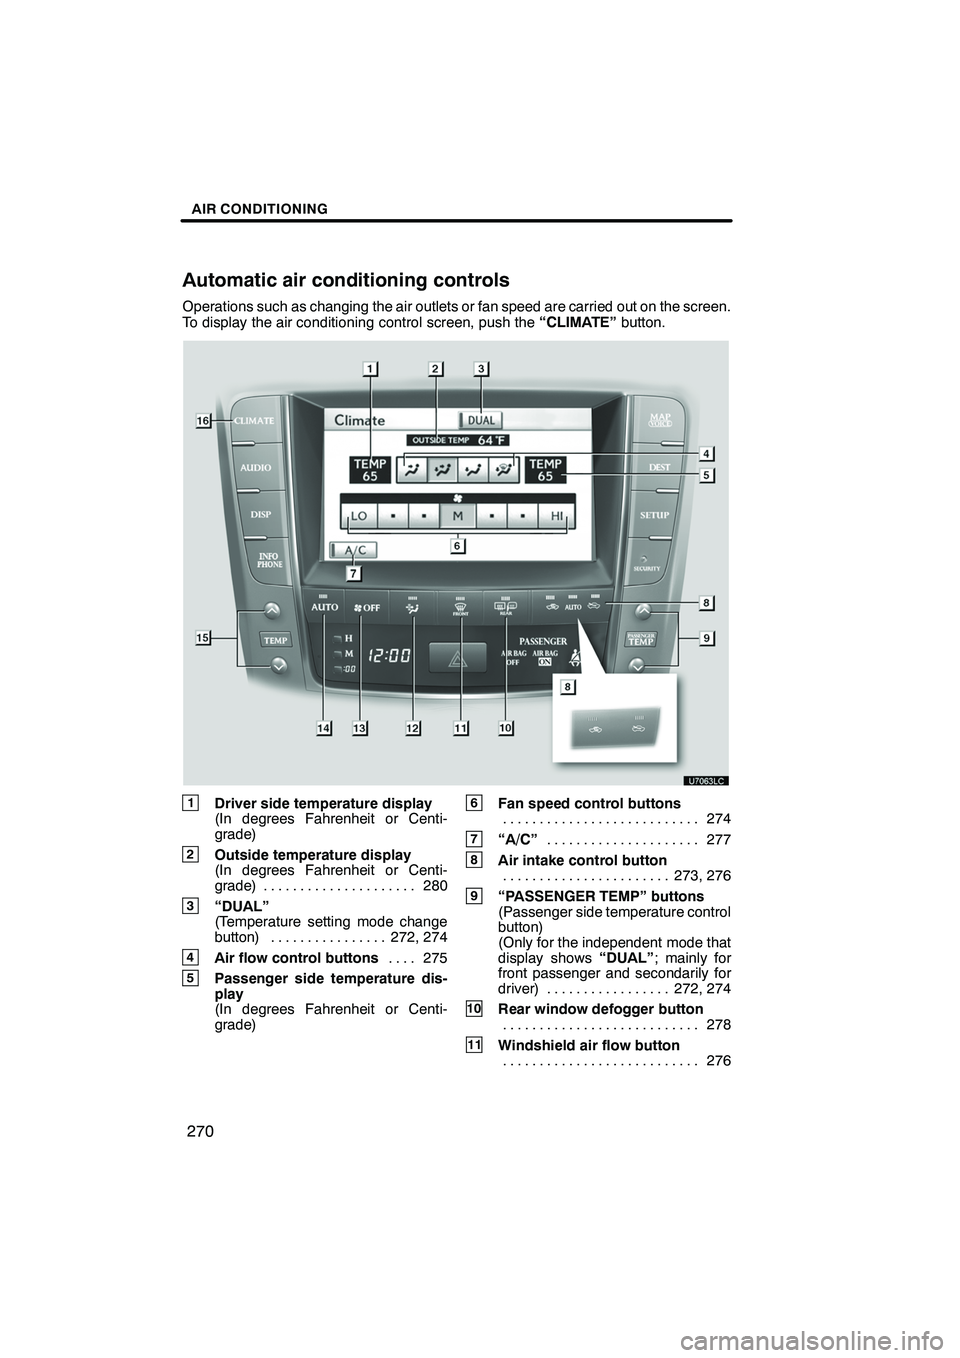
Operations such as changing the air outlets or fan speed are carried out on the screen.
To display the air conditioning control screen, push the“CLIMATE”button.
1Driver side temperature display
(In degrees Fahrenheit or Centi-
grade)
2Outside temperature display
(In degrees Fahrenheit or Centi-
grade) 280.....................
3“DUAL”
(Temperature setting mode change
button) 272, 274 ................
4Air flow control buttons 275
....
5Passenger side temperature dis-
play
(In degrees Fahrenheit or Centi-
grade)
6Fan speed control buttons
274
...........................
7“A/C” 277
.....................
8Air intake control button
273, 276
.......................
9“PASSENGER TEMP” buttons
(Passenger side temperature control
button)
(Only for the independent mode that
display shows “DUAL”; mainly for
front passenger and secondarily for
driver) 272, 274 .................
10Rear window defogger button
278
...........................
11Windshield air flow button
276
...........................
ISF/IS NAVI (U)
Finish
Automatic air conditioning controls
Page 272 of 391
AIR CONDITIONING
271
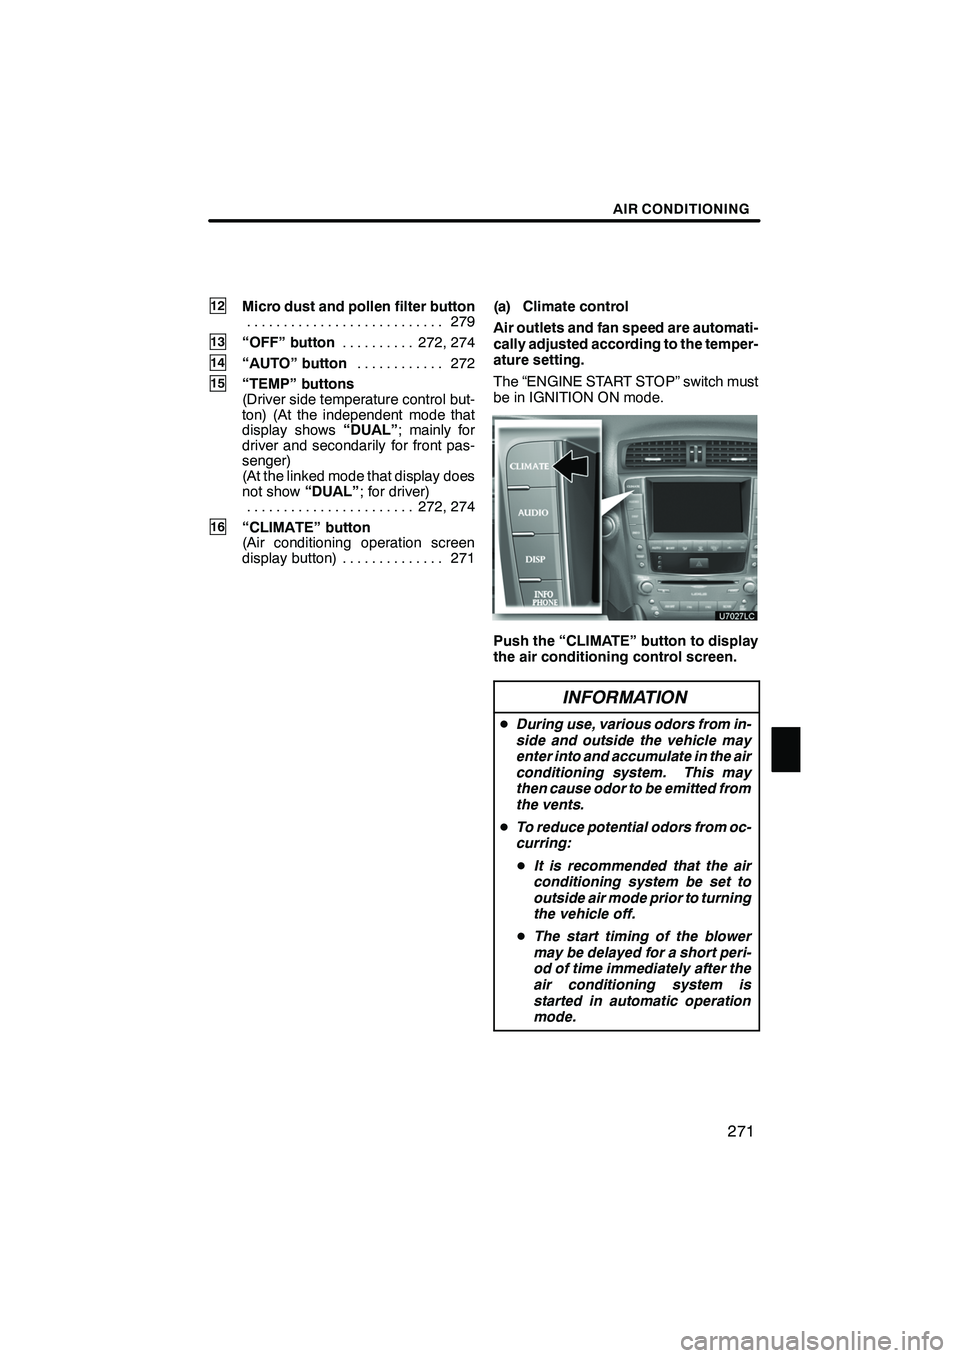
12Micro dust and pollen filter button279
...........................
13“OFF” button 272, 274
..........
14“AUTO” button 272
............
15“TEMP” buttons
(Driver side temperature control but-
ton) (At the independent mode that
display shows “DUAL”; mainly for
driver and secondarily for front pas-
senger)
(At the linked mode that display does
not show “DUAL”; for driver)
272, 274
.......................
16“CLIMATE” button
(Air conditioning operation screen
display button) 271 .............. (a) Climate control
Air outlets and fan speed are automati-
cally adjusted according to the temper-
ature setting.
The “ENGINE START STOP” switch must
be in IGNITION ON mode.
Push the “CLIMATE” button to display
the air conditioning control screen.
INFORMATION
D
During use, various odors from in-
side and outside the vehicle may
enter into and accumulate in the air
conditioning system. This may
then cause odor to be emitted from
the vents.
D To reduce potential odors from oc-
curring:
D It is recommended that the air
conditioning system be set to
outside air mode prior to turning
the vehicle off.
D The start timing of the blower
may be delayed for a short peri-
od of time immediately after the
air conditioning system is
started in automatic operation
mode.
ISF/IS NAVI (U)
Finish
8
Page 279 of 391

AIR CONDITIONING
278
DSwitching between outside air and
recirculated air modes
Recirculated air mode or outside
air mode may be automatically
switched to in accordance with the
temperature setting and the inside
temperature.
D Window defogger feature
Recirculated air mode may auto-
matically switch to outside air
mode in situations where the win-
dows need to be defogged.
D When outside air temperature is
below 32 _F(0 _C)
The cooling and dehumidification
function may not operate even
when “A/C” is on.
D When the indicator light on “A/C”
flashes
Touch “A/C” to turn off the air con-
ditioning system and turn it on
again. There may be a problem in
the air conditioning system if the
indicator light continues to flash.
Turn the air conditioning system
off and have it inspected by your
Lexus dealer.
D Automatic air intake change mode
(on some models)
In automatic mode, the system au-
tomatically switches between re-
circulated air and outside air
modes according to whether the
system detects harmful sub-
stances such as exhaust gas in the
air outside.(f) Rear window and outside rear view
mirror defogging
To turn the electric rear window and
outside rear view mirror defogger on,
push the button above.
The “ENGINE START STOP” switch must
be in IGNITION ON mode.
The thin heater wires on the inside of the
rear window and the heater panels in the
outside rear view mirrors will quickly clear
the surface.
Keep your hands off the mirror faces when
the system is on.
The indicator light is on when the defogger
is operating.
CAUTION
When the outside rear view mirror de-
foggers are on, do not touch the out-
side surface of the rear view mirror as
it can become very hot and burn you.
ISF/IS NAVI (U)
Finish