Page 45 of 61
412
4-3. Do-it-yourself maintenance
12ALT140 A
PSB, H-LP CLN, P-P/SEAT, RR DEF,
ABS NO.2, FAN MAIN, ABS NO.1,
HTR, RR FOG, RR DOOR RH, RR
DOOR LH, FUEL OPN, FR FOG,
OBD, STOP, TI & TE, A/C, PWR,
DOOR NO.2, S/ROOF, GAUGE
NO.2, POWER, P/SEAT
13STR LOCK20 ASteering lock system
14IG220 A
GAUGE NO.2, IGN, multiport fuel
injection system/sequential multiport
fuel injection system
15HAZ15 ATurn signal lights
16ETCS10 AElectronic throttle control system
17E-ACM10 AElectric active control mount
18A/C CTRL PNL15 AAir conditioning system
19MAYDAY10 AMayday system
20ALT-S7. 5 ACharging system
21AM27. 5 AStarting system
22EFI MAIN30 AEFI NO.2, EFI NO.3, fuel system, ECT
system
23AMP30 AAudio system
24AMP230 AAudio system
25DOOR NO.125 APower door lock system
26RADIO NO.115 AAudio system
27ECU-B NO.110 AECU powers
28DOME10 AInterior lights, meters, vanity lights
29H-LP (LH)15 ALeft-hand headlight (high beam)
FuseAmpereCircuit
Page 47 of 61
414
4-3. Do-it-yourself maintenance
■Driver’s side instrument panel
FuseAmpereCircuit
1RR DOOR RH25 APo w e r w i n d o w
2RR DOOR LH25 APo w e r w i n d o w
3FUEL OPN7. 5 AFuel filler door opener
4FR FOG15 AFront fog lights
5OBD7. 5 AOn-board diagnosis system
6ECU-B NO.27. 5 AECU powers
7STOP10 AStop lights
8TI & TE30 ATilt and telescopic steering
9A/C7. 5 AAir conditioning system
10PWR25 APo w e r w i n d o w s
11DOOR NO.225 AMain body ECU
12S/ROOF30 AMoon roof
13TA I L10 AFront and rear side marker lights, tail
lights, license plate lights
14PA N E L7. 5 ASwitch illumination
Page 48 of 61

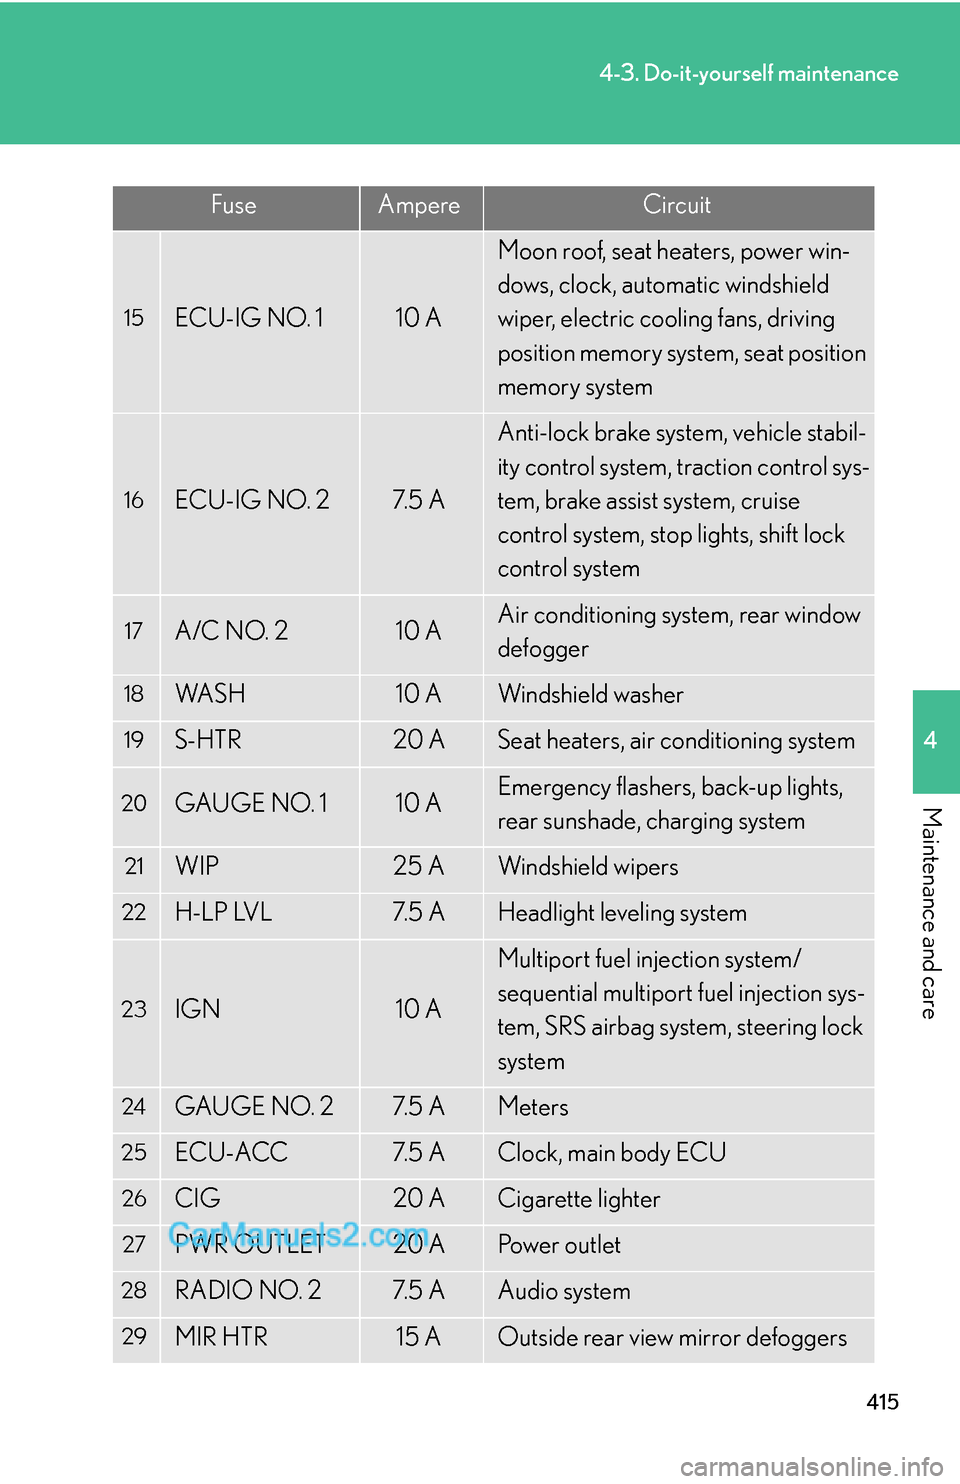
415
4-3. Do-it-yourself maintenance
4
Maintenance and care
15ECU-IG NO. 110 A
Moon roof, seat heaters, power win-
dows, clock, automatic windshield
wiper, electric cooling fans, driving
position memory system, seat position
memory system
16ECU-IG NO. 27. 5 A
Anti-lock brake system, vehicle stabil-
ity control system, traction control sys-
tem, brake assist system, cruise
control system, stop lights, shift lock
control system
17A/C NO. 210 AAir conditioning system, rear window
defogger
18WA S H10 AWindshield washer
19S-HTR20 ASeat heaters, air conditioning system
20GAUGE NO. 110 AEmergency flashers, back-up lights,
rear sunshade, charging system
21WIP25 AWindshield wipers
22H-LP LVL7. 5 AHeadlight leveling system
23IGN10 A
Multiport fuel injection system/
sequential multiport fuel injection sys-
tem, SRS airbag system, steering lock
system
24GAUGE NO. 27. 5 AMeters
25ECU-ACC7. 5 AClock, main body ECU
26CIG20 ACigarette lighter
27PWR OUTLET20 APo w e r o u t l e t
28RADIO NO. 27. 5 AAudio system
29MIR HTR15 AOutside rear view mirror defoggers
FuseAmpereCircuit
Page 49 of 61

416
4-3. Do-it-yourself maintenance
30POWER30 APo w e r w i n d o w
31P/ S E AT30 APo w e r s e a t
■After a fuse is replaced
●If the lights do not turn on even after the fuse has been replaced, a bulb may
need replacement. (→
P. 4 1 9)
●If the replaced fuse blows again, have the vehicle inspected by your Lexus
dealer.
■If there is an overload in the circuits
The fuses are designed to blow before the entire wiring harness is damaged.
CAUTION
■To prevent system breakdowns and vehicle fire
Observe the following precautions.
Failing to do so may cause damage, and possibly a fire or injury.
●Never use a fuse of a higher amperage rating than indicated, or use any other
object in place of a fuse.
●Always use a genuine Lexus fuse or equivalent.
Never replace a fuse with a wire, even as a temporary fix.
This can cause extensive damage or even fire.
●Do not modify fuses or the fuse box.
NOTICE
■Before replacing fuses
Have the cause of electrical overload determined and repaired by your Lexus
dealer.
FuseAmpereCircuit
Page 50 of 61
417
4-3. Do-it-yourself maintenance
4
Maintenance and care
Headlight aim (vehicles with discharge headlights)
■Vertical movement adjusting bolts
Adjustment bolt A
Adjustment bolt B
■Before checking the headlight aim
Make sure the vehicle has a full tank of gas and the area around
the headlight is not deformed.
Park the vehicle on level ground.
Sit in the driver’s seat.
Bounce the vehicle several times.
■Adjusting the headlight aim
Remove the engine compartment cover. (→P. 3 76)
Turn bolt A in either direction
using a Phillips-head screw
-
driver.
Remember the turning direction
and the number of turns in mind.
STEP1
STEP2
STEP3
STEP4
STEP1
STEP2
Page 52 of 61
419
4-3. Do-it-yourself maintenance
4
Maintenance and care
Light bulbs
You may replace the following bulbs yourself. For more information about
replacing other light bulbs, contact your Lexus dealer.
■Prepare a replacement light bulb.
Check the wattage of the light bulb being replaced. (→P. 4 9 7 )
■Front bulb locations
■Rear bulb locations
Headlight high beam
Headlight
low beam
(halogen
bulb)
Front turn signal light
Front side
marker light
Rear turn signal lightStop/tail light
Rear side marker light
Back-up light
Tail light
Page 54 of 61
421
4-3. Do-it-yourself maintenance
4
Maintenance and care
■Front side marker lights and front turn signal lights
Remove the access hole cover.
Front side marker light
Front turn signal light
Turn the bulb base counterclock-
wise.
Front side marker light
Remove the light bulb.
STEP1
STEP2
STEP3
Page 56 of 61
423
4-3. Do-it-yourself maintenance
4
Maintenance and care
■Back-up lights and tail lights
Open the trunk lid and remove the
trunk panel cover clips.
Partly remove the trunk panel
cover and turn the bulb bases
counterclockwise.
Tail light
Back-up light
Remove the light bulb.
Tail light
Back-up light
STEP1
STEP2
STEP3