2010 KIA VENGA wheel
[x] Cancel search: wheelPage 63 of 379

Safety features of your vehicle
50
3
The side impact air bags are designed to
deploy only during certain side-impact
collisions, depending on the crash sever-
ity, angle, speed and point of impact. Theside impact air bags are not designed to
deploy in all side impact situations.(Continued)
Do not install any accessories on
the side or near the side impact
air bag.
Do not place any objects over the air bag or between the air bag
and yourself.
Do not place any objects (an umbrella, bag, etc.) between the
front door and the front seat.
Such objects may become dan-
gerous projectiles and cause
injury if the supplemental side
impact air bag inflates.
To prevent unexpected deploy- ment of the side impact air bag
that may result in personal injury,
avoid impact to the side impact
sensor when the ignition switchis on.
If seat or seat cover is damaged, have the vehicle checked and
repaired by an authorized KIA
dealer. Inform that your vehicle isequipped with side impact air
bags.WARNING
The side impact air bag is sup- plemental to the driver's and the
passenger's seat belt systems
and is not a substitute for them.
Therefore your seat belts must be
worn at all times while the vehicle
is in motion. The air bags deploy
only in certain side impact condi-
tions severe enough to cause
significant injury to the vehicleoccupants.
For best protection from the side impact air bag system and to
avoid being injured by the
deploying side impact air bag,
both front seat occupants shouldsit in an upright position with the
seat belt properly fastened. Thedriver's hands should be placedon the steering wheel at the 9:00
and 3:00 positions. The passen-
ger's arms and hands should beplaced on their laps.
Do not use any accessory seat covers.
Use of seat covers could reduce or prevent the effectiveness ofthe system.
(Continued)
Page 70 of 379

357
Safety features of your vehicle
SRS Care
The SRS is virtually maintenance-free
and so there are no parts you can safely
service by yourself. If the SRS air bag
warning light does not illuminate, or con-
tinuously remains on, have your vehicle
immediately inspected by an authorized
KIA dealer.
Any work on the SRS system, such as
removing, installing, repairing, or any
work on the steering wheel must be per-
formed by an authorized KIA dealer.Improper handling of the SRS system
may result in serious personal injury.
WARNING
Modification to SRS components or wiring, including the addition
of any kind of badges to the pad
covers or modifications to the
body structure, can adversely
affect SRS performance and lead
to possible injury.
For cleaning the air bag pad cov- ers, use only a soft, dry cloth or
one which has been moistened
with plain water. Solvents or
cleaners could adversely affect
the air bag covers and proper
deployment of the system.
No objects should be placed over
or near the air bag modules on the
steering wheel, instrument panel,
and the front passenger's panel
above the glove box, because any
such object could cause harm if the
vehicle is in a crash severe enough
to cause the air bags to inflate.
(Continued)
(Continued)
If the air bags inflate, they must be replaced by an authorized KIA
dealer.
Do not tamper with or disconnect SRS wiring, or other components
of the SRS system. Doing so
could result in injury, due to acci-
dental inflation of the air bags or
by rendering the SRS inopera-
tive.
If components of the air bag sys- tem must be discarded, or if the
vehicle must be scrapped, certain
safety precautions must be
observed. An authorized KIA
dealer knows these precautions
and can give you the necessary
information. Failure to follow
these precautions and proce-dures could increase the risk of
personal injury.
If your car was flooded and has soaked carpeting or water on
flooring, you shouldn't try to start
the engine; have the car towed to
an authorized KIA dealer.
Page 73 of 379

4
Keys / 4-2
Remote keyless entry / 4-5
Smart key / 4-8
Theft-alarm system / 4-11
Door locks / 4-13
Tailgate / 4-17
Windows / 4-19
Hood / 4-24
Fuel filler lid / 4-26
Panorama sunroof / 4-29
Steering wheel / 4-33
Mirrors / 4-35
Instrument cluster / 4-40
Rear parking assist system / 4-57
Rearview camera / 4-60
Hazard warning flasher / 4-60
Lighting / 4-61
Wipers and washers / 4-67
Interior light / 4-70
Defroster / 4-71
Manual climate control system / 4-72
Automatic climate control system / 4-81
Windshield defrosting and defogging / 4-89
Storage compartment / 4-91
Interior features / 4-93
Audio system / 4-99
Features of your vehicle
Page 105 of 379

433
Features of your vehicle
Electric power steering
Power steering uses the motor to assist
you in steering the vehicle. If the engine
is off or if the power steering system
becomes inoperative, the vehicle may
still be steered, but it will require
increased steering effort.
The motor driven power steering is con-
trolled by the power steering control unit
which senses the steering wheel torque
and vehicle speed to command the
motor.
The steering effort becomes heavier as
the vehicle’s speed increases and
becomes lighter as the vehicle’s speed
decreases for better control of the steer-ing wheel.
Should you notice any change in the
effort required to steer during normal
vehicle operation, have the power steer-
ing checked by an authorized KIA dealer.✽✽NOTICE
The following symptoms may occur dur-
ing normal vehicle operation:
The EPS warning light does not illumi- nate.
The steering effort is high immediately after turning the ignition switch on.
This happens as the EPS system per-
forms the diagnostics. When the diag-
nostics is completed, the steering effort
will return to its normal condition.
A click noise may be heard from the EPS relay after the ignition switch is
turned to the ON or LOCK position.
Motor noise may be heard when the
vehicle is at a stop or at a low driving
speed.
The steering effort can suddenly increase, if the operation of the EPS
system is stopped to prevent serious
accidents when EPS control unit
detects malfunction of the EPS system
by self-diagnosis.
The steering effort increases if the steering wheel is rotated continuously
when the vehicle is not in motion.
However, after a few minutes, it will
return to its normal conditions.Tilt steering
Tilt steering allows you to adjust the
steering wheel before you drive. You can
also raise it to give your legs more room
when you exit and enter the vehicle.
The steering wheel should be positioned
so that it is comfortable for you to drive,
while permitting you to see the instru-
ment panel warning lights and gauges.
STEERING WHEEL
WARNING
Never adjust the angle of the steering wheel while driving. You
may lose steering control and
cause severe personal injury,death or accidents.
After adjusting, push the steering wheel both up and down to be
certain it is locked in position.
Page 106 of 379

Features of your vehicle
34
4
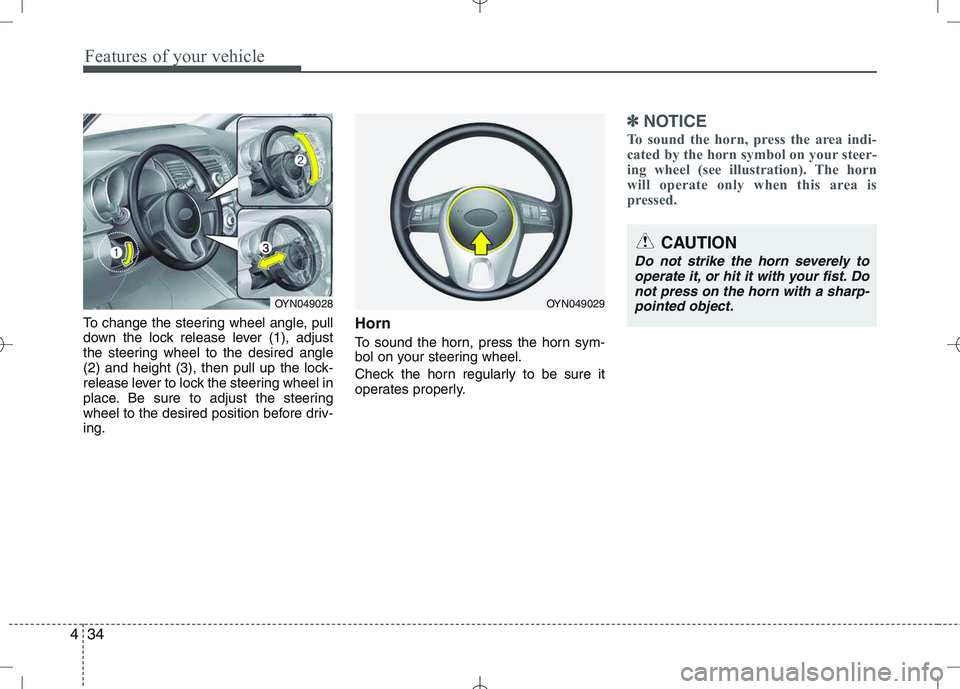
To change the steering wheel angle, pull
down the lock release lever (1), adjust
the steering wheel to the desired angle
(2) and height (3), then pull up the lock-
release lever to lock the steering wheel in
place. Be sure to adjust the steering
wheel to the desired position before driv-ing. Horn
To sound the horn, press the horn sym-
bol on your steering wheel.
Check the horn regularly to be sure it
operates properly.
✽✽
NOTICE
To sound the horn, press the area indi-
cated by the horn symbol on your steer-
ing wheel (see illustration). The horn
will operate only when this area is
pressed.
CAUTION
Do not strike the horn severely to operate it, or hit it with your fist. Do not press on the horn with a sharp-
pointed object.
OYN049029OYN049028
Page 122 of 379

Features of your vehicle
50
4
Front fog light indicator
(if equipped)
This indicator comes on when the front
fog lights are ON.
Rear fog light indicator
(if equipped)
This indicator illuminates when the rear
fog lights are ON.
Light on indicator (if equipped)
The indicator illuminates when the tail lights or headlights are ON.
Parking brake & brake fluidwarning
Parking brake warning
This warning light is illuminated when the
parking brake is applied with the ignition
switch in the START or ON position. The
warning light should go off when the
parking brake is released.
The parking brake warning chime (if
equipped) will sound to remind you that the
parking brake is applied when you are driv-
ing above approximately 10 km/h (6 mph).
Always release the parking brake before
you drive.
Low brake fluid level warning
If the warning light remains on, it may
indicate that the brake fluid level in the
reservoir is low.
If the warning light remains on:
1. Drive carefully to the nearest safe location and stop your vehicle.
2. With the engine stopped, check the brake fluid level immediately and add
fluid as required. Then check all brake
components for fluid leaks. 3. Do not drive the vehicle if leaks are
found, the warning light remains on or
the brakes do not operate properly.
Have the vehicle towed to any author-
ized KIA dealer for a brake system
inspection and necessary repairs.
Your vehicle is equipped with dual-diago-
nal braking systems. This means you still
have braking on two wheels even if one
of the dual systems should fail. With only
one of the dual systems working, more
than normal pedal travel and greaterpedal pressure are required to stop the
vehicle. Also, the vehicle will not stop in
as short a distance with only a portion of
the brake system working. If the brakes
fail while you are driving, shift to a lower
gear for additional engine braking and
stop the vehicle as soon as it is safe to do
so.
To check bulb operation, check whether
the parking brake and brake fluid warning
light illuminates when the ignition switchis in the ON position.
WARNING
Driving the vehicle with a warning
light on is dangerous. If the brake
warning light remains on, have the
brakes checked and repaired imme-
diately by an authorized KIA dealer.
Page 126 of 379

Features of your vehicle
54
4
ESP OFF indicator
(if equipped)
The ESP OFF indicator will illuminate
when the ignition switch is turned ON,
but should go off after approximately 3
seconds. To switch to ESP OFF mode,
press the ESP OFF button. The ESPOFF indicator will illuminate indicating
the ESP is deactivated.
✽✽ NOTICE
After reconnecting or recharging a dis-
charged battery, the ESP OFF indicator
may illuminate. In this case, turn the
steering wheel 360 degrees to the left
and 360 degrees to the right while the
ignition switch is in the ON position.
Then, restart the engine after the igni-
tion is off. If the ESP OFF indicator does
not turn off, have the system checked by
an authorized KIA dealer as soon as
possible.
Cruise indicator (if equipped)
CRUISE indicator
The indicator illuminates when the cruise
control system is enabled.
The cruise indicator in the instrument
cluster is illuminated when the cruise
control ON-OFF button on the steeringwheel is pushed.
The indicator goes off when the cruise
control ON-OFF button is pushed again.
For more information about the use of
cruise control, refer to “Cruise control
system” in section 5.
Cruise SET indicator
The indicator illuminates when the cruise
control switch (SET- or RES+) is ON.
The cruise SET indicator in the instru- ment cluster is illuminated when the
cruise control switch (SET- or RES+) ispushed.
The cruise SET indicator does not illumi-
nate when the cruise control switch(CANCEL) is pushed or the system isdisengaged.
Speed limit indicator (if equipped)
(1) Speed limit indicator
(2) Set speed limit indicator The speed limit indicator illuminates when the speed limit control system is
enabled.
The speed limit indicator in the instru- ment cluster illuminates when the speed
limit ON-OFF button on the steeringwheel is pressed.
If the " " indicator is shown in the
instrument cluster, it indicates no settingof the speed limit.
The set speed limit will display when the
speed limit control switch (SET-/RES+) isON.
If you drive over the speed limit, the set
speed limit will blink and chime willsound.
The set speed limit turns off when the
speed limit is cancelled by pressing the
CANCEL button. The speed limit indicator goes off when
the speed limit is deactivated.
For more information about the speed
limit control usage, refer to “Speed Limit
control System” in section 5.
SET
① ②
Page 147 of 379

475
Features of your vehicle
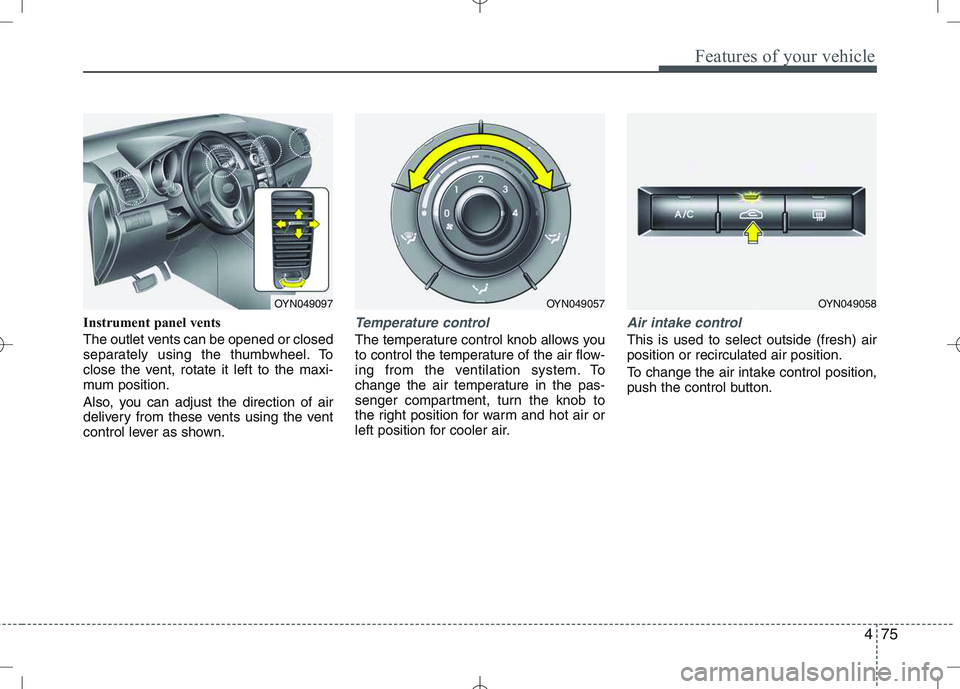
Instrument panel vents
The outlet vents can be opened or closed
separately using the thumbwheel. To
close the vent, rotate it left to the maxi-
mum position.
Also, you can adjust the direction of air
delivery from these vents using the vent
control lever as shown.Temperature control
The temperature control knob allows you
to control the temperature of the air flow-
ing from the ventilation system. To
change the air temperature in the pas-
senger compartment, turn the knob to
the right position for warm and hot air or
left position for cooler air.
Air intake control
This is used to select outside (fresh) air position or recirculated air position.
To change the air intake control position,
push the control button.
OYN049097OYN049057OYN049058