Page 336 of 379

745
Maintenance
Compact spare tire replacement (if equipped)
A compact spare tire has a shorter
tread life than a regular size tire.
Replace it when you can see the
tread wear indicator bars on the tire.The replacement compact spare tire
should be the same size and design
tire as the one provided with your
new vehicle and should be mountedon the same compact spare tire
wheel. The compact spare tire is notdesigned to be mounted on a regular
size wheel, and the compact spare
tire wheel is not designed for mount-
ing a regular size tire. Wheel replacement
When replacing the metal wheels for
any reason, make sure the new
wheels are equivalent to the original
factory units in diameter, rim widthand offset.
Tire traction
Tire traction can be reduced if you
drive on worn tires, tires that are
improperly inflated or on slippery
road surfaces. Tires should be
replaced when tread wear indicators
appear. Slow down whenever there
is rain, snow or ice on the road, toreduce the possibility of losing con-
trol of the vehicle. Tire maintenance In addition to proper inflation, correct wheel alignment helps decrease tire
wear. If you find a tire worn unevenly,
have your dealer check the wheelalignment.
When you have new tires installed,
make sure they are balanced. This
will increase vehicle ride comfort and
tire life. Additionally, a tire should
always be rebalanced if it is removedfrom the wheel.
WARNING
A wheel that is not the correct
size may adversely affect wheel
and bearing life, braking and
stopping abilities, handling
characteristics, ground clear-
ance, body-to-tire clearance,
snow chain clearance,speedometer and odometer cal-
ibration, headlight aim and
bumper height.
Page 337 of 379

Maintenance
46
7
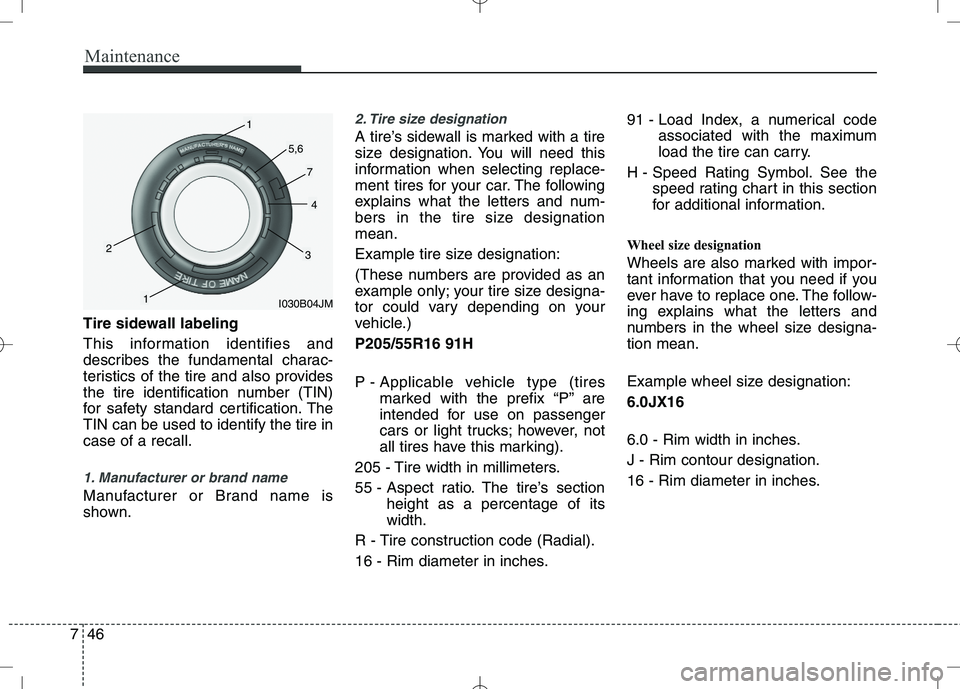
Tire sidewall labeling
This information identifies and
describes the fundamental charac-
teristics of the tire and also provides
the tire identification number (TIN)
for safety standard certification. TheTIN can be used to identify the tire incase of a recall.
1. Manufacturer or brand name
Manufacturer or Brand name is
shown.
2. Tire size designation
A tire’s sidewall is marked with a tire
size designation. You will need this
information when selecting replace-
ment tires for your car. The following
explains what the letters and num-
bers in the tire size designationmean.
Example tire size designation:
(These numbers are provided as an
example only; your tire size designa-
tor could vary depending on your
vehicle.) P205/55R16 91H
P - Applicable vehicle type (tires
marked with the prefix “P’’ are
intended for use on passenger
cars or light trucks; however, not
all tires have this marking).
205 - Tire width in millimeters.
55 - Aspect ratio. The tire’s section height as a percentage of its width.
R - Tire construction code (Radial).
16 - Rim diameter in inches. 91 - Load Index, a numerical code
associated with the maximum
load the tire can carry.
H - Speed Rating Symbol. See the speed rating chart in this section
for additional information.
Wheel size designation
Wheels are also marked with impor-
tant information that you need if you
ever have to replace one. The follow-
ing explains what the letters and
numbers in the wheel size designa-tion mean.
Example wheel size designation: 6.0JX16
6.0 - Rim width in inches. J - Rim contour designation.
16 - Rim diameter in inches.
I030B04JM
1
1
23
4
5,6
7
Page 341 of 379

Maintenance
50
7
FUSES
A vehicle’s electrical system is protected
from electrical overload damage by
fuses. This vehicle has 2 (or 3) fuse panels, one
located in the driver’s side panel bolster,
the other in the engine compartment
near the battery.
If any of your vehicle’s lights, acces-
sories, or controls do not work, check the
appropriate circuit fuse. If a fuse has
blown, the element inside the fuse will bemelted.
If the electrical system does not work,
first check the driver’s side fuse panel.
Always replace a blown fuse with one of
the same rating.
If the replacement fuse blows, this indi-
cates an electrical problem. Avoid using
the system involved and immediately
consult an authorized KIA dealer.
Three kinds of fuses are used: blade type
for lower amperage rating, cartridge type
and multi fuse for higher amperage rat-ings.
OBK079042
Normal
Normal
Cartridge type Multi fuse Blown
Blown
Normal Blown
WARNING - Fuse replace-
ment
Never replace a fuse with any- thing but another fuse of the same rating.
A higher capacity fuse could cause damage and possibly a
fire.
Never install a wire instead of the proper fuse - even as a temporary
repair. It may cause extensive
wiring damage and a possible fire.
CAUTION
Do not use a screwdriver or any
other metal object to remove fuses because it may cause a short circuitand damage the system.
Blade type
Page 342 of 379
751
Maintenance
Instrument panel fuse replace- ment
1. Turn the ignition switch and all otherswitches off.
2. Open the fuse panel cover. 3. Pull the suspected fuse straight out.
Use the removal tool provided in the
engine compartment fuse panel cover.
4. Check the removed fuse; replace it if it is blown.
5. Push in a new fuse of the same rating, and make sure it fits tightly in the clips.
If it fits loosely, consult an authorized KIA
dealer.
If you do not have a spare, use a fuse of the same rating from a circuit you may
not need for operating the vehicle, such as the cigarette lighter fuse.
If the headlights or other electrical com-
ponents do not work and the fuses are
OK, check the fuse panel in the engine
compartment. If a fuse is blown, it mustbe replaced.
OYN079023OYN079018
Page 343 of 379
Maintenance
52
7
Memory fuse
Your vehicle is equipped with a memory
fuse to prevent battery discharge if your
vehicle is parked without being operated
for prolonged periods. Use the following
procedures before parking the vehicle for
prolonged periods.
1. Turn off the engine.
2. Turn off the headlights and tail lights.
3. Open the driver’s side panel cover and
pull up the memory fuse.
✽✽ NOTICE
If the memory fuse is pulled up from the fuse panel, the warning chime,
audio, clock and interior lamps, etc.,
will not operate. Some items must be
reset after replacement. Refer to
“Battery” in this section.
Even though the memory fuse is
pulled up, the battery can still be dis-
charged by operation of the head-
lights or other electrical devices.
Engine compartment panel fuse replacement
1. Turn the ignition switch and all other switches off.
2. Remove the fuse box cover by press- ing the tab and pulling up the cover.
OYN079020
OYN079021/OYN079022
Diesel only
Page 346 of 379
755
Maintenance
Inner fuse panelDescription Fuse rating Protected component
START 10A Start Motor
ACC 10A Audio, Trip Computer, Outside Mirror Actuator
P/OUTLET FRT 15A Front Power Outlet & Cigar Lighter
P/OUTLET RR 25A Rear Power Outlet, Console Power Outlet CLUSTER 10A Cluster, BCM, Trip Computer, PDM, Smart Key Unit T/SIG 10A Multi Function Switch Light
ECU 5 10A ECU, Air Flow Sensor, Fuel Water Sensor TCU 10A Speed In Sensor, Speed Out Sensor, Speed Sensor
B/UP LP 10A Back Up Switch, Inhibit Switch, RPAS
ABS 3 10A Yaw Rate Sensor, ABS(ESP), ESP Switch
A/BAG 10A ACU
A/BAG IND 10A Cluster(Air Bag Indicator)
IGN COIL 15A Ignition Coil, Condensor IG1 10A MDPS, Center Facia Switch Module, TPMS, RPAS, Start Motor(ISG)
IG2 10A HLLD Switch, HLLD Actuator, BCM, FATC, Sunroof
WIPER FRT 25A Front Wiper S/HEATER 15A Seat Warmer
WIPER RR 25A Rear Wiper PDM 2 10A PDM
HTD MIRR 10A Outside Mirror Defroster
FOG LP FRT10AFront Fog Light
FOG LP RR10ARear Fog Light
Page 347 of 379
Maintenance
56
7
Description Fuse rating Protected component
AUDIO 20A Audio
ROOM LP 10A Room Lamp Switch STOP LP 15A Stop Lamp Switch
PDM 1 25A PDM
DEICER 15A Front Deicer
DR LOCK 20A Door Lock/Unlock
FOLD’G MIRR 10A Outside Mirror Folding Switch SUNROOF 20A Sunroof
TAIL LP LH 10A Left Tail Light
TAIL LP RH 10A Right Tail Light HAZARD 15A Switch Module
P/WDW LH 25A Left Power Window
P/WDW RH 25A Right Power Window
SAFETY P/WDW 15A Safety Power Window (Driver)
Page 349 of 379
Maintenance
58
7
Engine compartment fuse panel (Diesel engine only) Description Fuse rating
Protected component
FUEL HTR30AFuel Filter Heater(Diesel)
A/CON 110AAir Conditioning System Relay
A/CON 210AAir Conditioning System
ECU 3 10A Immobilizer, Stop Switch, IMV, MPROP
ECU 2 30A ECU 4 10A, Main Relay, Fuse-ECU 1 20A, ECU 3 10A, SENSOR 10A, INJECTOR 15A
DRL 10A Daytime Running Light
SENSOR 10A Gasoline - Air Conditioning System Relay, Cooling Fan Relay(High, Low), Camshaft Position, Sensor,
Immobilizer, Canister Purge Solenoid Valve, Oxygen Sensor Up/Down
Diesel - Air Conditioning System Relay, Cooling Fan Relay(High, Low), Lambda Sensor
INJECTOR 15A Gasoline - Injector #1~#4, Fuel Pump Relay, Oil Control Valve
Diesel - Electrical EGR Actuator, Immobilizer, VGT Actuator, Crank Position Sensor, Glow Plug Relay,
PTC HTR 1 Relay
Description Fuse rating Protected component
GLOW 80A Glow Plug
PTC HTR 1 50A PTC Heater 1
PTC HTR 2 50A PTC Heater 2
PTC HTR 3 50A PTC Heater 3