2010 KIA Sportage child lock
[x] Cancel search: child lockPage 59 of 371
Knowing your vehicle
50
3
1
2
3
4
5
6
7
8
9
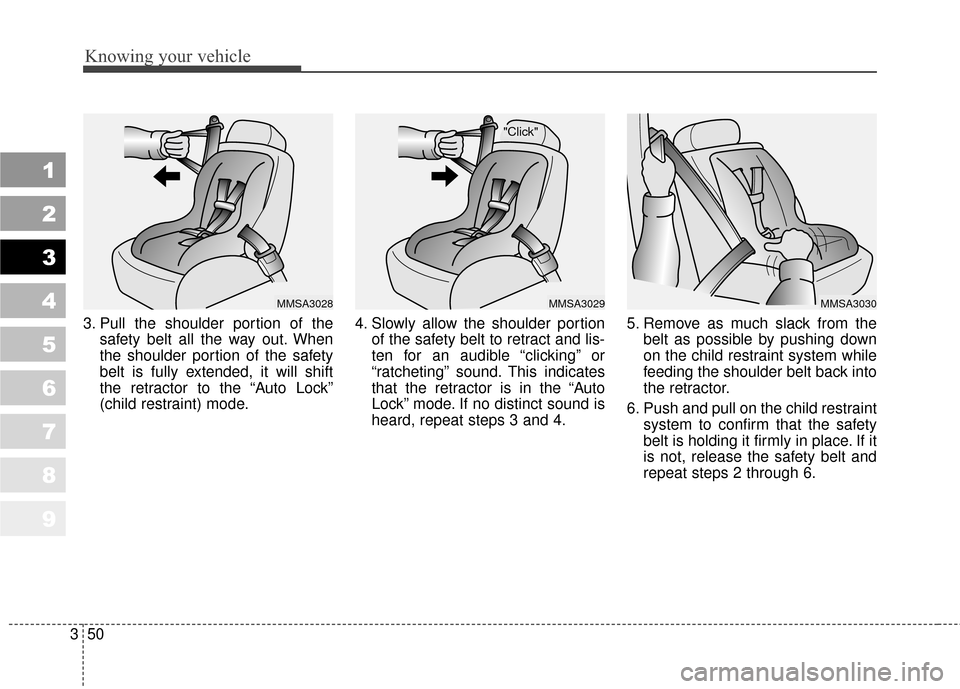
3. Pull the shoulder portion of the
safety belt all the way out. When
the shoulder portion of the safety
belt is fully extended, it will shift
the retractor to the “Auto Lock”
(child restraint) mode. 4. Slowly allow the shoulder portion
of the safety belt to retract and lis-
ten for an audible “clicking” or
“ratcheting” sound. This indicates
that the retractor is in the “Auto
Lock” mode. If no distinct sound is
heard, repeat steps 3 and 4. 5. Remove as much slack from the
belt as possible by pushing down
on the child restraint system while
feeding the shoulder belt back into
the retractor.
6. Push and pull on the child restraint system to confirm that the safety
belt is holding it firmly in place. If it
is not, release the safety belt and
repeat steps 2 through 6.
"Click"
MMSA3029MMSA3028MMSA3030
Page 60 of 371
351
Knowing your vehicle
1
2
3
4
5
6
7
8
9
7. Double check that the retractor isin the “Auto Lock” mode by
attempting to pull more of the safe-
ty belt out of the retractor. If you
cannot, the retractor is in the “Auto
Lock” mode.
To remove the child restraint, press
the release button on the buckle and
then pull the lap/shoulder belt out of
the restraint and allow the safety belt
to retract fully.
When the safety belt is allowed to
retract to its fully stowed position,
the retractor will automatically
switch from the “Auto Lock” mode
to the emergency lock mode for
normal adult usage.
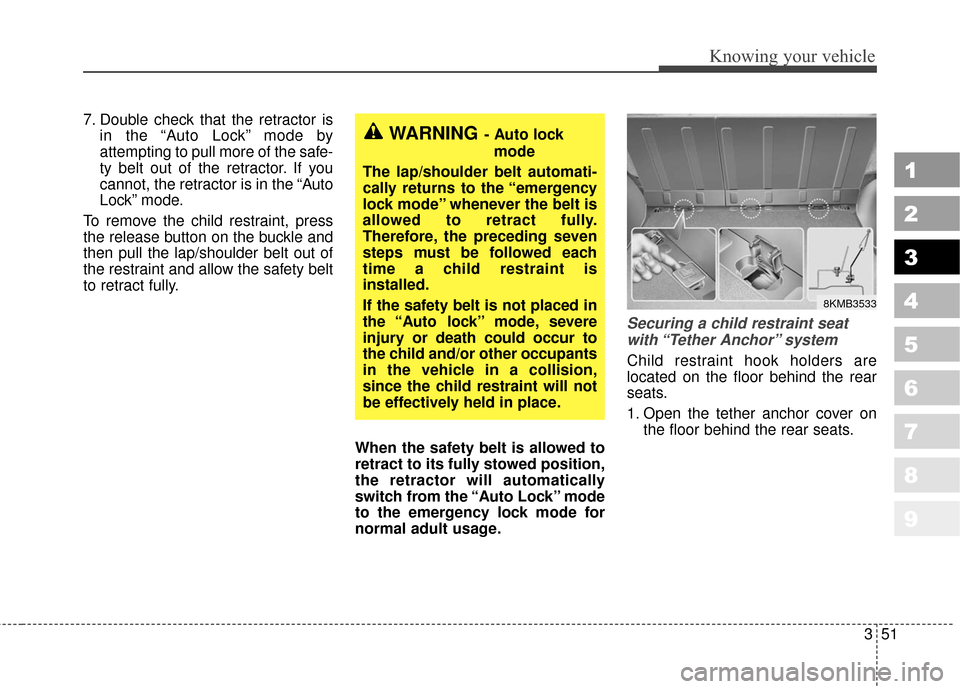
Securing a child restraint seatwith “Tether Anchor” system
Child restraint hook holders are
located on the floor behind the rear
seats.
1. Open the tether anchor cover on the floor behind the rear seats.
WARNING- Auto lock
mode
The lap/shoulder belt automati-
cally returns to the “emergency
lock mode” whenever the belt is
allowed to retract fully.
Therefore, the preceding seven
steps must be followed each
time a child restraint is
installed.
If the safety belt is not placed in
the “Auto lock” mode, severe
injury or death could occur to
the child and/or other occupants
in the vehicle in a collision,
since the child restraint will not
be effectively held in place.
8KMB3533
Page 78 of 371
369
1
2
3
4
5
6
7
8
9
Knowing your vehicle
The curtain airbag deploymentoccurs only on the side of the vehi-
cle affected by the impact.
The side airbags (side and curtain airbags) are not designed to
deploy during collisions from the
front or rear of the vehicle or in
most rollover situations.
The curtain airbags are designed to deploy only during certain side-
impact collisions, depending on the
crash severity, angle, speed and
impact. The curtain airbags are not
designed to deploy in all side
impact situations.WARNING
In order for side airbags (sideand curtain airbags) to pro-
vide their best protection,
occupants should sit in an
upright position with the seat
belts properly fastened.
Children must be seated in the proper child restraint system.
Make sure to secure the child
restraint system in a locked
position.
(Continued)
(Continued)
Advise occupants not to leantheir heads or bodies onto
doors, and not to place
objects between the doors
and them since this may
defeat operation of the side
airbags.
Never try to open or repair any components of the side cur-
tain airbag system. This
should only be done by an
authorized Kia dealer.
Failure to follow the above men-
tioned instructions can result in
injury or death to the vehicle
occupants in an accident.
Page 86 of 371
377
1
2
3
4
5
6
7
8
9
Knowing your vehicle
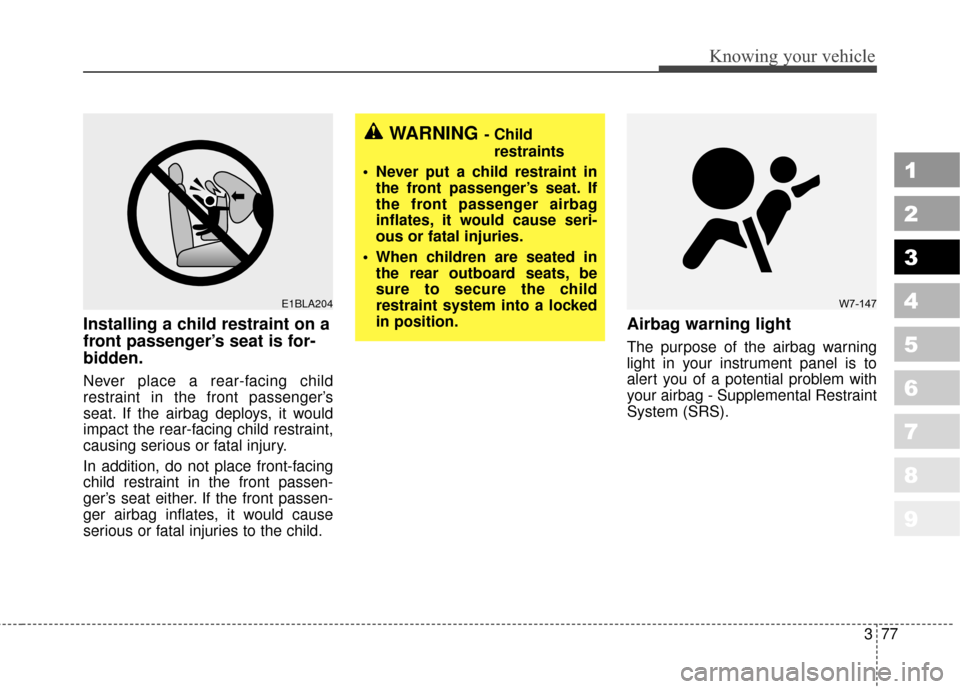
Installing a child restraint on a
front passenger’s seat is for-
bidden.
Never place a rear-facing child
restraint in the front passenger’s
seat. If the airbag deploys, it would
impact the rear-facing child restraint,
causing serious or fatal injury.
In addition, do not place front-facing
child restraint in the front passen-
ger’s seat either. If the front passen-
ger airbag inflates, it would cause
serious or fatal injuries to the child.
Airbag warning light
The purpose of the airbag warning
light in your instrument panel is to
alert you of a potential problem with
your airbag - Supplemental Restraint
System (SRS).
WARNING- Childrestraints
Never put a child restraint in the front passenger’s seat. If
the front passenger airbag
inflates, it would cause seri-
ous or fatal injuries.
When children are seated in the rear outboard seats, be
sure to secure the child
restraint system into a locked
in position.
E1BLA204W7-147
Page 126 of 371
3117
Knowing your vehicle
1
2
3
4
5
6
7
8
9
In case USB is connected to the mul-
tiple terminal inside the console on
the right hand side of the driver’s
seat. When USB is connected, the
‘USB’ icon will be displayed on the
top right corner of the display screen.
1.AUX Selection Button
If USB is not connected, it switches
to the USB mode from the Radio and
CD mode to play the song files
stored in the USB.
If AUX is not connected, it is invalid
key.
2. Track Moving Button
Press the [SEEK ] button forless than 0.8 second to play from
the beginning of the song currently
played.
Press the button for less than 0.8
second and press it again within 1
second to move to and play the pre-
vious track.
Press the button for 0.8 second or
longer to play the song in reverse
direction in fast speed. Press the [SEEK ] button for
less
than 0.8 second to move to the
next track.
Press the button for 0.8 second or
longer to play the song in forward
direction in fast speed.
3. INFO Selection Button
Displays the information of the file
currently played in the order of FILE
NAME
➟TITLE➟ARTIST➟ALBUM➟
FOLDER➟TOTAL FILE➟FILE NAME
➟… (Displays no information if the
file has no song information.)
4. Folder moving Button
Moves [FLDR ] button child fold- er of the current folder and displays
the first song in the folder. Press
TUNE/ENTER button to move to
the folder displayed. It will play the
first song in the folder.
Moves [FLDR ] button parent folder and displays the first song in
the folder. Press TUNE/ENTER
button to move to the folder dis-
played. It will play the first song in
the folder.
5. TUNE/ENTER Button
Turn this button clockwise to display
the songs next to the currently
played song.
Turn the button counterclockwise to
display the songs before the current-
ly played song.
Press the button to skip to and play
the selected song.
Page 139 of 371
Knowing your vehicle
130
3
1
2
3
4
5
6
7
8
9
In case USB is connected to the mul-
tiple terminal inside the console on
the right hand side of the driver’s
seat. When USB is connected, the
‘USB’ icon will be displayed on the
top right corner of the display screen.
1. AUX Selection Button
If USB is not connected, it switches
to the USB mode from the Radio and
CD mode to play the song files
stored in the USB.
If AUX is not connected, it is invalid
key.
2. Track Moving Button
Press the [SEEK ] button for
less than 0.8 second to play from
the beginning of the song currently
played.
Press the button for less than 0.8
second and press it again within 1
second to move to and play the pre-
vious track.
Press the button for 0.8 second or
longer to play the song in reverse
direction in fast speed. Press the [SEEK ] button for
less
than 0.8 second to move to the
next track.
Press the button for 0.8 second or
longer to play the song in forward
direction in fast speed.
3. INFO Selection Button
Displays the information of the file
currently played in the order of FILE
NAME
➟TITLE➟ARTIST➟ALBUM➟
FOLDER➟TOTAL FILE➟FILE NAME
➟… (Displays no information if the
file has no song information.)
4. Folder moving Button
Moves [FLDR ] button child fold- er of the current folder and displays
the first song in the folder. Press
TUNE/ENTER button to move to
the folder displayed. It will play the
first song in the folder.
Moves [FLDR ] button parent folder and displays the first song in
the folder. Press TUNE/ENTER
button to move to the folder dis-
played. It will play the first song in
the folder.
5. TUNE/ENTER Button
Turn this button clockwise to display
the songs next to the currently
played song.
Turn the button counterclockwise to
display the songs before the current-
ly played song.
Press the button to skip to and play
the selected song.
6. RANDOM Playback Button
Press the button for less than 0.8
second to start or stop the random
playback of the songs in the current
folder.
Press the button for more than 0.8
second to randomly play the entire
songs in the USB device.
Press the button again to cancel the
mode.
Page 155 of 371
Driving your vehicle
84
1
2
3
4
5
6
7
8
9
Transaxle ranges
P (park)
Always come to a complete stop
before shifting into P. This position
locks the transaxle and prevents the
front wheels from rotating.
✽ ✽
NOTICE
The transaxle may be damaged if
you shift into P (Park) while the
vehicle is in motion.
(Continued)
Before leaving the driver’s
seat, always make sure the
shift lever is in the P (PARK)
position. Set the parking
brake fully, shut the engine off
and take the key with you.
Unexpected and sudden vehi-
cle movement can occur if you
do not follow these precau-
tions in the order specified.
Never leave a child unattend- ed in a vehicle.WARNING- Automatic
transaxle
Shifting into P (Park) while the vehicle is in motion will cause
the drive wheels to lock which
will cause you to lose control
of the vehicle.
Do not use the P (Park) posi- tion in place of the parking
brake. Always make sure the
shift lever is latched in the P
(Park) position so that it can-
not be moved unless the lock
release button is pushed in,
AND set the parking brake
fully.
(Continued)