2010 KIA Soul fog light
[x] Cancel search: fog lightPage 9 of 314
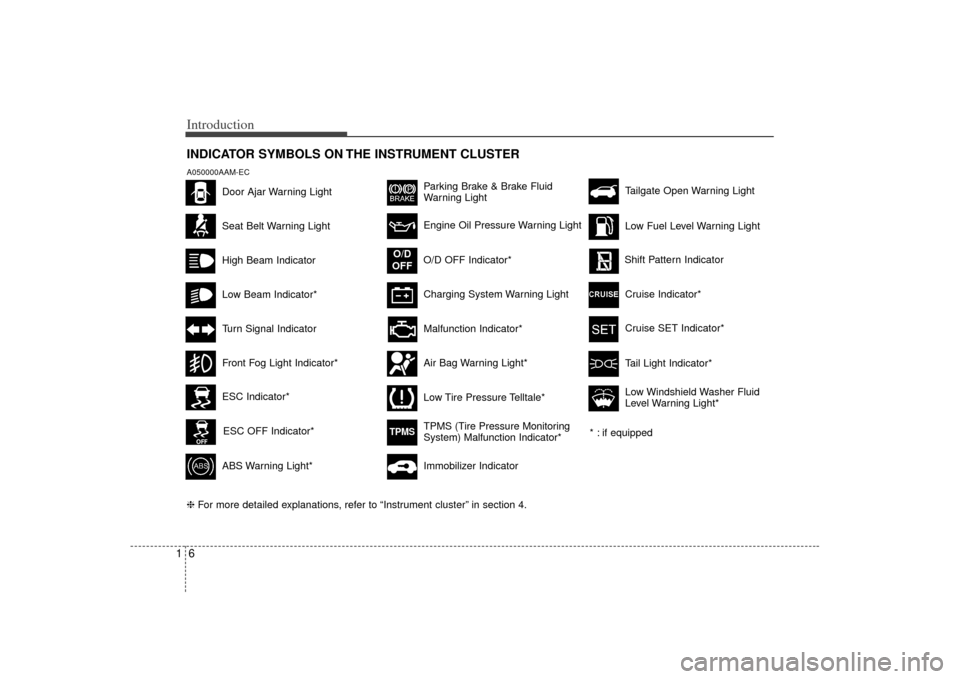
Introduction61INDICATOR SYMBOLS ON THE INSTRUMENT CLUSTER
Seat Belt Warning LightHigh Beam IndicatorTurn Signal IndicatorABS Warning Light*
Parking Brake & Brake Fluid
Warning LightMalfunction Indicator*Immobilizer Indicator
Low Fuel Level Warning Light
* : if equipped Tailgate Open Warning Light
❈ For more detailed explanations, refer to “Instrument cluster” in section 4.
Charging System Warning Light
Door Ajar Warning Light
A050000AAM-EC
Front Fog Light Indicator*
Engine Oil Pressure Warning Light
O/D OFF Indicator*
O/D
OFF
Air Bag Warning Light*
TPMS (Tire Pressure Monitoring
System) Malfunction Indicator* Low Tire Pressure Telltale*
Cruise Indicator*Cruise SET Indicator*Shift Pattern Indicator
ESC Indicator*ESC OFF Indicator*
TPMS
Tail Light Indicator*Low Windshield Washer Fluid
Level Warning Light*
Low Beam Indicator*
Page 73 of 314

4
Keys / 4-2
Remote keyless entry / 4-6
Door locks / 4-8
Tailgate / 4-12
Windows / 4-14
Hood / 4-17
Fuel filler lid / 4-19
Sunroof / 4-22
Steering wheel / 4-26
Mirrors / 4-28
Instrument cluster / 4-32
Rearview camera / 4-46
Hazard warning flasher / 4-46
Lighting / 4-47
Wipers and washers / 4-51
Interior light / 4-54
Defroster / 4-56
Manual climate control system / 4-57
Windshield defrosting and defogging / 4-66
Storage compartment / 4-68
Interior features / 4-70
Exterior feature / 4-74
Audio system / 4-75
Features of your vehicle
Page 111 of 314
439
Features of your vehicle
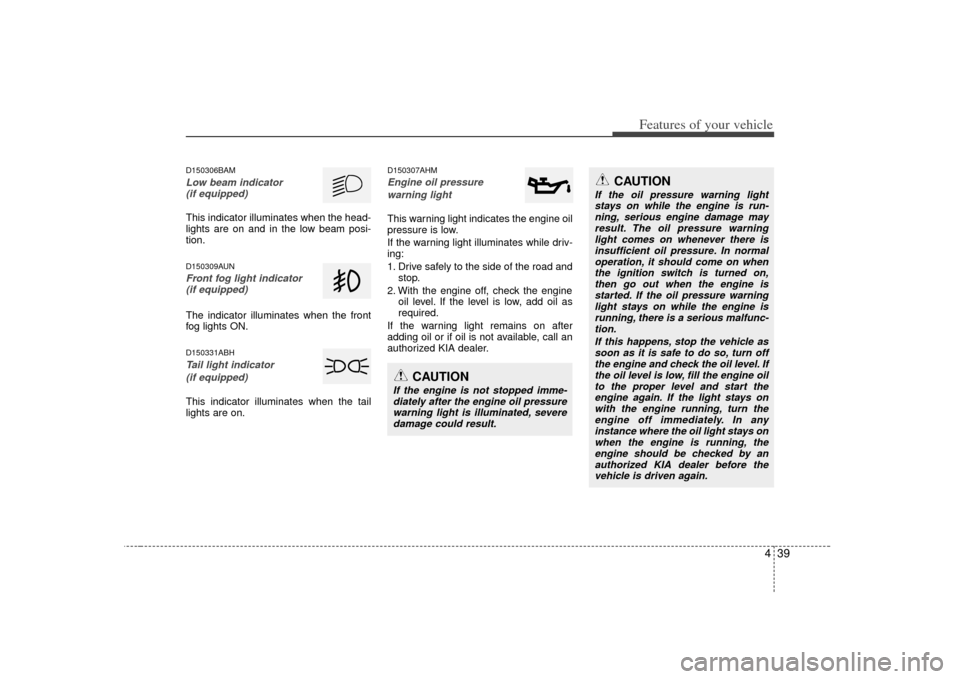
D150306BAMLow beam indicator (if equipped)This indicator illuminates when the head-
lights are on and in the low beam posi-
tion.D150309AUNFront fog light indicator (if equipped)The indicator illuminates when the front
fog lights ON.D150331ABHTail light indicator
(if equipped)This indicator illuminates when the tail
lights are on.
D150307AHMEngine oil pressure warning lightThis warning light indicates the engine oil
pressure is low.
If the warning light illuminates while driv-
ing:
1. Drive safely to the side of the road and stop.
2. With the engine off, check the engine oil level. If the level is low, add oil as
required.
If the warning light remains on after
adding oil or if oil is not available, call an
authorized KIA dealer.
CAUTION
If the engine is not stopped imme- diately after the engine oil pressurewarning light is illuminated, severe damage could result.
CAUTION
If the oil pressure warning lightstays on while the engine is run-ning, serious engine damage mayresult. The oil pressure warning light comes on whenever there isinsufficient oil pressure. In normal operation, it should come on whenthe ignition switch is turned on, then go out when the engine isstarted. If the oil pressure warninglight stays on while the engine is running, there is a serious malfunc-tion.
If this happens, stop the vehicle assoon as it is safe to do so, turn offthe engine and check the oil level. If the oil level is low, fill the engine oilto the proper level and start the engine again. If the light stays onwith the engine running, turn the engine off immediately. In anyinstance where the oil light stays on when the engine is running, theengine should be checked by an authorized KIA dealer before thevehicle is driven again.
Page 121 of 314
449
Features of your vehicle
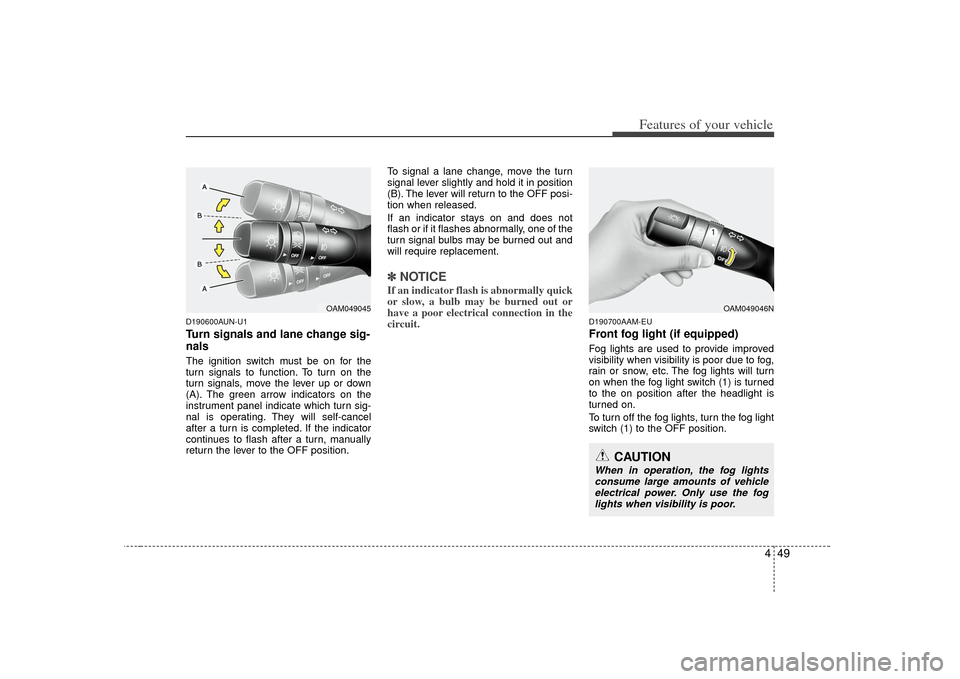
D190600AUN-U1Turn signals and lane change sig-
nalsThe ignition switch must be on for the
turn signals to function. To turn on the
turn signals, move the lever up or down
(A). The green arrow indicators on the
instrument panel indicate which turn sig-
nal is operating. They will self-cancel
after a turn is completed. If the indicator
continues to flash after a turn, manually
return the lever to the OFF position.To signal a lane change, move the turn
signal lever slightly and hold it in position
(B). The lever will return to the OFF posi-
tion when released.
If an indicator stays on and does not
flash or if it flashes abnormally, one of the
turn signal bulbs may be burned out and
will require replacement.
✽ ✽
NOTICEIf an indicator flash is abnormally quick
or slow, a bulb may be burned out or
have a poor electrical connection in the
circuit.
D190700AAM-EUFront fog light (if equipped)Fog lights are used to provide improved
visibility when visibility is poor due to fog,
rain or snow, etc. The fog lights will turn
on when the fog light switch (1) is turned
to the on position after the headlight is
turned on.
To turn off the fog lights, turn the fog light
switch (1) to the OFF position.
OAM049045
OAM049046N
CAUTION
When in operation, the fog lights
consume large amounts of vehicle electrical power. Only use the foglights when visibility is poor.
Page 134 of 314
Features of your vehicle62
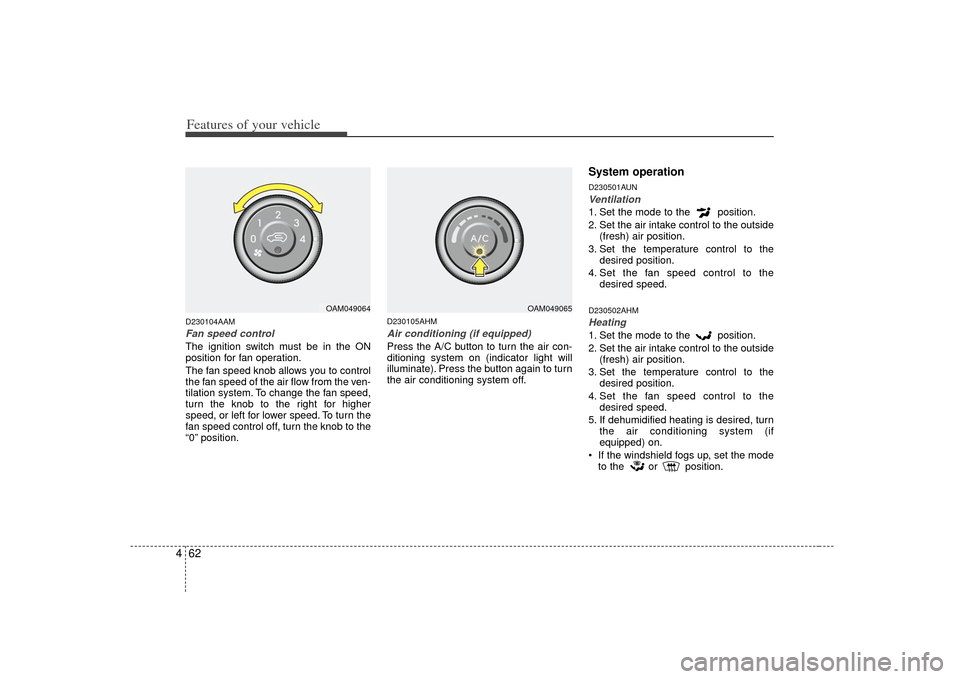
4D230104AAMFan speed controlThe ignition switch must be in the ON
position for fan operation.
The fan speed knob allows you to control
the fan speed of the air flow from the ven-
tilation system. To change the fan speed,
turn the knob to the right for higher
speed, or left for lower speed. To turn the
fan speed control off, turn the knob to the
“0” position.
D230105AHMAir conditioning (if equipped)Press the A/C button to turn the air con-
ditioning system on (indicator light will
illuminate). Press the button again to turn
the air conditioning system off.
System operationD230501AUNVentilation1. Set the mode to the position.
2. Set the air intake control to the outside
(fresh) air position.
3. Set the temperature control to the desired position.
4. Set the fan speed control to the desired speed.D230502AHMHeating1. Set the mode to the position.
2. Set the air intake control to the outside(fresh) air position.
3. Set the temperature control to the desired position.
4. Set the fan speed control to the desired speed.
5. If dehumidified heating is desired, turn the air conditioning system (if
equipped) on.
If the windshield fogs up, set the mode to the or position.
OAM049064
OAM049065
Page 139 of 314
467
Features of your vehicle
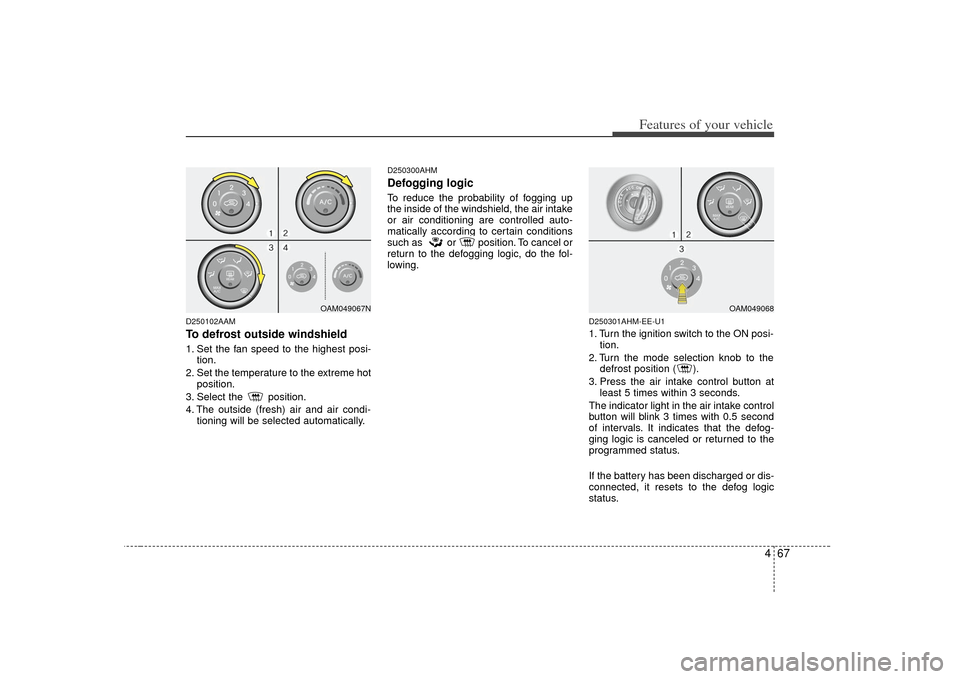
D250102AAMTo defrost outside windshield1. Set the fan speed to the highest posi-tion.
2. Set the temperature to the extreme hot position.
3. Select the position.
4. The outside (fresh) air and air condi- tioning will be selected automatically.
D250300AHMDefogging logicTo reduce the probability of fogging up
the inside of the windshield, the air intake
or air conditioning are controlled auto-
matically according to certain conditions
such as or position. To cancel or
return to the defogging logic, do the fol-
lowing.
D250301AHM-EE-U11. Turn the ignition switch to the ON posi-tion.
2. Turn the mode selection knob to the defrost position ( ).
3. Press the air intake control button at least 5 times within 3 seconds.
The indicator light in the air intake control
button will blink 3 times with 0.5 second
of intervals. It indicates that the defog-
ging logic is canceled or returned to the
programmed status.
If the battery has been discharged or dis-
connected, it resets to the defog logic
status.
OAM049067N
OAM049068
Page 291 of 314

Maintenance48
7Inner fuse panel
Description Fuse rating Protected componentP/WDW LH25A Power Window Main Switch, Rear Power Window Switch LH
P/WDW RH 25A Power Window Main Switch, Passenger Power Window Switch, Rear Power Window Switch RH
F/MIRROR 10A Data Link Connector
HAZARD LP 15A Hazard Relay, Hazard Switch
TAIL LH 10A Rear Combination Lamp LH, Head Lamp LH, License Lamp
TAIL RH 10ARear Combination Lamp RH, Head Lamp RH, Rheostat Detent, AUX & USB Jack, Hazard Switch,
ESC Switch, Instrument Cluster (ILL.), Instrument Cluster (IND.), Mood Lamp Switch,
Power Window Main Switch, Audio, Driver/Passenger Seat Warmer Switch, Shift Lever Switch,
A/C Control Module, Multifunction Switch (Remocon)
IGN 2 10A BCM, Electro Chromic Mirror, Sunroof Control Module
WIPER(RR) 15A Rear Wiper Relay, Rear Wiper Motor, Multifunction Switch (Wiper)
S/HTR 20A Driver/Passenger Seat Warmer Switch
WIPER(FR) 25A E/R Fuse & Relay Box (Front Wiper Relay), Front Wiper Motor, Multifunction Switch (Wiper)
AMP 25A AMP
S/ROOF 20A Sunroof Control Module
(FOG LP(FR)) 15A Front Fog Lamp Relay
T/GATE OPEN 15A Tail Gate Relay, DRL Relay
(FOG LP(RR)) 10A Rear Fog Lamp Relay
A/CON 10A A/C Control Module, E/R Fuse & Relay Box (Head Lamp Relay (High), Blower Relay
H/LP 10A E/R Fuse & Relay Box (Head Lamp Relay (Low))
ACC 10A Audio, Mood Lamp Switch, Power Outside Mirror Switch
ACC SOCKET 15A Cigarette Lighter, Front Power Outlet
MIRR. HTD 10A ECM/PCM (G4FC), Driver/Passenger Power Outside Mirror Motor, A/C Control Module
DR LOCK 20A Door Lock Relay, Door Unlock Relay, 2 Turn Unlock Relay
STOP LP 15A Stop Lamp Switch, E/R Fuse & Relay Box (Multipurpose Check Connector)
TCU 10A Vehicle Speed Sensor (M/T), Pulse Generator 'A', Pulse Generator 'B', PCM, Shift Lever Switch
Page 305 of 314
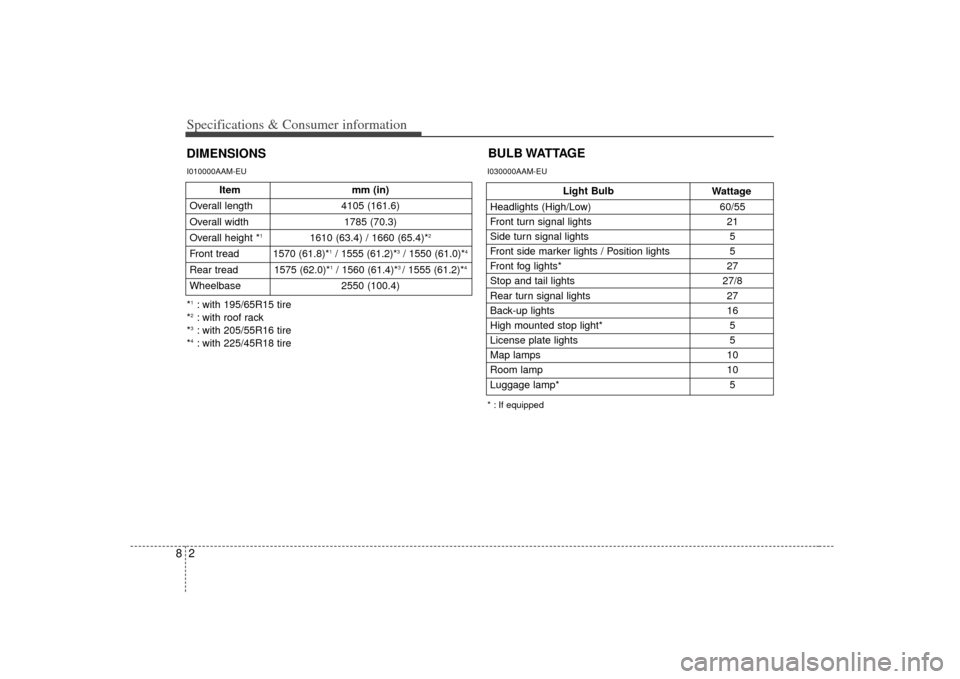
Specifications & Consumer information28DIMENSIONSBULB WATTAGE
Item
mm (in)
Overall length 4105 (161.6)
Overall width 1785 (70.3)
Overall height *
1
1610 (63.4) / 1660 (65.4)*
2
Front tread 1570 (61.8)*
1/ 1555 (61.2)*
3 / 1550 (61.0)*
4
Rear tread 1575 (62.0)*
1/ 1560 (61.4)*
3 / 1555 (61.2)*
4
Wheelbase 2550 (100.4)*1: with 195/65R15 tire
*2: with roof rack
*3: with 205/55R16 tire
*4: with 225/45R18 tireI010000AAM-EU
Headlights (High/Low) 60/55
Front turn signal lights 21
Side turn signal lights 5
Front side marker lights / Position lights 5
Front fog lights* 27
Stop and tail lights 27/8
Rear turn signal lights 27
Back-up lights 16
High mounted stop light* 5
License plate lights 5
Map lamps 10
Room lamp 10
Luggage lamp* 5* : If equippedI030000AAM-EU
Light Bulb
Wattage