2010 KIA Soul AUX
[x] Cancel search: AUXPage 148 of 314
Features of your vehicle76
4VOLUME ( / ) (1)• Push up the lever to increase volume.
Push down the lever to decrease vol-
ume.SEEK/PRESET ( / ) (2)If the SEEK/PRESET button is pressed
for 0.8 second or more, it will work as fol-
lows in each mode.
RADIO mode
It will function as the AUTO SEEK select
button.
CDP mode
It will function as the FF/REW button.
CDC mode
It will function as the DISC UP/DOWN
button.
If the SEEK/PRESET button is pressed
for less than 0.8 second, it will work as
follows in each mode.
RADIO mode
It will function as the PRESET STATION
select buttons. CDP mode
It will function as the TRACK UP/DOWN
button.
CDC mode
It will function as the TRACK UP/DOWN
button.
MODE (3)Press the button to select Radio or CD
(compact disc).MUTE (4) Press the MUTE button to cancel the
sound.
Press the MUTE button again to acti- vate the sound.
Detailed information for audio control
buttons is described in the following
pages in this section.
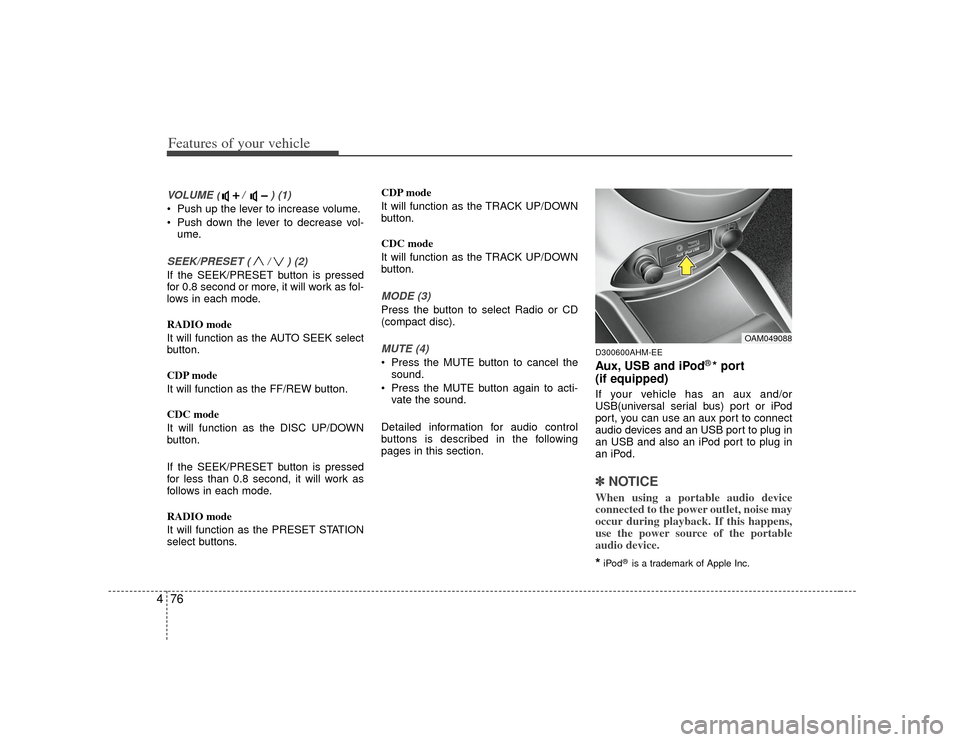
D300600AHM-EEAux, USB and iPod
®* port
(if equipped)
If your vehicle has an aux and/or
USB(universal serial bus) port or iPod
port, you can use an aux port to connect
audio devices and an USB port to plug in
an USB and also an iPod port to plug in
an iPod.✽ ✽ NOTICEWhen using a portable audio device
connected to the power outlet, noise may
occur during playback. If this happens,
use the power source of the portable
audio device.*iPod
®is a trademark of Apple Inc.
OAM049088
Page 153 of 314
481
Features of your vehicle
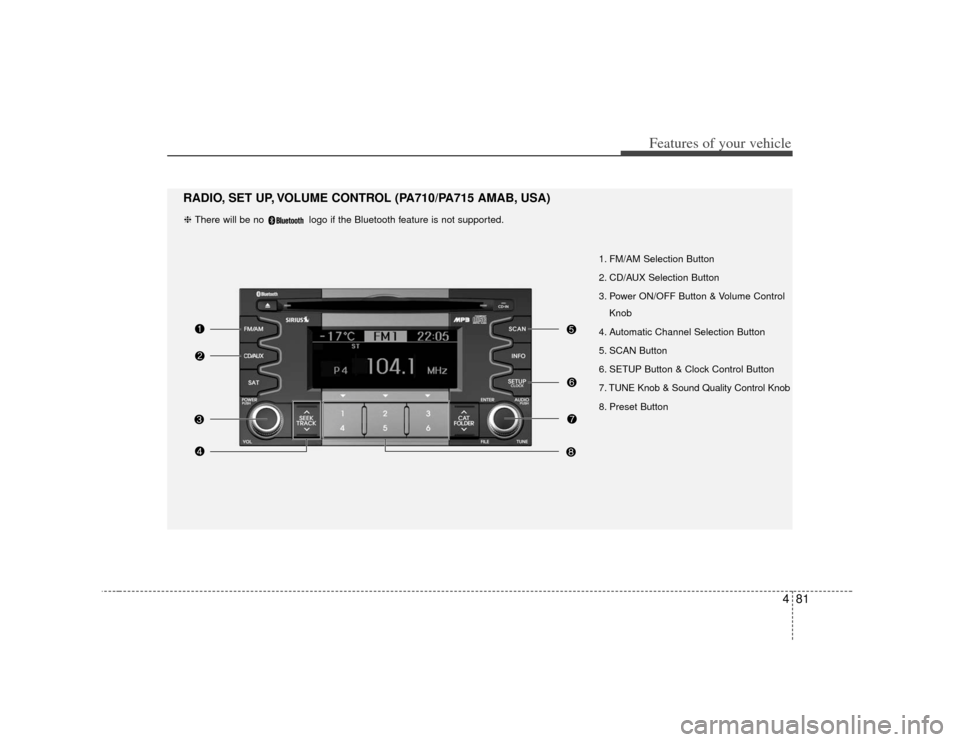
1. FM/AM Selection Button
2. CD/AUX Selection Button
3. Power ON/OFF Button & Volume ControlKnob
4. Automatic Channel Selection Button
5. SCAN Button
6. SETUP Button & Clock Control Button
7. TUNE Knob & Sound Quality Control Knob
8. Preset Button
RADIO, SET UP, VOLUME CONTROL (PA710/PA715 AMAB, USA)❈ There will be no logo if the Bluetooth feature is not supported.
Page 154 of 314
Features of your vehicle82
41. FM/AM Selection ButtonTurns to FM or AM mode, and toggles in
the order of FM1
➟ FM2
➟ AM
➟ FM1...
when the button is pressed each time.
2. CD/AUX Selection ButtonIf there is a CD in the CDP DECK it turns
to CD mode. If a device is connected to
AUX, then it toggles in the order of CD
➟
AUX
➟CD... when the button is pressed
each time. (It will not turn to AUX if there
is no auxiliary device connected.)
3. Power ON/OFF Button & Volume Control KnobTurns on/off the set when the IGNITION
SWITCH is on ACC or ON. If the button
is turned to the right, it increases the vol-
ume and left, decreases the volume.4. Automatic Channel SelectionButton ] button is pressed,
it reduces the band frequency by
200kHz to automatically select a chan-
nel. Stops at the previous frequency if
no channel is found. ] button is pressed,
it increases the band frequency by
200kHz to automatically select a chan-
nel. Stops at the previous frequency if no
channel is found.
5. SCAN ButtonIf this button is pressed, the frequencies
will become increased and receive the
corresponding broadcasts. This function
will play the frequencies for 5 seconds
(SIRIUS MODE:10 seconds) each and
find other broadcasts as the frequency
increases. Press the button again when
desiring to continue listening to the cur-
rently playing broadcast.6. SETUP Button & Clock Control ButtonPress this button to turn to the SIRIUS
option and the other adjustment mode.
If no action is taken for 5 seconds after
pressing the button, it will return to the
play mode. (After entering SETUP mode,
move between items using the left, right
and PUSH functions of the [TUNE]
knob.)
■ PA710 AMAB is an internal AMP
MODEL with Bluetooth feature.
The setup changes in the order of
CLOCK
↔
SAT
↔
SCROLL
↔
P.BASS
↔
RETURN
↔
TEMP
↔
PHONE
↔
SDVC
↔
CLOCK...
■ PA710 AMA is an internal AMP MODEL
without Bluetooth feature.
The setup changes in the order of
CLOCK
↔
SAT
↔
SCROLL
↔
P.BASS
↔
TEMP
↔
SDVC
↔
CLOCK...
■ PA715 AMAB is an external AMP
MODEL with Bluetooth feature.
The setup changes in the order of
CLOCK
↔ SAT
↔ SCROLL
↔ TEMP
↔
PHONE
↔
SDVC
↔
CLOCK...
■ PA715 AMA is an external AMP MODEL
without Bluetooth feature.
The setup changes in the order of
CLOCK
↔ SAT
↔ SCROLL
↔ RETURN
↔
TEMP
↔
SDVC
↔
CLOCK...
Page 155 of 314
![KIA Soul 2010 1.G Owners Manual 483
Features of your vehicle
Press the [SETUP] button. Use the vol-
ume controller to adjust the clock in the
following order: CLOCK
➟
ENTER
➟
hour or minute.
Adjust the hour and press the [ENT KIA Soul 2010 1.G Owners Manual 483
Features of your vehicle
Press the [SETUP] button. Use the vol-
ume controller to adjust the clock in the
following order: CLOCK
➟
ENTER
➟
hour or minute.
Adjust the hour and press the [ENT](/manual-img/2/2920/w960_2920-154.png)
483
Features of your vehicle
Press the [SETUP] button. Use the vol-
ume controller to adjust the clock in the
following order: CLOCK
➟
ENTER
➟
hour or minute.
Adjust the hour and press the [ENTER]
button to set. Use the same method to
adjust the minute and press the [ENTER]
button to complete and exit from clock
adjustment mode.
Pressing the [SETUP] button while in
POWER OFF screen will allow the user
to make immediately adjustments to the
clock.
This function is used to display charac-
ters longer than the LCD text display and
can be turned ON/OFF through the vol-
ume controller.
This function displays the previous
MODE screen.
This function is used to change the tem-
perature display setting.
This function automatically adjusts the
volume level according to the speed of
the vehicle and can be turned ON/OFF
through the volume controller.
Based on psychoacoustic technology, this
technology overcomes BASS limitations
which may occur due to the limited num-
ber and size of speakers to offer dynamic
BASS sound quality. It is possible to adjust
in 3 levels of LOW/MID/HIGH.
OFF
➟LOW
➟MID
➟HIGH
Modes: CD/FM/AUX/IPOD/USB (exclud-
ing AM Mode)
7. TUNE Knob & Sound Quality Control KnobRotate the knob clockwise by one notch
to increase frequency by 200kHz from
current frequency.
Rotate the knob counterclockwise by one
notch to decrease frequency by 200kHz
from current frequency.
MIDDLE, TREBLE, FADER and BAL-
ANCE TUNE mode. The mode selected
is shown on the display. After selecting
each mode, rotate the Audio control
knob clockwise or counterclockwise. (Sound Quality Control will operate in FM,
AM, CD, AUX, USB, iPod and SAT
modes.)
To increase the BASS, rotate the knob
clockwise, while to decrease the BASS,
rotate the knob counterclockwise.
To increase the MIDDLE, rotate the knob
clockwise, while to decrease the MID-
DLE, rotate the knob counterclockwise.
Control
To increase the TREBLE, rotate the knob
clockwise, while to decrease the TRE-
BLE, rotate the knob counterclockwise.
Turn the control knob clockwise to
emphasize rear speaker sound(front
speaker sound will be attenuated). When
the control knob is turned counterclock-
wise, front speaker sound will be empha-
sized(rear speaker sound will be attenu-
ated).
Page 157 of 314
485
Features of your vehicle
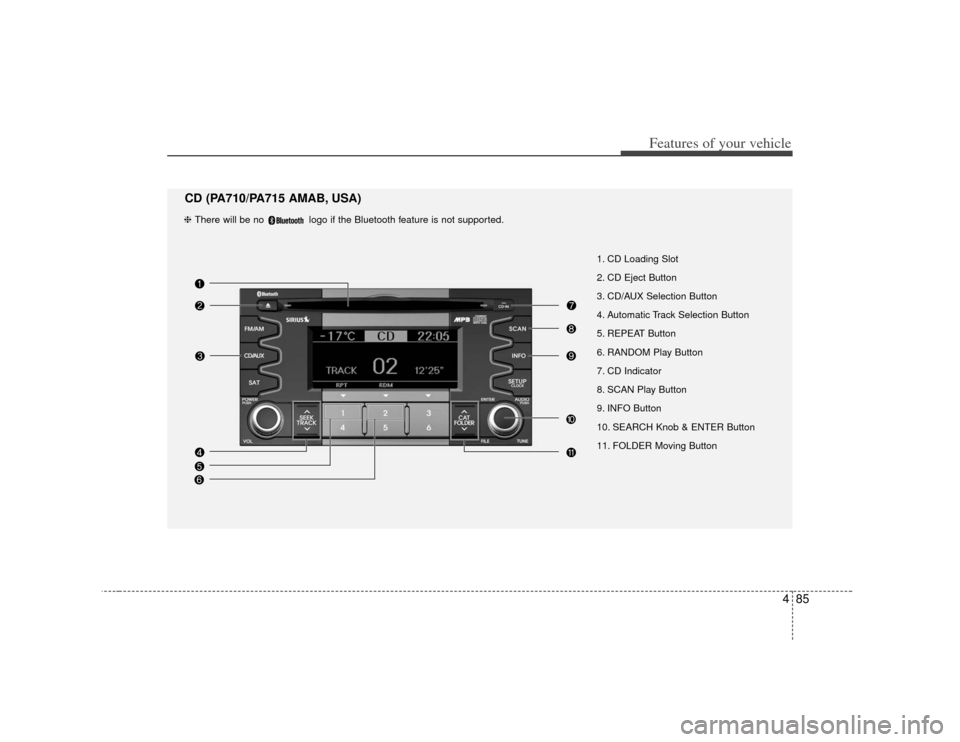
1. CD Loading Slot
2. CD Eject Button
3. CD/AUX Selection Button
4. Automatic Track Selection Button
5. REPEAT Button
6. RANDOM Play Button
7. CD Indicator
8. SCAN Play Button
9. INFO Button
10. SEARCH Knob & ENTER Button
11. FOLDER Moving Button
CD (PA710/PA715 AMAB, USA)❈ There will be no logo if the Bluetooth feature is not supported.
Page 158 of 314
Features of your vehicle86
41. CD Loading SlotPlease face printed side upward and gen-
tly push in. When the ignition switch is on
ACC or ON and power is off, power is auto-
matically turned on if the CD is loaded.
This CDP supports only 12 cm CD. If VCD
or Data CD are loaded, a "Reading Error"
message will be displayed and the CD will
be ejected.2. CD Eject ButtonPush button to eject the CD during
CD playback. This button is enabled
when ignition switch is off.3. CD/AUX Selection Button
switches to AUX mode from the other
mode to play the sounds from the aux-
iliary player.
and if a device is connected to AUX
then it toggles in the order of CD
➟AUX
➟
CD... when the button is pressed
each time.(It will not turn to AUX if the
auxiliary device is not connected.)
then it displays the message "No
Media" for 3 seconds and returns to the
previous mode.
4. Automatic Track Selection Button ] button for less than
0.8 second to play from the beginning
of current song.
] button for less than 0.8 second and press again within 1
second to play the previous song.
Continue to press down the [TRACK ] button to initiate reverse direction high
speed sound search of current song.
] button for less than 0.8 second to play the next song.
Continue to press down the [TRACK ] button to initiate high speed sound
search of current song.5. REPEAT ButtonRepeats current song when the button is
pressed for less than 0.8 second.
Repeats the entire DISC when the button
is pressed for 0.8 second or longer.
(In the case of MP3, the Repeat function
will operate only within folder.)
6. RANDOM Play ButtonPress this button for less than 0.8 second
to activate ‘RDM’ mode and longer than
0.8 second to activate ‘A.RDM’ mode.
Only files/tracks in a folder/disc are played back in a random sequence.
All files in a disc are played back in the random
sequence.7. CD Indicator When car ignition switch is ACC or ON
and if the CD is loaded, this indicator is
lighted. If the CD is ejected, the light is
turned off.8. SCAN Play ButtonScans first 10 seconds of each song in
the DISC. To cancel the mode, press the
button once again.9. INFO ButtonDisplays the information of the current
CD TRACK(FILE) in the order shown
below each time the button is pressed.
Disc Title
➟ Disc Artist
➟Tr a c k
Title
➟ Track Artist
➟Total Track...
Page 161 of 314
489
Features of your vehicle
1. USB Selection ButtonIf USB is connected, it switches to the
USB mode from the other mode to play
the song files stored in the USB. If no CD
and auxiliary device is not connected, it
displays "NO Media" for 3 seconds and
returns to the previous mode.2. TRACK Moving Button ] button for lessthan 0.8 second to play from the begin-
ning of the song currently played.
Press the button for less than 0.8 second
and press it again within 1 second to
move to and play the previous track.
Press the button for 0.8 second or
longer to play the song in reverse direc-
tion in fast speed.
] button for less
than 0.8 second to move to the next
track. Press the button for 0.8 second or
longer to play the song in forward direc-
tion in fast speed.
3. REPEAT ButtonPress this button for less than 0.8 second
to activate 'RPT' mode and longer than
0.8 second to activate ' ' mode.
Only the current file is repeatedly played back.
: All files in a folder are repeat- edly played back.4. RANDOM Playback ButtonPress this button for less than 0.8 second
to activate 'RDM' mode and longer than
0.8 second to activate 'A.RDM' mode.
All files in a folder are playedback in random sequence.
All files in a USB memory are played back in random sequence.5. SCAN Selection ButtonScan 10 seconds of each song in the USB
device.
Press the button once again to cancel
scanning.
6. INFO ButtonDisplays the information of the currently
played file in the order of File Name
➟
Title
➟
Artist
➟
Album
➟
Folder
➟
Total
File
➟Normal Display
➟ File Name
➟…
(Displays no information if the file has no
song information.)
7. SEARCH Knob & ENTER ButtonRotate the knob clockwise to display the
songs after the currently played song.
Rotate the knob counterclockwise to dis-
play the songs before the currently
played song.
Press the button to skip and play the
selected song.8. FOLDER Moving Button ] button to move
child folder of the current folder and dis-
play the first song in the folder. Press
TUNE/ENTER knob to move to the fold-
er displayed. It will play the first song in
the folder.
] button to move parent folder and display the first song
in the folder. Press TUNE/ENTER knob
to move to the folder displayed.
Page 166 of 314
Features of your vehicle94
4✽
✽
NOTICE FOR USING iPod
®
DEVICE
• Some iPod models might not sup-
port the communication protocol
and the files will not be played.
(iPod models supported: Mini, 4G,
Photo, Nano, 5G)
• The order of search or playback of songs in the iPod can be different
from the order searched in the
audio system.
• If the iPod crashes due to its own malfunction, reset the iPod. (Reset:
Refer to iPod manual)
• An iPod may not operate normally on low battery.
CAUTION IN USING
iPod
®DEVICE
You need the power cable exclu-
sive for an iPod in order to oper-ate an iPod with the buttons on the audio system. The PC cableprovided by Apple may cause a malfunction and do not use it forvehicle use.
When connecting the device with an iPod cable, push in the jackfully not to interfere with commu- nication.
When adjusting the sound effects of an iPod and the audio system,the sound effects of both devices will overlap and might reduce ordistort the quality of the sound.
Deactivate (turn off) the equalizer function of an iPod when adjust-ing the audio system’s volume,and turn off the equalizer of theaudio system when using theequalizer of an iPod.
(Continued)
(Continued) When the iPod cable is connected, the system can be switched to theAUX mode even without the iPoddevice and can cause noise. Disconnect the iPod cable whenyou are not using the iPod device.
When the iPod is not used for the audio system, the iPod cable hasto be separate from iPod devices.Original display of iPod may not be displayed.