2010 KIA Soul display
[x] Cancel search: displayPage 165 of 314
493
Features of your vehicle
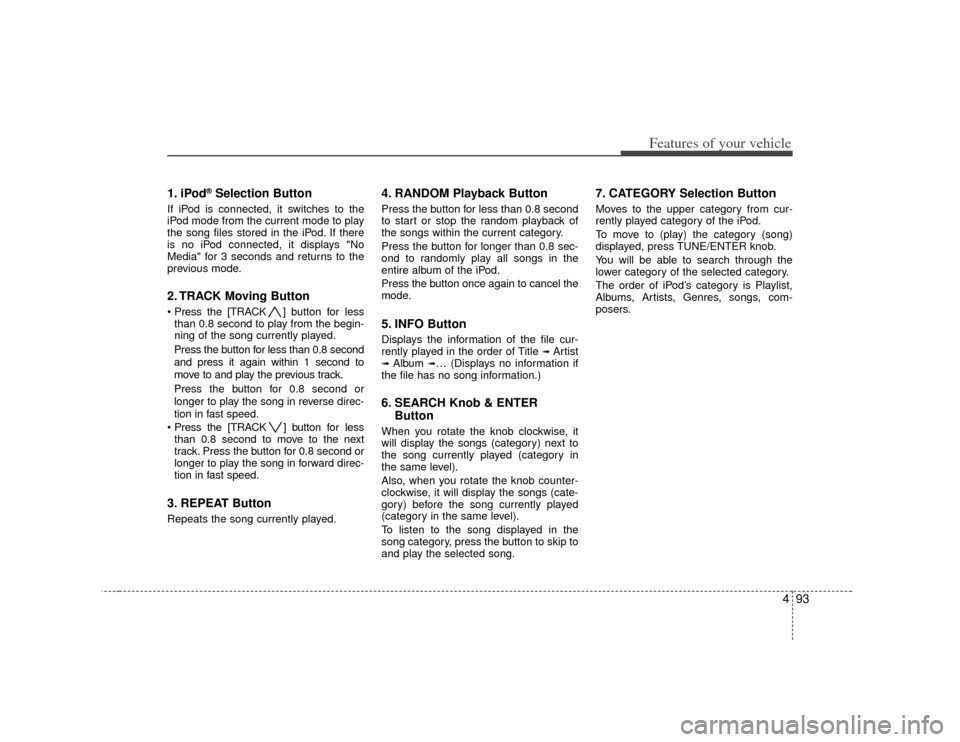
1. iPod
®Selection Button
If iPod is connected, it switches to the
iPod mode from the current mode to play
the song files stored in the iPod. If there
is no iPod connected, it displays "No
Media" for 3 seconds and returns to the
previous mode.2. TRACK Moving Button ] button for less
than 0.8 second to play from the begin-
ning of the song currently played.
Press the button for less than 0.8 second
and press it again within 1 second to
move to and play the previous track.
Press the button for 0.8 second or
longer to play the song in reverse direc-
tion in fast speed.
] button for less
than 0.8 second to move to the next
track. Press the button for 0.8 second or
longer to play the song in forward direc-
tion in fast speed.3. REPEAT ButtonRepeats the song currently played.
4. RANDOM Playback ButtonPress the button for less than 0.8 second
to start or stop the random playback of
the songs within the current category.
Press the button for longer than 0.8 sec-
ond to randomly play all songs in the
entire album of the iPod.
Press the button once again to cancel the
mode.5. INFO ButtonDisplays the information of the file cur-
rently played in the order of Title
➟ Artist
➟ Album
➟… (Displays no information if
the file has no song information.)
6. SEARCH Knob & ENTER ButtonWhen you rotate the knob clockwise, it
will display the songs (category) next to
the song currently played (category in
the same level).
Also, when you rotate the knob counter-
clockwise, it will display the songs (cate-
gory) before the song currently played
(category in the same level).
To listen to the song displayed in the
song category, press the button to skip to
and play the selected song.
7. CATEGORY Selection ButtonMoves to the upper category from cur-
rently played category of the iPod.
To move to (play) the category (song)
displayed, press TUNE/ENTER knob.
You will be able to search through the
lower category of the selected category.
The order of iPod’s category is Playlist,
Albums, Artists, Genres, songs, com-
posers.
Page 166 of 314
Features of your vehicle94
4✽
✽
NOTICE FOR USING iPod
®
DEVICE
• Some iPod models might not sup-
port the communication protocol
and the files will not be played.
(iPod models supported: Mini, 4G,
Photo, Nano, 5G)
• The order of search or playback of songs in the iPod can be different
from the order searched in the
audio system.
• If the iPod crashes due to its own malfunction, reset the iPod. (Reset:
Refer to iPod manual)
• An iPod may not operate normally on low battery.
CAUTION IN USING
iPod
®DEVICE
You need the power cable exclu-
sive for an iPod in order to oper-ate an iPod with the buttons on the audio system. The PC cableprovided by Apple may cause a malfunction and do not use it forvehicle use.
When connecting the device with an iPod cable, push in the jackfully not to interfere with commu- nication.
When adjusting the sound effects of an iPod and the audio system,the sound effects of both devices will overlap and might reduce ordistort the quality of the sound.
Deactivate (turn off) the equalizer function of an iPod when adjust-ing the audio system’s volume,and turn off the equalizer of theaudio system when using theequalizer of an iPod.
(Continued)
(Continued) When the iPod cable is connected, the system can be switched to theAUX mode even without the iPoddevice and can cause noise. Disconnect the iPod cable whenyou are not using the iPod device.
When the iPod is not used for the audio system, the iPod cable hasto be separate from iPod devices.Original display of iPod may not be displayed.
Page 168 of 314
Features of your vehicle96
4How to Use SIRIUS Satellite
RadioYour Kia vehicle is equipped with a 3
month complimentary period of SIRIUS
Satellite Radio so you have access to
over 130 channels of music, information,
and entertainment programming.ActivationIn order to extend or reactivate your sub-
scription to SIRIUS Satellite Radio, you
will need to contact SIRIUS Customer
Care at 888-539-7474. Have your 12 digit
SID (Sirius Identification Number)/ESN
(Electronic Serial Number) ready. To
retrieve the SID/ESN, turn on the radio,
press the [SAT] button and tune to chan-
nel zero. Please note that the vehicle will
need to be turned on, in Sirius mode, and
have an unobstructed view of the sky in
order for the radio to receive the activa-
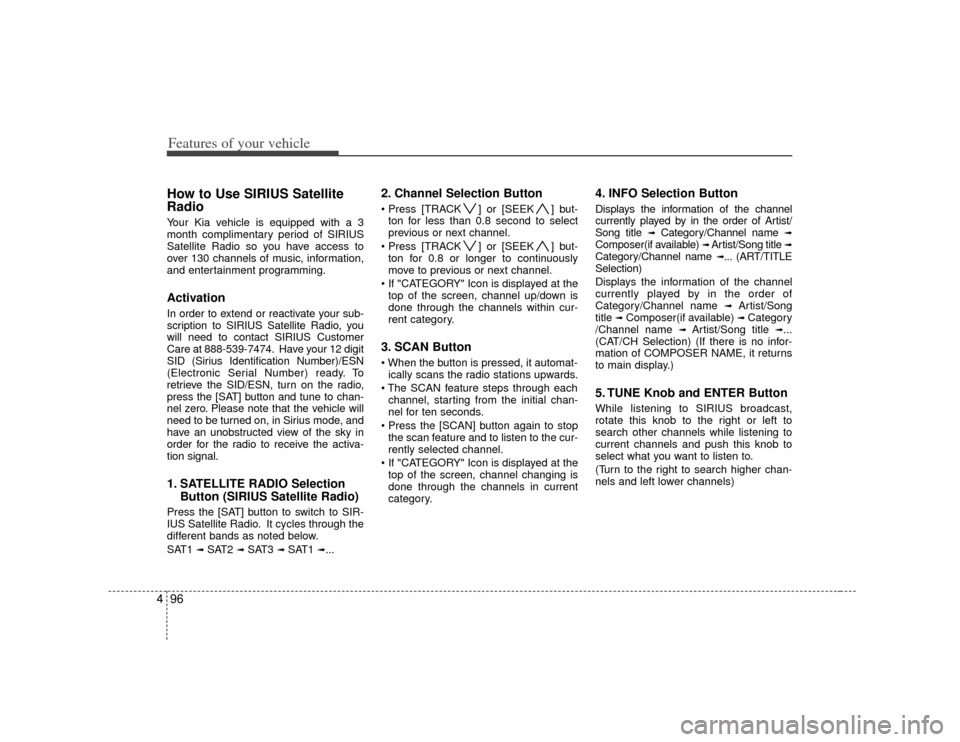
tion signal.1. SATELLITE RADIO Selection
Button (SIRIUS Satellite Radio)Press the [SAT] button to switch to SIR-
IUS Satellite Radio. It cycles through the
different bands as noted below.
SAT1
➟ SAT2
➟ SAT3
➟ SAT1
➟...
2. Channel Selection Button ] or [SEEK ] but-
ton for less than 0.8 second to select
previous or next channel.
] or [SEEK ] but- ton for 0.8 or longer to continuously
move to previous or next channel.
top of the screen, channel up/down is
done through the channels within cur-
rent category.3. SCAN Button ically scans the radio stations upwards.
channel, starting from the initial chan-
nel for ten seconds.
the scan feature and to listen to the cur-
rently selected channel.
top of the screen, channel changing is
done through the channels in current
category.
4. INFO Selection ButtonDisplays the information of the channel
currently played by in the order of Artist/
Song title
➟
Category/Channel name
➟
Composer(if available)
➟ Artist/Song title
➟
Category/Channel name
➟... (ART/TITLE
Selection)
Displays the information of the channel
currently played by in the order of
Category/Channel name ➟
Artist/Song
title
➟Composer(if available)
➟ Category
/Channel name
➟
Artist/Song title
➟...
(CAT/CH Selection) (If there is no infor-
mation of COMPOSER NAME, it returns
to main display.)
5. TUNE Knob and ENTER ButtonWhile listening to SIRIUS broadcast,
rotate this knob to the right or left to
search other channels while listening to
current channels and push this knob to
select what you want to listen to.
(Turn to the right to search higher chan-
nels and left lower channels)
Page 169 of 314
![KIA Soul 2010 1.G Owners Manual 497
Features of your vehicle
6. CAT/FOLDER Button ] or [FOLDER ] buttonto enter the Category List Mode, it dis-
plays category items and highlights the
category that currently tuned channel
belongs KIA Soul 2010 1.G Owners Manual 497
Features of your vehicle
6. CAT/FOLDER Button ] or [FOLDER ] buttonto enter the Category List Mode, it dis-
plays category items and highlights the
category that currently tuned channel
belongs](/manual-img/2/2920/w960_2920-168.png)
497
Features of your vehicle
6. CAT/FOLDER Button ] or [FOLDER ] buttonto enter the Category List Mode, it dis-
plays category items and highlights the
category that currently tuned channel
belongs to.
buttons to navigate category list.
Press [ENTER] button to select the low- est channel in highlighted category.
gory "CATEGORY" Icon is displayed at
the top of the screen.7. Preset Selection Buttonond to play the channel saved in each
button.
second or longer to save current chan-
nel. An audible beep will play to confirm
the preset is stored.
✽ ✽ Troubleshooting1. Antenna Error
If this message is displayed, the anten-
na or antenna cable is broken or
unplugged. Please consult with your
Kia dealership.
2. Acquiring Signal If this message is displayed, it means
that the antenna is covered and that
the SIRIUS Satellite Radio signal is
not available. Ensure the antenna is
uncovered and has a clear view of the
sky.
Page 172 of 314
Features of your vehicle100
4 Changing Priority
The connection priority for registered
phones can be changed.
1. Press the button.
2. Say "Set Up".
3. Say "Change Priority".
4. Say the name of the contact or the number of the contact.
5. Say "Yes".
Turning Bluetooth on / off
Bluetooth function can be switched ON/
OFF. initial status : Bluetooth ON
1. Press the button.
2. Say "Set Up".
3. Say "Bluetooth off".
4. Say "Yes".
Turning Bluetooth on
1. Press the send or button.
2. Say "yes".
3. The Bluetooth will be turned on.
■ Phone Book Adding Entry
Phone numbers and voice tags can be
registered. Entries registered in the phone
can also be transferred.
Adding Entry by Voice
1. Press the button.
2. Say "phonebook".
3. Say "add entry".
4. Say "by voice".
5. Say the name of the contact.
6. Say "yes".
7. Say the phone number.
8. Say "store".
9. Say "Home", "Office", "Mobile", "Other" or "default".
10. Say "Yes" to store an additional loca- tion for this contact.
Adding Entry by phone
1. Press the button.
2. Say "phonebook".
3. Say "add entry".
4. Say "by phone".
5. Say "yes".
6. Transfer procedures may vary depend- ing on the cellular phone.
✽ ✽NOTICEThe system can recognize single digits
from zero to nine. Numbers that are ten
or greater are not recognized.
To speed up input, it is a good idea to
group all digits into a continuous string.
However, you can enter each digit indi-
vidually or group digits together in pre-
ferred string lengths.
The display corresponding to each oper-
ation appears on the screen as follows:
Input operation
1. say: "Nine, nine, five"
Display: "995"
2. say: "Seven, three, four" Display: "995734"Changing Name
The registered names can be changed.
1. Press the button.
2. Say "phonebook".
3. Say "Change name".
4. Say the name of the phonebook [voice tag].
5. Say "yes".
6. Say the name of the phonebook to be changed.
Page 174 of 314

Features of your vehicle102
4■ Receiving a phone callWhen receiving a phone call, a ring tone
is audible and the system changes into
telephone mode.
When receiving a phone call, the phone
number and the message "Incoming" will
be displayed.
Press the send switch to take the call.
Press the end switch to refuse the call.
or "- " on the steering volume controls.
Volume adjustment cannot be made
using the audio system.
The received call can be transferred
from the hands-free system to the cellu-
lar phone that is connected to Bluetooth.
For details, please refer to you user's
manual for the cellular phone or go to the
Key matrix in this manual (next page).
■ Talking on the phoneWhen talking on the phone, the display
will differ depending on whether or not
the vehicle is in motion.
Number and "active call" is displayed.
When the call is finished, press the end
switch.✽ ✽ NOTICEIn the following situations, your voice
may not reach the other party:
1. Talk alternately with the other party
on the phone. If you talk at the same
time, the voice may not reach each
other parties. (This is not a malfunc-
tion.) (It is not a malfunction.)
2. Keep the volume of receiving voice to a low level. Otherwise, high volumes
may result in an echo. When you talk
on the phone, speak clearly towards
the microphone.
3. When driving on a rough road.
4. When driving at high speeds.
5. When the window is open.
6. When the air conditioning vents are facing the microphone.
7. When the sound of the air condition- ing fan is loud.
Page 186 of 314
511
Driving your vehicle
For smooth operation, depress the brakepedal when shifting from N (Neutral) to aforward or reverse gear.
E060101AAMTransaxle rangesThe indicator in the instrument cluster
displays the shift lever position when the
ignition switch is in the ON position.
P (Park)
Always come to a complete stop before
shifting into P (Park). This position locks
the transaxle and prevents the drive
wheels from rotating.
WARNING
- Automatic transaxle
Always check the surrounding
areas near your vehicle for peo-
ple, especially children, before
shifting the shift lever into D
(Drive) or R (Reverse).
Before leaving the driver’s seat, always make sure the shift lever
is in the P (Park) position; then
set the parking brake fully and
shut the engine off. Unexpected
and sudden vehicle movement
can occur if these precautions
are not followed in the order iden-
tified.
CAUTION
To avoid damage to your transaxle, do not accelerate theengine in R (Reverse) or any for-ward gear position with thebrakes on.
When stopped on an incline, do not hold the vehicle with theengine power. Use the servicebrake or the parking brake.
Do not shift from N (Neutral) or P (Park) into D (Drive), or R(Reverse) when the engine is above idle speed.
WARNING
Shifting into P (Park) while the vehicle is in motion will cause the
drive wheels to lock which will
cause you to lose control of the
vehicle.
Do not use the P (Park) position in place of the parking brake.
Always make sure the shift lever
is latched in the P (Park) position
and set the parking brake fully.
Never leave a child unattended in a vehicle.
Page 226 of 314
67
What to do in an emergency
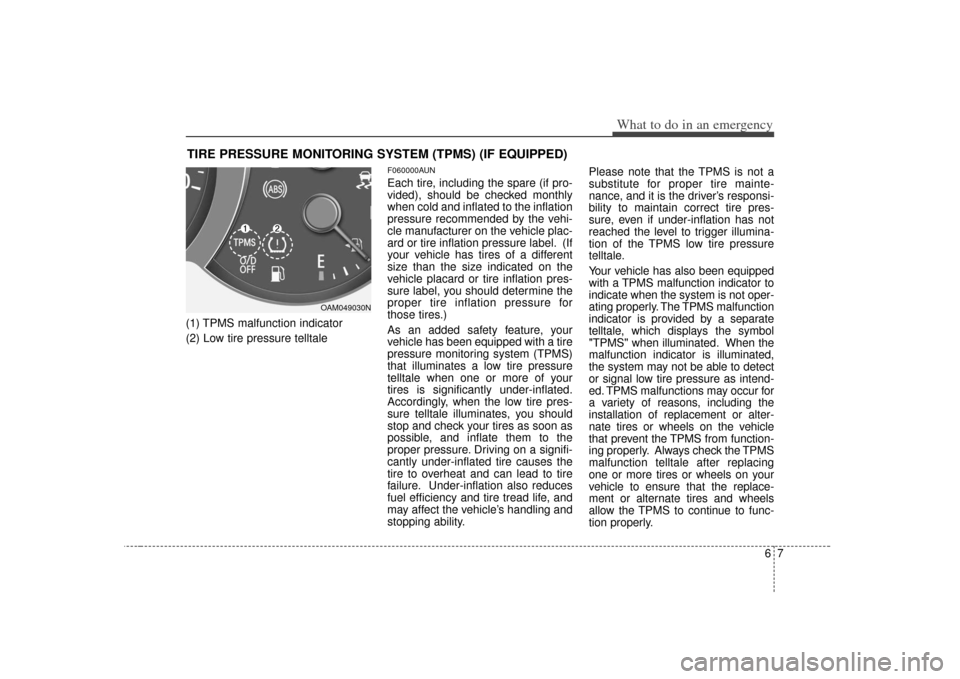
TIRE PRESSURE MONITORING SYSTEM (TPMS) (IF EQUIPPED)(1) TPMS malfunction indicator
(2) Low tire pressure telltale
F060000AUNEach tire, including the spare (if pro-
vided), should be checked monthly
when cold and inflated to the inflation
pressure recommended by the vehi-
cle manufacturer on the vehicle plac-
ard or tire inflation pressure label. (If
your vehicle has tires of a different
size than the size indicated on the
vehicle placard or tire inflation pres-
sure label, you should determine the
proper tire inflation pressure for
those tires.)
As an added safety feature, your
vehicle has been equipped with a tire
pressure monitoring system (TPMS)
that illuminates a low tire pressure
telltale when one or more of your
tires is significantly under-inflated.
Accordingly, when the low tire pres-
sure telltale illuminates, you should
stop and check your tires as soon as
possible, and inflate them to the
proper pressure. Driving on a signifi-
cantly under-inflated tire causes the
tire to overheat and can lead to tire
failure. Under-inflation also reduces
fuel efficiency and tire tread life, and
may affect the vehicle’s handling and
stopping ability.Please note that the TPMS is not a
substitute for proper tire mainte-
nance, and it is the driver’s responsi-
bility to maintain correct tire pres-
sure, even if under-inflation has not
reached the level to trigger illumina-
tion of the TPMS low tire pressure
telltale.
Your vehicle has also been equipped
with a TPMS malfunction indicator to
indicate when the system is not oper-
ating properly. The TPMS malfunction
indicator is provided by a separate
telltale, which displays the symbol
"TPMS" when illuminated. When the
malfunction indicator is illuminated,
the system may not be able to detect
or signal low tire pressure as intend-
ed. TPMS malfunctions may occur for
a variety of reasons, including the
installation of replacement or alter-
nate tires or wheels on the vehicle
that prevent the TPMS from function-
ing properly. Always check the TPMS
malfunction telltale after replacing
one or more tires or wheels on your
vehicle to ensure that the replace-
ment or alternate tires and wheels
allow the TPMS to continue to func-
tion properly.
OAM049030N