2010 KIA SORENTO fog light
[x] Cancel search: fog lightPage 10 of 399

17
Introduction
INDICATOR SYMBOLS ON THE INSTRUMENT CLUSTER
Seat belt warning light
Door/tailgate open position indicator*
Tailgate open warning light
High beam indicator
Light on indicator*
Turn signal indicator
Front fog light indicator*
ABS warning light
Parking brake & Brake fluid
warning light
Engine oil pressure warning light
4WD system warning light* 4WD LOCK indicator*
Malfunction indicator*
Air bag warning light
Cruise SET indicator*
Low fuel level warning light
Shift pattern indicator*
DBC indicator*
❈ For more detailed explanations, refer to “Instrument cluster” in section 4.
Charging system warning light
Low windshield washer fluid level
warning light*
Door ajar warning light
Overspeed warning light*
120km/h
Key out warning light*KEY
OUT
* if equipped
Glow indicator (Diesel only)
Fuel filter warning light (Diesel only)
Cruise indicator*
Rear fog light indicator*
ESP indicator*
ESP OFF indicator*
Immobilizer indicator*
Low tire pressure telltale*/
TPMS (Tire Pressure MonitoringSystem) malfunction indicator*
Low tire pressure position telltale*
Page 76 of 399

4
Keys / 4-3
Remote keyless entry / 4-6
Smart key / 4-9
Theft-alarm system / 4-12
Door locks / 4-14
Tailgate / 4-18
Windows / 4-20
Hood / 4-24
Fuel filler lid / 4-26
Panorama sunroof / 4-29
Steering wheel / 4-33
Mirrors / 4-35
Instrument cluster / 4-39
Rear parking assist system / 4-59
Rearview camera / 4-62
Hazard warning flasher / 4-62
Lighting / 4-63
Wipers and washers / 4-69
Interior light / 4-73
Defroster / 4-76
Manual climate control system / 4-77
Automatic climate control system / 4-86
Windshield defrosting and defogging / 4-94
Features of your vehicle
Page 125 of 399

Features of your vehicle
50
4
Front fog light indicator
(if equipped)
The indicator illuminates when the front
fog lights are ON.
Rear fog light indicator
(if equipped)
This indicator illuminates when the rear
fog lights are ON.
Engine oil pressure
warning light
This warning light indicates the engine oil
pressure is low.
If the warning light illuminates while driv- ing:
1. Drive safely to the side of the road and stop.
2. With the engine off, check the engine oil level. If the level is low, add oil as required.
If the warning light remains on after
adding oil or if oil is not available, call an
authorized KIA dealer.
CAUTION
If the engine is not stopped imme- diately after the engine oil pressure
warning light is illuminated, severe damage could result.
CAUTION
If the oil pressure warning lightstays on while the engine is run-
ning, serious engine damage may result. The oil pressure warninglight comes on whenever there is insufficient oil pressure. In normal
operation, it should come on whenthe ignition switch is turned on, then go out when the engine is
started. If the oil pressure warning light stays on while the engine isrunning, there is a serious malfunc-tion.
If this happens, stop the vehicle assoon as it is safe to do so, turn offthe engine and check the oil level. If the oil level is low, fill the engine oilto the proper level and start the
engine again. If the light stays onwith the engine running, turn theengine off immediately. In any instance where the oil light stays on
when the engine is running, theengine should be checked by an authorized KIA dealer before thevehicle is driven again.
Page 141 of 399

Features of your vehicle
66
4
To signal a lane change, move the turn
signal lever slightly and hold it in position
(B). The lever will return to the OFF posi-tion when released.
If an indicator stays on and does not
flash or if it flashes abnormally, one of the
turn signal bulbs may be burned out andwill require replacement.
One-touch lane change function
(if equipped)
To activate an one-touch lane change
function, move the turn signal lever
slightly for less than 1.5 second and then
release it. The lane change signals will
blink 3 times.
✽✽ NOTICE
If an indicator flash is abnormally quick
or slow, a bulb may be burned out or
have a poor electrical connection in the
circuit.
Front fog light (if equipped)
Fog lights are used to provide improved
visibility when visibility is poor due to fog,
rain or snow, etc. The fog lights will turn
on when the fog light switch (1) is turned
on after the parklight is turned on.
To turn off the fog lights, turn the fog light
switch (1) to the OFF position. Rear fog light (if equipped)
To turn the rear fog lights on, turn the
headlight switch to the headlight on posi-
tion and turn the rear fog light switch (1)to the on position.
The rear fog lights turn on when the rear
fog light switch is turned on after the front
fog light switch is turned on and the
headlight switch is in the parklight posi-tion.
To turn the rear fog lights off, turn the rear
fog light switch to the on position again or
turn the headlight switch off.
✽✽
NOTICE
To turn on the rear fog light switch, the
ignition switch must be in the ON position.
CAUTION
When in operation, the fog lights consume large amounts of vehicleelectrical power. Only use the foglights when visibility is poor.
OBK049052LOAM049046L
Page 167 of 399

Features of your vehicle
92
4
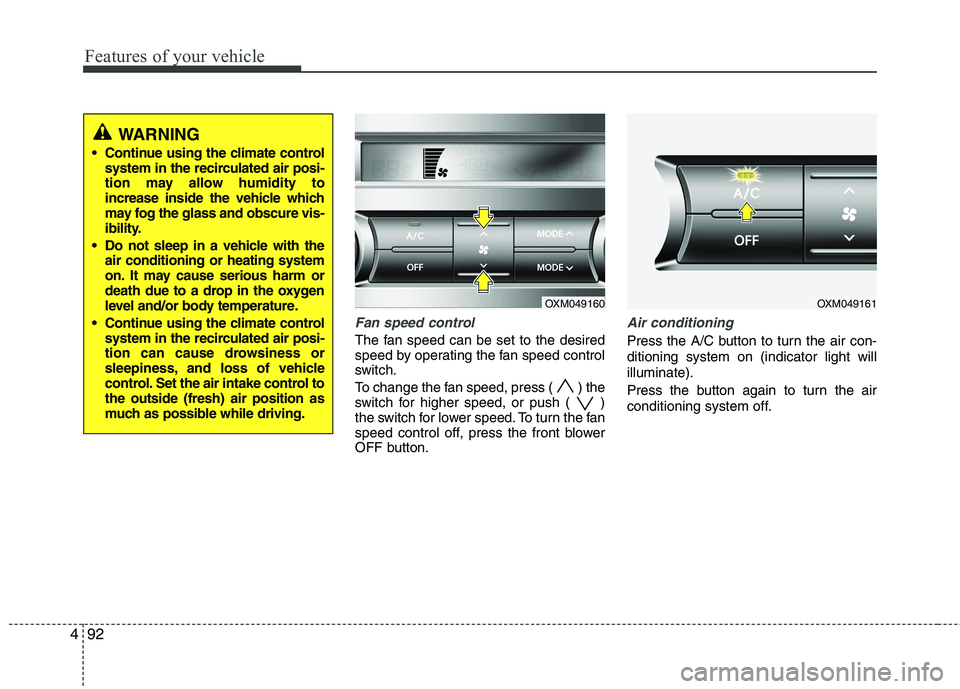
Fan speed control
The fan speed can be set to the desired
speed by operating the fan speed control
switch.
To change the fan speed, press ( ) the
switch for higher speed, or push ( )
the switch for lower speed. To turn the fan
speed control off, press the front blower
OFF button.
Air conditioning
Press the A/C button to turn the air con- ditioning system on (indicator light willilluminate).
Press the button again to turn the air
conditioning system off.
OXM049160OXM049161
WARNING
Continue using the climate control system in the recirculated air posi-
tion may allow humidity to
increase inside the vehicle which
may fog the glass and obscure vis-
ibility.
Do not sleep in a vehicle with the air conditioning or heating system
on. It may cause serious harm or
death due to a drop in the oxygen
level and/or body temperature.
Continue using the climate control system in the recirculated air posi-
tion can cause drowsiness or
sleepiness, and loss of vehicle
control. Set the air intake control tothe outside (fresh) air position as
much as possible while driving.
Page 171 of 399

Features of your vehicle
96
4
Defogging logic
To reduce the possibility of fogging up
the inside of the windshield, the air intakeor air conditioning are controlled auto-
matically according to certain conditions
such as or position. To cancel or
return to the defogging logic, do the fol-
lowing.
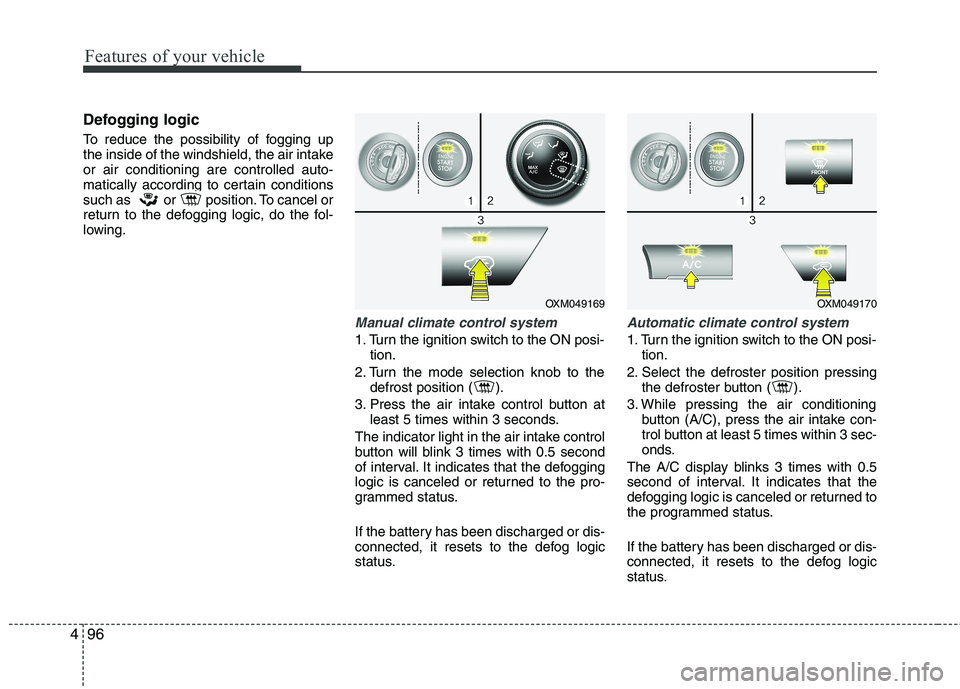
Manual climate control system
1. Turn the ignition switch to the ON posi-
tion.
2. Turn the mode selection knob to the defrost position ( ).
3. Press the air intake control button at least 5 times within 3 seconds.
The indicator light in the air intake control
button will blink 3 times with 0.5 second
of interval. It indicates that the defogging
logic is canceled or returned to the pro-
grammed status.
If the battery has been discharged or dis-
connected, it resets to the defog logic
status.
Automatic climate control system
1. Turn the ignition switch to the ON posi- tion.
2. Select the defroster position pressing the defroster button ( ).
3. While pressing the air conditioning button (A/C), press the air intake con-
trol button at least 5 times within 3 sec-
onds.
The A/C display blinks 3 times with 0.5
second of interval. It indicates that the
defogging logic is canceled or returned to
the programmed status.
If the battery has been discharged or dis-
connected, it resets to the defog logic
status.
OXM049169OXM049170
Page 369 of 399

763
Maintenance
LIGHT BULBS
Use only the bulbs of the specifiedwattage.
✽✽ NOTICE
After driving in heavy rain or washing,
headlight and taillight lenses could
appear frosty. This condition is caused by
the temperature difference between the
lamp inside and outside. This is similar
to the condensation on your windows
inside your vehicle during the rain and
doesn’t indicate a problem with your
vehicle. If the water leaks into the lamp
bulb circuitry, have the vehicle checked
by an authorized KIA dealer.
Headlight, position light, turn sig-
nal light, front fog light bulbreplacement
(1) Headlight (High)
(2) Headlight (Low)
(3) Front turn signal light / Position light
(4) Front fog light (if equipped)
WARNING - Working on
the lights
Prior to working on the light, firmly
apply the parking brake, ensure
that the ignition switch is turned tothe LOCK position and turn off the
lights to avoid sudden movement
of the vehicle and burning your fin-
gers or receiving an electric shock.
WARNING
Be sure to replace the burned-out
bulb with one of the same wattage
rating. Otherwise, it may cause
extensive wiring damage and pos-
sible fire.
CAUTION
If you don’t have necessary tools, the correct bulbs and the expertise,
consult an authorized KIA dealer. Inmany cases, it is difficult to replacevehicle light bulbs because other parts of the vehicle must be
removed before you can get to thebulb. This is especially true if youhave to remove the headlight
assembly to
get to the bulb(s).
Removing/installingthe headlight
assembly can result in damage to the vehicle.OXM079029
Page 372 of 399

Maintenance
66
7
Front fog light bulbs (if equipped)
1. Remove the front bumper under cover.
2. Reach your hand into the back of the
front bumper.
3. Disconnect the power connector from the socket.
4. Remove the bulb-socket from the housing by turning the socket counter
clockwise until the tabs on the socketalign with the slots on the housing.
5. Install the new bulb-socket into the housing by aligning the tabs on the
socket with the slots in the housing.
Push the socket into the housing and
turn the socket clockwise.
6. Connect the power connector to the socket.
7. Reinstall the front bumper under cover.
✽✽ NOTICE
If the headlight aiming adjustment is
necessary after the headlight assembly is
reinstalled, consult an authorized KIA
dealer.
Headlight (HID type), position, turn signal, and front fog light bulb
replacement
If the light bulb does not operate, have
the vehicle checked by an authorized KIA
dealer.
Side repeater light replacement
Type A
If the light bulb does not operate, have
the vehicle checked by an authorized KIA
dealer.
WARNING - HID Headlight
low beam (if equipped)
Do not attempt to replace or
inspect the low beam (XENON bulb)
due to electric shock danger. If the
low beam (XENON bulb) is not
working, have your vehicle checked
by an authorized KIA Dealer
OXM079031OXM079053L