2010 KIA SORENTO ignition
[x] Cancel search: ignitionPage 188 of 399
4113
Features of your vehicle
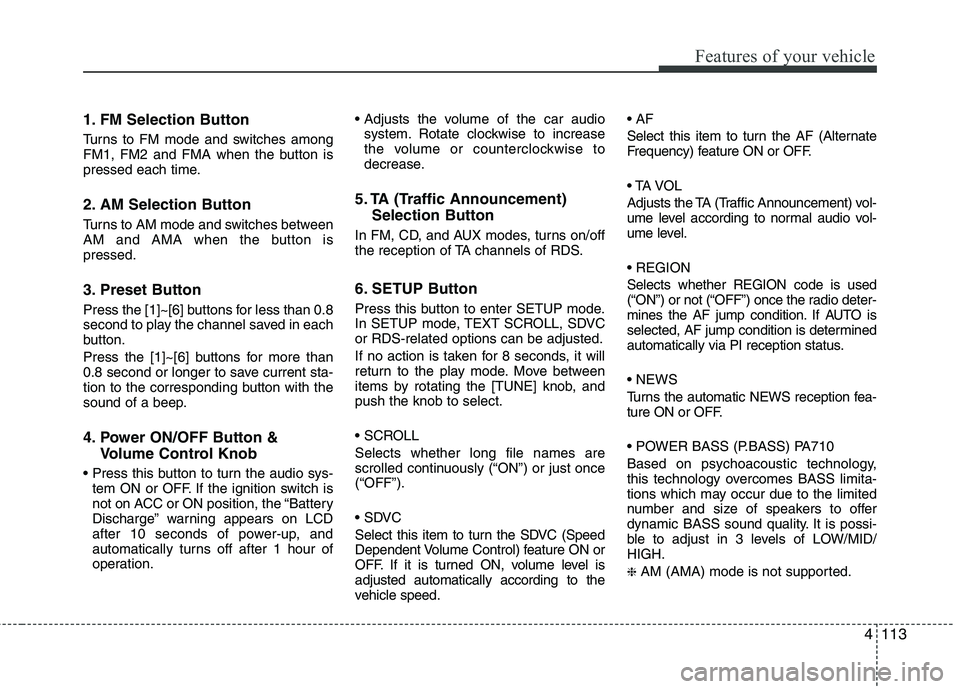
1. FM Selection Button
Turns to FM mode and switches among
FM1, FM2 and FMA when the button is
pressed each time.
2. AM Selection Button
Turns to AM mode and switches between
AM and AMA when the button ispressed.
3. Preset Button
Press the [1]~[6] buttons for less than 0.8
second to play the channel saved in each
button.
Press the [1]~[6] buttons for more than
0.8 second or longer to save current sta-
tion to the corresponding button with the
sound of a beep.
4. Power ON/OFF Button &Volume Control Knob
tem ON or OFF. If the ignition switch is
not on ACC or ON position, the “Battery
Discharge” warning appears on LCD
after 10 seconds of power-up, and
automatically turns off after 1 hour of
operation.
system. Rotate clockwise to increase
the volume or counterclockwise to
decrease.
5. TA (Traffic Announcement) Selection Button
In FM, CD, and AUX modes, turns on/off
the reception of TA channels of RDS.
6. SETUP Button
Press this button to enter SETUP mode.
In SETUP mode, TEXT SCROLL, SDVCor RDS-related options can be adjusted.
If no action is taken for 8 seconds, it will
return to the play mode. Move between
items by rotating the [TUNE] knob, andpush the knob to select.
Selects whether long file names are
scrolled continuously (“ON”) or just once(“OFF”).
Select this item to turn the SDVC (Speed
Dependent Volume Control) feature ON or
OFF. If it is turned ON, volume level isadjusted automatically according to the
vehicle speed.
Select this item to turn the AF (Alternate
Frequency) feature ON or OFF.
Adjusts the TA (Traffic Announcement) vol-
ume level according to normal audio vol-
ume level. Selects whether REGION code is used
(“ON”) or not (“OFF”) once the radio deter-
mines the AF jump condition. If AUTO is
selected, AF jump condition is determined
automatically via PI reception status.
Turns the automatic NEWS reception fea-
ture ON or OFF.
Based on psychoacoustic technology,
this technology overcomes BASS limita-
tions which may occur due to the limited
number and size of speakers to offer
dynamic BASS sound quality. It is possi-
ble to adjust in 3 levels of LOW/MID/HIGH. ❈
AM (AMA) mode is not supported.
Page 191 of 399
Features of your vehicle
116
4
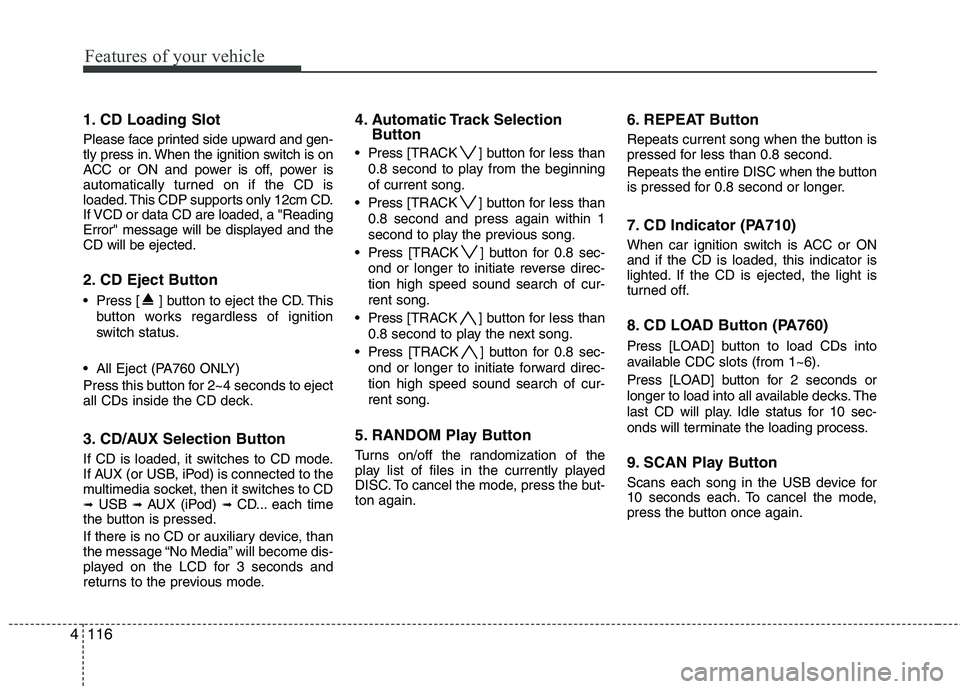
1. CD Loading Slot
Please face printed side upward and gen-
tly press in. When the ignition switch is on
ACC or ON and power is off, power is
automatically turned on if the CD is
loaded. This CDP supports only 12cm CD.
If VCD or data CD are loaded, a "Reading
Error" message will be displayed and theCD will be ejected.
2. CD Eject Button
Press [ ] button to eject the CD. This
button works regardless of ignition
switch status.
All Eject (PA760 ONLY)
Press this button for 2~4 seconds to eject
all CDs inside the CD deck.
3. CD/AUX Selection Button
If CD is loaded, it switches to CD mode.
If AUX (or USB, iPod) is connected to the
multimedia socket, then it switches to CD➟ USB ➟ AUX (iPod) ➟ CD... each time
the button is pressed.
If there is no CD or auxiliary device, than
the message “No Media” will become dis-
played on the LCD for 3 seconds and
returns to the previous mode. 4. Automatic Track Selection
Button
Press [TRACK ] button for less than
0.8 second to play from the beginning of current song.
Press [TRACK ] button for less than
0.8 second and press again within 1
second to play the previous song.
Press [TRACK ] button for 0.8 sec-
ond or longer to initiate reverse direc-tion high speed sound search of cur-rent song.
Press [TRACK ] button for less than
0.8 second to play the next song.
Press [TRACK ] button for 0.8 sec-
ond or longer to initiate forward direc-tion high speed sound search of cur-rent song.
5. RANDOM Play Button
Turns on/off the randomization of the
play list of files in the currently played
DISC. To cancel the mode, press the but-ton again. 6. REPEAT Button
Repeats current song when the button is
pressed for less than 0.8 second.
Repeats the entire DISC when the button
is pressed for 0.8 second or longer.
7. CD Indicator (PA710)
When car ignition switch is ACC or ON and if the CD is loaded, this indicator is
lighted. If the CD is ejected, the light is
turned off.
8. CD LOAD Button (PA760)
Press [LO
AD] button to load CDs into
available CDC slots (from 1~6).
Press [LOAD] button for 2 seconds or
longer to load into all available decks. The
last CD will play. Idle status for 10 sec-
onds will terminate the loading process.
9. SCAN Play Button
Scans each song in the USB device for
10 seconds each. To cancel the mode,
press the button once again.
Page 201 of 399
![KIA SORENTO 2010 Owners Manual Features of your vehicle
126
4
1. FM Selection Button
Turns to FM mode and toggles FM1 and
FM2 when the button is pressed each
time.
2. AM Selection Button
Pressing the [AM] button selects the A KIA SORENTO 2010 Owners Manual Features of your vehicle
126
4
1. FM Selection Button
Turns to FM mode and toggles FM1 and
FM2 when the button is pressed each
time.
2. AM Selection Button
Pressing the [AM] button selects the A](/manual-img/2/40478/w960_40478-200.png)
Features of your vehicle
126
4
1. FM Selection Button
Turns to FM mode and toggles FM1 and
FM2 when the button is pressed each
time.
2. AM Selection Button
Pressing the [AM] button selects the AM
band. AM Mode is displayed on the LCD.
3. Preset Button
Press the [1]~[6] buttons for less than 0.8
second to play the channel saved in each
button.
Press the [1]~[6] buttons for more than
0.8 second or longer to save current sta-
tion to the respective button with a beep.
4. Power ON/OFF Button &
Volume Control Knob
Press this button to turn the audio sys-
tem ON or OFF if the ignition switch is on
ACC or ON position.
Adjusts the volume of car audio. Rotate
clockwise to increase the volume, or
counterclockwise to decrease. 5. SETUP Button
Press this button to enter the TEXT
SCROLL, SDVC and P.BASS adjustment
mode. If no action is taken for 8 seconds
after pressing the button, it will return to
the play mode. (After entering SETUP
mode, move between items using the
left, right and PUSH functions of the
[TUNE] button.)
The setup items changes from TEXT
SCROLL
↔
SDVC ↔ P.BASS...
Select whether long file names are
scrolled continuously (“ON”) or just once(“OFF”).
Select this item to turn the SDVC(Speed
Dependent Volume Control) feature ON
or OFF. If it is turned ON, volume level isadjusted automatically according to the
vehicle speed.
This function creates virtual sound
effects and allows adjustments to the
BASS level. HIGH
➟
MID ➟LOW ➟OFF
Page 204 of 399
4129
Features of your vehicle
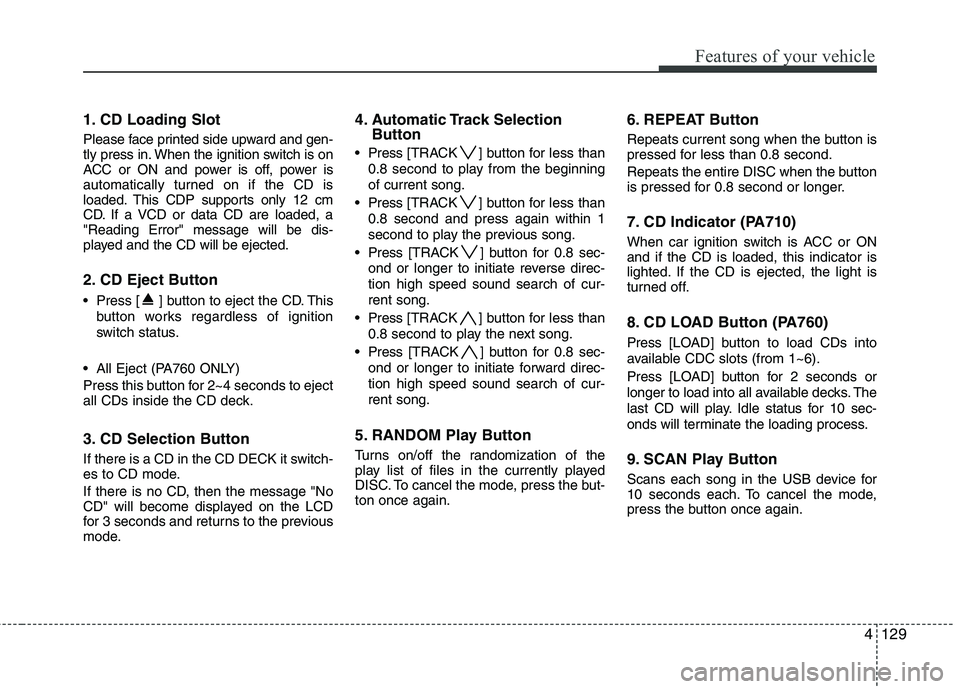
1. CD Loading Slot
Please face printed side upward and gen-
tly press in. When the ignition switch is on
ACC or ON and power is off, power is
automatically turned on if the CD is
loaded. This CDP supports only 12 cm
CD. If a VCD or data CD are loaded, a"Reading Error" message will be dis-
played and the CD will be ejected.
2. CD Eject Button
Press [ ] button to eject the CD. Thisbutton works regardless of ignition
switch status.
All Eject (PA760 ONLY)
Press this button for 2~4 seconds to eject
all CDs inside the CD deck.
3. CD Selection Button
If there is a CD in the CD DECK it switch-
es to CD mode.
If there is no CD, then the message "No
CD" will become displayed on the LCD
for 3 seconds and returns to the previous
mode. 4. Automatic Track Selection
Button
Press [TRACK ] button for less than
0.8 second to play from the beginning of current song.
Press [TRACK ] button for less than
0.8 second and press again within 1
second to play the previous song.
Press [TRACK ] button for 0.8 sec-
ond or longer to initiate reverse direc-tion high speed sound search of cur-rent song.
Press [TRACK ] button for less than
0.8 second to play the next song.
Press [TRACK ] button for 0.8 sec-
ond or longer to initiate forward direc-tion high speed sound search of cur-rent song.
5. RANDOM Play Button
Turns on/off the randomization of the
play list of files in the currently played
DISC. To cancel the mode, press the but-ton once again. 6. REPEAT Button
Repeats current song when the button is
pressed for less than 0.8 second.
Repeats the entire DISC when the button
is pressed for 0.8 second or longer.
7. CD Indicator (PA710)
When car ignition switch is ACC or ON and if the CD is loaded, this indicator is
lighted. If the CD is ejected, the light is
turned off.
8. CD LOAD Button (PA760)
Press [LO
AD] button to load CDs into
available CDC slots (from 1~6).
Press [LOAD] button for 2 seconds or
longer to load into all available decks. The
last CD will play. Idle status for 10 sec-
onds will terminate the loading process.
9. SCAN Play Button
Scans each song in the USB device for
10 seconds each. To cancel the mode,
press the button once again.
Page 215 of 399

53
Driving your vehicle
Before entering vehicle
• Be sure that all windows, outside mir-ror(s), and outside lights are clean.
Check the condition of the tires.
Check under the vehicle for any sign of leaks.
Be sure there are no obstacles behind you if you intend to back up.
Necessary inspections
Fluid levels, such as engine oil, engine
coolant, brake fluid, and washer fluid
should be checked on a regular basis,
with the exact interval depending on the
fluid. Further details are provided in sec-
tion 7, “Maintenance”. Before starting
Close and lock all doors.
Position the seat so that all controls are
easily reached.
Adjust the inside and outside rearview mirrors.
Be sure that all lights work.
Check all gauges.
Check the operation of warning lights when the ignition switch is turned to the ON position.
Release the parking brake and make sure the brake warning light goes out.
For safe operation, be sure you are famil-
iar with your vehicle and its equipment.
BEFORE DRIVING
WARNING
All passengers must be properly
belted whenever the vehicle is mov-
ing. Refer to “Seat belts” in section
3 for more information on their
proper use.
WARNING
Always check the surrounding
areas near your vehicle for people,
especially children, before putting a
vehicle into D (Drive) or R (Reverse).
WARNING - Driving under
the influence of alcohol or drugs
Drinking and driving is dangerous.
Drunk driving is the number one
contributor to the highway death
toll each year. Even a small amount
of alcohol will affect your reflexes,
perceptions and judgment. Drivingwhile under the influence of drugs
is as dangerous or more dangerousthan driving drunk.
You are much more likely to have a
serious accident if you drink or
take drugs and drive.
If you are drinking or taking drugs,
don’t drive. Do not ride with a driv-er who has been drinking or taking
drugs. Choose a designated driveror call a cab.
WARNING
When you intend to park or stop the
vehicle with the engine on, be care-ful not to depress the accelerator
pedal for a long period of time. It
may overheat the engine or exhaust
system and cause fire.
Page 216 of 399
Driving your vehicle
4
5
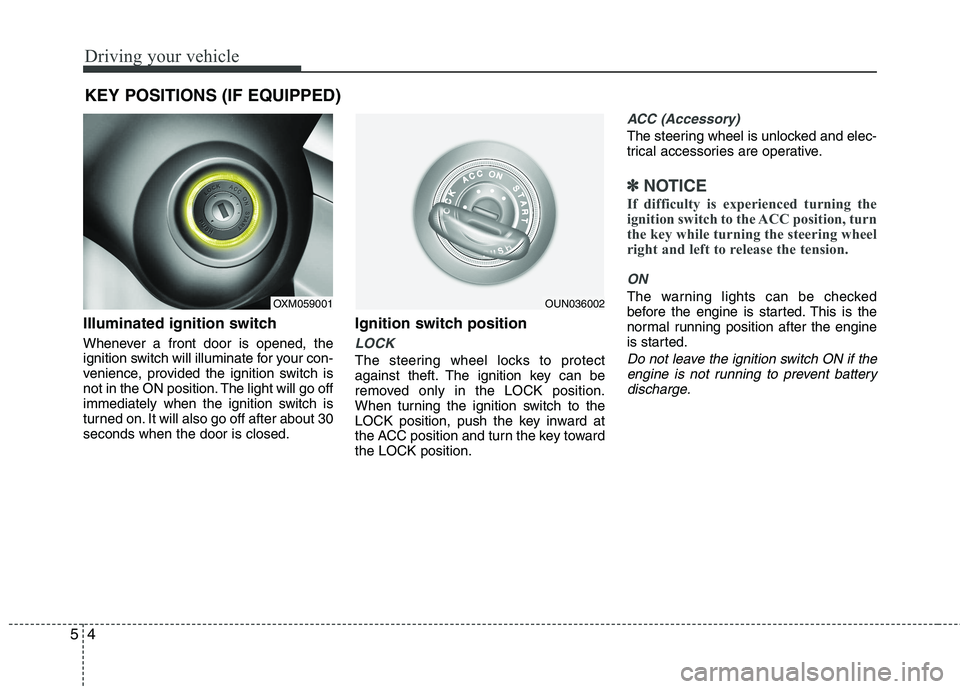
Illuminated ignition switch
Whenever a front door is opened, the
ignition switch will illuminate for your con-
venience, provided the ignition switch is
not in the ON position. The light will go off
immediately when the ignition switch is
turned on. It will also go off after about 30seconds when the door is closed. Ignition switch position
LOCK
The steering wheel locks to protect
against theft. The ignition key can be
removed only in the LOCK position.
When turning the ignition switch to the
LOCK position, push the key inward at
the ACC position and turn the key towardthe LOCK position.
ACC (Accessory)
The steering wheel is unlocked and elec-
trical accessories are operative.
✽✽
NOTICE
If difficulty is experienced turning the
ignition switch to the ACC position, turn
the key while turning the steering wheel
right and left to release the tension.
ON
The warning lights can be checked
before the engine is started. This is the
normal running position after the engine
is started.
Do not leave the ignition switch ON if the engine is not running to prevent batterydischarge.
KEY POSITIONS (IF EQUIPPED)
OXM059001OUN036002
Page 217 of 399
55
Driving your vehicle
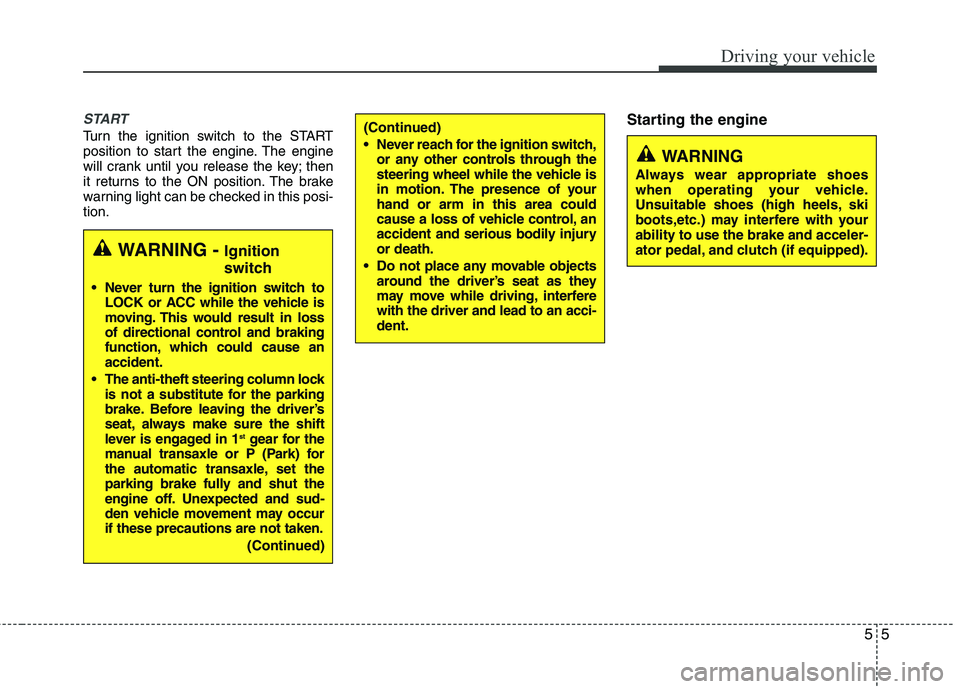
START
Turn the ignition switch to the START
position to start the engine. The engine
will crank until you release the key; then
it returns to the ON position. The brake
warning light can be checked in this posi-tion.Starting the engine
WARNING -
Ignition
switch
Never turn the ignition switch to LOCK or ACC while the vehicle is
moving. This would result in loss
of directional control and braking
function, which could cause anaccident.
The anti-theft steering column lock is not a substitute for the parking
brake. Before leaving the driver’s
seat, always make sure the shift
lever is engaged in 1 st
gear for the
manual transaxle or P (Park) for
the automatic transaxle, set the
parking brake fully and shut the
engine off. Unexpected and sud-
den vehicle movement may occurif these precautions are not taken.
(Continued)
(Continued)
Never reach for the ignition switch,or any other controls through the
steering wheel while the vehicle is
in motion. The presence of yourhand or arm in this area could
cause a loss of vehicle control, an
accident and serious bodily injuryor death.
Do not place any movable objects around the driver’s seat as they
may move while driving, interferewith the driver and lead to an acci-dent.
WARNING
Always wear appropriate shoes
when operating your vehicle.
Unsuitable shoes (high heels, ski
boots,etc.) may interfere with yourability to use the brake and acceler-
ator pedal, and clutch (if equipped).
Page 218 of 399
Driving your vehicle
6
5
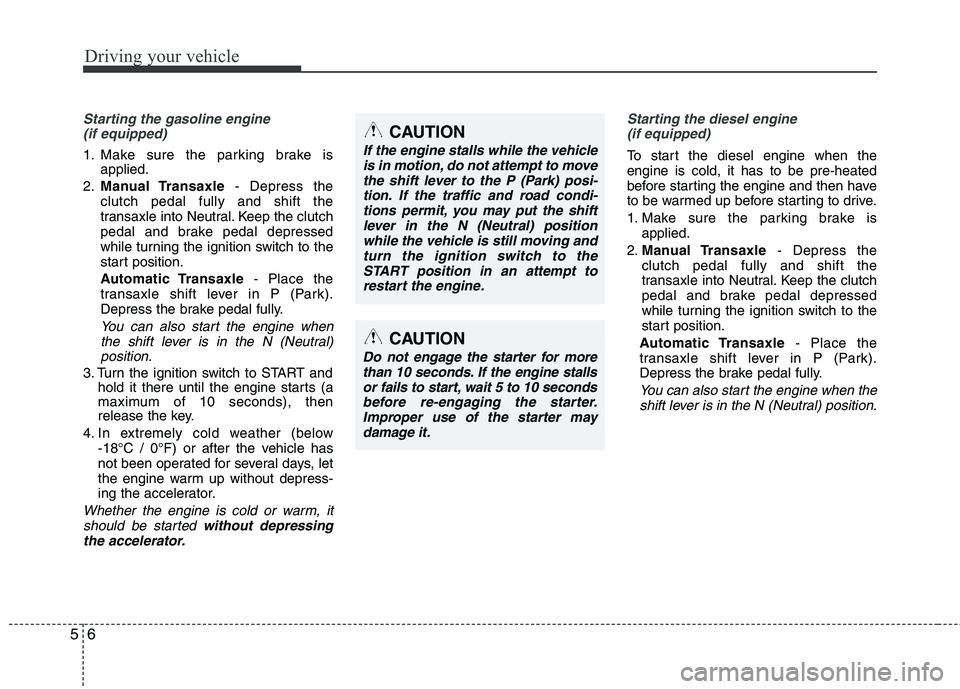
Starting the gasoline engine
(if equipped)
1. Make sure the parking brake is applied.
2. Manual Transaxle - Depress the
clutch pedal fully and shift the
transaxle into Neutral. Keep the clutch
pedal and brake pedal depressed
while turning the ignition switch to the
start position.
Automatic Transaxle - Place the
transaxle shift lever in P (Park).
Depress the brake pedal fully.
You can also start the engine when
the shift lever is in the N (Neutral)position.
3. Turn the ignition switch to START and hold it there until the engine starts (a
maximum of 10 seconds), then
release the key.
4. In extremely cold weather (below -18°C / 0°F) or after the vehicle has
not been operated for several days, let
the engine warm up without depress-
ing the accelerator.
Whether the engine is cold or warm, it
should be started without depressing
the accelerator.
Starting the diesel engine (if equipped)
To start the diesel engine when the engine is cold, it has to be pre-heated
before starting the engine and then have
to be warmed up before starting to drive.
1. Make sure the parking brake is applied.
2. Manual Transaxle - Depress the
clutch pedal fully and shift the
transaxle into Neutral. Keep the clutch
pedal and brake pedal depressed
while turning the ignition switch to the
start position.
Automatic Transaxle - Place the
transaxle shift lever in P (Park).
Depress the brake pedal fully.
You can also start the engine when the
shift lever is in the N (Neutral) position.
CAUTION
If the engine stalls while the vehicleis in motion, do not attempt to move
the shift lever to the P (Park) posi-tion. If the traffic and road condi-tions permit, you may put the shift lever in the N (Neutral) position
while the vehicle is still moving andturn the ignition switch to theSTART position in an attempt to
restart the engine.
CAUTION
Do not engage the starter for morethan 10 seconds. If the engine stallsor fails to start, wait 5 to 10 secondsbefore re-engaging the starter. Improper use of the starter may
damage it.