2010 KIA SORENTO buttons
[x] Cancel search: buttonsPage 84 of 399

49
Features of your vehicle
With a smart key, you can lock or unlock
a door (and tailgate) and even start the
engine without inserting the key.
The functions of the buttons on a smart
key are similar to the remote keyless
entry. (Refer to the “Remote keyless
entry” in this section.)
Smart key functions
Carrying the smart key, you may lock and
unlock the vehicle doors (and tailgate).
Also, you may start the engine. Refer to
the following, for more details.Locking
Pressing the button of the front outside door handles with all doors (and tailgate)
closed and any door unlocked, locks all
the doors (and tailgate). The hazard
warning lights will blink once to indicate
that all doors (and tailgate) are locked.
The button will only operate when the
smart key is within 0.7 m (28 in.) from the
outside door handle. If you want to make
sure that a door has locked or not, you
should check the door lock button inside
the vehicle or pull the outside door han-
dle.Even though you press the button, the
doors will not lock and the chime sounds
if any of the following occurs:
The smart key is in the vehicle.
The ENGINE START/STOP button is in
the ACC or ON position.
Any door except the tailgate is opened.
Unlocking
Pressing the button of the front outside door handles with all doors (and tailgate)
closed and locked, unlocks all the doors
(and tailgate). The hazard warning lights
will blink twice to indicate that all doors
(and tailgate) are unlocked. The button
will only operate when the smart key iswithin 0.7 m (28 in.) from the outside
door handle.
When the smart key is recognized in the area of 0.7 m (28 in.) from the front out-
side door handle, other people can alsoopen a door without possession of the
smart key.
SMART KEY (IF EQUIPPED)
OXM049001LOXM049002
Page 163 of 399
Features of your vehicle
88
4
Manual heating and air condition- ing The heating and cooling system can be
controlled manually by pressing buttons
or turning knob(s) other than the AUTO
button. In this case, the system workssequentially according to the order of
buttons or knob(s) selected.
1. Start the engine.
2. Set the mode to the desired position.
For improving the effectiveness of heating and cooling;- Heating: - Cooling:
3. Set the temperature control to the desired position.
4. Set the air intake control to the outside (fresh) air position.
5. Set the fan speed control to the desired speed.
6. If air conditioning is desired, turn the air conditioning system on.
Press the AUTO button in order to con-
vert to full automatic control of the sys-tem.
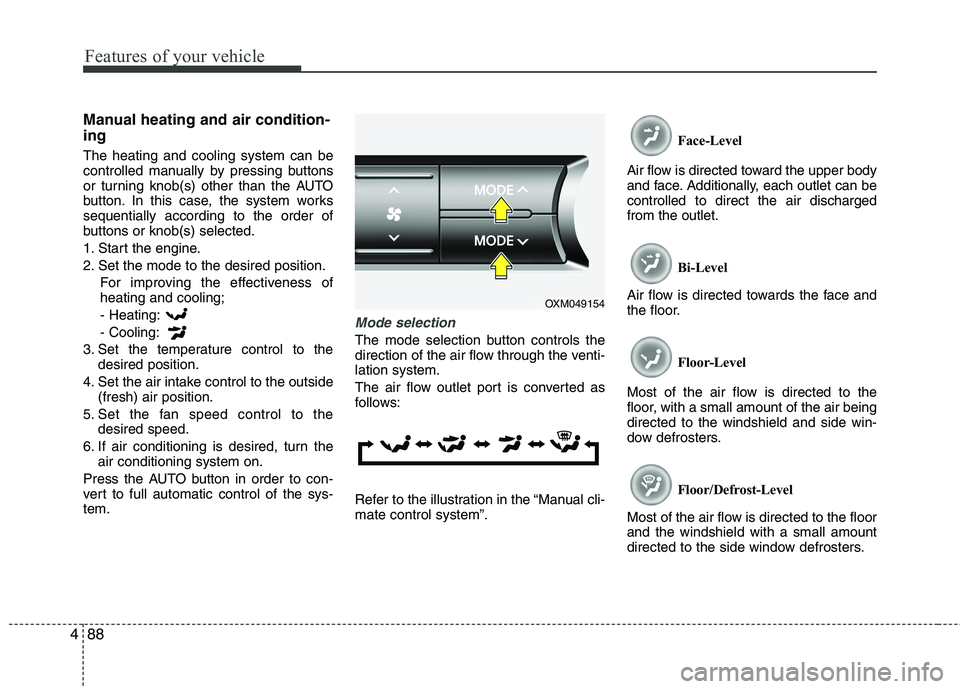
Mode selection
The mode selection button controls the
direction of the air flow through the venti-lation system.
The air flow outlet port is converted as
follows:
Refer to the illustration in the “Manual cli- mate control system”. Face-Level
Air flow is directed toward the upper body
and face. Additionally, each outlet can becontrolled to direct the air dischargedfrom the outlet.
Bi-Level
Air flow is directed towards the face and
the floor.
Floor-Level
Most of the air flow is directed to the
floor, with a small amount of the air beingdirected to the windshield and side win-
dow defrosters.
Floor/Defrost-Level
Most of the air flow is directed to the floorand the windshield with a small amount
directed to the side window defrosters.
OXM049154
Page 168 of 399
493
Features of your vehicle
OFF mode
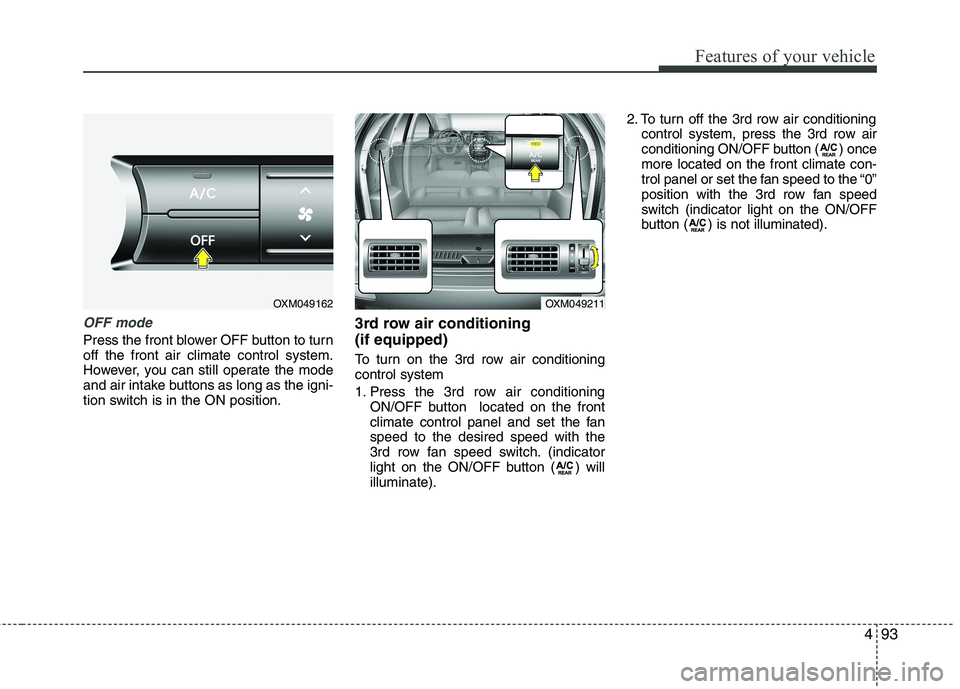
Press the front blower OFF button to turn off the front air climate control system.
However, you can still operate the mode
and air intake buttons as long as the igni-
tion switch is in the ON position.3rd row air conditioning (if equipped)
To turn on the 3rd row air conditioning control system
1. Press the 3rd row air conditioning
ON/OFF button located on the front
climate control panel and set the fanspeed to the desired speed with the
3rd row fan speed switch. (indicator
light on the ON/OFF button ( ) willilluminate). 2. To turn off the 3rd row air conditioning
control system, press the 3rd row air
conditioning ON/OFF button ( ) oncemore located on the front climate con-
trol panel or set the fan speed to the “0”
position with the 3rd row fan speed
switch (indicator light on the ON/OFF
button ( ) is not illuminated).
OXM049162OXM049211
Page 177 of 399

Features of your vehicle
102
4
Digital clock
Whenever the battery terminals or relat-
ed fuses are disconnected, you must
reset the time.
When the ignition switch is in the ACC or
ON position, the clock buttons operate as
follows:
Hour (1)
Pressing the H button will advance the
time displayed by one hour.
Minute (2)
Pressing the M button will advance the
time displayed by one minute.
To change the 24 hour format to the 12
hours format (if equipped), while press-
ing the “H” button, press the “M” button
for 3 seconds or more. For example, if the
“H” and “M” buttons are pressed for morethan 3 seconds while the time is 22:15,
the display will change to 10:15.
WARNING
Do not adjust the clock while driv-
ing. You may lose your steering
control and cause an accident that
results in severe personal injury ordeath.
CAUTION
Use the power outlet only when the engine is running and remove
the accessory plug after use.Using the accessory plug for pro-longed periods of time with the engine off could cause the bat-
tery to discharge.
Only use 12V electric accessories which are less than 10A in elec-tric capacity.
Adjust the air-conditioner or heater to the lowest operatinglevel when using the power outlet.
Close the cover when not in use. Some electronic devices can cause electronic interference
when plugged into a vehicle’spower outlet. These devices may cause excessive audio static andmalfunctions in other electronic
systems or devices used in yourvehicle.
WARNING
Do not put a finger or a foreign ele-
ment (pin, etc.) into a power outlet
and do not touch with a wet hand.
You may get an electric shock.
OXM049186
Page 182 of 399
4107
Features of your vehicle
Antenna
Roof antenna
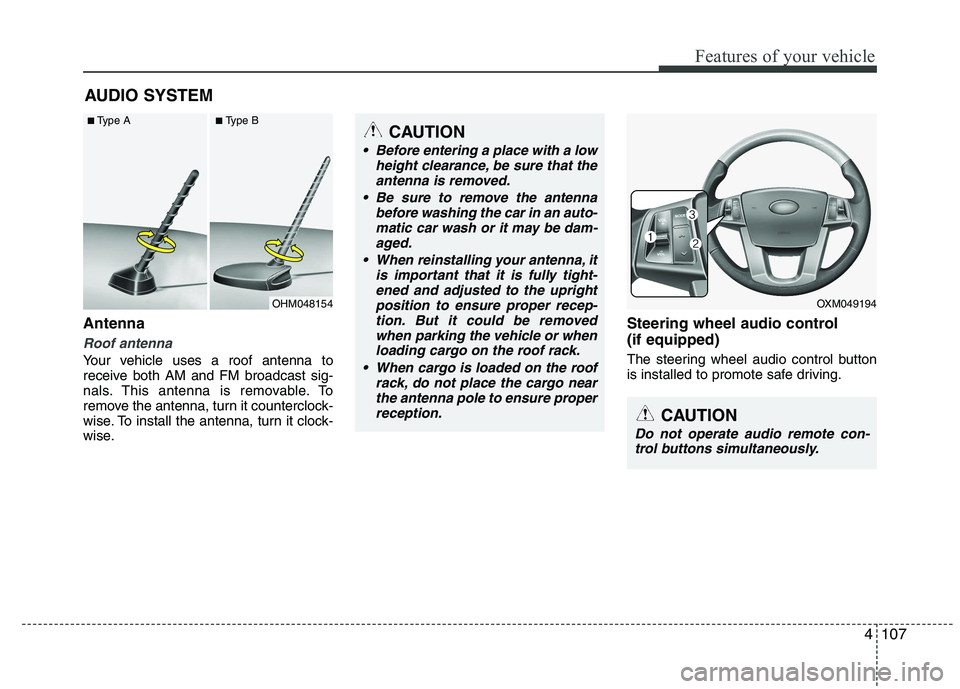
Your vehicle uses a roof antenna to
receive both AM and FM broadcast sig-
nals. This antenna is removable. To
remove the antenna, turn it counterclock-
wise. To install the antenna, turn it clock-
wise.Steering wheel audio control (if equipped)
The steering wheel audio control button
is installed to promote safe driving.
AUDIO SYSTEM
CAUTION
• Before entering a place with a low
height clearance, be sure that the
antenna is removed.
Be sure to remove the antenna before washing the car in an auto-matic car wash or it may be dam-
aged.
When reinstalling your antenna, it is important that it is fully tight-ened and adjusted to the upright position to ensure proper recep-
tion. But it could be removedwhen parking the vehicle or whenloading cargo on the roof rack.
When cargo is loaded on the roof rack, do not place the cargo near
the antenna pole to ensure properreception.
OXM049194
CAUTION
Do not operate audio remote con- trol buttons simultaneously.
OHM048154
■
Type A ■Type B
Page 183 of 399
Features of your vehicle
108
4
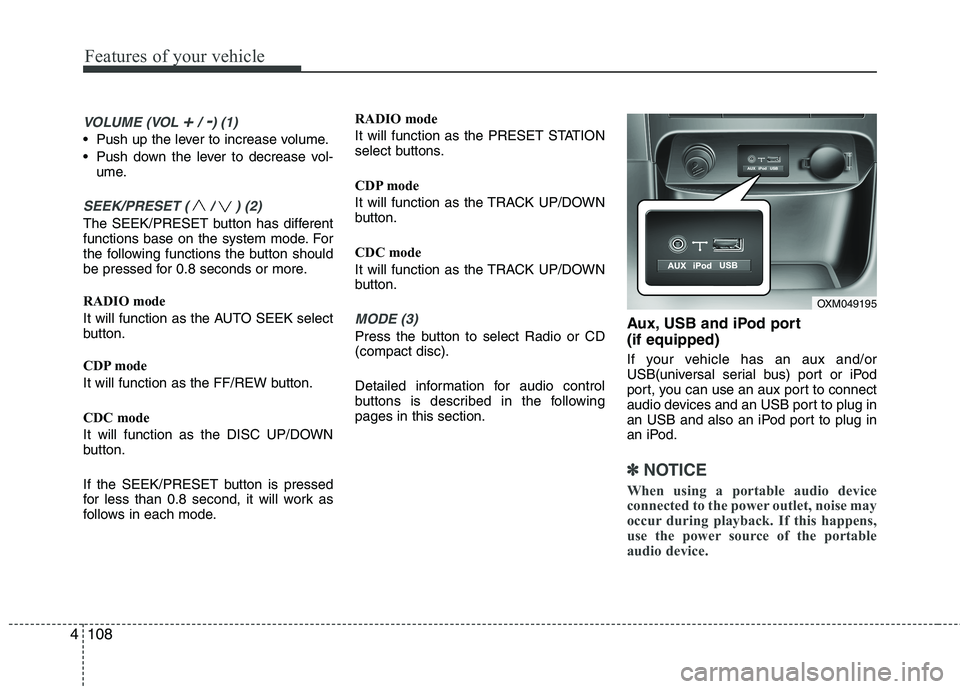
VOLUME (VOL +/ -) (1)
• Push up the lever to increase volume.
Push down the lever to decrease vol-
ume.
SEEK/PRESET ( / ) (2)
The SEEK/PRESET button has different
functions base on the system mode. For
the following functions the button should
be pressed for 0.8 seconds or more.
RADIO mode
It will function as the AUTO SEEK select
button.
CDP mode
It will function as the FF/REW button.
CDC mode
It will function as the DISC UP/DOWN
button.
If the SEEK/PRESET button is pressed
for less than 0.8 second, it will work as
follows in each mode. RADIO mode
It will function as the PRESET STATION
select buttons.
CDP mode
It will function as the TRACK UP/DOWN
button.
CDC mode
It will function as the TRACK UP/DOWN
button.
MODE (3)
Press the button to select Radio or CD (compact disc).
Detailed information for audio control
buttons is described in the followingpages in this section.
Aux, USB and iPod port (if equipped)
If your vehicle has an aux and/or
USB(universal serial bus) port or iPod
port, you can use an aux port to connect
audio devices and an USB port to plug in
an USB and also an iPod port to plug in
an iPod.
✽✽
NOTICE
When using a portable audio device
connected to the power outlet, noise may
occur during playback. If this happens,
use the power source of the portable
audio device.
OXM049195
Page 187 of 399
Features of your vehicle
112
4
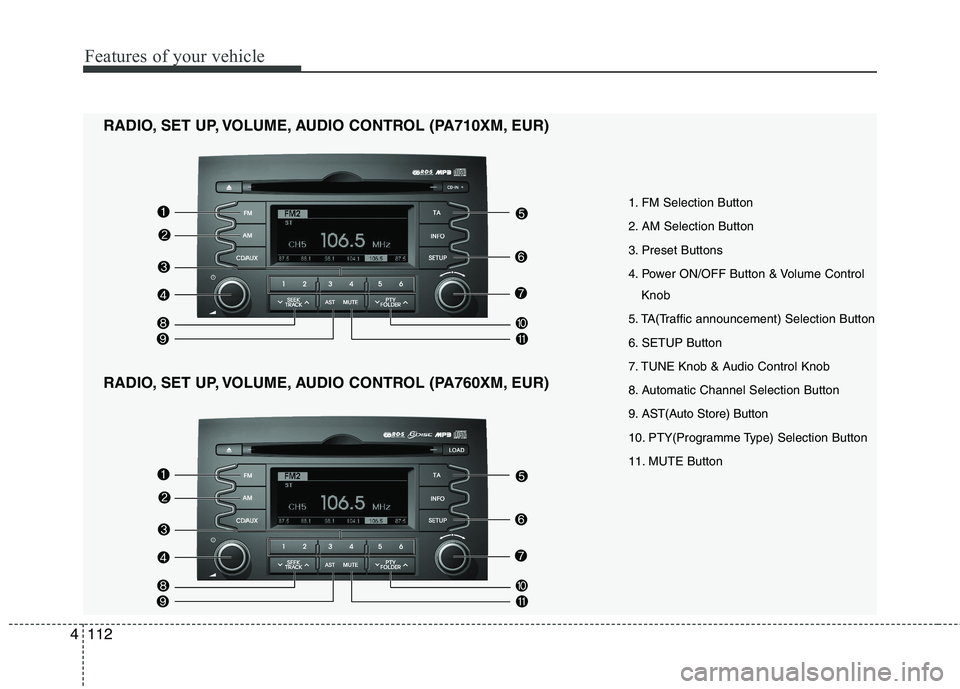
1. FM Selection Button
2. AM Selection Button
3. Preset Buttons
4. Power ON/OFF Button & Volume Control
Knob
5. TA(Traffic announcement) Selection Button
6. SETUP Button
7. TUNE Knob & Audio Control Knob
8. Automatic Channel Selection Button
9. AST(Auto Store) Button
10. PTY(Programme Type) Selection Button
11. MUTE Button
RADIO, SET UP, VOLUME, AUDIO CONTROL (PA710XM, EUR)
RADIO, SET UP, VOLUME, AUDIO CONTROL (PA760XM, EUR)
Page 188 of 399
4113
Features of your vehicle
1. FM Selection Button
Turns to FM mode and switches among
FM1, FM2 and FMA when the button is
pressed each time.
2. AM Selection Button
Turns to AM mode and switches between
AM and AMA when the button ispressed.
3. Preset Button
Press the [1]~[6] buttons for less than 0.8
second to play the channel saved in each
button.
Press the [1]~[6] buttons for more than
0.8 second or longer to save current sta-
tion to the corresponding button with the
sound of a beep.
4. Power ON/OFF Button &Volume Control Knob
tem ON or OFF. If the ignition switch is
not on ACC or ON position, the “Battery
Discharge” warning appears on LCD
after 10 seconds of power-up, and
automatically turns off after 1 hour of
operation.
system. Rotate clockwise to increase
the volume or counterclockwise to
decrease.
5. TA (Traffic Announcement) Selection Button
In FM, CD, and AUX modes, turns on/off
the reception of TA channels of RDS.
6. SETUP Button
Press this button to enter SETUP mode.
In SETUP mode, TEXT SCROLL, SDVCor RDS-related options can be adjusted.
If no action is taken for 8 seconds, it will
return to the play mode. Move between
items by rotating the [TUNE] knob, andpush the knob to select.
Selects whether long file names are
scrolled continuously (“ON”) or just once(“OFF”).
Select this item to turn the SDVC (Speed
Dependent Volume Control) feature ON or
OFF. If it is turned ON, volume level isadjusted automatically according to the
vehicle speed.
Select this item to turn the AF (Alternate
Frequency) feature ON or OFF.
Adjusts the TA (Traffic Announcement) vol-
ume level according to normal audio vol-
ume level. Selects whether REGION code is used
(“ON”) or not (“OFF”) once the radio deter-
mines the AF jump condition. If AUTO is
selected, AF jump condition is determined
automatically via PI reception status.
Turns the automatic NEWS reception fea-
ture ON or OFF.
Based on psychoacoustic technology,
this technology overcomes BASS limita-
tions which may occur due to the limited
number and size of speakers to offer
dynamic BASS sound quality. It is possi-
ble to adjust in 3 levels of LOW/MID/HIGH. ❈
AM (AMA) mode is not supported.