Page 189 of 236
In case of an emergency
20
6
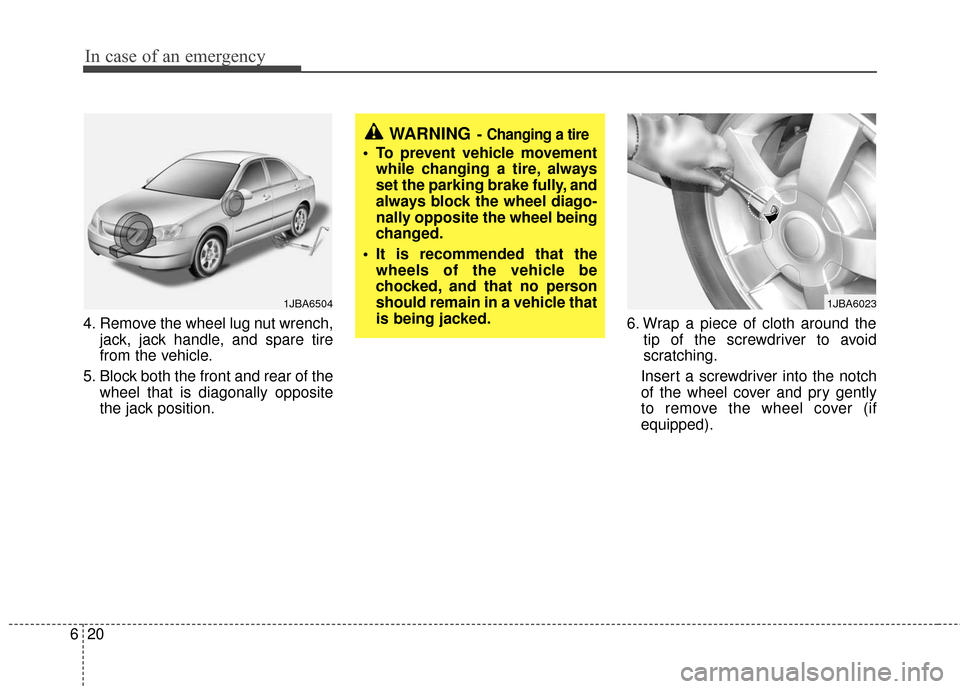
4. Remove the wheel lug nut wrench,
jack, jack handle, and spare tire
from the vehicle.
5. Block both the front and rear of the wheel that is diagonally opposite
the jack position. 6. Wrap a piece of cloth around the
tip of the screwdriver to avoid
scratching.
Insert a screwdriver into the notch
of the wheel cover and pry gently
to remove the wheel cover (if
equipped).
WARNING- Changing a tire
To prevent vehicle movement while changing a tire, always
set the parking brake fully, and
always block the wheel diago-
nally opposite the wheel being
changed.
It is recommended that the wheels of the vehicle be
chocked, and that no person
should remain in a vehicle that
is being jacked.
1JBA65041JBA6023
Page 195 of 236
Maintenance
47
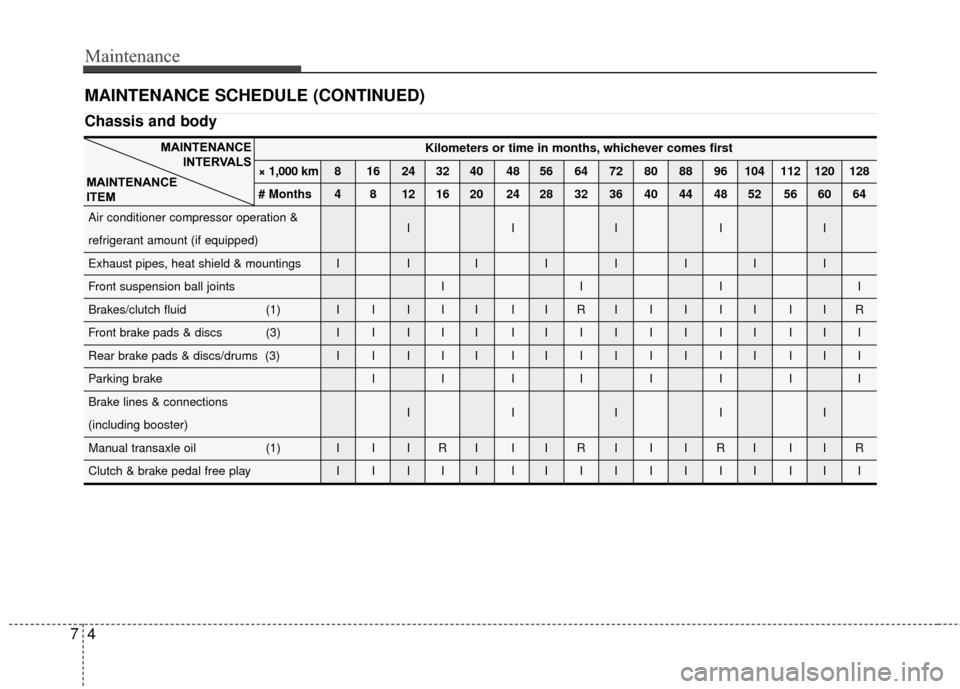
MAINTENANCE SCHEDULE (CONTINUED)
Chassis and body
Kilometers or time in months, whichever comes first
× 1,000 km 8 16 24 32 40 48 56 64 72 80 88 96 104 112 120 128
# Months 4 8 12 16 20 24 28 32 36 40 44 48 52 56 60 64
Air conditioner compressor operation & IIIII
refrigerant amount (if equipped)
Exhaust pipes, heat shield & mountings I I IIIIII
Front suspension ball joints I I I I
Brakes/clutch fluid (1) I I I I I I I R IIIII IIR
Front brake pads & discs (3) I I I I I I IIIIIII III
Rear brake pads & discs/drums (3) I I I I I I IIIIIII III
Parking brake I I I IIIII
Brake lines & connections IIIII
(including booster)
Manual transaxle oil (1) I I I R I I I R I I I R I I I R
Clutch & brake pedal free play I I I I I I IIIIIII III
MAINTENANCE
INTERVALS
MAINTENANCE
ITEM
Page 198 of 236

77
Maintenance
OWNER MAINTENANCE
Owner maintenance schedule
The following lists are vehicle checks and
inspections that should be performed by
the owner or an authorized Kia dealer at
the frequencies indicated to help ensure
safe, dependable operation of your vehi-
cle.
Any adverse conditions should be
brought to the attention of your dealer as
soon as possible.
These Owner Maintenance Checks are
generally not covered by warranties and
you may be charged for labor, parts and
lubricants used.
When you stop for fuel:
Check the engine oil level.
Check coolant level in coolant reser-voir.
Check the windshield washer fluid level.
Look for low or under-inflated tires.
While operating your vehicle:
Note any changes in the sound of the exhaust or any smell of exhaust fumes
in the vehicle.
Check for vibrations in the steering wheel. Notice any increased steering
effort or looseness in the steering
wheel, or change in its straight-ahead
position.
Notice if your vehicle constantly turns slightly or “pulls” to one side when trav-
eling on smooth, level road.
When stopping, listen and check for strange sounds, pulling to one side,
increased brake pedal travel or “hard-
to-push” brake pedal.
If any slipping or changes in the oper- ation of your transaxle occurs, check
the transaxle fluid level.
Check automatic transaxle P (Park) function.
Check parking brake.
Check for fluid leaks under your vehicle (water dripping from the air condition-
ing system during or after use is nor-
mal).
At least monthly:
Check coolant level in the coolantrecovery reservoir.
Check the operation of all exterior lights, including the stoplights, turn sig-
nals and hazard warning flashers.
Check the inflation pressures of all tires including the spare.
At least twice a year (i.e., every Spring and Fall) :
Check radiator, heater and air condi- tioning hoses for leaks or damage.
Check windshield washer spray and wiper operation. Clean wiper blades
with clean cloth dampened with wash-
er fluid.
Check headlight alignment.
Check muffler, exhaust pipes, shields and clamps.
Check the lap/shoulder belts for wear and function.
Check for worn tires and loose wheel lug nuts.
WARNING
Be careful when checking your
engine coolant level when the
engine is hot. Scalding hot coolant
and steam may blow out under
pressure. This could cause burns or
other serious injury.
Page 207 of 236

Maintenance
16
7
AUTOMATIC TRANSAXLE (IF EQUIPPED)
Checking the automatic transaxle
fluid level
The automatic transaxle fluid level
should be checked regularly.
Keep the vehicle on the level ground with
the parking brake applied and check the
fluid level according to the following pro-
cedure.
1. Place the selector lever in N (Neutral)
position and confirm the engine is run-
ning at normal idle speed.
2. After the transaxle is warmed up suffi- ciently (fluid temperature 158~176°F
(70~80°C)), for example by 10 minutes
usual driving, shift the selector lever
through all positions then place the
selector lever in N (Neutral) or P (Park)
position. 3. Confirm that the fluid level is in “HOT”
range on the level gauge. If the fluid
level is lower, add the specified fluid
from the fill hole. If the fluid level is
higher, drain the fluid from the drain
hole.
4. If the fluid level is checked in cold con- dition (fluid temperature 68~86°F
(20~30°C) add the fluid to “COLD” line
and then recheck the fluid level
according to the above step 2.
1JBA70061LDA5009
WARNING - Transaxle fluid
The transaxle fluid level should be
checked when the engine is at nor-
mal operating temperature. This
means that the engine, radiator,
radiator hose and exhaust system
etc., are very hot. Exercise great
care not to burn yourself during this
procedure.
WARNING- Parking brake
To avoid sudden movement of the
vehicle, apply parking brake and
depress the brake pedal before
moving the shift lever.
CAUTION
Low fluid level causes transaxle shift slippage. Overfilling cancause foaming, loss of fluid and transaxle malfunction.
The use of a non-specified fluid could result in transaxle malfunc-tion and failure.