2010 KIA Magnetis ECU
[x] Cancel search: ECUPage 254 of 336

67
What to do in an emergency
(Continued)
Be sure to use the correctfront and rear jacking posi-
tions on the vehicle; never
use the bumpers or any other
part of the vehicle for jack
support.
The vehicle can easily roll off the jack causing serious
injury or death. No person
should place any portion of
their body under a vehicle that
is supported only by a jack;
use vehicle support stands.
Do not start or run the engine while the vehicle is on the
jack.
Do not allow anyone to remain in the vehicle while it is on the
jack.
Make sure any children pres- ent are in a secure place away
from the road and from the
vehicle to be raised with the
jack.
IF YOU HAVE A FLAT TIRE
F070100ABH
Jack and tools
The jack, jack handle, and wheel lug
nut wrench are stored in the luggage
compartment. Pull up the luggage
box cover to reach this equipment.
(1) Jack handle
(2) Jack
(3) Wheel lug nut wrench
F070101AUN
Jacking instructions
The jack is provided for emergency
tire changing only.
To prevent the jack from “rattling”
while the vehicle is in motion, store it
properly.
Follow jacking instructions to reduce
the possibility of personal injury.
WARNING- Changing tires
Never attempt vehicle repairs in the traffic lanes of a public
road or highway.
Always move the vehicle com- pletely off the road and onto
the shoulder before trying to
change a tire. The jack should
be used on level firm ground.
If you cannot find a firm, level
place off the road, call a tow-
ing service company for
assistance.
(Continued)ONF068001
Page 259 of 336

What to do in an emergency
12
6
12. Reinstall the wheel cap by fitting
the boss of the wheel cap in the
groove of the wheel, hitting the
center of the wheel cap with your
hand (If equipped).
If you have a tire gauge, remove the
valve cap and check the air pressure.
If the pressure is lower than recom-
mended, drive slowly to the nearest
service station and inflate to the cor-
rect pressure. If it is too high, adjust
it until it is correct. Always reinstall
the valve cap after checking or
adjusting tire pressure. If the cap is
not replaced, air may leak from the
tire. If you lose a valve cap, buy
another and install it as soon as pos-
sible.
After you have changed wheels,
always secure the flat tire in its place
and return the jack and tools to their
proper storage locations. To prevent the jack, jack handle,
wheel lug nut wrench and spare tire
from rattling while the vehicle is in
motion, store them properly.CAUTION
Your vehicle has metric threads
on the wheel studs and nuts.Make certain during wheelremoval that the same nuts thatwere removed are reinstalled -or, if replaced, that nuts withmetric threads and the samechamfer configuration are used.Installation of a non-metricthread nut on a metric stud orvice-versa will not secure thewheel to the hub properly andwill damage the stud so that itmust be replaced.
Note that most lug nuts do nothave metric threads. Be sure touse extreme care in checkingfor thread style before installingaftermarket lug nuts or wheels.If in doubt, consult an author-ized KIA dealer.
WARNING- Wheel studs
If the studs are damaged, they
may lose their ability to retain
the wheel. This could lead to the
loss of the wheel and a collision
resulting in serious injuries.
WARNING - Inadequate
spare tire pressure
Check the inflation pressures as
soon as possible after installing
the spare tire. Adjust it to the
specified pressure, if necessary.
Refer to “Tires and wheels” sec-
tion 8.
Page 263 of 336

What to do in an emergency
16
6
When towing your vehicle in an emer-
gency without wheel dollies :
1. Set the ignition switch in the ACC posi-
tion.
2. Place the transaxle shift lever in N (Neutral).
3. Release the parking brake.
F080200AMG
Removable towing hook
(if equipped)
1. Open the trunk lid, and remove the towing hook from the tool case.
2. Remove the hole cover pressing the lower part of the cover on the front
bumper. 3. Install the towing hook by turning it
clockwise into the hole until it is fully
secured.
4. Remove the towing hook and install the cover after use.
CAUTION
Failure to place the transaxle shiftlever in N (Neutral) may cause inter- nal damage to the transaxle.
OMG065011OMG065012
Page 264 of 336

617
What to do in an emergency
F080300AUN
Emergency towing
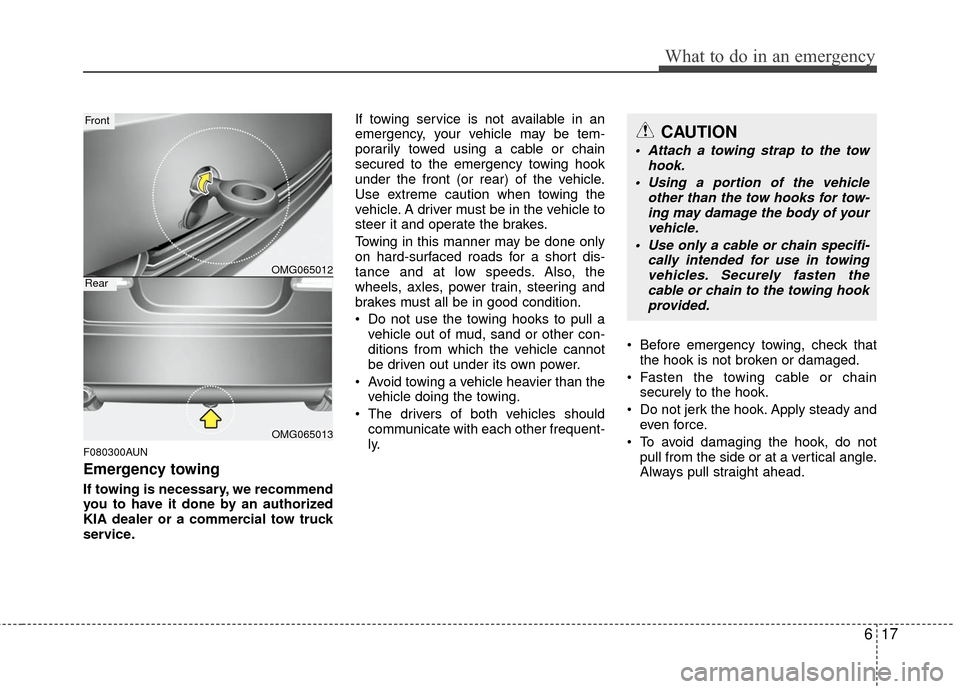
If towing is necessary, we recommend
you to have it done by an authorized
KIA dealer or a commercial tow truck
service.If towing service is not available in an
emergency, your vehicle may be tem-
porarily towed using a cable or chain
secured to the emergency towing hook
under the front (or rear) of the vehicle.
Use extreme caution when towing the
vehicle. A driver must be in the vehicle to
steer it and operate the brakes.
Towing in this manner may be done only
on hard-surfaced roads for a short dis-
tance and at low speeds. Also, the
wheels, axles, power train, steering and
brakes must all be in good condition.
Do not use the towing hooks to pull a
vehicle out of mud, sand or other con-
ditions from which the vehicle cannot
be driven out under its own power.
Avoid towing a vehicle heavier than the vehicle doing the towing.
The drivers of both vehicles should communicate with each other frequent-
ly. Before emergency towing, check that
the hook is not broken or damaged.
Fasten the towing cable or chain securely to the hook.
Do not jerk the hook. Apply steady and even force.
To avoid damaging the hook, do not pull from the side or at a vertical angle.
Always pull straight ahead.
CAUTION
Attach a towing strap to the tow hook.
Using a portion of the vehicle other than the tow hooks for tow-ing may damage the body of yourvehicle.
Use only a cable or chain specifi- cally intended for use in towingvehicles. Securely fasten thecable or chain to the towing hookprovided.
OMG065012
OMG065013
Front
Rear
Page 278 of 336

713
Maintenance
G050700AUN
Vacuum crankcase ventilation
hoses
Inspect the surface of hoses for evidence
of heat and/or mechanical damage. Hard
and brittle rubber, cracking, tears, cuts,
abrasions, and excessive swelling indi-
cate deterioration. Particular attention
should be paid to examine those hose
surfaces nearest to high heat sources,
such as the exhaust manifold.
Inspect the hose routing to assure that
the hoses do not come in contact with
any heat source, sharp edges or moving
component which might cause heat dam-
age or mechanical wear. Inspect all hose
connections, such as clamps and cou-
plings, to make sure they are secure, and
that no leaks are present. Hoses should
be replaced immediately if there is any
evidence of deterioration or damage.
G050800AUN
Air cleaner filter
A Genuine KIA air cleaner filter is recom-
mended when the filter is replaced.
G050900AUN
Spark plugs
Make sure to install new spark plugs of
the correct heat range.
G051000AUN
Valve clearance
Inspect excessive valve noise and/or
engine vibration and adjust if necessary.
An authorized KIA dealer should perform
the operation.
G051100AUN
Cooling system
Check cooling system components, such
as radiator, coolant reservoir, hoses and
connections for leakage and damage.
Replace any damaged parts.
G051200AUN
Coolant
The coolant should be changed at the
intervals specified in the maintenance
schedule.
G051500AUN
Brake hoses and lines
Visually check for proper installation,
chafing, cracks, deterioration and any
leakage. Replace any deteriorated or
damaged parts immediately.
G051600AUN
Brake fluid
Check brake fluid level in the brake fluid
reservoir. The level should be between
“MIN” and “MAX” marks on the side of
the reservoir. Use only hydraulic brake
fluid conforming to DOT 3 or DOT 4
specification.
Page 288 of 336

723
Maintenance
WASHER FLUID
G120100AUN
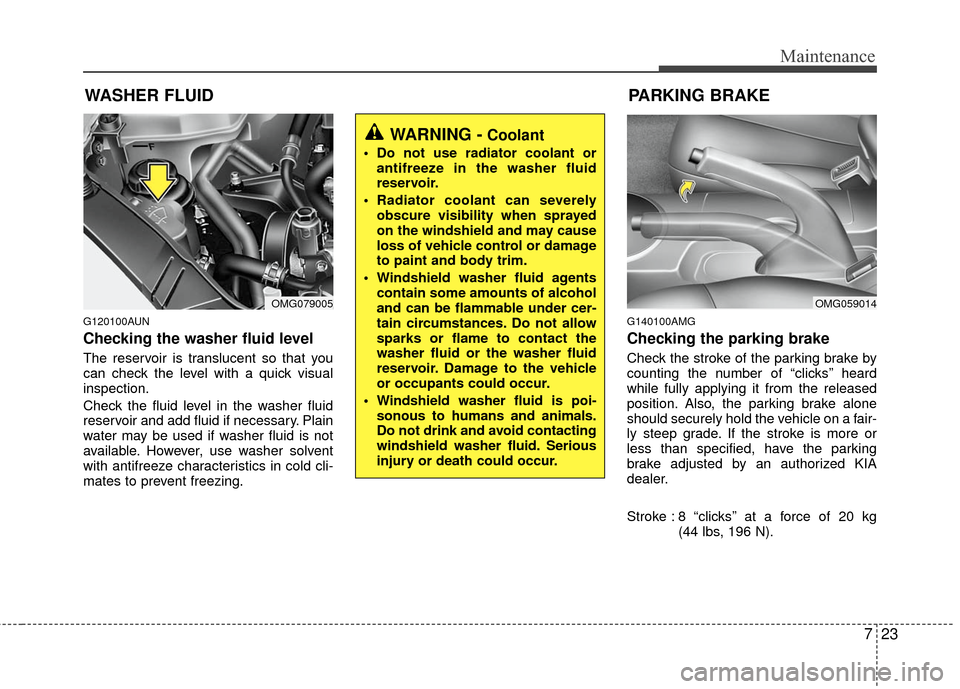
Checking the washer fluid level
The reservoir is translucent so that you
can check the level with a quick visual
inspection.
Check the fluid level in the washer fluid
reservoir and add fluid if necessary. Plain
water may be used if washer fluid is not
available. However, use washer solvent
with antifreeze characteristics in cold cli-
mates to prevent freezing.
G140100AMG
Checking the parking brake
Check the stroke of the parking brake by
counting the number of “clicks’’ heard
while fully applying it from the released
position. Also, the parking brake alone
should securely hold the vehicle on a fair-
ly steep grade. If the stroke is more or
less than specified, have the parking
brake adjusted by an authorized KIA
dealer.
Stroke : 8 “clicks’’ at a force of 20 kg (44 lbs, 196 N).
WARNING -Coolant
Do not use radiator coolant orantifreeze in the washer fluid
reservoir.
Radiator coolant can severely obscure visibility when sprayed
on the windshield and may cause
loss of vehicle control or damage
to paint and body trim.
Windshield washer fluid agents contain some amounts of alcohol
and can be flammable under cer-
tain circumstances. Do not allow
sparks or flame to contact the
washer fluid or the washer fluid
reservoir. Damage to the vehicle
or occupants could occur.
Windshield washer fluid is poi- sonous to humans and animals.
Do not drink and avoid contacting
windshield washer fluid. Serious
injury or death could occur.
OMG079005OMG059014
PARKING BRAKE
Page 292 of 336

727
Maintenance
G190100BUN
For best battery service
Keep the battery securely mounted.
Keep the battery top clean and dry.
Keep the terminals and connectionsclean, tight, and coated with petroleum
jelly or terminal grease.
Rinse any spilled electrolyte from the battery immediately with a solution of
water and baking soda.
If the vehicle is not going to be used for an extended time, disconnect the bat-
tery cables.
BATTERY
OMG075021
(Continued)
If any electrolyte gets intoyour eyes, flush your eyes
with clean water for at least
15 minutes and get immedi-
ate medical attention.
If electrolyte gets on your
skin, thoroughly wash the
contacted area. If you feel a
pain or a burning sensa-
tion, get medical attention
immediately.
Wear eye protection whencharging or working near a
battery. Always provide
ventilation when working in
an enclosed space.
An inappropriately dis- posed battery can be harm-
ful to the environment and
human health. Dispose the
battery according to your
local law(s) or regulation.
(Continued)WARNING- Battery dangers
Always read the following
instructions carefully when
handling a battery.
Keep lighted cigarettes and all other flames or sparks
away from the battery.
Hydrogen, a highly com- bustible gas, is always
present in battery cells and
may explode if ignited.
Keep batteries out of the reach of children because
batteries contain highly
corrosive SULFURIC ACID.
Do not allow battery acid to
contact your skin, eyes,
clothing or paint finish.
(Continued)
Page 311 of 336

Maintenance
46
7
G210201AMG
Main fuse
If the main fuse is blown, it must be
removed as follows:
1. Remove the fuse panel cover on the
right side in the engine compartment.
2. Remove the nuts shown in the picture above.
3. Replace the fuse with a new one of the same rating.
4. Reinstall in the reverse order of removal.
✽ ✽NOTICE
If the main fuse is blown, consult an
authorized KIA dealer.CAUTION
After checking the fuse panel in the
engine compartment, securelyinstall the fuse panel cover. If not,electrical failures may occur fromwater contact.
OMG065019