2010 KIA Cerato Electrical
[x] Cancel search: ElectricalPage 239 of 321

65
What to do in an emergency
F040101AUNJump starting procedure 1. Make sure the booster battery is 12-volt and that its negative terminal is
grounded.
2. If the booster battery is in another vehicle, do not allow the vehicles to
touch.
3. Turn off all unnecessary electrical loads.
4. Connect the jumper cables in the exact sequence shown in the illustration.
First connect one end of a jumper
cable to the positive terminal of the
discharged battery (1), then connect
the other end to the positive terminal
on the booster battery (2).
Proceed to connect one end of the
other jumper cable to the negative ter-
minal of the booster battery (3), then
the other end to a solid, stationary,
metallic point (for example, the engine
lifting bracket) away from the battery
(4). Do not connect it to or near any
part that moves when the engine is
cranked. Do not allow the jumper cables to con-
tact anything except the correct battery
terminals or the correct ground. Do not
lean over the battery when making
connections.
5. Start the engine of the vehicle with the booster battery and let it run at 2,000
rpm, then start the engine of the vehi-
cle with the discharged battery.
If the cause of your battery discharging isnot apparent, you should have your vehi- cle checked by an authorized KIA dealer.
F040200AUNPush-starting Your manual transaxle-equipped vehicle
should not be push-started because it
might damage the emission control sys-
tem.
Vehicles equipped with automatic
transaxle cannot be push-started.
Follow the directions in this section for
jump-starting.
WARNING
Never tow a vehicle to start it
because the sudden surge forward
when the engine starts could cause
a collision with the tow vehicle.
CAUTION
- Battery cables
Do not connect the jumper cablefrom the negative terminal of thebooster battery to the negative ter- minal of the discharged battery.This can cause the discharged bat- tery to overheat and crack, releas-ing battery acid.
Page 278 of 321

Maintenance26
7
G190200AUNBattery recharging Your vehicle has a maintenance-free,
calcium-based battery.
If the battery becomes discharged in a
short time (because, for example, the
headlights or interior lights were left on
while the vehicle was not in use),
recharge it by slow charging (trickle)
for 10 hours.
If the battery gradually discharges because of high electric load while the
vehicle is being used, recharge it at 20-
30A for two hours.
(Continued)
When lifting a plastic-cased bat-tery, excessive pressure on the
case may cause battery acid to
leak, resulting in personal injury.
Lift with a battery carrier or with
your hands on opposite corners.
Never attempt to recharge the battery when the battery cables
are connected.
The electrical ignition system works with high voltage. Never
touch these components with the
engine running or the ignition
switched on.
Failure to follow the above warn-
ings can result in serious bodily
injury or death.
WARNING
- Recharging battery
When recharging the battery,
observe the following precautions:
The battery must be removed
from the vehicle and placed in an
area with good ventilation.
Do not allow cigarettes, sparks, or flame near the battery.
Watch the battery during charg- ing, and stop or reduce the charg-
ing rate if the battery cells begin
gassing (boiling) violently or if
the temperature of the electrolyte
of any cell exceeds 49°C (120°F).
Wear eye protection when check- ing the battery during charging.
(Continued)
Page 293 of 321

741
Maintenance
FUSESG210000ATDA vehicle’s electrical system is protected
from electrical overload damage by
fuses.This vehicle has 2 fuse panels, one locat-
ed in the driver’s side panel bolster, the
other in the engine compartment near
the battery.
If any of your vehicle’s lights, acces-
sories, or controls do not work, check the
appropriate circuit fuse. If a fuse has
blown, the element inside the fuse will
melt.
If the electrical system does not work,
first check the driver’s side fuse panel.
Always replace a blown fuse with one of
the same rating.
If the replacement fuse blows, this indi-
cates an electrical problem. Avoid using
the system involved and immediately
consult an authorized KIA dealer.
Three kinds of fuses are used: blade type
for lower amperage rating, cartridge type,and multi fuse for higher amperage rat-ings.
OHDC078019
Normal
Normal
Blade type
Cartridge type
Multi fuse Blown
Blown
Normal Blown
WARNING
- Fuse replace- ment
Never replace a fuse with any-
thing but another fuse of the
same rating.
A higher capacity fuse could cause damage and possibly a
fire.
Never install a wire instead of the proper fuse - even as a temporary
repair. It may cause extensive
wiring damage and a possible fire.
CAUTION
Do not use a screwdriver or any
other metal object to remove fusesbecause it may cause a short circuit and damage the system.
Page 294 of 321

Maintenance42
7G210100ATDInstrument panel fuse replacement1. Turn the ignition switch and all other
switches off.
2. Open the fuse panel cover. 3. Pull the suspected fuse straight out.
Use the removal tool provided in the
engine compartment fuse panel.
4. Check the removed fuse; replace it if it is blown.
5. Push in a new fuse of the same rating, and make sure it fits tightly in the clips.
If it fits loosely, consult an authorized KIA
dealer.
If you do not have a spare, use a fuse of the same rating from a circuit you may not need for operating the vehicle, suchas the cigar lighter fuse.
If the headlights or other electrical com-
ponents do not work and the fuses are
OK, check the fuse block in the engine
compartment. If a fuse is blown, it must
be replaced.
OTD079020
Driver’s side panel
OTD079021
Page 295 of 321

743
Maintenance
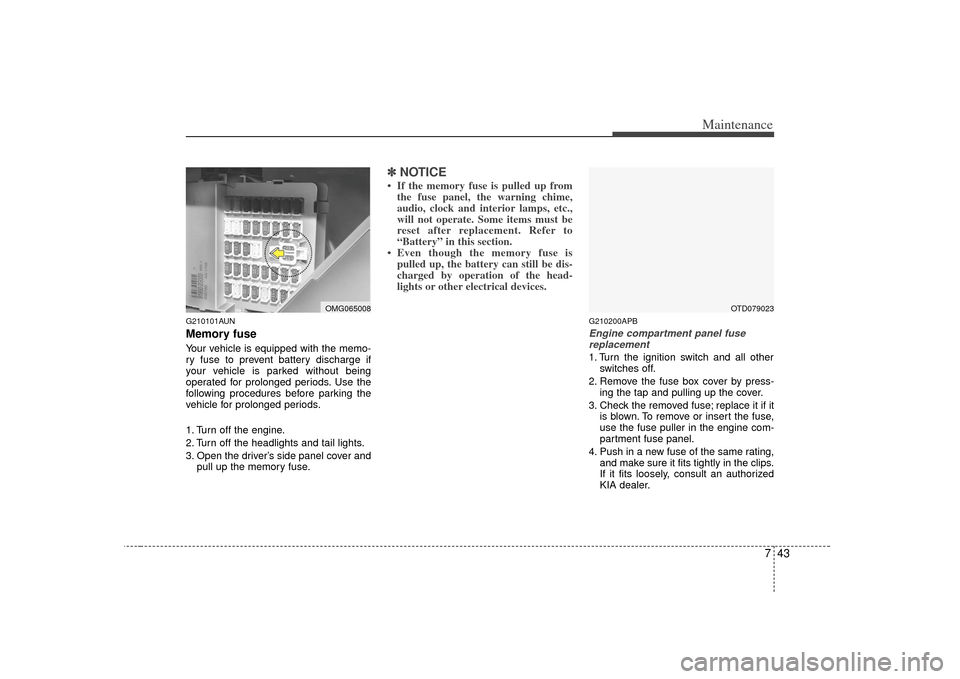
G210101AUNMemory fuseYour vehicle is equipped with the memo-
ry fuse to prevent battery discharge if
your vehicle is parked without being
operated for prolonged periods. Use the
following procedures before parking the
vehicle for prolonged periods.
1. Turn off the engine.
2. Turn off the headlights and tail lights.
3. Open the driver’s side panel cover andpull up the memory fuse.
✽ ✽NOTICE• If the memory fuse is pulled up from
the fuse panel, the warning chime,
audio, clock and interior lamps, etc.,
will not operate. Some items must be
reset after replacement. Refer to
“Battery” in this section.
• Even though the memory fuse is pulled up, the battery can still be dis-
charged by operation of the head-
lights or other electrical devices.
G210200APBEngine compartment panel fuse
replacement1. Turn the ignition switch and all other switches off.
2. Remove the fuse box cover by press- ing the tap and pulling up the cover.
3. Check the removed fuse; replace it if it is blown. To remove or insert the fuse,
use the fuse puller in the engine com-
partment fuse panel.
4. Push in a new fuse of the same rating, and make sure it fits tightly in the clips.
If it fits loosely, consult an authorized
KIA dealer.
OMG065008
OTD079023
Page 296 of 321

Maintenance44
7
G210201AAMMulti fuseIf the multi fuse is blown, it must be
removed as follows:
1. Turn off the engine.
2. Disconnect the negative battery cable.
3. Remove the fuse panel on the right
side in the engine compartment.
4. Remove the nuts shown in the picture above.
5. Replace the fuse with a new one of the same rating.
6. Reinstall in the reverse order of removal.
✽ ✽NOTICEIf the multi fuse is blown, consult an
authorized KIA dealer.
OTD079025
CAUTION
After checking the fuse panel in the
engine compartment, securelyinstall the fuse panel cover. If not, electrical failures may occur fromwater leaking in.
Page 303 of 321

751
Maintenance
Waxing
Wax the vehicle when water will no
longer bead on the paint.
Always wash and dry the vehicle before
waxing. Use a good quality liquid or
paste wax, and follow the manufacturer’s
instructions. Wax all metal trim to protect
it and to maintain its luster.
Removing oil, tar, and similar materials
with a spot remover will usually strip the
wax from the finish. Be sure to re-wax
these areas even if the rest of the vehicle
does not yet need waxing.
G230103AUNFinish damage repair Deep scratches or stone chips in the
painted surface must be repaired
promptly. Exposed metal will quickly rust
and may develop into a major repair
expense.✽ ✽NOTICEIf your vehicle is damaged and requires
any metal repair or replacement, be sure
the body shop applies anti-corrosion
materials to the parts repaired or
replaced.
CAUTION
Water washing in the engine com-
partment including high pressurewater washing may cause the fail- ure of electrical circuits located inthe engine compartment.
Never allow water or other liquids to come in contact with electri-cal/electronic components inside the vehicle as this may damagethem.
OJB037800
CAUTION
Wiping dust or dirt off the body with a dry cloth will scratch thefinish.
Do not use steel wool, abrasive cleaners, or strong detergentscontaining highly alkaline orcaustic agents on chrome-platedor anodized aluminum parts. This may result in damage to the pro-tective coating and cause discol- oration or paint deterioration.
Page 307 of 321

755
Maintenance
Interior careG230201AHMInterior general precautions Prevent caustic solutions such as per-
fume and cosmetic oil from contacting
the dashboard because they may cause
damage or discoloration. If they do con-
tact the dashboard, wipe them off imme-
diately. See the instructions for the prop-
er way to clean vinyl.
G230202AUNCleaning the upholstery and interiortrim Vinyl
Remove dust and loose dirt from vinyl
with a whisk broom or vacuum cleaner.
Clean vinyl surfaces with a vinyl cleaner.
Fabric
Remove dust and loose dirt from fabric
with a whisk broom or vacuum cleaner.
Clean with a mild soap solution recom-
mended for upholstery or carpets.
Remove fresh spots immediately with a
fabric spot cleaner. If fresh spots do not
receive immediate attention, the fabric
can be stained and its color can be
affected. Also, its fire-resistant properties
can be reduced if the material is not
properly maintained.
G230203AUNCleaning the lap/shoulder belt web- bing Clean the belt webbing with any mild
soap solution recommended for cleaning
upholstery or carpet. Follow the instruc-
tions provided with the soap. Do not
bleach or re-dye the webbing because
this may weaken it.G230204AHMCleaning the interior window glass If the interior glass surfaces of the vehi-
cle become fogged (that is, covered with
an oily, greasy or waxy film), they should
be cleaned with a glass cleaner. Follow
the directions on the glass cleaner con-
tainer.
CAUTION
Never allow water or other liquidsto come in contact with electrical/electronic components inside thevehicle as this may damage them.
CAUTION
When cleaning leather products (steering wheel, seats etc.), useneutral detergents or low alcoholcontent solutions. If you use highalcohol content solutions oracid/alkaline detergents, the color of the leather may fade or the sur-face may get stripped off.
CAUTION
Using anything but recommended cleaners and procedures may affectthe fabric’s appearance and fire-resistant properties.
CAUTION
Do not scrape or scratch the inside of the rear window. This may resultin damage to the rear windowdefroster grid.