Page 147 of 554
WARNING!
Do not adjust the steering column while driving.
Adjusting the steering column while driving or driv-
ing with the steering column unlocked, could cause
the driver to lose control of the vehicle. Be sure the
steering column is locked before driving your ve-
hicle. Failure to follow this warning may result in
serious injury or death.
ELECTRONIC SPEED CONTROL — IF EQUIPPED
Electronic Speed Control takes over the accelerator op-
eration at speeds greater than 25 mph (40 km/h). The
Electronic Speed Control lever is located on the right side
of the steering wheel.NOTE:
In order to ensure proper operation, the Elec-
tronic Speed Control System has been designed to shut
down if multiple Speed Control functions are operated at
the same time. If this occurs, the Electronic Speed ControlElectronic Speed Control Lever
146 UNDERSTANDING THE FEATURES OF YOUR VEHICLE
Page 154 of 554
Rear Cupholders
The rear cupholders are located on the back of the center
console.
STORAGE
Console Storage Compartment
To lock or unlock the storage compartment, insert the
ignition key and turn. To open the storage compartment,
press the latch and lift the cover.
Rear Cupholders
Center Console
3
UNDERSTANDING THE FEATURES OF YOUR VEHICLE 153
Page 162 of 554
Front Panel(s) Removal
NOTE: Left panel must be removed before removing
right panel.
1. Fold down the sun visor, and move it to the side.
2. Turn the rear fasteners (knobs) (located on the over-
head speaker bar assembly) counterclockwise until they
can be removed.3. Turn the center L-shaped locks (two) from the center
of the roof panel.
3
UNDERSTANDING THE FEATURES OF YOUR VEHICLE 161
Page 163 of 554
4. Turn the rear L-shaped lock (located above the shoul-
der belt anchorage).
5. Unlatch the header panel latch located at the top of the
windshield.6. Remove the left-hand panel.
To remove the right panel, follow the steps above
except for Step 3.
162 UNDERSTANDING THE FEATURES OF YOUR VEHICLE
Page 168 of 554
Front Panel(s) Installation
NOTE:Set the panels on the windshield frame so that
there is no overhang. Also, make sure that the panels are
sitting flush with the body.
1. Install the right panel first, then the left panel.
2. Reinstall the panel(s) using the same steps for removal
in reverse order.
Front Panel(s) Installation with Rear Hard Top
Removed
1. Turn the left and right panels over and move the
spacer block (located on the rear of the panel) upward 90
degrees. NOTE:
The front panel(s) must be positioned properly
to ensure sealing. Set the panels on the windshield frame
so that there is no overhang. Also, make sure that the
panels are sitting flush with the body.
3
UNDERSTANDING THE FEATURES OF YOUR VEHICLE 167
Page 170 of 554
6. Locate the wire harness on the left rear inside corner of
the vehicle.7. Release the red locking tab by pushing upward.
3
UNDERSTANDING THE FEATURES OF YOUR VEHICLE 169
Page 225 of 554
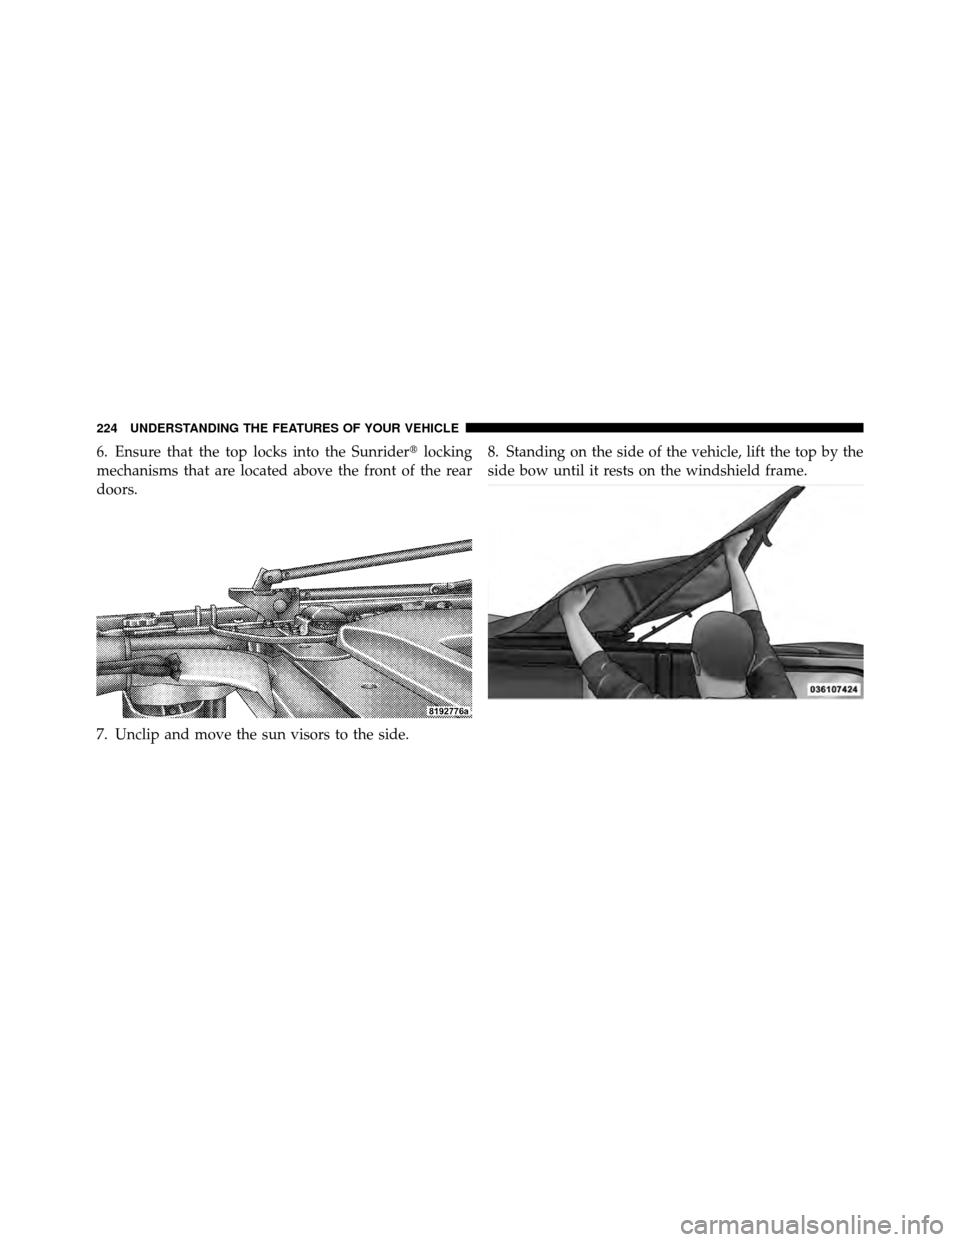
6. Ensure that the top locks into the Sunrider�locking
mechanisms that are located above the front of the rear
doors.
7. Unclip and move the sun visors to the side. 8. Standing on the side of the vehicle, lift the top by the
side bow until it rests on the windshield frame.
224 UNDERSTANDING THE FEATURES OF YOUR VEHICLE
Page 238 of 554
6. Secure the top by using the two provided straps. Each
strap will wrap around the side bow and Velcro�to itself;
use one strap on each side of the vehicle.Closing the Sunrider�
Perform the above steps in the opposite order.
NOTE: Failure to fold the fabric rearward will allow the
material to sag and may block the rearview mirror.
3
UNDERSTANDING THE FEATURES OF YOUR VEHICLE 237


 Removal
NOTE: Left panel must be removed before removing
right panel.
1. Fold down the sun visor, and move it to the side.
2. Turn the rear fasteners (knobs) (located on the over-
head")
.
5. Unlatch the header panel latch located at the top of the
windshield.6. Remove the left-hand panel.
To remove the right")
 Installation
NOTE:Set the panels on the windshield frame so that
there is no overhang. Also, make sure that the panels are
sitting flush with the body.
1. Install the right panel first,")