Page 234 of 554
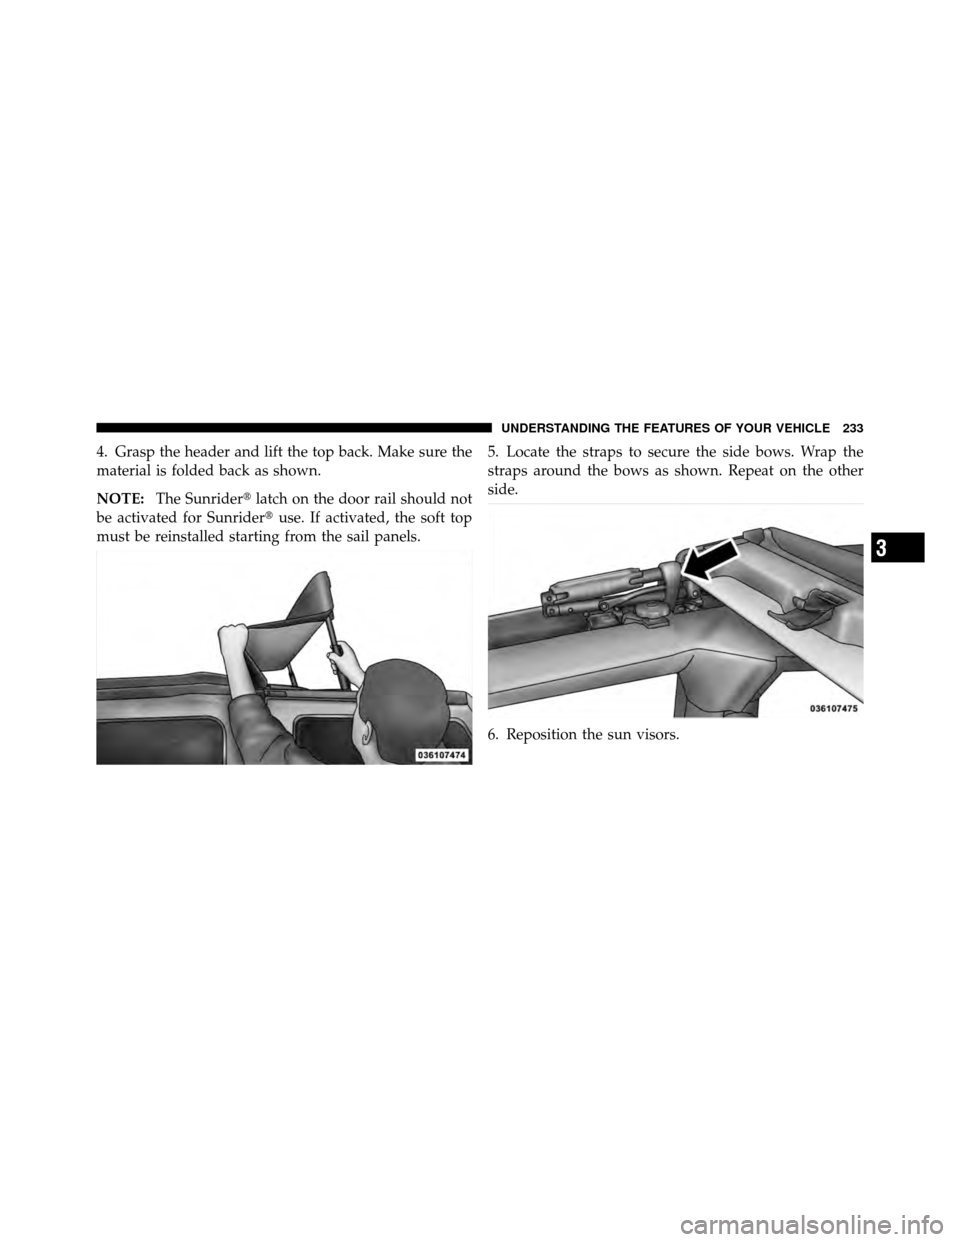
4. Grasp the header and lift the top back. Make sure the
material is folded back as shown.
NOTE:The Sunrider� latch on the door rail should not
be activated for Sunrider� use. If activated, the soft top
must be reinstalled starting from the sail panels. 5. Locate the straps to secure the side bows. Wrap the
straps around the bows as shown. Repeat on the other
side.
6. Reposition the sun visors.
3
UNDERSTANDING THE FEATURES OF YOUR VEHICLE 233
Page 238 of 554
6. Secure the top by using the two provided straps. Each
strap will wrap around the side bow and Velcro�to itself;
use one strap on each side of the vehicle.Closing the Sunrider�
Perform the above steps in the opposite order.
NOTE: Failure to fold the fabric rearward will allow the
material to sag and may block the rearview mirror.
3
UNDERSTANDING THE FEATURES OF YOUR VEHICLE 237
Page 251 of 554

13. Airbag Warning LightThis light will turn on for four to eight seconds
as a bulb check when the ignition switch is first
turned ON. If the light is either not on during
starting, stays on, or turns on while driving,
then have the system inspected at an authorized dealer as
soon as possible. Refer to “Occupant Restraints” in
“Things To Know Before Starting Your Vehicle” for
further information.
14. Rear Axle Lock Indicator — If Equipped This light indicates when the rear axle lock has
been activated.
15. Tachometer
Indicates the engine speed in revolutions per minute
(RPM).CAUTION!
Do not operate the engine with the tachometer
pointer in the red area. Engine damage will occur.
16. Engine Temperature Warning Light This light warns of an overheated engine condi-
tion. If the engine is critically hot, a warning chime
will sound 10 times. After the chime turns off, the
engine will still be critically hot until the light goes out.
17. Vehicle Security Light — If Equipped This light will flash at a fast rate for approxi-
mately 15 seconds, when the vehicle security
alarm is arming, and then will flash slowly
until the vehicle is disarmed.
250 UNDERSTANDING YOUR INSTRUMENT PANEL
Page 357 of 554

The Basics of Off-Road Driving
You will encounter many types of terrain driving off-
road. You should be familiar with the terrain and area
before proceeding. There are many types of surface
conditions: hard-packed dirt, gravel, rocks, grass, sand,
mud, snow and ice. Every surface has a different effect on
your vehicle’s steering, handling and traction. Control-
ling your vehicle is one of the keys to successful off-road
driving, so always keep a firm grip on the steering wheel
and maintain a good driving posture. Avoid sudden
accelerations, turns or braking. In most cases, there are no
road signs, posted speed limits or signal lights. Therefore,
you will need to use your own good judgment on what is
safe and what is not. When on a trail, you should always
be looking ahead for surface obstacles and changes in
terrain. The key is to plan your future driving route while
remembering what you are currently driving over.CAUTION!
Never park your vehicle over dry grass or other
combustible materials. The heat from your vehicle
exhaust system could cause a fire.
WARNING!
Always wear your seat belt and firmly tie down
cargo. Unsecured cargo can become projectiles in an
off-road situation.
When to Use 4L (Low) Range
When off-road driving, shift into 4L (Low) for additional
traction and control on slippery or difficult terrain,
ascending or descending steep hills, and to increase low
speed pulling power. This range should be limited to
extreme situations such as deep snow, mud, steep in-
clines, or sand where additional low speed pulling power
356 STARTING AND OPERATING
Page 421 of 554

Loading
The actual total weight and the weight of the front and
rear of your vehicle at the ground can best be determined
by weighing it when it is loaded and ready for operation.
The entire vehicle should first be weighed on a commer-
cial scale to ensure that the GVWR has not been ex-
ceeded. The weight on the front and rear of the vehicle
should then be determined separately to be sure that the
load is properly distributed over front and rear axle.
Weighing the vehicle may show that the GAWR of either
the front or rear axles has been exceeded, but the total
load is within the specified GVWR. If so, weight must be
shifted from front to rear, or rear to front, as appropriate
until the specified weight limitations are met. Store the
heavier items down low and be sure that the weight is
distributed equally. Stow all loose items securely before
driving.Improper weight distributions can have an adverse affect
on the way your vehicle steers and handles, and the way
the brakes operate.
CAUTION!
Do not load your vehicle any heavier than the GVWR
or the maximum front and rear GAWR. If you do,
parts on your vehicle can break, or it can change the
way your vehicle handles. This could cause you to
lose control. Also, overloading can shorten the life of
your vehicle.
TRAILER TOWING
In this section, you will find safety tips and information
on limits to the type of towing you can reasonably do
with your vehicle. Before towing a trailer, carefully
review this information to tow your load as efficiently
and safely as possible.
420 STARTING AND OPERATING
Page 430 of 554
 the new vehicle is driven. The engine,
axle or other parts could be damaged.
•Then, during the first 500 miles (805 km) th")
CAUTION!
•Do not tow a trailer at all during the first 500 miles
(805 km) the new vehicle is driven. The engine,
axle or other parts could be damaged.
•Then, during the first 500 miles (805 km) that a
trailer is towed, do not drive over 50 mph
(80 km/h) and do not make starts at full throttle.
This helps the engine and other parts of the
vehicle wear in at the heavier loads.
WARNING!
Improper towing can lead to an injury accident.
Follow these guidelines to make your trailer towing
as safe as possible:(Continued)
WARNING! (Continued)
•Make certain that the load is secured in the trailer
and will not shift during travel. When trailering
cargo that is not fully secured, dynamic load shifts
can occur that may be difficult for the driver to
control. You could lose control of your vehicle and
have an accident.
•When hauling cargo or towing a trailer, do not
overload your vehicle or trailer. Overloading can
cause a loss of control, poor performance or dam-
age to the brakes, axle, engine, transmission, steer-
ing, suspension, chassis structure or tires.
•Safety chains must always be used between your
vehicle and trailer. Always connect the chains to
the frame or hook retainers of the vehicle hitch.
Cross the chains under the trailer tongue and
allow enough slack for turning corners.(Continued)
5
STARTING AND OPERATING 429
Page 436 of 554

CAUTION!
Front or rear wheel lifts should not be used. Internal
damage to the transmission or transfer case will occur
if a front or rear wheel lift is use")
RECREATIONAL TOWING (BEHIND
MOTORHOME, ETC.)
CAUTION!
Front or rear wheel lifts should not be used. Internal
damage to the transmission or transfer case will occur
if a front or rear wheel lift is used when recreational
towing.
Two-Wheel Drive Models
Recreational towing is allowed ONLY if the rear drive-
shaft is removed. See your authorized dealer or refer to
the Service Manual.Towing with the rear wheels on the
ground while the driveshaft is connected can result in
severe transmission damage.
WARNING!
If the driveshaft is removed, the vehicle can roll even
if the transmission is in PARK, which could cause
serious injury or death.
The parking brake must be firmly engaged and the
wheels chocked during driveshaft removal and installa-
tion. The parking brake must remain engaged unless the
vehicle is securely and properly connected to the tow
vehicle, or the driveshaft is completely reinstalled. See
your authorized dealer for proper driveshaft removal
and reinstallation procedures, including flange
orientation/alignment, use of thread-locking compound,
proper bolt torque specifications, etc.
5
STARTING AND OPERATING 435
Page 438 of 554
7. Release the brake pedal and ensure that there is no
vehicle movement.
8. Turn the engine off and turn the ignition switch to the
ACC position.
9. Shift the automatic transmission into PARK.
10. Apply the parking brake.
11. Attach the vehicle to the tow vehicle with the tow bar.
12. Release the parking brake.
13. Disconnect the negative battery cable, and secure it
away from the negative battery post.CAUTION!
Damage to the transmission may occur if the trans-
mission is shifted into PARK with the transfer case in
N (Neutral) and the engine running. With the trans-
fer case in N (Neutral) ensure that the engine is off
prior to shifting the transmission into PARK (refer to
steps8–9above).
Shifting Out of Neutral (N)
Use the following procedure to prepare your vehicle for
normal usage.
1. Turn the engine off.
2. Shift the automatic transmission into NEUTRAL or
press the clutch pedal on a manual transmission.
5
STARTING AND OPERATING 437