Page 369 of 496
Gross Vehicle Weight Rating (GVWR)
The GVWR is the total allowable weight of your vehicle.
This includes driver, passengers, and cargo. The total
load must be limited so that you do not exceed the
GVWR.
Tire Size
The tire size on the Vehicle Certification Label represents
the actual tire size on your vehicle. Replacement tires
must be equal to the load capacity of this tire size.
Rim Size
This is the rim size that is appropriate for the tire size
listed.
Inflation Pressure
This is the cold tire inflation pressure for your vehicle, for
all loading conditions.
Curb Weight
The curb weight of a vehicle is defined as the total weight
of the vehicle with all fluids, including vehicle fuel, at full
capacity conditions, and with no occupants or cargo
loaded into the vehicle. The front and rear curb weight
values are determined by weighing your vehicle on a
commercial scale before any occupants or cargo are
added.
Overloading
The load carrying components (springs, tires, wheels,
etc.) of your vehicle will provide satisfactory service as
long as you do not exceed the GVWR.
The best way to figure out the total weight of your
vehicle is to weigh it when it is fully loaded and ready for
operation. Weigh it on a commercial scale to ensure that
it is not over the GVWR.
368 STARTING AND OPERATING
Page 373 of 496
Trailer Hitch Classification
Your vehicle may be factory equipped for safe towing of
trailers weighing over 2,000 lbs (907 kg) with the optional
Trailer Tow Prep Package. See your authorized dealer for
package content.
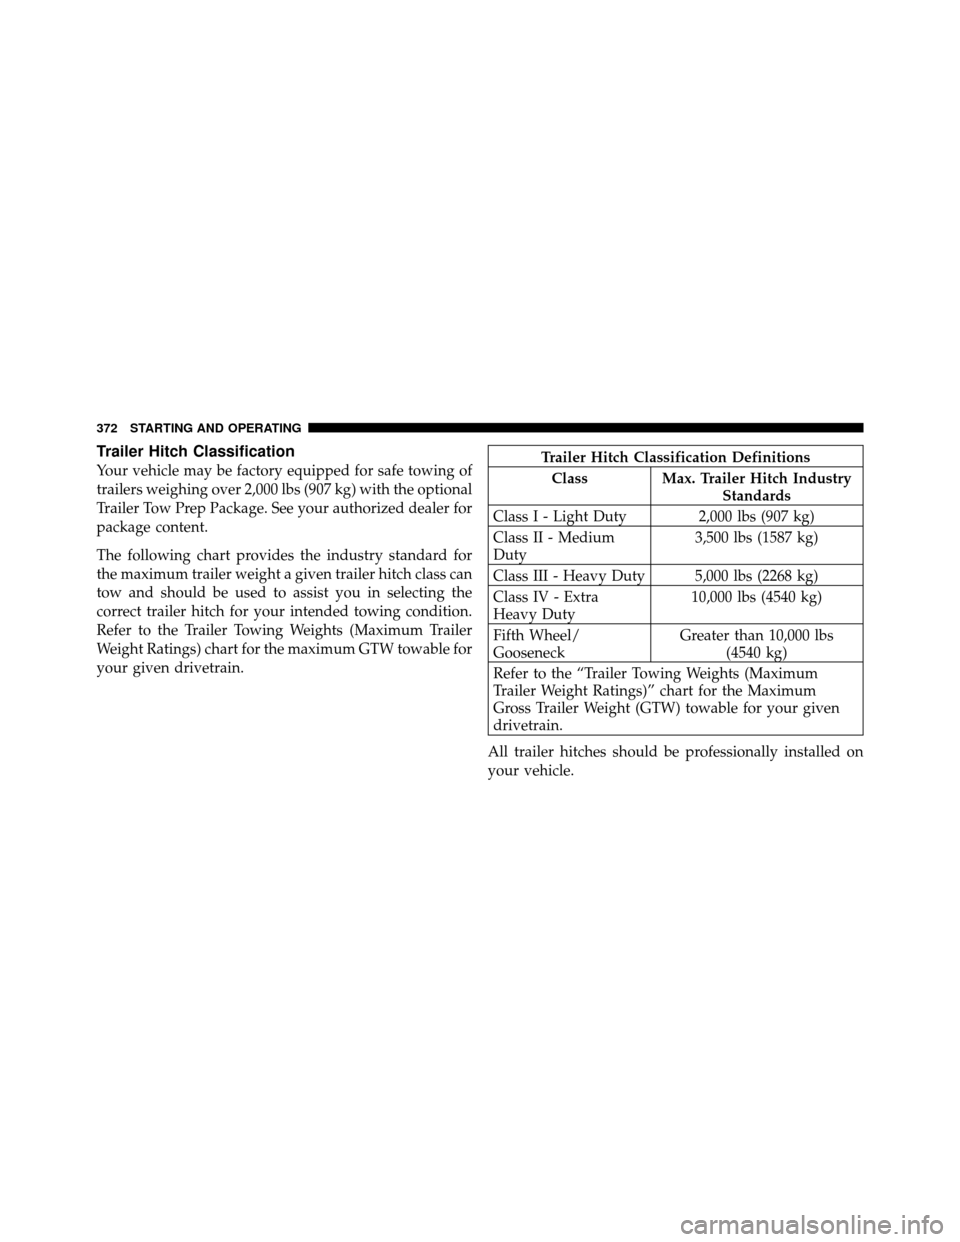
The following chart provides the industry standard for
the maximum trailer weight a given trailer hitch class can
tow and should be used to assist you in selecting the
correct trailer hitch for your intended towing condition.
Refer to the Trailer Towing Weights (Maximum Trailer
Weight Ratings) chart for the maximum GTW towable for
your given drivetrain.Trailer Hitch Classification DefinitionsClass Max. Trailer Hitch Industry Standards
Class I - Light Duty 2,000 lbs (907 kg)
Class II - Medium
Duty 3,500 lbs (1587 kg)
Class III - Heavy Duty 5,000 lbs (2268 kg)
Class IV - Extra
Heavy Duty 10,000 lbs (4540 kg)
Fifth Wheel/
Gooseneck Greater than 10,000 lbs
(4540 kg)
Refer to the “Trailer Towing Weights (Maximum
Trailer Weight Ratings)” chart for the Maximum
Gross Trailer Weight (GTW) towable for your given
drivetrain.
All trailer hitches should be professionally installed on
your vehicle.
372 STARTING AND OPERATING
Page 374 of 496
Trailer Towing Weights (Maximum Trailer Weight Ratings)
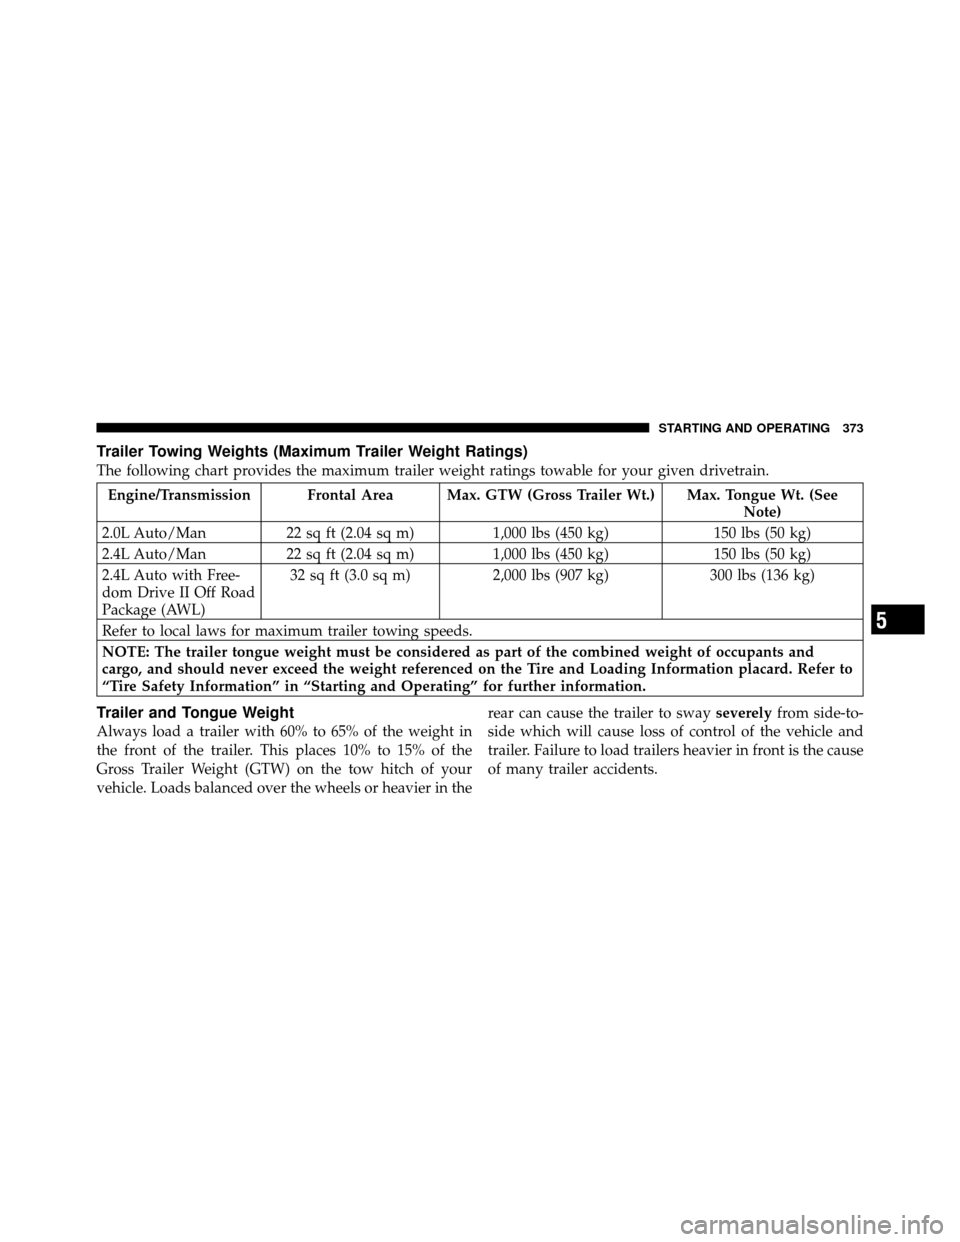
The following chart provides the maximum trailer weight ratings towable for your given drivetrain.
Engine/Transmission Frontal Area Max. GTW (Gross Trailer Wt.) Max. Tongue Wt. (SeeNote)
2.0L Auto/Man 22 sq ft (2.04 sq m) 1,000 lbs (450 kg) 150 lbs (50 kg)
2.4L Auto/Man 22 sq ft (2.04 sq m) 1,000 lbs (450 kg) 150 lbs (50 kg)
2.4L Auto with Free-
dom Drive II Off Road
Package (AWL) 32 sq ft (3.0 sq m)
2,000 lbs (907 kg) 300 lbs (136 kg)
Refer to local laws for maximum trailer towing speeds.
NOTE: The trailer tongue weight must be considered as part of the combined weight of occupants and
cargo, and should never exceed the weight referenced on the Tire and Loading Information placard. Refer to
“Tire Safety Information” in “Starting and Operating” for further information.
Trailer and Tongue Weight
Always load a trailer with 60% to 65% of the weight in
the front of the trailer. This places 10% to 15% of the
Gross Trailer Weight (GTW) on the tow hitch of your
vehicle. Loads balanced over the wheels or heavier in the rear can cause the trailer to sway
severelyfrom side-to-
side which will cause loss of control of the vehicle and
trailer. Failure to load trailers heavier in front is the cause
of many trailer accidents.
5
STARTING AND OPERATING 373
Page 377 of 496
WARNING! (Continued)
•Safety chains must always be used between your
vehicle and trailer. Always connect the chains to
the frame or hook retainers of the vehicle hitch.
Cross the chains under the trailer tongue and
allow enough slack for turning corners.
•Vehicles with trailers should not be parked on a
grade. When parking, apply the parking brake on
the tow vehicle. Put the tow vehicle automatic
transmission in PARK. Always block or�chock�
the trailer wheels.
•GCWR must not be exceeded.
•Total weight must be distributed between the tow
vehicle and the trailer such that the following four
ratings are not exceeded:
1. GVWR
2. GTW
(Continued)
WARNING! (Continued)
3. GAWR
4. Tongue weight rating for the trailer hitch utilized
(This requirement may limit the ability to always
achieve the 10% to 15% range of tongue weight as a
percentage of total trailer weight).
Towing Requirements – Tires
�
Do not attempt to tow a trailer while using a compact
spare tire.
�Proper tire inflation pressures are essential to the safe
and satisfactory operation of your vehicle. Refer to
“Tires – General Information” in “Starting and Oper-
ating” for proper tire inflation procedures.
�Check the trailer tires for proper tire inflation pres-
sures before trailer usage.
376 STARTING AND OPERATING
Page 382 of 496
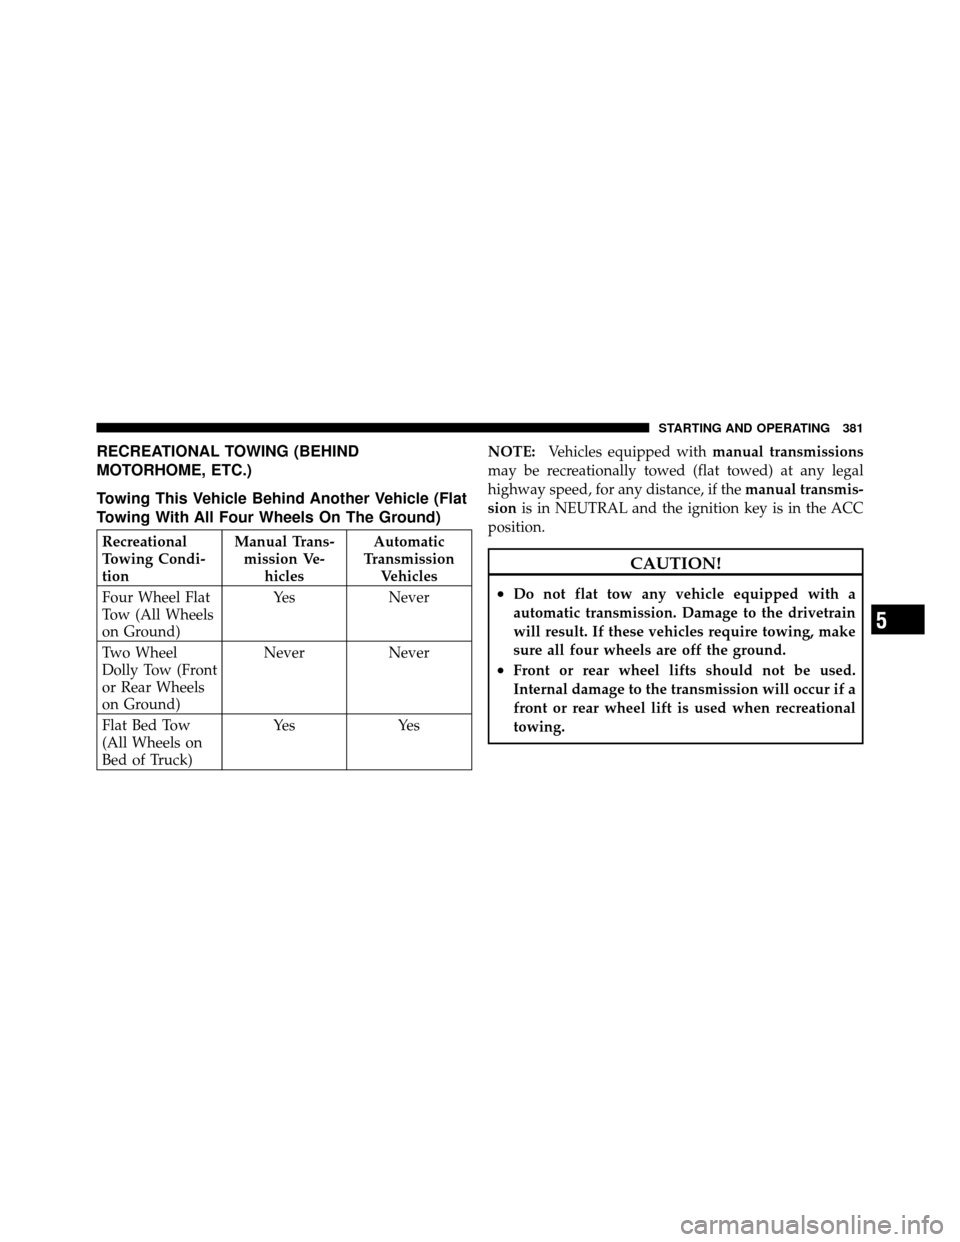
RECREATIONAL TOWING (BEHIND
MOTORHOME, ETC.)
Towing This Vehicle Behind Another Vehicle (Flat
Towing With All Four Wheels On The Ground)
Recreational
Towing Condi-
tionManual Trans-
mission Ve- hicles Automatic
Transmission Vehicles
Four Wheel Flat
Tow (All Wheels
on Ground) Yes
Never
Two Wheel
Dolly Tow (Front
or Rear Wheels
on Ground) Never
Never
Flat Bed Tow
(All Wheels on
Bed of Truck) Ye s
Ye sNOTE:
Vehicles equipped with manual transmissions
may be recreationally towed (flat towed) at any legal
highway speed, for any distance, if the manual transmis-
sion is in NEUTRAL and the ignition key is in the ACC
position.
CAUTION!
•Do not flat tow any vehicle equipped with a
automatic transmission. Damage to the drivetrain
will result. If these vehicles require towing, make
sure all four wheels are off the ground.
•Front or rear wheel lifts should not be used.
Internal damage to the transmission will occur if a
front or rear wheel lift is used when recreational
towing.
5
STARTING AND OPERATING 381
Page 388 of 496
Preparations For Jacking
1. Park the vehicle on a firm, level surface. Avoid ice or
slippery areas.
WARNING!
Do not attempt to change a tire on the side of the
vehicle close to moving traffic. Pull far enough off
the road to avoid the danger of being hit when
operating the jack or changing the wheel.
2. Set the parking brake.
3. Place the shift lever into PARK (automatic transmis-
sion) or REVERSE (manual transmission).
4. Turn OFF the ignition.
5. Turn on the Hazard Warning flasher. 6. Block both the front and rear of the
wheel diagonally opposite the jacking
position. For example, if changing the
right front tire, block the left rear
wheel.
NOTE: Passengers should not remain in the vehicle
while the vehicle is being jacked.
Jacking Instructions
WARNING!
Carefully follow these tire changing warnings to
help prevent personal injury or damage to your
vehicle:
(Continued)
6
WHAT TO DO IN EMERGENCIES 387
Page 389 of 496
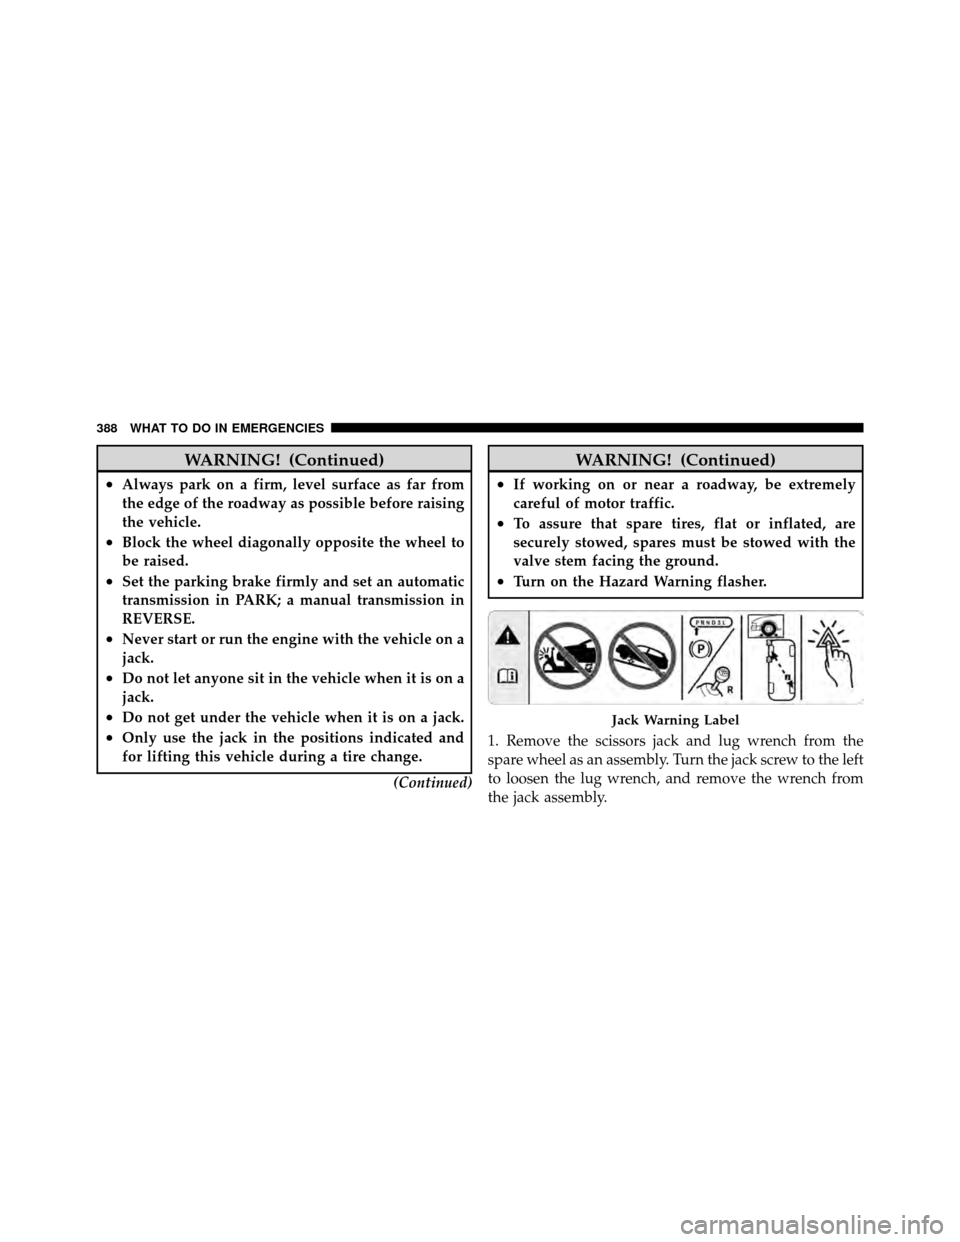
WARNING! (Continued)
•Always park on a firm, level surface as far from
the edge of the roadway as possible before raising
the vehicle.
•Block the wheel diagonally opposite the wheel to
be raised.
•Set the parking brake firmly and set an automatic
transmission in PARK; a manual transmission in
REVERSE.
•Never start or run the engine with the vehicle on a
jack.
•Do not let anyone sit in the vehicle when it is on a
jack.
•Do not get under the vehicle when it is on a jack.
•Only use the jack in the positions indicated and
for lifting this vehicle during a tire change.(Continued)
WARNING! (Continued)
•If working on or near a roadway, be extremely
careful of motor traffic.
•To assure that spare tires, flat or inflated, are
securely stowed, spares must be stowed with the
valve stem facing the ground.
•Turn on the Hazard Warning flasher.
1. Remove the scissors jack and lug wrench from the
spare wheel as an assembly. Turn the jack screw to the left
to loosen the lug wrench, and remove the wrench from
the jack assembly.
Jack Warning Label
388 WHAT TO DO IN EMERGENCIES
Page 390 of 496
2. Loosen, but do not remove, the wheel nuts by turning
them to the left one turn while the wheel is still on the
ground.CAUTION!
Do not attempt to raise the vehicle by jacking on
locations other than those indicated in Step 3.
3. There are two front jacking locations and two rear
jacking locations on each side of the body. The front
locations are outlined by two triangular cutouts, the rear
ones by two rectangular cutouts. For vehicles equipped
with plastic trim, the plastic has been cut away to expose
the jacking locations in the body.
Do not raise the vehicle until you are sure the jack is
securely engaged.
4. Turn the jack screw to the left until the jack can be
placed under the jacking location. Once the jack is
positioned, turn the jack screw to the right until the jack
Jacking Locations
6
WHAT TO DO IN EMERGENCIES 389