Page 267 of 522
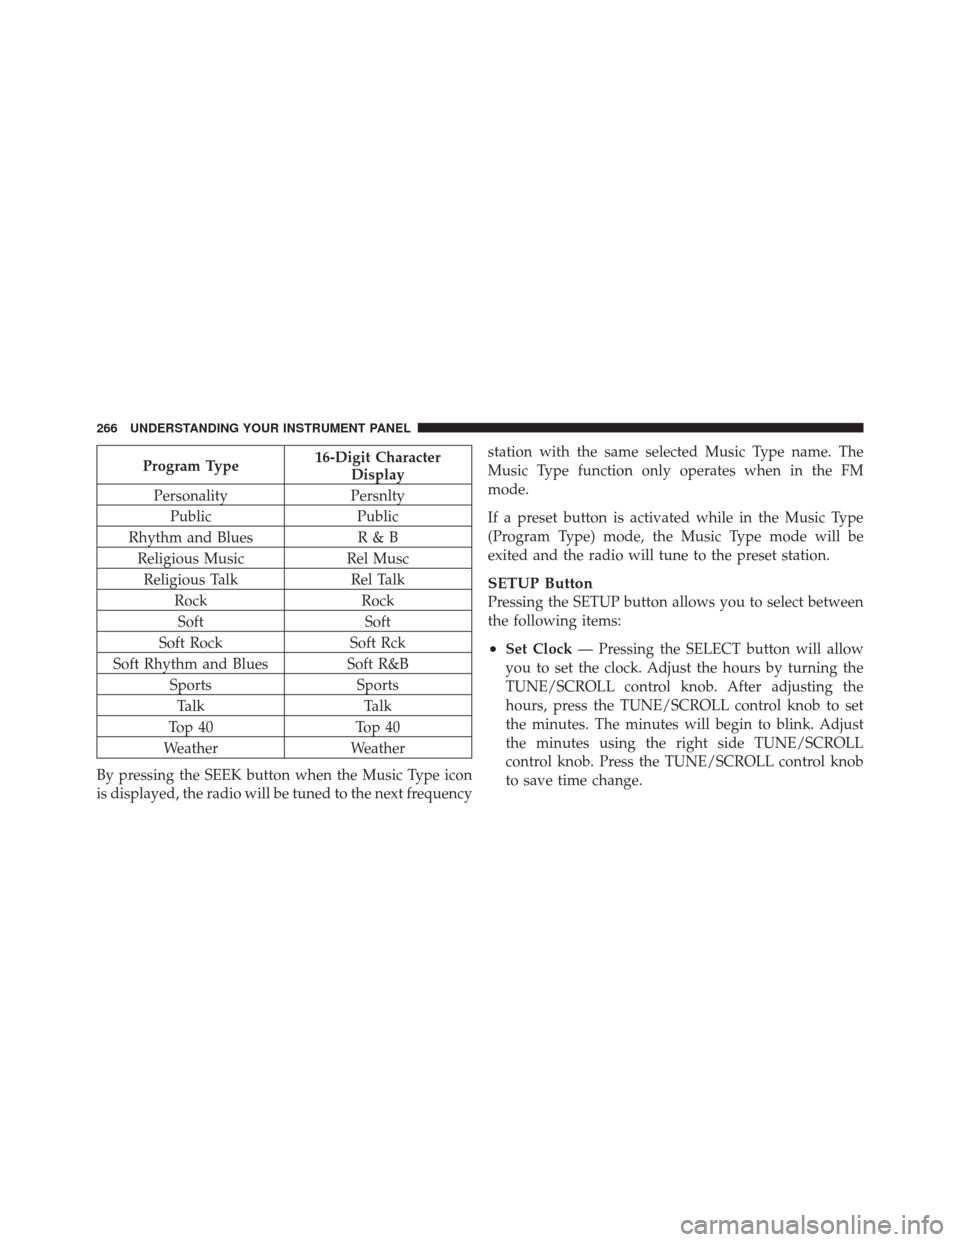
Program Type16-Digit Character
Display
Personality Persnlty
Public Public
Rhythm and Blues R & B
Religious Music Rel Musc
Religious Talk Rel Talk
Rock Rock
Soft Soft
Soft Rock Soft Rck
Soft Rhythm and Blues Soft R&B
Sports Sports
Talk Talk
Top 40 Top 40
Weather Weather
By pressing the SEEK button when the Music Type icon
is displayed, the radio will be tuned to the next frequency station with the same selected Music Type name. The
Music Type function only operates when in the FM
mode.
If a preset button is activated while in the Music Type
(Program Type) mode, the Music Type mode will be
exited and the radio will tune to the preset station.
SETUP Button
Pressing the SETUP button allows you to select between
the following items:
•Set Clock
— Pressing the SELECT button will allow
you to set the clock. Adjust the hours by turning the
TUNE/SCROLL control knob. After adjusting the
hours, press the TUNE/SCROLL control knob to set
the minutes. The minutes will begin to blink. Adjust
the minutes using the right side TUNE/SCROLL
control knob. Press the TUNE/SCROLL control knob
to save time change.
266 UNDERSTANDING YOUR INSTRUMENT PANEL
Page 270 of 522
If you have ejected a disc and have not removed it within
10 seconds, it will be reloaded. If the CD is not removed,
the radio will reinsert the CD but will not play it.
A disc can be ejected with the radio and ignition OFF.
NOTE:Ejecting with the ignition OFF is not allowed on
convertible or soft-top models (if equipped).
SEEK Button
Press the right SEEK button for the next selection on the
CD. Press the left SEEK button to return to the beginning
of the current selection, or return to the beginning of the
previous selection if the CD is within the first second of
the current selection. Pressing and holding the SEEK
button will allow faster scrolling through the tracks in
CD and MP3 modes.
TIME Button
Press this button to change the display from a large CD
playing time display to a small CD playing time display.
RW/FF
Press and hold FF (Fast Forward) and the CD player will
begin to fast forward until FF is released or RW or
another CD button is pressed. The RW (Reverse) button
works in a similar manner.
AM/FM Button
Press the button to select either AM or FM mode.
SET/RND Button (Random Play Button)
Press this button while the CD is playing to activate
Random Play. This feature plays the selections on the
compact disc in random order to provide an interesting
change of pace.
Press the right SEEK button to move to the next ran-
domly selected track.
Press the SET/RND button a second time to stop Ran-
dom Play.
4
UNDERSTANDING YOUR INSTRUMENT PANEL 269
Page 274 of 522
Press and hold the INFO button again for three seconds
to return to�elapsed time� display.
Operation Instructions - Auxiliary Mode
The auxiliary (AUX) jack is an audio input jack which
allows the user to plug in a portable device such as an
MP3 player or cassette player and utilize the vehicle’s
audio system to amplify the source and play through the
vehicle speakers.
Pressing the AUX button will change the mode to auxil-
iary device if the AUX jack is connected.
NOTE:The AUX device must be turned on and the
device’s volume set to the proper level. If the AUX audio
is not loud enough, turn the device’s volume up. If the
AUX audio sounds distorted, turn the device’s volume
down.
TIME Button (Auxiliary Mode)
Press this button to change the display to time of day. The
time of day will display for five seconds (when the
ignition is OFF).
Operating Instructions - uconnect™ phone (If
Equipped)
Refer to “uconnect™ phone” in Section 3.
Operating Instructions - uconnect™ studios
(Satellite Radio) (If Equipped)
Refer to “uconnect™ studios (Satellite Radio)” in this
section.
uconnect™ studios (SATELLITE RADIO) — IF
EQUIPPED (REN/REQ/RER/RES/REU RADIOS
ONLY)
Satellite radio uses direct satellite-to-receiver broadcast-
ing technology to provide clear digital sound, coast to
coast. The subscription service provider is Sirius Satellite
Radio. This service offers over 130 channels of music,
4
UNDERSTANDING YOUR INSTRUMENT PANEL 273
Page 279 of 522
SETUP Button
Pressing the SETUP button allows you to select the
following items:
•Display Sirius ID number — Press the AUDIO/
SELECT button to display the Sirius ID number. This
number is used to activate, deactivate, or change the
Sirius subscription.
SET Button – To Set the Pushbutton Memory
When you are receiving a channel that you wish to
commit to pushbutton memory, press the SET button.
The symbol SET 1 will now show in the display window.
Select the button (1-6) you wish to lock onto this channel
and press and release that button. If a button is not
selected within five seconds after pressing the SET but-
ton, the channel will continue to play but will not be
stored into pushbutton memory.You may add a second channel to each pushbutton by
repeating the above procedure with this exception: Press
the SET button twice and SET 2 will show in the display
window. Each button can be set for SET 1 and SET 2. This
allows a total of 12 Satellite channels to be stored into
pushbutton memory. The channels stored in SET 2
memory can be selected by pressing the pushbutton
twice.
Every time a preset button is used, a corresponding
button number will display.
Buttons1-6
These buttons tune the radio to the channels that you
commit to pushbutton memory (12 Satellite stations).
278 UNDERSTANDING YOUR INSTRUMENT PANEL
Page 281 of 522
•Press the button in the center of the switch to change
modes (i.e., AM, FM, etc.).
Left-Hand Switch Functions for Radio Operation
•
Press the top of the switch to SEEK the next listenable
station up from the current setting.
•Press the bottom of the switch to SEEK the next
listenable station down from the current setting.
•Press the button in the center of the switch to tune to
the next preset that you have programmed.
Left-Hand Switch Functions for Media (i.e., CD)
Operation
•
Press the top of the switch once to listen to the next
track.
•Press the bottom of the switch once either to listen to
the beginning of the current track or to listen to thebeginning of the previous track if it is within one
second after the current track begins to play.
•Press the switch up or down twice to listen to the
second track, three times to listen to the third track,
and so forth.
•Press the button located in the center of the switch to
change to the next preset that you have programmed.
CD/DVD MAINTENANCE
To keep a CD/DVD in good condition, take the following
precautions:
1. Handle the disc by its edge; avoid touching the
surface.
2. If the disc is stained, clean the surface with a soft cloth,
wiping from center to edge.
3. Do not apply paper or tape to the disc; avoid scratch-
ing the disc.
280 UNDERSTANDING YOUR INSTRUMENT PANEL
Page 335 of 522
Electronic Roll Mitigation (ERM)
This system anticipates the potential for wheel lift by
monitoring the driver ’s steering wheel input and the
speed of the vehicle. When ERM determines that the rate
of change of the steering wheel angle and vehicle’s speed
are sufficient to potentially cause wheel lift, it then
applies the appropriate brake and may also reduce
engine power to lessen the chance that wheel lift will
occur. ERM will only intervene during very severe or
evasive driving maneuvers. ERM can only reduce the
chance of wheel lift occurring during severe or evasive
driving maneuvers. It cannot prevent wheel lift due to
other factors, such as road conditions, leaving the road-
way, or striking objects or other vehicles.
NOTE:ERM is disabled anytime the ESC is in “Full Off”
mode. Refer to Electronic Stability Control (ESC) for a
complete explanation of the available ESC modes.WARNING!
Many factors, such as vehicle loading, road condi-
tions, and driving conditions, influence the chance
that wheel lift or rollover may occur. Electronic Roll
Mitigation (ERM) cannot prevent all wheel lift or
rollovers, especially those that involve leaving the
roadway or striking objects or other vehicles. Only a
safe, attentive, and skillful driver can prevent acci-
dents. The capabilities of an ERM-equipped vehicle
must never be exploited in a reckless or dangerous
manner, which could jeopardize the user’s safety or
the safety of others.
Hill Start Assist (HSA)
The HSA system is designed to help the driver accelerate
the vehicle from a complete stop while on an incline. If
the driver releases the brake while stopped on an incline,
HSA will continue to hold the brake pressure for a short
334 STARTING AND OPERATING
Page 426 of 522
CAUTION!
Overfilling or underfilling the crankcase will cause
aeration or loss of oil pressure. This could damage
your engine.
Change Engine Oil
The oil change indicator system will remind you that it is
time to take your vehicle in for scheduled maintenance.
Refer to the “Maintenance Schedule” in Section 8 for
information on this system.
NOTE: Under no circumstances should oil change
intervals exceed 6,000 miles (10 000 km) or six months,
whichever occurs first.
Engine Oil Selection
For best performance and maximum protection under all
types of operating conditions, the manufacturer recom-
mends engine oils that are API Certified and meet the
requirements of Chrysler Material Standard MS-6395.
American Petroleum Institute (API) Engine Oil
Identification Symbol
This symbol means that the oil has
been certified by the American
Petroleum Institute (API). The
manufacturer only recommends
API Certified engine oils.
7
MAINTAINING YOUR VEHICLE 425
Page 434 of 522

Exhaust System
The best protection against carbon monoxide entry into
the vehicle body is a properly maintained engine exhaust
system.
If you notice a change in the sound of the exhaust system
or if the exhaust fumes can be detected inside the vehicle,
or when the underside or rear of the vehicle is damaged,
have an authorized technician inspect the complete ex-
haust system and adjacent body areas for broken, dam-
aged, deteriorated, or mispositioned parts. Open seams
or loose connections could permit exhaust fumes to seep
into the passenger compartment. In addition, inspect the
exhaust system each time the vehicle is raised for lubri-
cation or oil change. Replace as required.WARNING!
Exhaust gases can injure or kill. They contain carbon
monoxide (CO) which is colorless and odorless.
Breathing it can make you unconscious and can
eventually poison you. To avoid breathing CO Refer
to “Exhaust Gas” in the “Safety Tips” section of this
manual.
CAUTION!
The catalytic converter requires the use of unleaded
fuel only. Leaded gasoline will destroy the effective-
ness of the catalyst as an emissions control device
and may seriously reduce engine performance and
cause serious damage to the engine.
7
MAINTAINING YOUR VEHICLE 433