2010 JEEP GRAND CHEROKEE steering
[x] Cancel search: steeringPage 3 of 84

INTRODUCTION/WELCOME
WELCOME FROM
CHRYSLER GROUP LLC.......... 2
CONTROLS AT A GLANCE
DRIVER COCKPIT.............. 4
INSTRUMENT CLUSTER .......... 6
GETTING STARTED
KEYFOB .................. 8
THEFT ALARM............... 9
SEAT BELT ................. 9
CHILD RESTRAINTS ............10
FRONT SEATS ...............11
REAR SEATS ................14
TILT / TELESCOPING STEERING
COLUMN ..................15
ADJUSTABLE PEDALS ...........16
PROGRAMMABLE FEATURES .......17
OPERATING YOUR VEHICLE
TURN SIGNAL/LIGHTS LEVER .......18
WIPER/WASHER LEVER ..........19
SPEED CONTROL LEVER .........20
ELECTRONIC RANGE SELECTION (ERS) . 21
MANUAL CLIMATE CONTROLS ......22
AUTOMATIC TEMPERATURE
CONTROLS (ATC) ..............22
PARKSENSE
®REAR PARK ASSIST ....23
PARKVIEW®REAR BACK-UP CAMERA . . 23
LIFTGATE FLIPPER GLASS ........23
POWER SUNROOF .............24
WIND BUFFETING .............25
ELECTRONICS
NON-TOUCH-SCREEN RADIOS ......26
TOUCH-SCREEN RADIOS .........28
REMOTE AUDIO CONTROLS ........32
ELECTRONIC VEHICLE INFORMATION
CENTER (EVIC) ...............33
UNIVERSAL GARAGE DOOR OPENER . . . 33
POWER INVERTER .............35
POWER OUTLET ..............35
UCONNECT™ PHONE ...........36
VOICE COMMAND .............38
OFF-ROAD CAPABILITIES
FOUR-WHEEL DRIVE OPERATION .....39
UTILITY
INTERIOR STORAGE COMPARTMENTS . . 41
TRAILER TOWING WEIGHTS (MAXIMUM
TRAILER WEIGHT RATINGS)........42
RECREATIONAL TOWING (BEHIND
MOTORHOME, ETC.) ............43
BRAKE/TRANSMISSION INTERLOCK
MANUAL OVERRIDE ............44
WHAT TO DO IN EMERGENCIES
24 HOUR TOWING ASSISTANCE -
U.S. ONLY..................45
INSTRUMENT CLUSTER WARNING
LIGHTS ...................45
IF YOUR ENGINE OVERHEATS .......47
JACKING AND TIRE CHANGING ......48
JUMP-STARTING ..............53
EMERGENCY TOW HOOKS .........55
TOWING A DISABLED VEHICLE ......57
EVENT DATA RECORDER (EDR) ......58
MAINTAINING YOUR VEHICLE
OPENING THE HOOD............59
ENGINE COMPARTMENT .........60
FLUIDS AND CAPACITIES .........63
MAINTENANCE CHART ..........66
FUSES ...................68
TIRE PRESSURES .............73
WHEEL AND WHEEL TRIM CARE .....74
EXTERIOR BULBS .............74
CONSUMER ASSISTANCE
CHRYSLER GROUP LLC CUSTOMER
CENTER...................75
CHRYSLER CANADA INC. CUSTOMER
CENTER ...................75
ASSISTANCE FOR THE HEARING
IMPAIRED ..................75
PUBLICATIONS ORDERING ........75
REPORTING SAFETY DEFECTS IN
THE 50 UNITED STATES AND
WASHINGTON, D.C. ............76
TIRE WARRANTY ..............76
MOPAR ACCESSORIES
MOPAR®ACCESSORIES..........79
TABLE OF CONTENTS
Page 17 of 84

Second Row Heated Seats
• Second row heated seat switches are locatedon the rear of the center console.
• Press the switch once to select High-level heating. Press the switch a second time to
select Low-level heating. Press the switch a
third time to shut the heating elements Off.
WARNING!
• Persons who are unable to feel pain to the skin because of advanced age, chronic illness, diabetes, spinal cord injury, medication, alcohol use, exhaustion or other
physical conditions must exercise care when using the seat heater. It may cause
burns even at low temperatures, especially if used for long periods of time.
• Do not place anything on the seat that insulates against heat, such as a blanket or cushion. This may cause the seat heater to overheat. Sitting in a seat that has
been overheated could cause serious burns due to the increased surface
temperature of the seat.
CAUTION!
Repeated overheating of the seat could damage the heating element and/or degrade
the material of the seat.
TILT / TELESCOPING STEERING COLUMN
• The tilt/telescoping control lever is locatedbelow the steering wheel at the end of the
steering column.
• Push down on the lever to unlock the steering column.
• To tilt the steering column, move the steering wheel upward or downward as desired. To
lengthen or shorten the steering column, pull
the steering wheel outward or push it inward
as desired.
15
GETTING STARTED
Page 18 of 84

• Pull upward on the lever to lock the column firmly in place.
WARNING!
Do not adjust the steering wheel while driving. The tilt/telescoping adjustment must
be locked while driving. Adjusting the steering wheel while driving or driving without
the tilt/telescoping adjustment locked could cause the driver to lose control of the
vehicle. Failure to follow this warning may result in serious injury or death.
ADJUSTABLE PEDALS
• The adjustable pedal switch is located on theleft side of the instrument panel.
• Press the bottom of the switch to move the brake and accelerator pedals away from the
driver. Press the top of the switch to move the
pedals closer to the driver.
NOTE: The pedals cannot be adjusted when
the vehicle is in REVERSE or when the
Electronic Speed Control is set.
WARNING!
Do not adjust the pedals while the vehicle is moving. You could lose control and have
an accident. Always adjust the pedals while the vehicle is parked.
CAUTION!
Do not place any article under the adjustable pedals or impede its ability to move, as
it may cause damage to the pedal controls. Pedal travel may become limited if
movement is stopped by an obstruction in the adjustable pedal’s path.
GETTING STARTED
16
Page 34 of 84

Change Stored Home Address
• Press the MENU hard-key, then touch the MY FILES soft-key.
• Touch the MY ADDRESS BOOK soft-key, then touch the HOME soft-key.
• In the Home Address Information screen, touch the EDIT CONTACT soft-key, then touchthe CHANGE ADDRESS soft-key in the next screen.
• Touch the INPUT STREET NAME soft-key and enter your street name into the speller.
• Touch the CONTINUE soft-key and enter your address into the speller; touch the CONTINUE soft-key again.
• Touch the city name and touch the SAVE soft-key to complete programming.
Guide Me Home
• Press the NAV hard-key to access the Navigation Main Menu.
• Touch the GUIDE ME HOME soft-key to route you back to your home destination from your current location. Touch the GO soft-key to start your trip.
Map
• Press the NAV hard-key to access the Navigation Main Menu.
• Touch the MAP soft-key to display a map of your current position.
REMOTE AUDIO CONTROLS
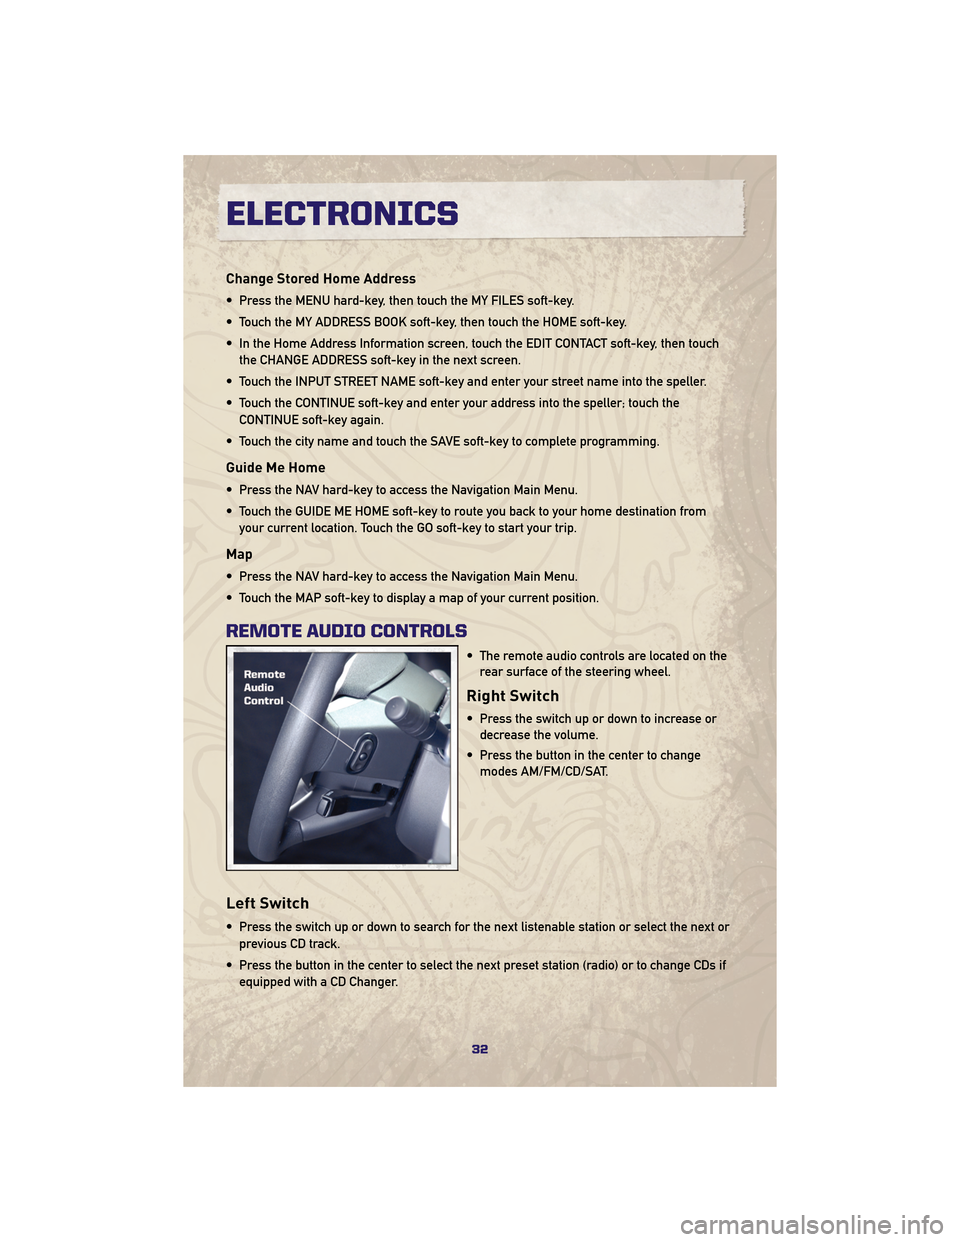
• The remote audio controls are located on therear surface of the steering wheel.
Right Switch
• Press the switch up or down to increase ordecrease the volume.
• Press the button in the center to change modes AM/FM/CD/SAT.
Left Switch
• Press the switch up or down to search for the next listenable station or select the next or
previous CD track.
• Press the button in the center to select the next preset station (radio) or to change CDs if equipped with a CD Changer.
ELECTRONICS
32
Page 35 of 84

ELECTRONIC VEHICLE INFORMATION CENTER (EVIC)
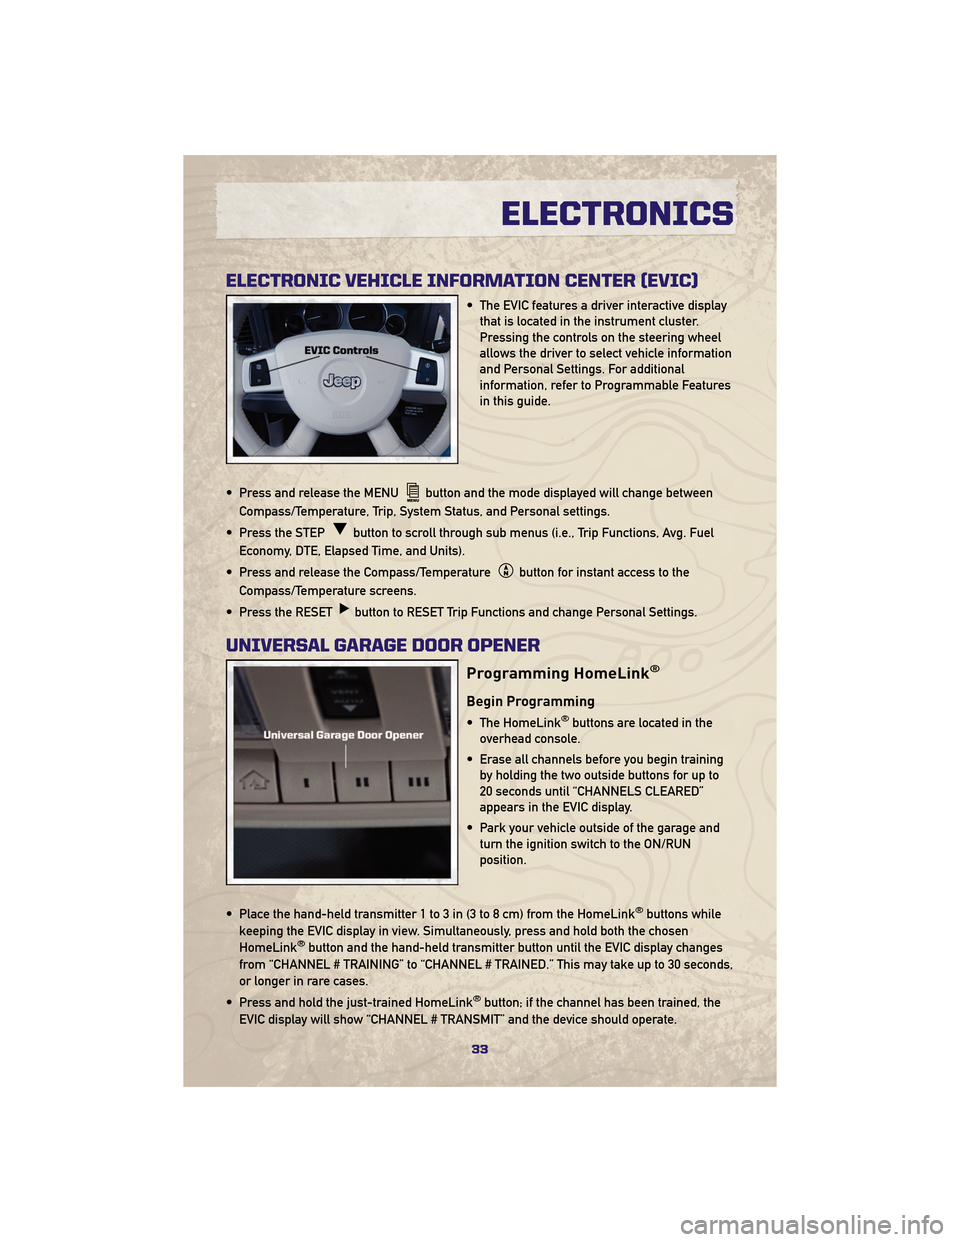
• The EVIC features a driver interactive displaythat is located in the instrument cluster.
Pressing the controls on the steering wheel
allows the driver to select vehicle information
and Personal Settings. For additional
information, refer to Programmable Features
in this guide.
• Press and release the MENU
button and the mode displayed will change between
Compass/Temperature, Trip, System Status, and Personal settings.
• Press the STEP
button to scroll through sub menus (i.e., Trip Functions, Avg. Fuel
Economy, DTE, Elapsed Time, and Units).
• Press and release the Compass/Temperature
button for instant access to the
Compass/Temperature screens.
• Press the RESET
button to RESET Trip Functions and change Personal Settings.
UNIVERSAL GARAGE DOOR OPENER
Programming HomeLink®
Begin Programming
• The HomeLink®buttons are located in the
overhead console.
• Erase all channels before you begin training by holding the two outside buttons for up to
20 seconds until “CHANNELS CLEARED”
appears in the EVIC display.
• Park your vehicle outside of the garage and turn the ignition switch to the ON/RUN
position.
• Place the hand-held transmitter 1 to 3 in (3 to 8 cm) from the HomeLink
®buttons while
keeping the EVIC display in view. Simultaneously, press and hold both the chosen
HomeLink
®button and the hand-held transmitter button until the EVIC display changes
from “CHANNEL # TRAINING” to “CHANNEL # TRAINED.” This may take up to 30 seconds,
or longer in rare cases.
• Press and hold the just-trained HomeLink
®button; if the channel has been trained, the
EVIC display will show “CHANNEL # TRANSMIT” and the device should operate.
33
ELECTRONICS
Page 61 of 84

OPENING THE HOOD
• Pull the hood release lever located below the steering wheel at the base of theinstrument panel.
• Reach into the opening beneath the center of the hood and move the safety latch lever while lifting the hood at the same time.
WARNING!
Be sure the hood is fully latched before driving your vehicle. If the hood is not fully
latched, it could open when the vehicle is in motion and block your vision. Failure to
follow this warning could result in serious injury or death.
59
MAINTAINING YOUR VEHICLE
Page 67 of 84

ComponentFluid, Lubricant, or
Genuine PartCapacities
Brake Master Cylinder MOPAR
®DOT 3 and SAE
J1703 should be used or
equivalent. If DOT 3 is not
available, then DOT 4 is
acceptable. Use only
recommended brake
fluids. —
Power Steering Reservoir MOPAR
®Hydraulic System
Power Steering Fluid or
equivalent, meeting the
requirements of Chrysler
Material Standard
MS-10838. —
65
MAINTAINING YOUR VEHICLE
Page 71 of 84

• The Integrated Power Module (IPM) is located in the engine compartment near thebattery. This center contains cartridge fuses, mini-fuses and relays.
Cavity Cartridge
Fuse Mini-Fuse
Description
8 10 Amp Red Lt Park Lamps
9 10 Amp Red Trailer-Tow Park Lamps
10 10 Amp Red Rt Park Lamps
12 20 Amp Yellow Front Control Module (FCM) Batt #4
13 20 Amp Yellow Front Control Module (FCM) Batt #2
14 20 Amp Yellow Adjustable Pedal
15 20 Amp Yellow Ft Fog Lamps
16 20 Amp Yellow Horn
17 20 Amp Yellow Rear Fog Lamps (Export Only)
18 20 Amp Yellow Front Control Module (FCM) Batt #1
19 20 Amp Yellow Lt Trailer-Tow Stop/Turn
20 20 Amp Yellow Front Control Module (FCM) Batt #3
21 20 Amp Yellow Rt Trailer-Tow Stop/Turn
22 30 Amp Pink Final Drive Control Module (FDCM) MOD
23 50 Amp Red Radiator Fan
27 15 Amp Blue Ignition Off Draw (IOD) #1 — Intrusion
Module, Satellite Video, Steering Control
Module
28 20 Amp Yellow Ignition Off Draw (IOD) #2 — Radio
29 10 Amp Red Occupant Restraint Controller (ORC) R/S
30 10 Amp Red Occupant Restraint Controller (ORC) R/O
69
MAINTAINING YOUR VEHICLE