2010 JEEP GRAND CHEROKEE reset
[x] Cancel search: resetPage 16 of 84
CAUTION!
Repeated overheating of the seat could damage the heating element and/or degrade
the material of the seat.
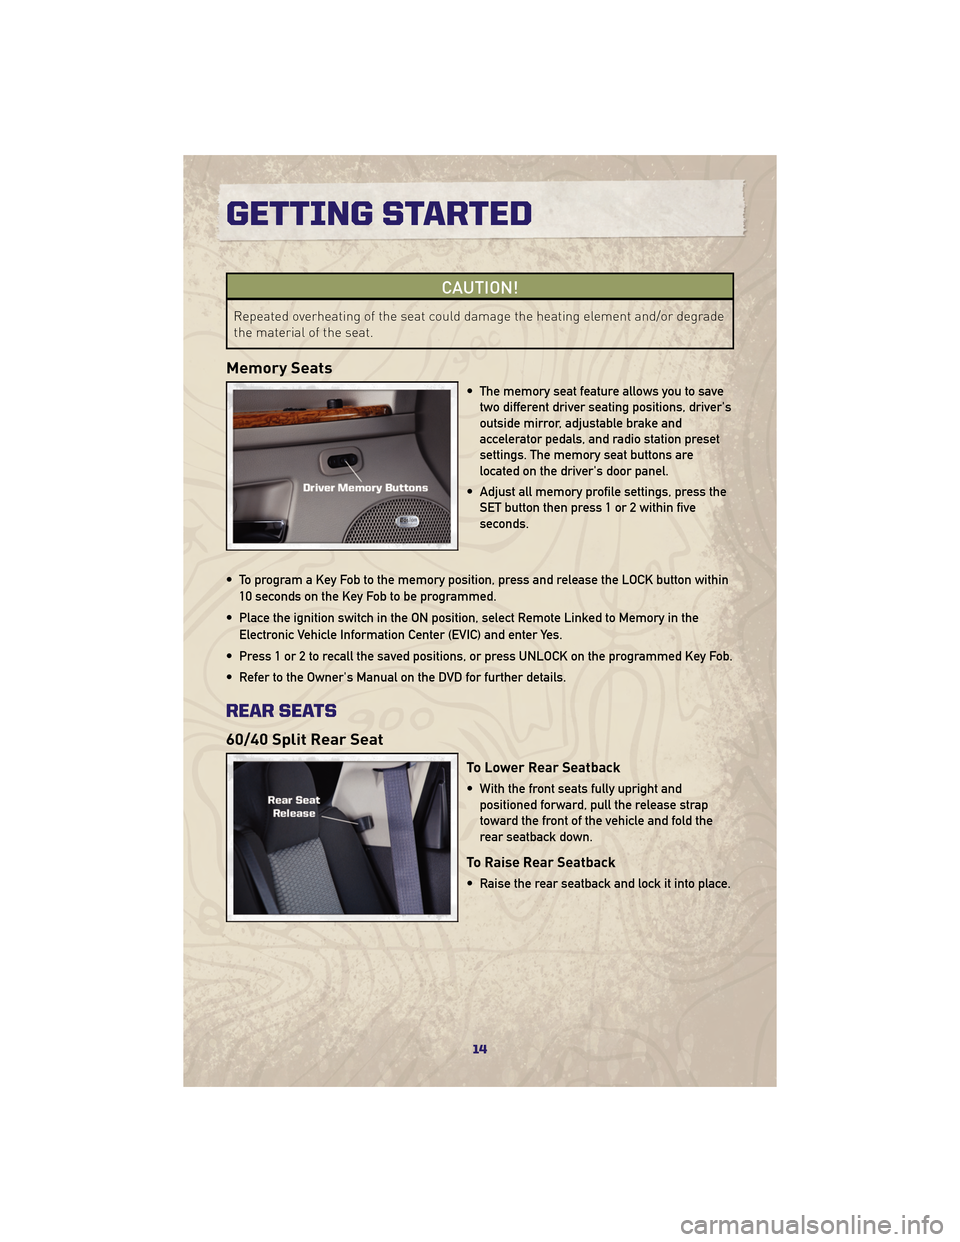
Memory Seats
• The memory seat feature allows you to savetwo different driver seating positions, driver's
outside mirror, adjustable brake and
accelerator pedals, and radio station preset
settings. The memory seat buttons are
located on the driver's door panel.
• Adjust all memory profile settings, press the SET button then press 1 or 2 within five
seconds.
• To program a Key Fob to the memory position, press and release the LOCK button within 10 seconds on the Key Fob to be programmed.
• Place the ignition switch in the ON position, select Remote Linked to Memory in the Electronic Vehicle Information Center (EVIC) and enter Yes.
• Press 1 or 2 to recall the saved positions, or press UNLOCK on the programmed Key Fob.
• Refer to the Owner's Manual on the DVD for further details.
REAR SEATS
60/40 Split Rear Seat
To Lower Rear Seatback
• With the front seats fully upright and positioned forward, pull the release strap
toward the front of the vehicle and fold the
rear seatback down.
To Raise Rear Seatback
• Raise the rear seatback and lock it into place.
GETTING STARTED
14
Page 29 of 84
NOTE:Uconnect™ Phone and Voice Command are vehicle options which must be ordered
separately. The buttons on the radio will only be active if the vehicle has been equipped with
the option.
• The radio sales code is located on the lower right side of the radio faceplate.
• Unless otherwise noted, the information provided on the operation and functionality of the radios in this section is common to all non-touch-screen radios.
Seek Up/Down Buttons
• Press to seek through radio stations in AM, FM, or SAT bands. Seek through tracks in CD.
• Holding either button will bypass stations without stopping.
Audio Settings
• Press the TUNE/SCROLL control knob and BASS, MID, TREBLE, BALANCE and FADE willdisplay. Rotate the TUNE/SCROLL control knob to select the desired setting.
Auxiliary Mode
• The auxiliary (AUX) jack allows a portable device, such as an MP3 player or a cassetteplayer, to be plugged into the radio and utilize the vehicle’s audio system to amplify the
source and play through the vehicle speakers.
• Pressing the AUX button will change the mode to auxiliary device if the AUX jack is connected.
• The control of the external device cannot be provided by the radio; use the device controls instead.
Clock Setting
• Press and hold the TIME button until the hours blink; turn the TUNE/SCROLL controlknob to set the hours.
• Press the TUNE/SCROLL control knob until the minutes begin to blink; turn the TUNE/SCROLL control knob to set the minutes.
• Press the TUNE/SCROLL control knob to save the time change.
• To exit, press any button/knob or wait five seconds.
Station Presets
• Press the SET/RND button once and SET 1 will show in the display. Then select the button (1–6).
• A second station may be added to each push button. Press the SET/RND button twice and SET 2 will show in the display, then select button (1–6).
27
ELECTRONICS
Page 32 of 84

• To adjust the hours, touch either the HOUR FORWARD or HOUR BACKWARD soft-key.
• To adjust the minutes, touch either the MINUTE FORWARD or MINUTE BACKWARDsoft-key.
• To save the new time setting, touch the screen where the word “Save” is displayed.
Store Radio Presets
• For REN and RER: Press the RADIO/MEDIA hard-key repeatedly until AM FM SAT is displayed in the upper left corner of the screen.
• For RBZ: Press the RADIO hard-key to display AM FM SAT in the upper left corner of the screen.
• Select the radio band by touching either the AM, FM, or SAT soft-key.
• Find the station to store by either pressing the SEEK UP/DOWN hard-key (REN and RER), touching the right and left arrow soft-keys (RBZ), touching the SCAN soft-key, or by using
the DIRECT TUNE soft-key.
• Once the station is found, touch and hold one of the PRESET soft-keys in the list to the right, until you hear a confirmation beep.
Hard Disk Drive Operation
Copy Complete Audio Disc To Hard-Drive
• Press the OPEN/CLOSE hard-key (REN and RER) or LOAD hard-key (RBZ) and insert adisc, then press the MENU hard-key.
• Touch the MY FILES soft-key, then select MY MUSIC.
• Touch the IMPORT MUSIC soft-key, then touch the FROM DISC soft-key in the next screen to start the process.
Copying From USB
• Insert a USB device, then select MY MUSIC.
• Touch the IMPORT MUSIC FILES soft-key, then touch the FROM USB soft-key in the nextscreen.
• Select the folders or titles you would like to copy, then touch the DONE soft-key to start the copy process.
Copy Pictures To The Hard-Drive
• Insert either a CD or a USB device containing your pictures.
• Touch the MY FILES soft-key, then go to the MANAGE MY FILES screen.
• Touch the MY PICTURES soft-key to get an overview of the currently stored images.
• Touch one of the ADD PICTURES soft-keys, then select the type of media inserted.
• Use the PAGE soft-keys to page through a list of pictures and press the picture you wouldlike to import.
• Confirm your selection by touching the YES soft-key. The imported picture is now available in the MANAGE MY PICTURES screen.
ELECTRONICS
30
Page 34 of 84
Change Stored Home Address
• Press the MENU hard-key, then touch the MY FILES soft-key.
• Touch the MY ADDRESS BOOK soft-key, then touch the HOME soft-key.
• In the Home Address Information screen, touch the EDIT CONTACT soft-key, then touchthe CHANGE ADDRESS soft-key in the next screen.
• Touch the INPUT STREET NAME soft-key and enter your street name into the speller.
• Touch the CONTINUE soft-key and enter your address into the speller; touch the CONTINUE soft-key again.
• Touch the city name and touch the SAVE soft-key to complete programming.
Guide Me Home
• Press the NAV hard-key to access the Navigation Main Menu.
• Touch the GUIDE ME HOME soft-key to route you back to your home destination from your current location. Touch the GO soft-key to start your trip.
Map
• Press the NAV hard-key to access the Navigation Main Menu.
• Touch the MAP soft-key to display a map of your current position.
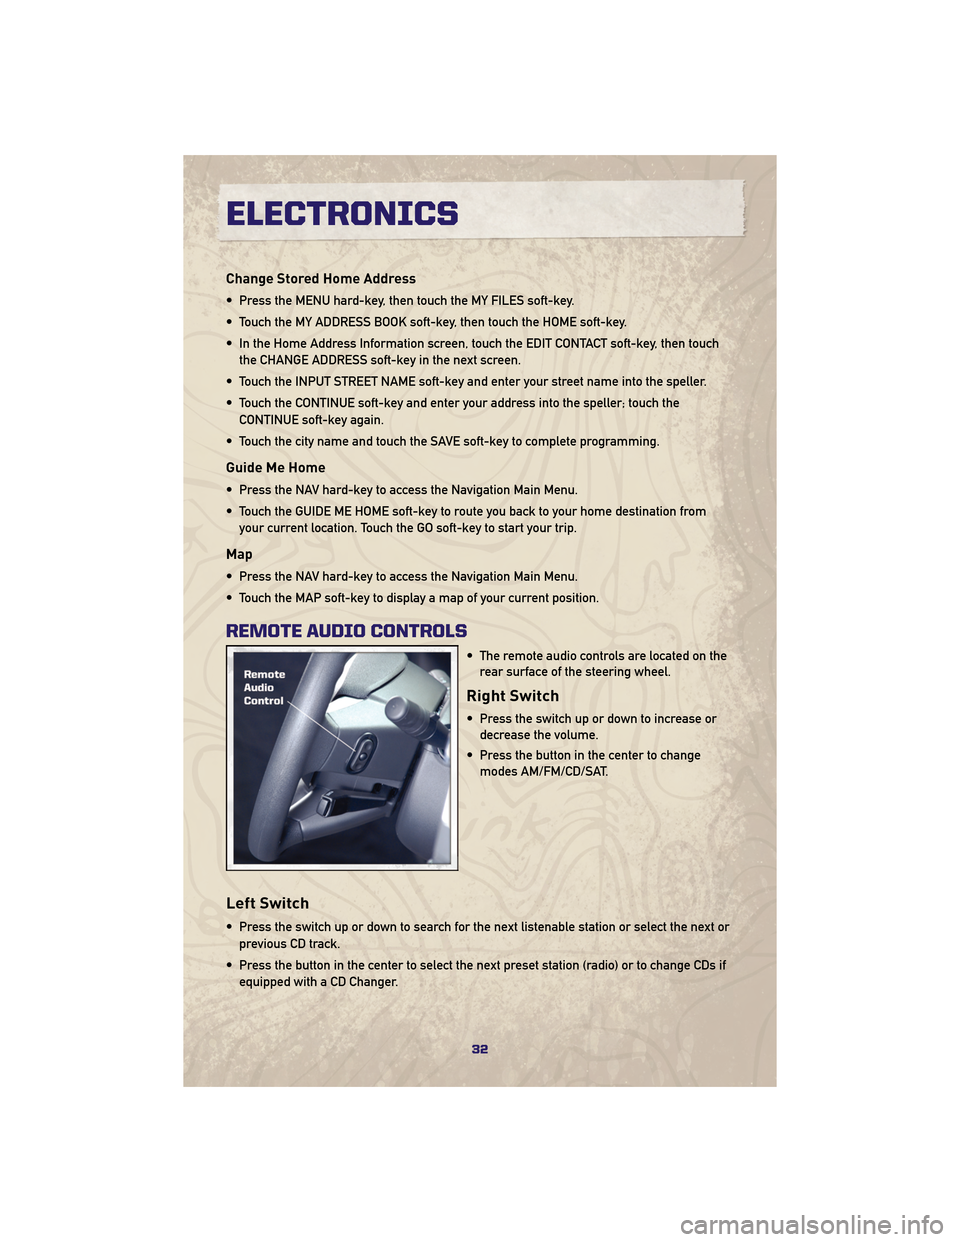
REMOTE AUDIO CONTROLS
• The remote audio controls are located on therear surface of the steering wheel.
Right Switch
• Press the switch up or down to increase ordecrease the volume.
• Press the button in the center to change modes AM/FM/CD/SAT.
Left Switch
• Press the switch up or down to search for the next listenable station or select the next or
previous CD track.
• Press the button in the center to select the next preset station (radio) or to change CDs if equipped with a CD Changer.
ELECTRONICS
32
Page 35 of 84
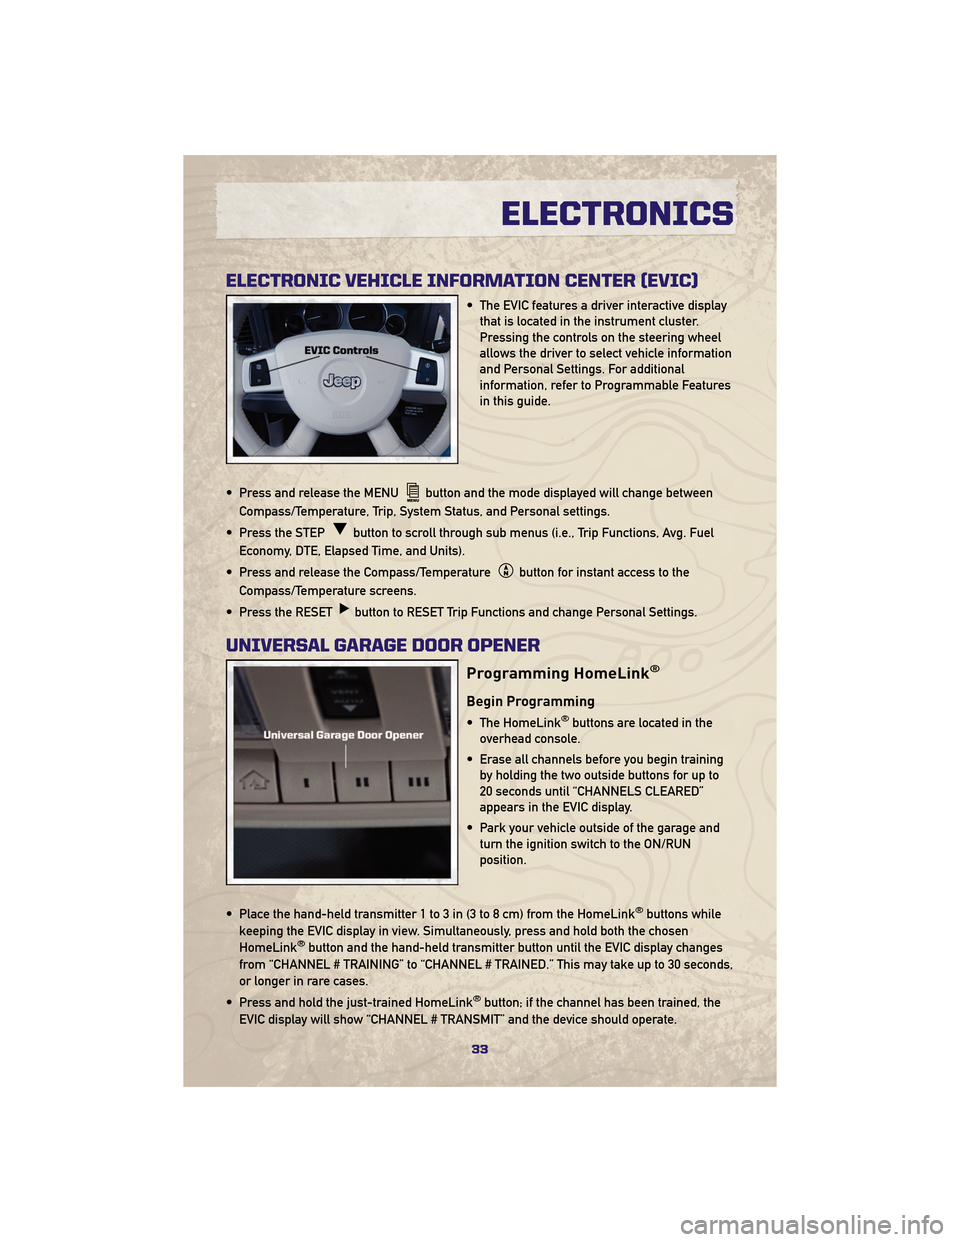
ELECTRONIC VEHICLE INFORMATION CENTER (EVIC)
• The EVIC features a driver interactive displaythat is located in the instrument cluster.
Pressing the controls on the steering wheel
allows the driver to select vehicle information
and Personal Settings. For additional
information, refer to Programmable Features
in this guide.
• Press and release the MENU
button and the mode displayed will change between
Compass/Temperature, Trip, System Status, and Personal settings.
• Press the STEP
button to scroll through sub menus (i.e., Trip Functions, Avg. Fuel
Economy, DTE, Elapsed Time, and Units).
• Press and release the Compass/Temperature
button for instant access to the
Compass/Temperature screens.
• Press the RESET
button to RESET Trip Functions and change Personal Settings.
UNIVERSAL GARAGE DOOR OPENER
Programming HomeLink®
Begin Programming
• The HomeLink®buttons are located in the
overhead console.
• Erase all channels before you begin training by holding the two outside buttons for up to
20 seconds until “CHANNELS CLEARED”
appears in the EVIC display.
• Park your vehicle outside of the garage and turn the ignition switch to the ON/RUN
position.
• Place the hand-held transmitter 1 to 3 in (3 to 8 cm) from the HomeLink
®buttons while
keeping the EVIC display in view. Simultaneously, press and hold both the chosen
HomeLink
®button and the hand-held transmitter button until the EVIC display changes
from “CHANNEL # TRAINING” to “CHANNEL # TRAINED.” This may take up to 30 seconds,
or longer in rare cases.
• Press and hold the just-trained HomeLink
®button; if the channel has been trained, the
EVIC display will show “CHANNEL # TRANSMIT” and the device should operate.
33
ELECTRONICS
Page 37 of 84
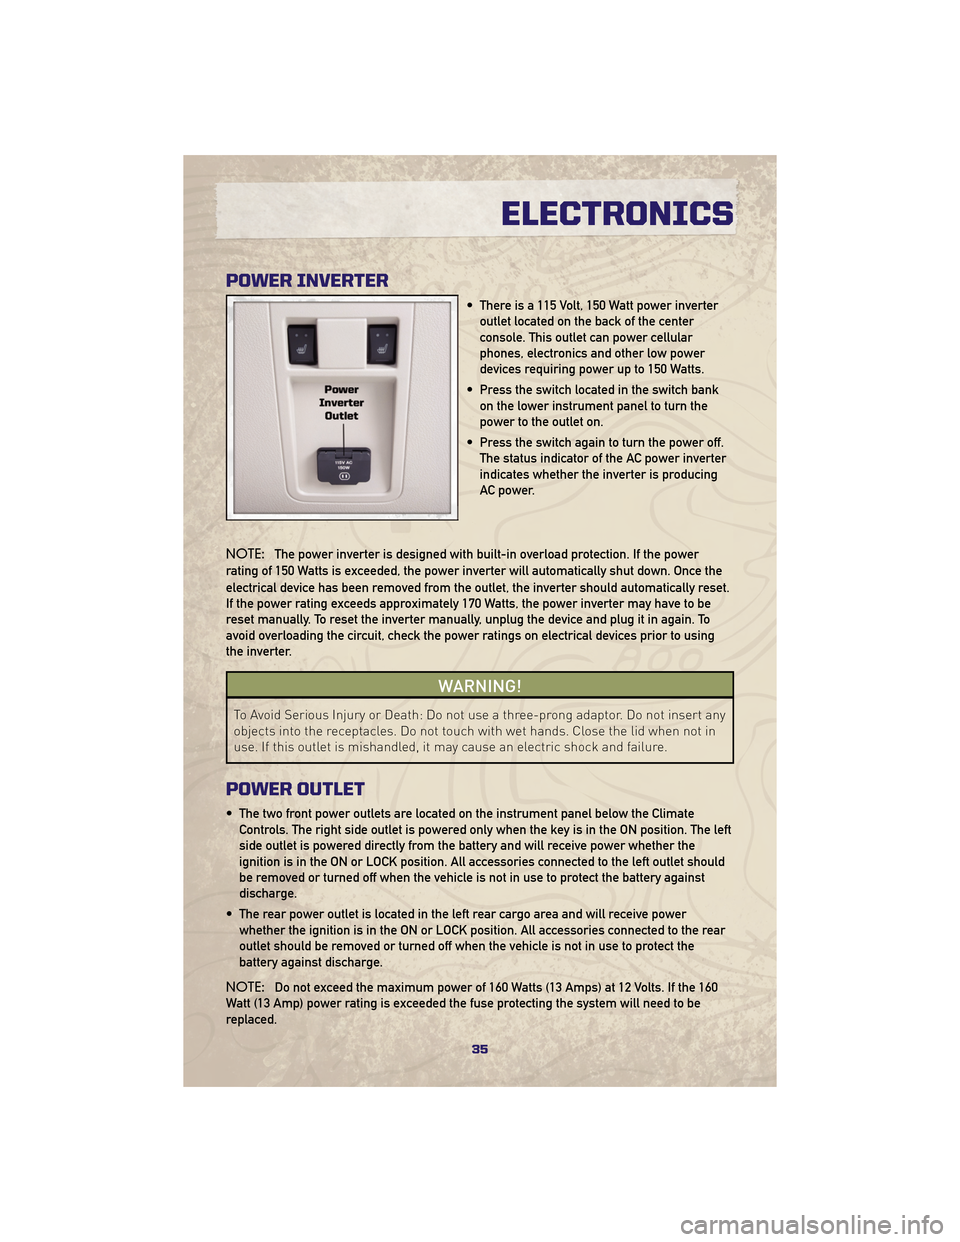
POWER INVERTER
• There is a 115 Volt, 150 Watt power inverteroutlet located on the back of the center
console. This outlet can power cellular
phones, electronics and other low power
devices requiring power up to 150 Watts.
• Press the switch located in the switch bank on the lower instrument panel to turn the
power to the outlet on.
• Press the switch again to turn the power off. The status indicator of the AC power inverter
indicates whether the inverter is producing
AC power.
NOTE: The power inverter is designed with built-in overload protection. If the power
rating of 150 Watts is exceeded, the power inverter will automatically shut down. Once the
electrical device has been removed from the outlet, the inverter should automatically reset.
If the power rating exceeds approximately 170 Watts, the power inverter may have to be
reset manually. To reset the inverter manually, unplug the device and plug it in again. To
avoid overloading the circuit, check the power ratings on electrical devices prior to using
the inverter.
WARNING!
To Avoid Serious Injury or Death: Do not use a three-prong adaptor. Do not insert any
objects into the receptacles. Do not touch with wet hands. Close the lid when not in
use. If this outlet is mishandled, it may cause an electric shock and failure.
POWER OUTLET
• The two front power outlets are located on the instrument panel below the Climate Controls. The right side outlet is powered only when the key is in the ON position. The left
side outlet is powered directly from the battery and will receive power whether the
ignition is in the ON or LOCK position. All accessories connected to the left outlet should
be removed or turned off when the vehicle is not in use to protect the battery against
discharge.
• The rear power outlet is located in the left rear cargo area and will receive power whether the ignition is in the ON or LOCK position. All accessories connected to the rear
outlet should be removed or turned off when the vehicle is not in use to protect the
battery against discharge.
NOTE: Do not exceed the maximum power of 160 Watts (13 Amps) at 12 Volts. If the 160
Watt (13 Amp) power rating is exceeded the fuse protecting the system will need to be
replaced.
35
ELECTRONICS
Page 49 of 84

- Electronic Throttle Control (ETC) Light
• This light informs you of a problem with the Electronic Throttle Control (ETC) system.
• If a problem is detected, the light will come on while the engine is running. Cycle theignition key when the vehicle has completely stopped and the shift lever is placed in the
PARK position; the light should turn off.
• If the light remains lit with the engine running, your vehicle will usually be drivable; however, see an authorized dealer for service as soon as possible. If the light is flashing
when the engine is running, immediate service is required and you may experience
reduced performance, an elevated/rough idle or engine stall and your vehicle may
require towing.
- Airbag Warning Light
• If the light is not on during starting, stays on, or turns on while driving, we recommendyou drive to the nearest Service Center and have the system serviced as soon as
possible.
Fuel Cap/Loose Gas Cap Message
• If a “gas cap” message (shown as Check Gascap) appears, tighten the gas cap until a“clicking” sound is heard.
• If the message continues to appear for more than three days after tightening the gas cap, see your authorized dealer.
Oil Change Indicator
Message
• If an “oil change” message (shown as Oil Change Required) appears and a single chimesounds, it is time for your next required oil change.
Resetting The Light After Servicing
• Turn the ignition switch to the ON/RUN position (do not start engine).
• Fully depress the accelerator pedal three times within 10 seconds.
• Turn the ignition switch to the OFF/LOCK position.
IF YOUR ENGINE OVERHEATS
• In any of the following situations, you can reduce the potential for overheating by takingthe appropriate action.
• On the highways — slow down.
• In city traffic — while stopped, shift transmission into NEUTRAL, but do not increase engine idle speed.
NOTE: There are steps that you can take to slow down an impending overheat condition:
• If your air conditioner (A/C) is on, turn it off. The A/C system adds heat to the engine cooling system and turning the A/C off can help remove this heat.
• You can also turn the Temperature Control to maximum heat, the Mode Control to floor and the Fan Control to high. This allows the heater core to act as a supplement to the
radiator and aids in removing heat from the engine cooling system.
47
WHAT TO DO IN EMERGENCIES