2010 JEEP GRAND CHEROKEE air condition
[x] Cancel search: air conditionPage 159 of 350

•CLIMATE CONTROLS ........................ 185
• Dual-Zone Manual Heating and Air Conditioning ...... 186
• Dual-Zone Automatic Temperature Control (ATC) —
If Equipped ............................ 188
• Operating Tips .......................... 192
• Operating Tips Chart ...................... 193
155
Page 162 of 350

INSTRUMENT CLUSTER
DESCRIPTIONS
1. Tachometer
Indicates the engine speed in revolutions per
minute (RPM).
2. Airbag Warning Light
This light will turn on for four to eight
seconds as a bulb check when the
ignition switch is first turned to the
ON/RUN position. If the light is ei-
ther not on during starting, stays on,
or turns on while driving, then have
the system inspected at an authorized dealer as
soon as possible. Refer to “Occupant Re-
straints” in “Things To Know Before Starting Your
Vehicle” for further information.
3. Malfunction Indicator Light (MIL) The Malfunction Indicator Light (MIL)
is part of an onboard diagnostic sys-
tem called OBD II that monitors en-
gine and automatic transmission con-
trol systems. The light will illuminate
when the key is in the ON/RUN position before
engine start. If the bulb does not come on when turning the key from OFF to ON/RUN, have the
condition checked promptly.
Certain conditions such as a loose or missing
gas cap, poor fuel quality, etc., may illuminate
the light after engine start. The vehicle should
be serviced if the light stays on through several
of your typical driving cycles. In most situa-
tions, the vehicle will drive normally and will not
require towing.
CAUTION!
Prolonged driving with the MIL on could cause
damage to the engine control system. It also
could affect fuel economy and drivability. If the
MIL is flashing, severe catalytic converter
damage and power loss will soon occur. Im-
mediate service is required.
WARNING!
A malfunctioning catalytic converter, as refer-
enced above, can reach higher temperatures
than in normal operating conditions. This can
cause a fire if you drive slowly or park over
flammable substances such as dry plants or
wood or cardboard, etc. This could result in
death or serious injury to the driver, occupants
or others.
4. Electronic Stability Control (ESC)
Activation/Malfunction Indicator Light —
If Equipped The “ESC Activation/Malfunction
Indicator Light” in the instrument
cluster will come on when the igni-
tion switch is turned to the ON/
RUN position. It should go out with
the engine running. If the “ESC
Activation/Malfunction Indicator Light” comes
on continuously with the engine running, a
malfunction has been detected in the ESC
system. If this light remains on after several
ignition cycles, and the vehicle has been driven
several miles (kilometers) at speeds greater
158
Page 163 of 350

than 30 mph (48 km/h), see your authorized
dealer as soon as possible to have the problem
diagnosed and corrected.
NOTE:
•The “ESC Off Indicator Light” and the
“ESC Activation/Malfunction Indicator
Light” come on momentarily each time
the ignition switch is turned to ON/RUN.
• Each time the ignition is turned to ON/
RUN, the ESC system will be ON even if it
was turned off previously.
• The ESC system will make buzzing or
clicking sounds when it is active. This is
normal; the sounds will stop when ESC
becomes inactive following the maneuver
that caused the ESC activation.
5. TOW/HAUL Indicator Light —
If Equipped This light will illuminate when the
TOW/HAUL button has been se-
lected. The TOW/HAUL button is
located in the center of the instru-
ment panel (below the climate
controls). 6. Turn Signal Indicator
The arrows will flash with the exterior turn
signals when the turn signal lever is op-
erated. A tone will chime, and an EVIC
message will appear if the turn signals are left
on for more than 1 mile (1.6 km).
7. High Beam Indicator Indicates that headlights are on high
beam.
8. Front Fog Light Indicator — If Equipped This indicator will illuminate when the
front fog lights are on.
9. Hill Descent Control Indicator Light —
If Equipped The symbol indicates the status of
the Hill Decent Control (HDC) fea-
ture. The lamp will be on solid
when HDC is armed. HDC can
only be armed when the transfer
case is in the “4WD Low” position
and the vehicle speed is less then 30 mph
(48 km/h). If these conditions are not met while
attempting to use the HDC feature, the HDC
indicator lamp will flash on/off. 10. Electronic Vehicle Information Center
(EVIC) Display/Odometer Display
The odometer display shows the total distance
the vehicle has been driven.
Regulations require that upon transfer of ve-
hicle ownership, the seller certify to the pur-
chaser the correct mileage that the vehicle has
been driven. If your odometer needs to be
repaired or serviced, the repair technician
should leave the odometer reading the same as
it was before the repair or service. If s/he
cannot do so, then the odometer must be set at
zero, and a sticker must be placed in the door
jamb stating what the mileage was before the
repair or service. It is a good idea for you to
make a record of the odometer reading before
the repair/service, so that you can be sure that
it is properly reset, or that the door jamb sticker
is accurate if the odometer must be reset at
zero.
When the appropriate conditions exist, this
display shows the Electronic Vehicle Informa-
tion Center (EVIC) messages. Refer to “Elec-
tronic Vehicle Information Center”.
159
Page 165 of 350

13. Seat Belt Reminder LightWhen the ignition switch is first turned
to ON/RUN, this light will turn on for
four to eight seconds as a bulb check.
During the bulb check, if the driver or
front passenger’s seat belt is unbuckled, a
chime will sound. After the bulb check or when
driving, if the driver or front passenger seat belt
remains unbuckled, the Seat Belt Indicator
Light will flash or remain on continuously. Refer
to “Occupant Restraints” in “Things To Know
Before Starting Your Vehicle” for further infor-
mation.
14. Brake Warning Light This light monitors various brake
functions, including brake fluid
level and parking brake applica-
tion. If the brake light turns on, it
may indicate that the parking
brake is applied, that the brake
fluid level is low, or that there is a problem with
the anti-lock brake system reservoir.
If the light remains on when the parking brake
has been disengaged, and the fluid level is at
the full mark on the master cylinder reservoir, it
indicates a possible brake hydraulic system malfunction or that a problem with the Brake
Booster has been detected by the Anti-Lock
Brake System (ABS) / Electronic Stability Pro-
gram (ESP) system. In this case, the light will
remain on until the condition has been cor-
rected. If the problem is related to the brake
booster, the ABS pump will run when applying
the brake and a brake pedal pulsation may be
felt during each stop.
The dual brake system provides a reserve
braking capacity in the event of a failure to a
portion of the hydraulic system. A leak in either
half of the dual brake system is indicated by the
Brake Warning Light, which will turn on when
the brake fluid level in the master cylinder has
dropped below a specified level.
The light will remain on until the cause is
corrected.
NOTE:
The light may flash momentarily during
sharp cornering maneuvers, which change
fluid level conditions. The vehicle should
have service performed, and the brake fluid
level checked.
If brake failure is indicated, immediate repair is
necessary.
WARNING!
Driving a vehicle with the red brake light on is
dangerous. Part of the brake system may
have failed. It will take longer to stop the
vehicle. You could have a collision. Have the
vehicle checked immediately.
Vehicles equipped with the Anti-Lock Brake
System (ABS), are also equipped with Elec-
tronic Brake Force Distribution (EBD). In the
event of an EBD failure, the Brake Warning
Light will turn on along with the ABS Light.
Immediate repair to the ABS system is re-
quired.
Operation of the Brake Warning Light can be
checked by turning the ignition switch from the
OFF position to the ON/RUN position. The light
should illuminate for approximately two sec-
onds. The light should then turn off unless the
parking brake is applied or a brake fault is
detected. If the light does not illuminate, have
the light inspected by an authorized dealer.
161
Page 167 of 350

23. Electronic Stability Control (ESC) OFF
Indicator Light — If EquippedThis light indicates the Electronic
Stability Control (ESC) is off.
24. Vehicle Security Light This light will flash rapidly for ap-
proximately 15 seconds when the
vehicle theft alarm is arming. The
light will flash at a slower speed
continuously after the alarm is set.
The security light will also come on
for about three seconds when the ignition is first
turned on.
25. Temperature Gauge
The temperature gauge shows engine coolant
temperature. Any reading within the normal
range indicates that the engine cooling system
is operating satisfactorily.
The gauge pointer will likely indicate a higher
temperature when driving in hot weather, up
mountain grades, or when towing a trailer. It should not be allowed to exceed the upper
limits of the normal operating range.
CAUTION!
Driving with a hot engine cooling system could
damage your vehicle. If the temperature
gauge reads “H” pull over and stop the ve-
hicle. Idle the vehicle with the air conditioner
turned off until the pointer drops back into the
normal range. If the pointer remains on the “H”
and you hear continuous chimes, turn the
engine off immediately, and call an authorized
dealership for service.
WARNING!
A hot engine cooling system is dangerous.
You or others could be badly burned by steam
or boiling coolant. You may want to call an
authorized dealership for service if your ve-
hicle overheats. If you decide to look under
the hood yourself, see “Maintaining Your Ve-
hicle”. Follow the warnings under the Cooling
System Pressure Cap paragraph.26. Rear Fog Light Indicator
This indicator will illuminate when the
rear fog lights are on.
ELECTRONIC VEHICLE
INFORMATION CENTER (EVIC)
The Electronic Vehicle Information Center
(EVIC) features a driver-interactive display that
is located in the instrument cluster.
Electronic Vehicle Information Center (EVIC)
Display
163
Page 172 of 350

•Adaptive Cruise Control (ACC) ON
This light will turn on when the
ACC is ON. For further information,
refer to “Adaptive Cruise Control
(ACC)” in “Understanding The
Features Of Your Vehicle”.
• Adaptive Cruise Control (ACC) SET
This light will turn on when the
ACC is SET. For further informa-
tion, refer to “Adaptive Cruise Con-
trol (ACC)” in “Understanding The
Features Of Your Vehicle”.
• Power Steering System Over Temp —
If Equipped If the “POWER STEERING SYS-
TEM OVER TEMP” message and a
icon are displayed on the EVIC
screen, it indicates that extreme
steering maneuvers may have oc-
curred, which caused an over tem-
perature condition in the power steering sys-
tem. You will lose power steering assistance
momentarily until the over temperature condi-
tion no longer exists. Once driving conditions
are safe, then pull over and let vehicle idle.
After five minutes, the system will cool and return to normal operation. Refer to “Power
Steering” in “Starting and Operating” for further
information.
NOTE:
•
Even if power steering assistance is no
longer operational, it is still possible to
steer the vehicle. Under these conditions
there will be a substantial increase in
steering effort, especially at very low ve-
hicle speeds and during parking maneu-
vers.
• If the condition persists, see your autho-
rized dealer for service.
EVIC Amber Telltale LightsThis area will show reconfigurable amber cau-
tion telltales. These telltales include:
• Forward Collision Warning (FCW) OFF
This light warns the driver of a
potential collision with the vehicle
in front of you and prompts the
driver to take action in order to
avoid the collision. For further in-
formation, refer to “Adaptive
Cruise Control (ACC)” in “Understanding The
Features Of Your Vehicle”. •
Wait To Start Light — Diesel Only
This light will illuminate when the igni-
tion switch is first turned to the RUN
position. Wait until the light turns off
before starting the vehicle. Refer to “Starting
Procedures” in “Starting And Operating”.
• Water In Fuel Indicator — Diesel Only
This light indicates water has col-
lected in the fuel filter and should
be drained immediately. See your
authorized dealer for service.
• Air Suspension Up
The air suspension up telltale will
illuminate when the air suspension
is in use. For further information,
refer to “Starting And Operating”.
• Air Suspension Down
The air suspension down telltale
will illuminate when the air suspen-
sion is in use. For further informa-
tion, refer to “Starting And Operat-
ing”.
168
Page 189 of 350

the left-hand control is different depending on
which mode you are in.
The following describes the left-hand control
operation in each mode.
Radio OperationPressing the top of the switch will “Seek” up for
the next listenable station and pressing the
bottom of the switch will “Seek” down for the
next listenable station.
The button located in the center of the left-hand
control will tune to the next preset station that
you have programmed in the radio preset
pushbutton.
CD PlayerPressing the top of the switch once will go to
the next track on the CD. Pressing the bottom of
the switch once will go to the beginning of the
current track, or to the beginning of the previ-
ous track if it is within one second after the
current track begins to play.
If you press the switch up or down twice, it
plays the second track; three times, it will play
the third, etc.The center button on the left side rocker switch
has no function for a single-disc CD player.
However, when a multiple-disc CD player is
equipped on the vehicle, the center button will
select the next available CD in the player.
CD/DVD DISC MAINTENANCETo keep a CD/DVD in good condition, take the
following precautions:
1. Handle the disc by its edge; avoid touching
the surface.
2. If the disc is stained, clean the surface with
a soft cloth, wiping from center to edge.
3. Do not apply paper or tape to the disc; avoid
scratching the disc.
4. Do not use solvents such as benzene, thin-
ner, cleaners, or anti-static sprays.
5. Store the disc in its case after playing.
6. Do not expose the disc to direct sunlight.
7. Do not store the disc where temperatures
may become too high.
NOTE:
If you experience difficulty in playing a par-
ticular disc, it may be damaged (i.e.,
scratched, reflective coating removed, a
hair, moisture or dew on the disc) oversized,
or have protection encoding. Try a known
good disc before considering disc player
service.
RADIO OPERATION AND MOBILE
PHONES
Under certain conditions, the mobile phone
being on in your vehicle can cause erratic or
noisy performance from your radio. This condi-
tion may be lessened or eliminated by relocat-
ing the mobile phone antenna. This condition is
not harmful to the radio. If your radio perfor-
mance does not satisfactorily “clear” by the
repositioning of the antenna, it is recom-
mended that the radio volume be turned down
or off during mobile phone operation.
CLIMATE CONTROLSThe Air Conditioning and Heating System is
designed to make you comfortable in all types
of weather.
185
Page 190 of 350

Dual-Zone Manual Heating and Air
Conditioning
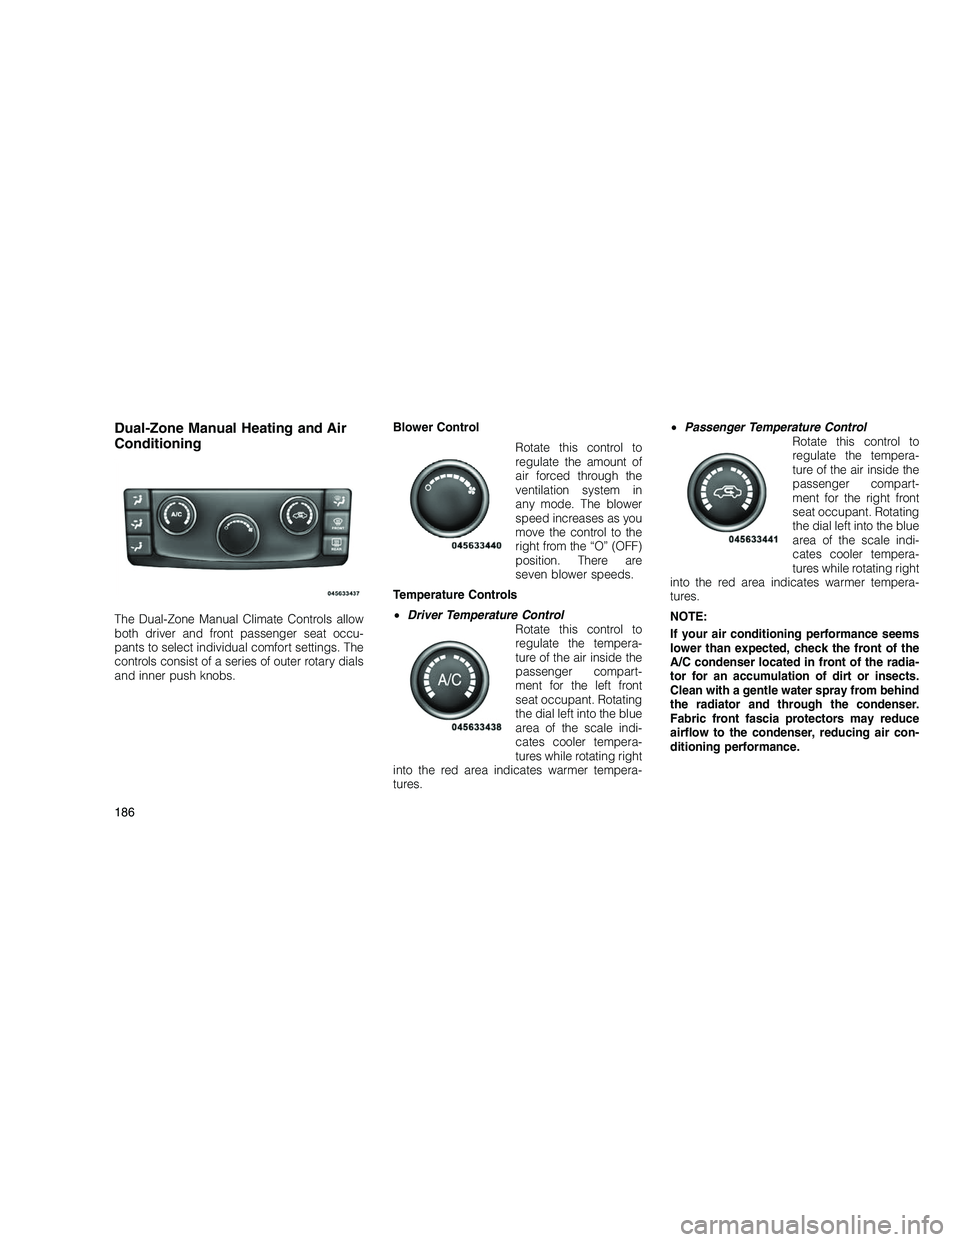
The Dual-Zone Manual Climate Controls allow
both driver and front passenger seat occu-
pants to select individual comfort settings. The
controls consist of a series of outer rotary dials
and inner push knobs.Blower Control
Rotate this control to
regulate the amount of
air forced through the
ventilation system in
any mode. The blower
speed increases as you
move the control to the
right from the “O” (OFF)
position. There are
seven blower speeds.
Temperature Controls
• Driver Temperature Control
Rotate this control to
regulate the tempera-
ture of the air inside the
passenger compart-
ment for the left front
seat occupant. Rotating
the dial left into the blue
area of the scale indi-
cates cooler tempera-
tures while rotating right
into the red area indicates warmer tempera-
tures. •
Passenger Temperature Control
Rotate this control to
regulate the tempera-
ture of the air inside the
passenger compart-
ment for the right front
seat occupant. Rotating
the dial left into the blue
area of the scale indi-
cates cooler tempera-
tures while rotating right
into the red area indicates warmer tempera-
tures.
NOTE:
If your air conditioning performance seems
lower than expected, check the front of the
A/C condenser located in front of the radia-
tor for an accumulation of dirt or insects.
Clean with a gentle water spray from behind
the radiator and through the condenser.
Fabric front fascia protectors may reduce
airflow to the condenser, reducing air con-
ditioning performance.
186