2010 JEEP COMMANDER heater
[x] Cancel search: heaterPage 13 of 78

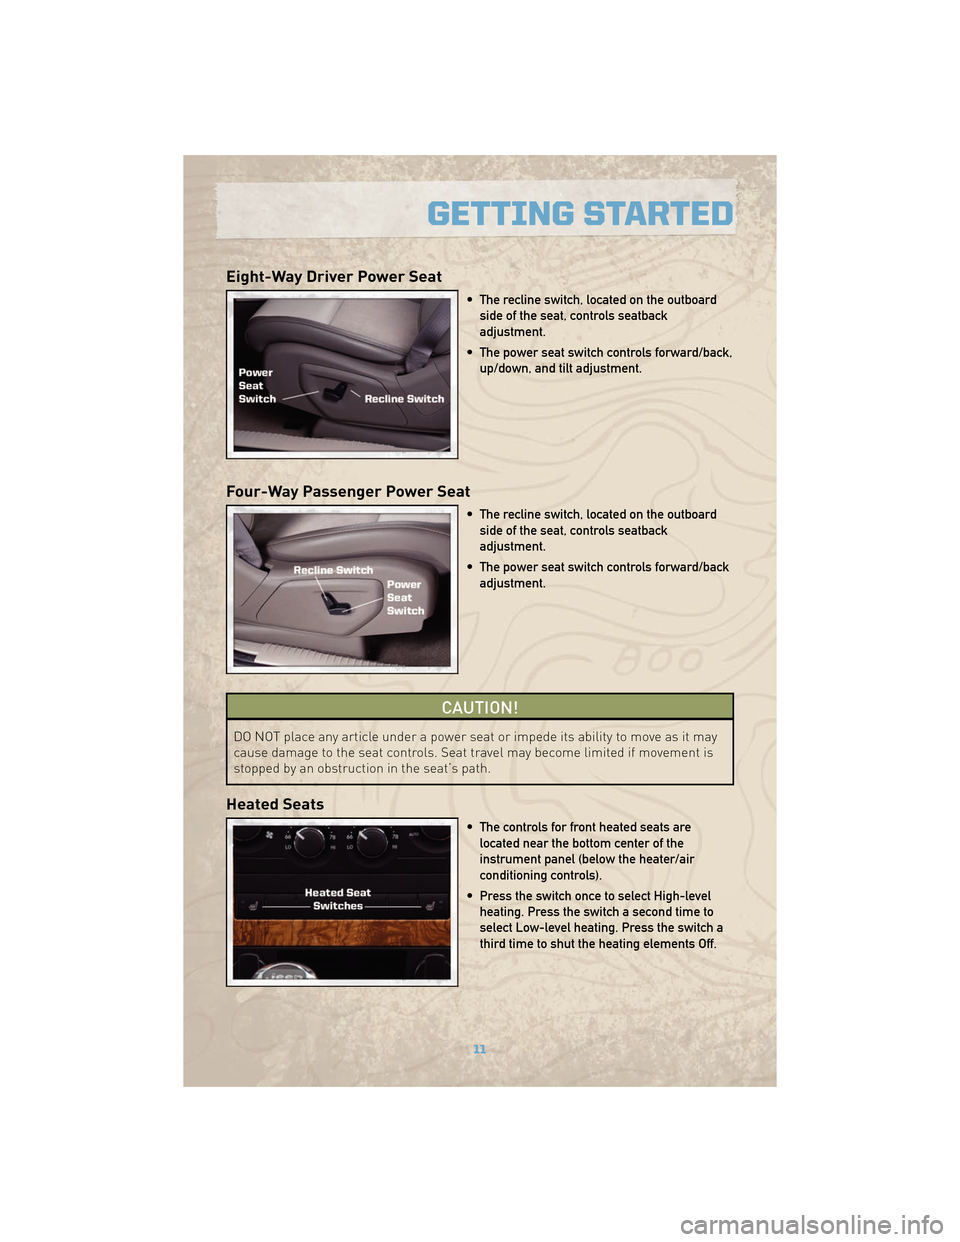
Eight-Way Driver Power Seat
• The recline switch, located on the outboardside of the seat, controls seatback
adjustment.
• The power seat switch controls forward/back, up/down, and tilt adjustment.
Four-Way Passenger Power Seat
• The recline switch, located on the outboardside of the seat, controls seatback
adjustment.
• The power seat switch controls forward/back adjustment.
CAUTION!
DO NOT place any article under a power seat or impede its ability to move as it may
cause damage to the seat controls. Seat travel may become limited if movement is
stopped by an obstruction in the seat’s path.
Heated Seats
• The controls for front heated seats arelocated near the bottom center of the
instrument panel (below the heater/air
conditioning controls).
• Press the switch once to select High-level heating. Press the switch a second time to
select Low-level heating. Press the switch a
third time to shut the heating elements Off.
11
GETTING STARTED
Page 14 of 78

WARNING!
• Persons who are unable to feel pain to the skin because of advanced age, chronicillness, diabetes, spinal cord injury, medication, alcohol use, exhaustion or other
physical condition must exercise care when using the seat heater. It may cause
burns even at low temperatures, especially if used for long periods of time.
• Do not place anything on the seat that insulates against heat, such as a blanket or cushion. This may cause the seat heater to overheat. Sitting in a seat that has
been overheated could cause serious burns due to the increased surface
temperature of the seat.
CAUTION!
Repeated overheating of the seat could damage the heating element and/or degrade
the material of the seat.
Memory Seats
• The memory seat feature allows you to savetwo different driver seating positions, driver's
outside mirror, adjustable brake and
accelerator pedals, and radio station preset
settings. The memory seat switch is located
on the driver's door panel.
• Adjust all memory profile settings, press the SET button then press 1 or 2 within five
seconds.
• To program a Key Fob to the memory position, press and release the LOCK button within 10 seconds on the Key Fob to be programmed.
• Place the ignition switch in the ON position, select Remote Linked to Memory in the Electronic Vehicle Information Center (EVIC) and enter Yes.
• Press 1 or 2 to recall the saved positions, or press UNLOCK on the programmed Key Fob.
• Refer to the Owner's Manual on the DVD for further details.
GETTING STARTED
12
Page 16 of 78

50/50 Third Row Folding Seat
• Either side of the third row seat can belowered.
• Open the liftgate.
• Pull the seatback release handle (toward the rear of the vehicle), and lower the seatback
using the pull strap.
• To raise the rear seat, detach the pull strap from the back of the seat, and pull the
seatback upward until it locks into place.
2nd Row Heated Seats
• Second row heated seat switches are locatedon the rear of the center console.
• Press the switch once to select High-level heating. Press the switch a second time to
select Low-level heating. Press the switch a
third time to shut the heating elements Off.
WARNING!
• Persons who are unable to feel pain to the skin because of advanced age, chronic illness, diabetes, spinal cord injury, medication, alcohol use, exhaustion or other
physical condition must exercise care when using the seat heater. It may cause
burns even at low temperatures, especially if used for long periods of time.
(Continued)
GETTING STARTED
14
Page 17 of 78

WARNING!(Continued)
• Do not place anything on the seat that insulates against heat, such as a blanket orcushion. This may cause the seat heater to overheat. Sitting in a seat that has
been overheated could cause serious burns due to the increased surface
temperature of the seat.
CAUTION!
Repeated overheating of the seat could damage the heating element and/or degrade
the material of the seat.
TILT/TELESCOPING STEERING COLUMN
• The tilt/telescoping control lever is locatedbelow the steering wheel at the end of the
steering column.
• Push down on the lever to unlock the steering column.
• To tilt the steering column, move the steering wheel upward or downward as desired. To
lengthen or shorten the steering column, pull
the steering wheel outward or push it inward
as desired.
• Pull upward on the lever to lock the column firmly in place.
WARNING!
Do not adjust the steering wheel while driving. The tilt/telescoping adjustment must
be locked while driving. Adjusting the steering wheel while driving or driving without
the tilt/telescoping adjustment locked could cause the driver to lose control of the
vehicle. Failure to follow this warning may result in serious injury or death.
15
GETTING STARTED
Page 49 of 78

IF YOUR ENGINE OVERHEATS
• In any of the following situations, you can reduce the potential for overheating by takingthe appropriate action.
• On the highways — slow down.
• In city traffic — while stopped, shift transmission into NEUTRAL, but do not increase engine idle speed.
NOTE: There are steps that you can take to slow down an impending overheat condition:
• If your air conditioner (A/C) is on, turn it off. The A/C system adds heat to the engine cooling system and turning the A/C off can help remove this heat.
• You can also turn the Temperature Control to maximum heat, the Mode Control to floor and the Fan Control to high. This allows the heater core to act as a supplement to the
radiator and aids in removing heat from the engine cooling system.
• If the temperature reading does not return to normal, turn the engine off immediately.
• We recommend that you do not operate the vehicle or engine damage will occur. Have the vehicle serviced immediately.
CAUTION!
Driving with a hot cooling system could damage your vehicle. If the temperature
gauge reads HOT (H), pull over and stop the vehicle. Idle the vehicle with the air
conditioner turned off until the pointer drops back into the normal range. If the
pointer remains on HOT (H), and you hear continuous chimes, turn the engine off
immediately and call for service.
WARNING!
You or others can be badly burned by hot engine coolant (antifreeze) or steam from
your radiator. If you see or hear steam coming from under the hood, do not open the
hood until the radiator has had time to cool. Never try to open a cooling system
pressure cap when the radiator or coolant bottle is hot.
47
WHAT TO DO IN EMERGENCIES
Page 54 of 78

WARNING!(Continued)
• A battery generates hydrogen gas which is flammable and explosive. Keep flamesor sparks away from the battery vent holes. Don’t lean over the battery when
attaching clamps or allow the clamps to touch each other.
• Do not use a booster battery or any other booster source with an output that exceeds 12-volts (i.e., do not use a 24-volt power source).
• Check the battery test indicator (if equipped). If a light or bright colored dot is visible in the indicator, DO NOT jump-start the battery. If the indicator is dark or shows a green dot,
proceed as follows:
• Remove all metal jewelry, such as watch bands or bracelets, which might make an unintended electrical contact.
WARNING!
• Do not permit vehicles to touch each other as this could establish a ground connection and personal injury could result.
• Do not connect the cable to the negative post of the discharged battery. The resulting electrical spark could cause the battery to explode and could result in
personal injury.
• Park the booster vehicle within cable reach but without letting the vehicles touch. Set the parking brake on both vehicles, shift the automatic transmission into PARK, and turn the
ignition to LOCK.
• Turn off the heater, radio, and all unnecessary electrical loads.
• Connect one end of a jumper cable to the positive terminal of the booster battery. Connect the other end of the same cable to the positive terminal of the discharged battery.
• Connect the other cable, first to the negative terminal of the booster battery and then to the engine ground (-) of the vehicle with the discharged battery. Make sure you have a
good contact on the engine ground.
• Start the engine in the vehicle which has the booster battery; let the engine idle a few minutes.
• Start the engine in the vehicle with the discharged battery.
• When removing the jumper cables, reverse the above sequence exactly. Be careful of the moving belts and fan.
WARNING!
During cold weather when temperatures are below the freezing point, electrolyte in a
discharged battery may freeze. Do not attempt jump-starting because the battery
could rupture or explode. The battery temperature must be brought up above the
freezing point before attempting a jump-start.
WHAT TO DO IN EMERGENCIES
52
Page 61 of 78

FLUIDS AND CAPACITIES
Component Fluid, Lubricant, or Genuine PartCapacities
Engine Coolant -
3.7L without rear
heat. MOPAR®Antifreeze/Coolant Five Year
/100,000 Mile Formula HOAT (Hybrid Organic
Additive Technology) or equivalent. 12.7 Quarts (11.8 Liters)
Includes heater and
coolant recovery bottle
filled to MAX level.
Engine Coolant -
3.7L with rear heat. MOPAR
®Antifreeze/Coolant Five Year
/100,000 Mile Formula HOAT (Hybrid Organic
Additive Technology) or equivalent. 14 Quarts (13.2 Liters)
Includes heater and
coolant recovery bottle
filled to MAX level.
Engine Coolant -
5.7L without rear
heat. MOPAR
®Antifreeze/Coolant Five Year
/100,000 Mile Formula HOAT (Hybrid Organic
Additive Technology) or equivalent.15.2 Quarts (14.4 Liters)
Includes heater and
coolant recovery bottle
filled to MAX level.
Engine Coolant -
5.7L with rear heat. MOPAR®Antifreeze/Coolant Five Year
/100,000 Mile Formula HOAT (Hybrid Organic
Additive Technology) or equivalent. 16.7 Quarts (15.8 Liters)
Includes heater and
coolant recovery bottle
filled to MAX level.
Engine Oil with
Filter 3.7L API certified 5W-20 engine oil, Meeting the
requirements of Chrysler Material Standard
MS-6395. Refer to your oil filler cap for correct
SAE grade. 5 Quarts (4.7 Liters)
Engine Oil with
Filter 5.7L API certified 5W-20 engine oil, meeting the
requirements of Chrysler Material Standard
MS-6395. Refer to your oil filler cap for correct
SAE grade. 7 Quarts (6.6 Liters)
Fuel Selection 5.7L 87 Octane acceptable. 89 recommended for 5.7L. 21 Gallons (79 Liters)
Engine Oil Filter
3.7L, 5.7L MOPAR
®Engine Oil Filter or equivalent.
—
Spark Plug 3.7L ZFR6F–11G (Gap 0.043 in [1.09 mm]) —
Spark Plug 5.7L LZFR5C–11G (Gap 0.043 in [1.09 mm]) —
Automatic
Transmission MOPAR
®ATF+4®Automatic Transmission Fluid
or equivalent licensed ATF+4®product. —
Transfer Case
(NV140 Single
Speed Only. MOPAR®ATF+4®Automatic Transmission Fluid
or equivalent licensed ATF+4®product.. —
Transfer Case
(NV245 Two Speed
Only) MOPAR
®NV 247 / 245 Transfer Case Lubricant
or equivalent. —
Axle Differential
(Front / Rear) MOPAR
®Synthetic Gear & Axle Lubricant SAE
75W–140 (API–GL5) or equivalent with Friction
Modifier Additive. —
Brake Master
Cylinder MOPAR
®DOT 3 and SAE J1703 should be used
or equivalent. If DOT 3 is not available, then DOT
4 is acceptable. Use only recommended brake
fluids. —
Power Steering
Reservoir This system requires the use of MOPAR
®
Hydraulic System Power Steering Fluid or
equivalent, Which meets Chrysler Matreial
Standard MS–10838. —
59
MAINTAINING YOUR VEHICLE
Page 66 of 78

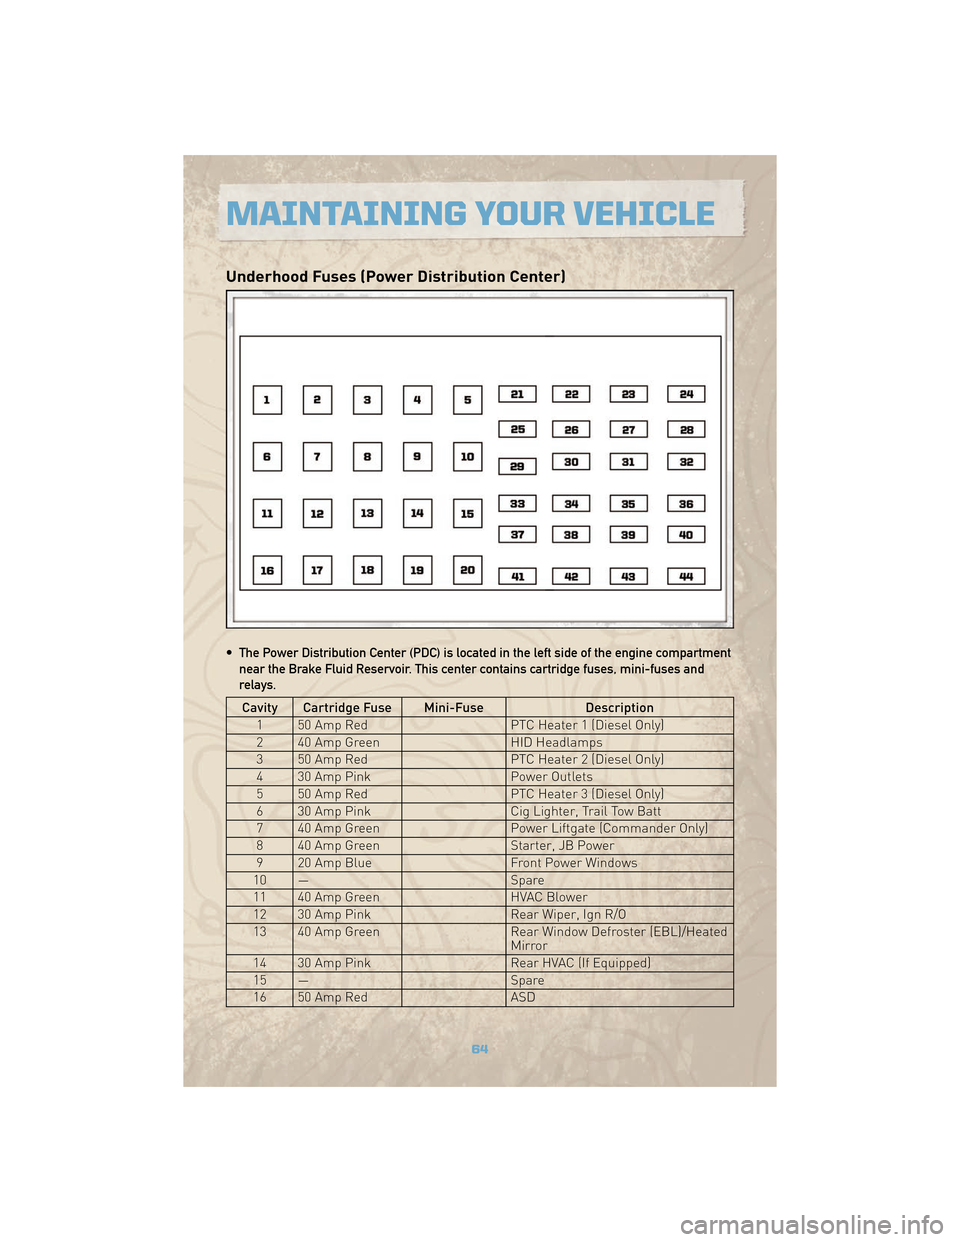
Underhood Fuses (Power Distribution Center)
• The Power Distribution Center (PDC) is located in the left side of the engine compartmentnear the Brake Fluid Reservoir. This center contains cartridge fuses, mini-fuses and
relays.
Cavity Cartridge Fuse Mini-Fuse Description
1 50 Amp Red PTC Heater 1 (Diesel Only)
2 40 Amp Green HID Headlamps
3 50 Amp Red PTC Heater 2 (Diesel Only)
4 30 Amp Pink Power Outlets
5 50 Amp Red PTC Heater 3 (Diesel Only)
6 30 Amp Pink Cig Lighter, Trail Tow Batt
7 40 Amp Green Power Liftgate (Commander Only)
8 40 Amp Green Starter, JB Power
9 20 Amp Blue Front Power Windows
10 — Spare
11 40 Amp Green HVAC Blower
12 30 Amp Pink Rear Wiper, Ign R/O
13 40 Amp Green Rear Window Defroster (EBL)/Heated
Mirror
14 30 Amp Pink Rear HVAC (If Equipped)
15 — Spare
16 50 Amp Red ASD
MAINTAINING YOUR VEHICLE
64