2010 JAGUAR XF ECU
[x] Cancel search: ECUPage 29 of 225

R
(FM8) SEMCON JLR OWNER GUIDE VER 1.00 EURO
LANGUAGE: english-en; MARQUE: jaguar; MODEL: XF
Occupant safety
29
Child restraint anchorages are
designed to withstand only those
loads imposed by corre ctly fitted child
restraints. Under no circumstances
are they to be used for adult seat
belts, harnesses or for attaching other
items or equipment to the vehicle.BOOSTER SEATS
In a situation where a child is too large to fit
into a child safety seat, but is still too small to
safely fit the three point belt properly, a booster
seat is recommended for maximum safety.
Follow the manufacturer's instructions for
fitting and use, then adjust the seat belt to suit.
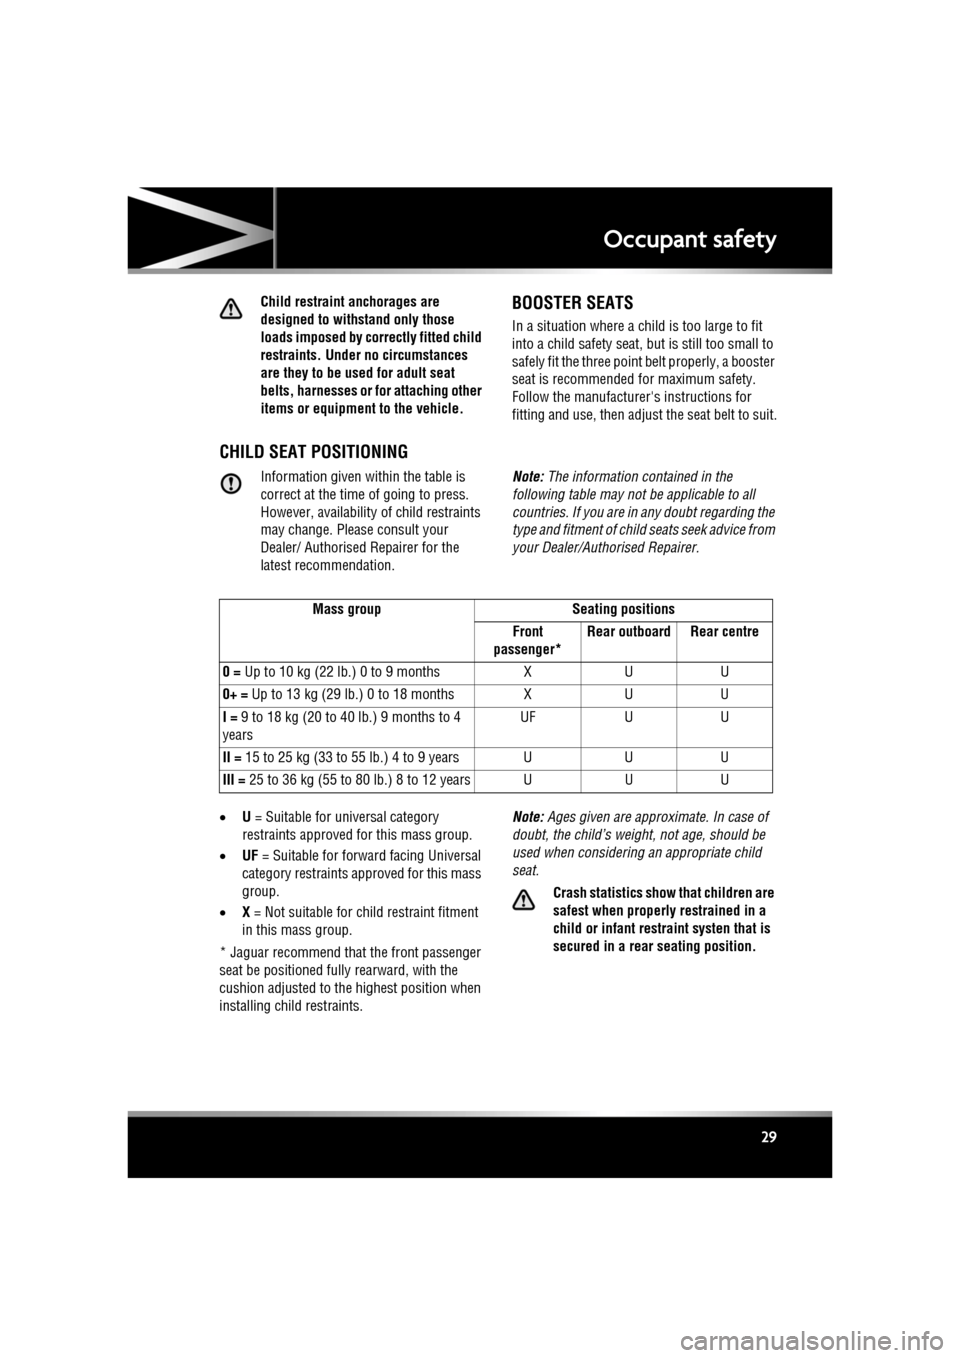
CHILD SEAT POSITIONING
Information given wi thin the table is
correct at the time of going to press.
However, availability of child restraints
may change. Please consult your
Dealer/ Authorised Repairer for the
latest recommendation. Note:
The information contained in the
following table may not be applicable to all
countries. If you are in any doubt regarding the
type and fitment of child seats seek advice from
your Dealer/Authorised Repairer.
• U = Suitable for universal category
restraints approved for this mass group.
• UF = Suitable for forward facing Universal
category restraints appr oved for this mass
group.
• X = Not suitable for ch ild restraint fitment
in this mass group.
* Jaguar recommend that the front passenger
seat be positioned fully rearward, with the
cushion adjusted to the highest position when
installing child restraints. Note:
Ages given are approximate. In case of
doubt, the child’s weight , not age, should be
used when considering an appropriate child
seat.
Crash statistics show that children are
safest when properly restrained in a
child or infant rest raint systen that is
secured in a rear seating position.
Mass group Seating positions
Front
passenger* Rear outboard Rear centre
0 = Up to 10 kg (22 lb.) 0 to 9 months XUU
0+ = Up to 13 kg (29 lb.) 0 to 18 months X UU
I = 9 to 18 kg (20 to 40 lb.) 9 months to 4
years UF
UU
II = 15 to 25 kg (33 to 55 lb.) 4 to 9 years U UU
III = 25 to 36 kg (55 to 80 lb.) 8 to 12 years U UU
Page 30 of 225

L
(FM8) SEMCON JLR OWNER GUIDE VER 1.00 EURO
LANGUAGE: english-en; MARQUE: jaguar; MODEL: XF
Occupant safety
30
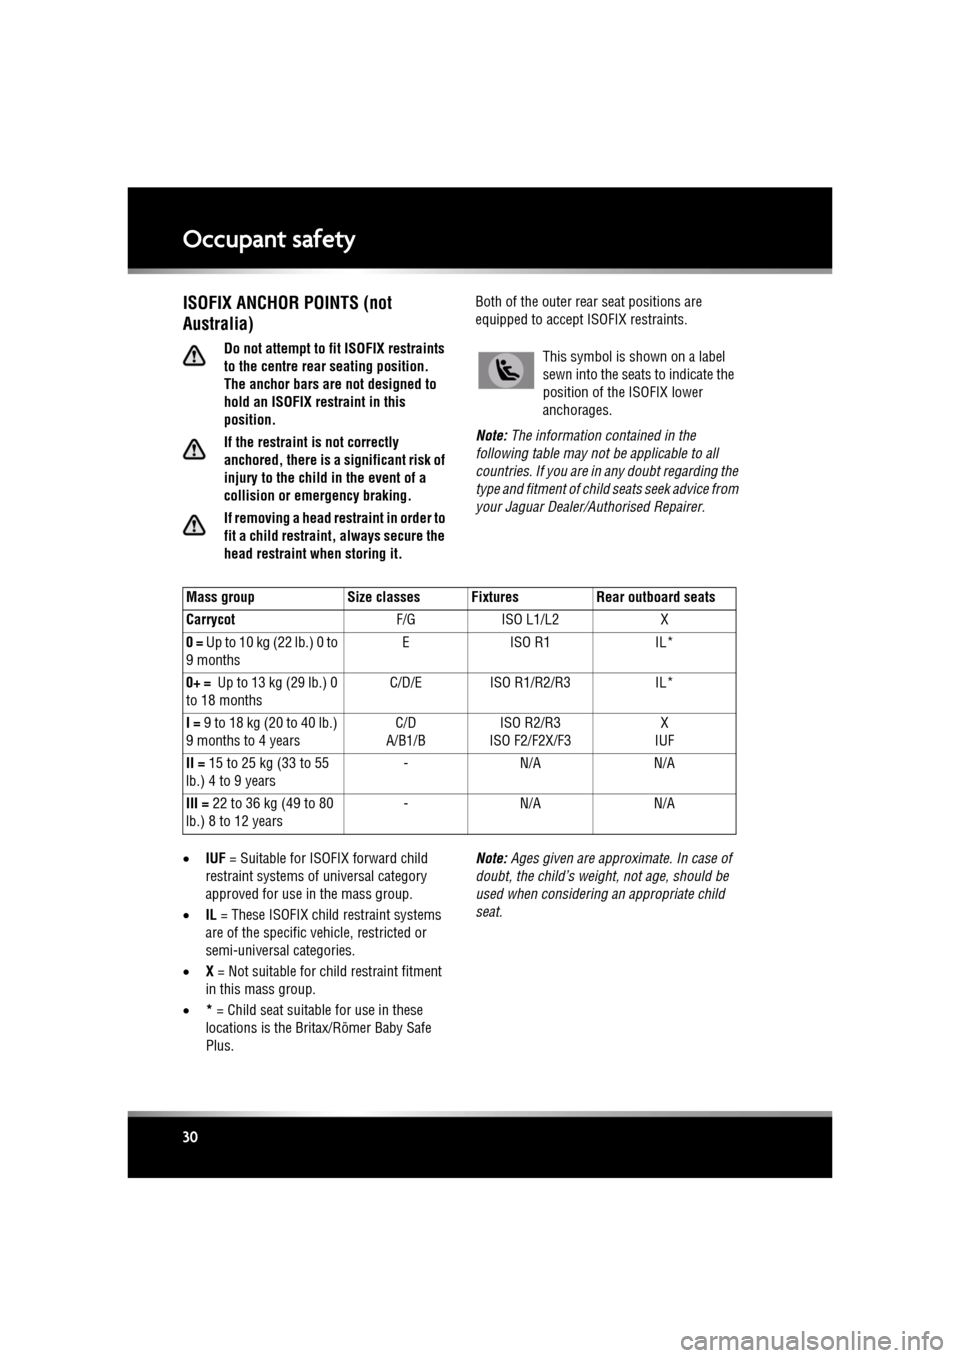
ISOFIX ANCHOR POINTS (not
Australia)
Do not attempt to fit ISOFIX restraints
to the centre rear seating position.
The anchor bars are not designed to
hold an ISOFIX restraint in this
position.
If the restraint is not correctly
anchored, there is a si gnificant risk of
injury to the child in the event of a
collision or em ergency braking.
If removing a head restraint in order to
fit a child restraint, always secure the
head restraint when storing it. Both of the outer rear seat positions are
equipped to accept
ISOFIX restraints.
Note: The information contained in the
following table may not be applicable to all
countries. If you are in any doubt regarding the
type and fitment of child seats seek advice from
your Jaguar Dealer/A uthorised Repairer.
• IUF = Suitable for ISOFIX forward child
restraint systems of universal category
approved for use in the mass group.
• IL = These ISOFIX child restraint systems
are of the specific vehicle, restricted or
semi-universal categories.
• X = Not suitable for ch ild restraint fitment
in this mass group.
• * = Child seat suitable for use in these
locations is the Britax/Römer Baby Safe
Plus. Note:
Ages given are approximate. In case of
doubt, the child’s weight , not age, should be
used when considering an appropriate child
seat.This symbol is shown on a label
sewn into the seats to indicate the
position of the ISOFIX lower
anchorages.
Mass group Size classes Fixtures Rear outboard seats
Carrycot F/GISO L1/L2 X
0 = U p t o 1 0 k g ( 2 2 l b. ) 0 t o
9 months EI
SO R 1 I L*
0+ = Up to 13 kg (29 lb.) 0
to 18 months C/D/E ISO R1/R2/R3
IL*
I = 9 to 18 kg (20 to 40 lb.)
9 months to 4 years C/D
A/B1/B ISO R2/R3
ISO F2/F2X/F3 X
IUF
II = 15 to 25 kg (33 to 55
lb.) 4 to 9 years -N
/A N /A
III = 22 to 36 kg (49 to 80
lb.) 8 to 12 years -N
/A N /A
Page 31 of 225

R
(FM8) SEMCON JLR OWNER GUIDE VER 1.00 EURO
LANGUAGE: english-en; MARQUE: jaguar; MODEL: XF
Occupant safety
31
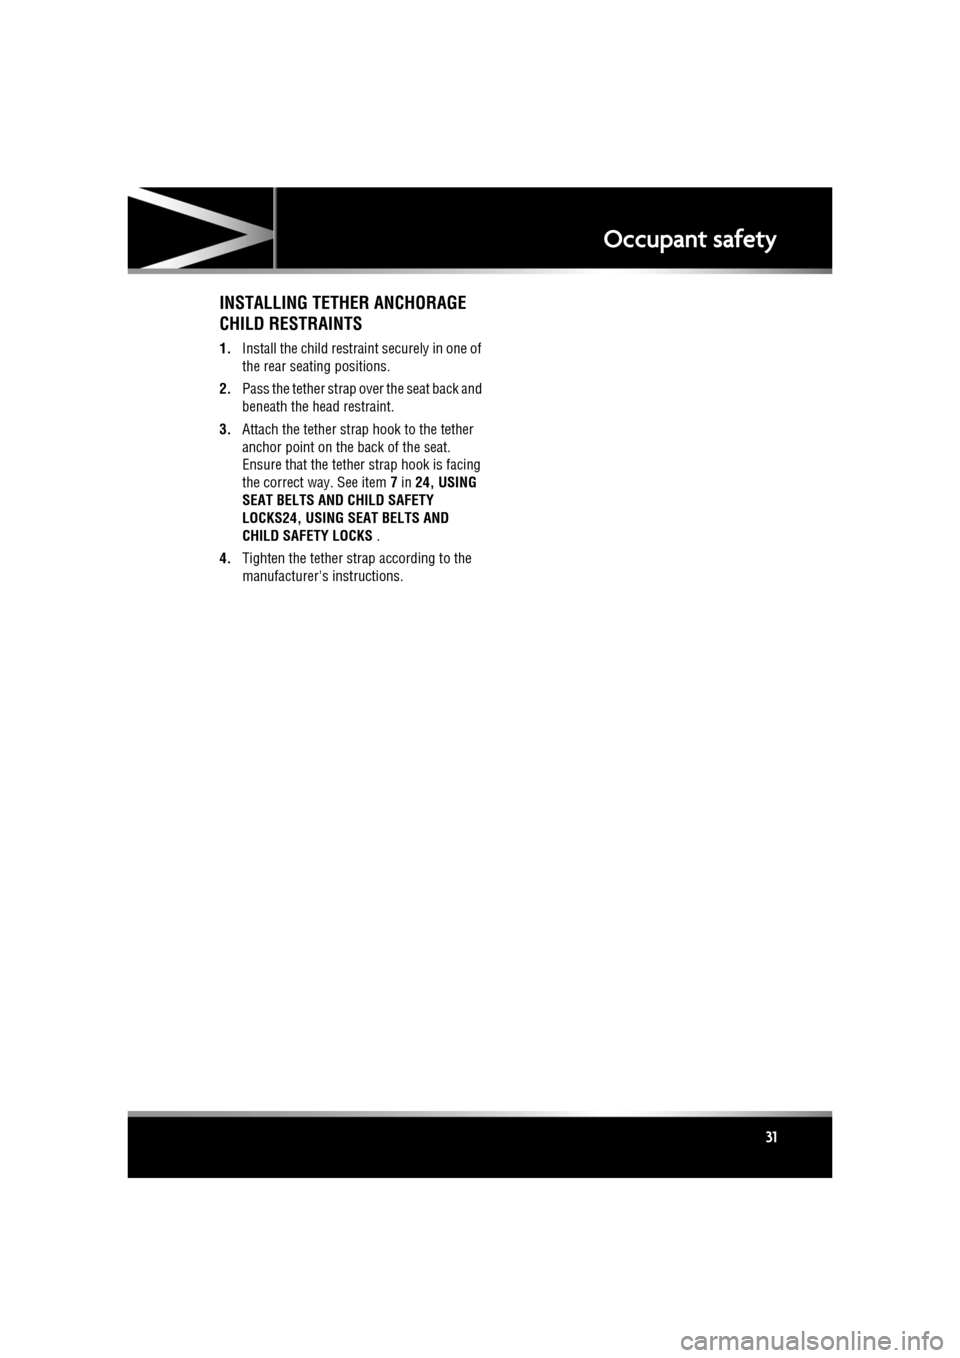
INSTALLING TETHER ANCHORAGE
CHILD RESTRAINTS
1. Install the child restraint securely in one of
the rear seating positions.
2. Pass the tether strap over the seat back and
beneath the head restraint.
3. Attach the tether strap hook to the tether
anchor point on the back of the seat.
Ensure that the tether strap hook is facing
the correct way. See item 7 in 24, USING
SEAT BELTS AND CHILD SAFETY
LOCKS24, USING SEAT BELTS AND
CHILD SAFETY LOCKS .
4. Tighten the tether strap according to the
manufacturer's instructions.
Page 38 of 225

L
(FM8) SEMCON JLR OWNER GUIDE VER 1.00 EURO
LANGUAGE: english-en; MARQUE: jaguar; MODEL: XF
Exterior lights
38
AUTO HIGH BEAM
This feature automatically selects and
deselects high beam, unde r specific conditions
of road lighting and in the absence of other
vehicle’s lights. The system is only active when
the ambient light drops below a predetermined
level.
This function is only active if the rotary control
is in the AUTO position and the stalk is in the
central position.
The system will only activate when vehicle
speed exceeds 25 mph (40 km/h). The system
will deactivate when ve hicle speed drops below
15 mph (24 km/h).
Note: Auto high beam does not operate when
reverse gear is selected.
To manually select high beam, move the stalk
to the high beam position as normal. To return
to Auto high beam, move the stalk back to the
central position.
To manually override to low beam from high
beam, pull the stalk to the flash position and
auto high beam will be cancelled. To return to
auto high beam, push the stalk to the high
beam position and then re turn it to the central
position.
Note: The following may affect the operation of
auto high beam:-
* Highly reflective road signs.
* Vehicles with dim headlamps.
* Adverse weather conditions.
* Dirty sensor.
* Dirty, damaged, or misted windscreen.
To turn off auto high beam, turn the rotary
control from AUTO to headlamps on. The Auto high beam feat
ure can be disabled/
enabled via the security/ vehicle settings menu
of the touch screen. See 61, VEHICLE
SETTINGS .
Note: Ensure that the sensor in the rear view
mirror is not blocked or obstructed.
HEADLAMPS - CONDENSATION
In certain circumstances, misting may occur
on the inside of a lamp lens. This is caused by
natural changes in environmental conditions.
This misting is not de trimental to lamp
performance and will clear during normal
usage.
When auto high beam is enabled,
the system indicator will
illuminate.
Page 44 of 225

L
(FM8) SEMCON JLR OWNER GUIDE VER 1.00 EURO
LANGUAGE: english-en; MARQUE: jaguar; MODEL: XF
Mirrors
44
MirrorsEXTERIOR MIRRORS
1. Left mirror adjustment.
2. Right mirror adjustment.
3. Powerfold/Unfold: Press both buttons
simultaneously. This feat ure is inhibited at
speeds over 110 km/h (70 mph).
The mirrors can be adjusted and folded when
the ignition is on and for up to 5 minutes after
the ignition is switched off, provided the
driver’s door is not opened.
Press the appropriate button to select the
mirror to be adjusted (button indicator
illuminates), then use th e joystick control to
adjust the mirror glass.
Note: Depending on the type of lens used,
distances may be difficult to judge accurately
when only using the mirrors. The mirrors can be confi
gured to automatically
fold when the vehicle is locked and unfold
when unlocked. This feature can be enabled or
disabled via the Security/vehicle settings area
of the touch screen. See 61, VEHICLE
SETTINGS .
If the mirrors are accide ntally knocked out of
position (i.e. so only one is folded), press both
buttons simultaneously to resynchronise.
Note: If the mirrors were folded using the
switches, they will not unfold when the vehicle
is unlocked.
Note: Two different exterior mirror positions
can be stored and recalled using the driving
position memory feature. See 15, DRIVING
POSITION MEMORY .
Page 45 of 225

R
(FM8) SEMCON JLR OWNER GUIDE VER 1.00 EURO
LANGUAGE: english-en; MARQUE: jaguar; MODEL: XF
Mirrors
45
MIRROR DIP WHEN REVERSING
The mirrors can be configured so that when
reverse gear is select ed, the passenger door
mirror automatically adjusts to provide an
improved viewing angle for reversing.
The exact dipped position can be adjusted
using the joystick control, when the mirror is
dipped. The next time reverse is selected, the
newly adjusted position will be selected.
When the gear selector is moved out of
reverse, or if vehicle speed exceeds 12 km/h
(7.5 mph) while reversing, the mirror will
return to its previous position.
Mirror dip can be selected or deselected using
the touch screen, as follows:
• From the touch screen Home menu, select
Set-up .
• Select Security/vehicle .
• Select Windows/mirrors .
• Select Reverse mirror dip - On or Off.
Page 48 of 225

L
(FM8) SEMCON JLR OWNER GUIDE VER 1.00 EURO
LANGUAGE: english-en; MARQUE: jaguar; MODEL: XF
Garage door opener
48
Garage door openerGARAGE DOOR TRANSCEIVER
Do not use the transceiver with any
garage door opener that lacks the
safety stop and reverse feature as
required by safety standards.
When programming the transceiver to
a garage door opener or entry gate,
ensure the area is clear. This will
prevent potential harm or damage as
the gate or garage door will activate
during the programme.
This device may suffer from
interference if operate d in the vicinity of
a mobile or fixed station transmitter.
This interference is li kely to affect the
hand-held transmitter as well as the
in-car transceiver.
The door transceiver is located in the rear-view
mirror. It can be programmed to transmit the
radio frequencies of up to three different
transmitters, which can be used to operate
garage doors, entry gates, home lighting,
security systems or other radio frequency
operated devices.
Although this section mainly describes the
procedures for a garage door opener, it equally
applies to the previously mentioned
applications.
In some countries, this feature is also known
as the HomeLink® Universal Transceiver.
For further information, see 50,
INFORMATION AND ASSISTANCE .
BEFORE PROGRAMMING
When programming a device that may
require you to press and re-press the
hand-held transmitter (cycle), unplug
the device during the cycling process to
prevent possible motor failure.
For best results, fit a new battery to the
hand-held transmitter of the garage door
opener (or other device ) before programming.
If your garage door opener receiver (located in
the garage) is equippe d with an antenna,
ensure that the antenna is hanging straight
down.
PROGRAMMING
Ensuring that the engine is switched off:
1. Ensure that the ignition system is on.
2. Hold the end of the original garage door
opener hand-held transmitter 50 to
150 mm (2 to 6 inches) away from the
transceiver in the rear-view mirror, keeping
the indicator lamp in view.
3. Using both hands, simultaneously press
and hold both the chosen transceiver
button on the rear-view mirror, as shown
above, and the hand- held transmitter
button. Keep both but tons pressed. The
indicator lamp will flas h slowly at first and
then change to a fast flash. When the
indicator lamp flashes rapidly, release both
buttons. The rapid flashing lamp indicates
successful programming.
Page 50 of 225

L
(FM8) SEMCON JLR OWNER GUIDE VER 1.00 EURO
LANGUAGE: english-en; MARQUE: jaguar; MODEL: XF
Garage door opener
50
ENTRY GATE PROGRAMMING
The technology of some entry gates requires
you to press and re-press (cycle) the hand-held
transmitter button every two seconds during
programming.
Continue to press and hold the desired
rear-view mirror button while you cycle your
hand-held transmitter until the indicator lamp
flashes rapidly.
INFORMATION AND ASSISTANCE
It is recommended that when you sell or
dispose of the vehi cle, the programmed
transceiver buttons be erased for
security purposes.
For information on the range of available
compatible products or accessories, or for
assistance, you should contact your Dealer/
Authorised Repairer.
You can also contact the supplier’s helpline on
0 0800 04663 5465. This toll-free number can
be called from anywhere within Europe. No
separate country code is required (the first zero
is not required when calling from within
Germany).
Contact can also be made via the internet. The
website addres s is www.eurohomelink.com.
The e-mail address is
[email protected].
Note: Keep the original transmitter for future
use or programming procedures if, for
example, you purchase a new vehicle.
Note: The manufacturer is not responsible for
any radio or TV interference caused by
unauthorised modifications to this equipment.
Such modifications c ould void the user’s
authority to operate the equipment.