2010 HYUNDAI TUCSON set clock
[x] Cancel search: set clockPage 169 of 382
Features of your vehicle
86
4
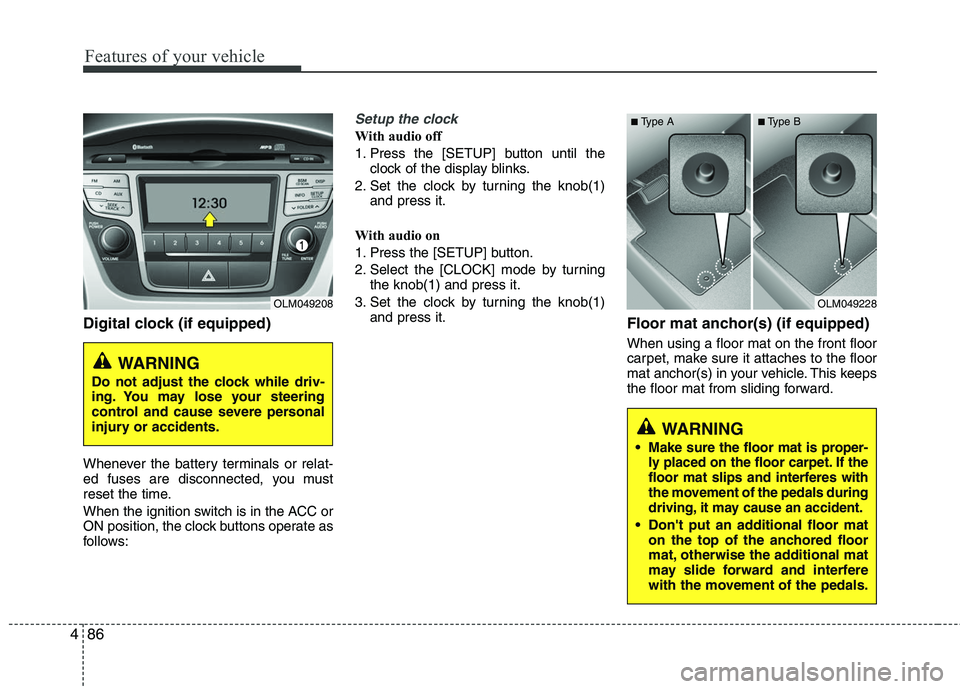
Digital clock (if equipped)
Whenever the battery terminals or relat-
ed fuses are disconnected, you must
reset the time.
When the ignition switch is in the ACC or
ON position, the clock buttons operate as
follows:
Setup the clock
With audio off
1. Press the [SETUP] button until the
clock of the display blinks.
2. Set the clock by turning the knob(1) and press it.
With audio on
1. Press the [SETUP] button.
2. Select the [CLOCK] mode by turning the knob(1) and press it.
3. Set the clock by turning the knob(1) and press it.
Floor mat anchor(s) (if equipped)
When using a floor mat on the front floor
carpet, make sure it attaches to the floor
mat anchor(s) in your vehicle. This keeps
the floor mat from sliding forward.
OLM049208
WARNING
Do not adjust the clock while driv-
ing. You may lose your steering
control and cause severe personal
injury or accidents.
OLM049228
WARNING
Make sure the floor mat is proper-
ly placed on the floor carpet. If the
floor mat slips and interferes with
the movement of the pedals during
driving, it may cause an accident.
Don't put an additional floor maton the top of the anchored floor
mat, otherwise the additional mat
may slide forward and interfere
with the movement of the pedals.
■Type A■Type B
Page 180 of 382
![HYUNDAI TUCSON 2010 Owners Manual
497
Features of your vehicle
Using RADIO, SETUP, VOLUME
and AUDIO CONTROL
1. AM Selection Button
Pressing the [AM] button selects the AM
band. AM Mode is displayed on the LCD.
2. FM Selection Button HYUNDAI TUCSON 2010 Owners Manual
497
Features of your vehicle
Using RADIO, SETUP, VOLUME
and AUDIO CONTROL
1. AM Selection Button
Pressing the [AM] button selects the AM
band. AM Mode is displayed on the LCD.
2. FM Selection Button](/manual-img/35/56207/w960_56207-179.png)
497
Features of your vehicle
Using RADIO, SETUP, VOLUME
and AUDIO CONTROL
1. AM Selection Button
Pressing the [AM] button selects the AM
band. AM Mode is displayed on the LCD.
2. FM Selection Button Turns to FM mode and toggles FM1 and
FM2 when the button is pressed each
time.
3. Automatic Station Seek Button
When the [SEEK ] is pressed, it willautomatically tune to the next lower
station.
When the [SEEK ] is pressed, it will automatically tune to the next higher
station.
4. Power ON/OFF Button & Volume Control Knob
Turns the audio system on/off when
the ignition switch is on ACC or ON.
If the knob is turned clockwise/counter- clockwise, the volume will increase
/decrease.
5. Preset Selection Button
Press [1]~[6] buttons less than 0.8 sec-ond to play the station saved in each
button.
Press [1]~[6] b utton more than 0.8 sec-
ond or longer to save the current station
to the respective button with a beep.
6. SCAN Button
When the button is pressed, it auto- matically scans the radio stations
upwards.
The SCAN feature steps through each station, starting from the initial station,
for ten seconds.
Press the [SCAN] button again to stop the scan feature and to listen to the
currently selected channel.
7. DISP Button
Turn the LCD Display & Backlight on/off
when [DISP] button press.
8. SETUP Button
Press this Button to enter SETUP mode,
If no action is taken for 8 seconds, it will
return to previous mode.
In “SETUP” mode, rotate the TUNE knob
to move the cursor between items, and
push the TUNE knob to select.
Select whether long file names are
scrolled continuously (“ON”) or just once
(“OFF”).
Select this item to turn the SDVC(Speed
Dependent Volume Control) feature ON
or OFF. If it is turned ON, volume level is
adjusted automatically according to the
vehicle speed.
This function creates virtual sound
effects and allows adjustments to the
BASS level.
HIGH
➟MID ➟LOW ➟OFF
Select default display of XM mode.
“Category/Channel name” or “Artist/Song
Title” can be selected.
Page 181 of 382
![HYUNDAI TUCSON 2010 Owners Manual
Features of your vehicle
98
4
Select this item to enter BLUETOOTH
setup mode. Refer to “BLUETOOTH
PHONE OPERATION” section for
detailed information.
Press the [SETUP] button. Use the vol-
ume c HYUNDAI TUCSON 2010 Owners Manual
Features of your vehicle
98
4
Select this item to enter BLUETOOTH
setup mode. Refer to “BLUETOOTH
PHONE OPERATION” section for
detailed information.
Press the [SETUP] button. Use the vol-
ume c](/manual-img/35/56207/w960_56207-180.png)
Features of your vehicle
98
4
Select this item to enter BLUETOOTH
setup mode. Refer to “BLUETOOTH
PHONE OPERATION” section for
detailed information.
Press the [SETUP] button. Use the vol-
ume controller to adjust the clock in the
following order: CLOCK
ENTERhour or
minute.
Adjust the hour and press the [ENTER]
button to set. Use the same method to
adjust the minute and press the [ENTER]
button to complete and exit from clock
adjustment mode.
Pressing the [SETUP] button while in
POWER OFF screen will allow the user
to make immediately adjustments to the
clock.
9. TUNE Knob & Audio Control Knob
clock wise to increase or decrease from
current frequency.
(AM 10kHz, FM 200kHz)
Pressing the button changes the BASS,
MIDDLE, TREBLE, FADER and BAL-
ANCE TUNE mode. The mode selected
is shown on the display. After selecting
each mode, rotate the Audio control knob
clockwise or counterclockwise.
To increase the BASS, rotate the knob
clockwise, while to decrease the BASS,
rotate the knob counterclockwise.
To increase the MIDDLE, rotate the knob
clockwise, while to decrease the MID-
DLE, rotate the knob counterclockwise.
Control
To increase the TREBLE, rotate the knob
clockwise, while to decrease the TRE-
BLE, rotate the knob counterclockwise.
Turn the control knob clockwise to
emphasize rear speaker sound (front
speaker sound will be attenuated). When
the control knob is turned counterclock-
wise, front speaker sound will be empha-
sized (rear speaker sound will be attenu-
ated).
Rotate the knob clockwise to emphasize
right speaker sound (left speaker sound
will be attenuated). When the control
knob is turned counter clockwise, left
speaker sound will be emphasized (right
speaker sound will be attenuated).
Page 189 of 382
Features of your vehicle
106
4
8. SEARCH Knob & ENTER
Button
songs after current song, or counter
clockwise to browse songs before cur-
rent song. To play the displayed song,
press the knob.
enters to AUDIO CONTROL mode.
✽ ✽ NOTICE FOR USING iPod
DEVICE
• Some iPod models might not support the communication protocol and the
files will not be played. (iPod models
supported: Mini, 4G, Photo, Nano,
5G)
• The order of search or playback of songs in the iPod can be different
from the order searched in the audio
system.
• If the iPod crashes due to its own trou- ble, reset iPod. (Reset: Refer to iPod
manual)
• iPod may not operate normally on low battery.
(Continued)
When the iPod cable is connected, the system can be switched to theAUX mode even without the iPoddevice and can cause noise.Disconnect iPod cable when youare not using the iPod device.
When the iPod is not used at audio system, iPod cable has tobe separate from iPod device.Origin display of iPod may not bedisplayed.CAUTION IN USING
iPod DEVICE
You need the power cable exclu-
sive for iPod in order to operateiPod with the buttons on the audiosystem. The PC cable provided byApple may cause malfunction anddo not use it for vehicle use.
When connecting the device with iPod cable, push in the jack fullynot to interfere with communica-tion.
When adjusting the sound effects of iPod and the audio system, thesound effects of both devices willoverlap each and might causereduce or distort the quality of thesound.
Deactivate (turn off) the equalizer function of iPod when adjustingthe audio system’s volume, andturn off the equalizer of the audiosystem when using the equalizerof iPod.
(Continued)
Page 193 of 382
![HYUNDAI TUCSON 2010 Owners Manual
Features of your vehicle
110
4
3. Preset Selection Button
Push [1]~[6] buttons less than 0.8 sec-
ond to play the channel saved in each
button. Push Preset button for 0.8 sec-
ond or longer to save c HYUNDAI TUCSON 2010 Owners Manual
Features of your vehicle
110
4
3. Preset Selection Button
Push [1]~[6] buttons less than 0.8 sec-
ond to play the channel saved in each
button. Push Preset button for 0.8 sec-
ond or longer to save c](/manual-img/35/56207/w960_56207-192.png)
Features of your vehicle
110
4
3. Preset Selection Button
Push [1]~[6] buttons less than 0.8 sec-
ond to play the channel saved in each
button. Push Preset button for 0.8 sec-
ond or longer to save current channel to
the respective button with a beep.
4. SCAN Selection Button
Press to hear a brief sampling of all
channels. To cancel the scan mode,
press the button once again.
5. INFO Button
Displays the information of the current
channel in the order of Artist/Song title➟Category/Channel name➟Current Play
Channel➟Artist/Song title➟Category/
Channel name... when the button is
pressed each time.
If can not display the whole text informa-
tion, rotate the tune button to see the
next page.
6. CATEGORY Search Button
Push [FOLDER ] button to search
previous category.
Push [CAT ] button to search next category. To listen to the displayed cat-
egory, press the TUNE/SETUP button.
To scan channel in displayed category,
press the scan button. To search chan-
nel in displayed category, press seek
buttons or turn the tune button clock-
wise/counterclockwise.(CATEGORY
icon is will be turned on in Category
mode)
7. Manual Channel Selection Button
While listening to XM broadcast, rotate
this control to the right or left to search
other channels while listening to current
channel. (Turn to the right to searchhigh-
er channels and left, lower channels)
Page 278 of 382
What to do in an emergency
14
6
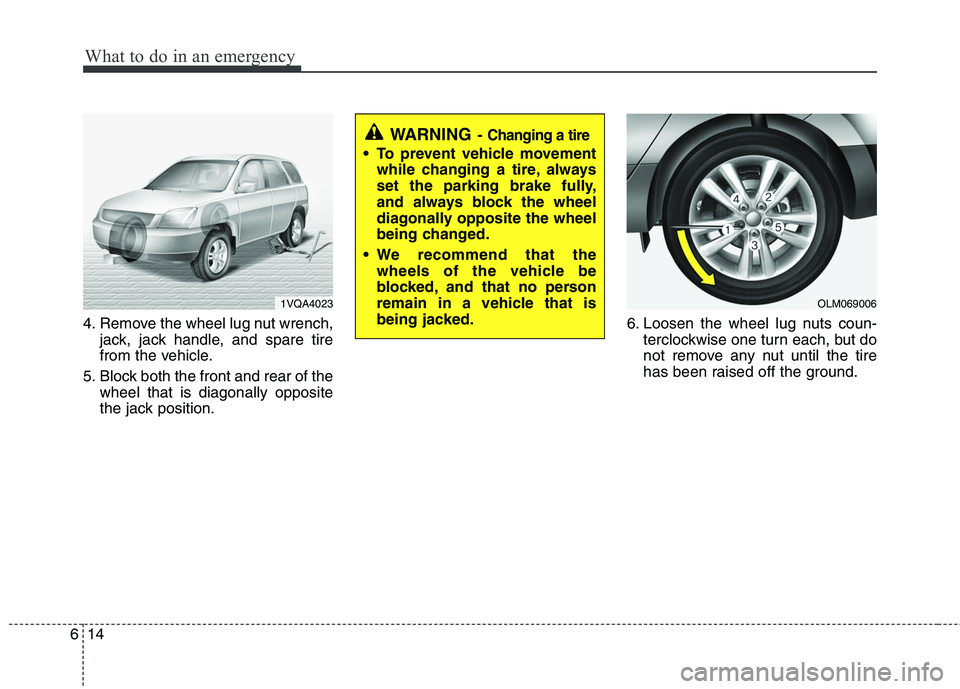
4. Remove the wheel lug nut wrench,
jack, jack handle, and spare tire
from the vehicle.
5. Block both the front and rear of the wheel that is diagonally opposite
the jack position. 6. Loosen the wheel lug nuts coun-
terclockwise one turn each, but do
not remove any nut until the tire
has been raised off the ground.
1VQA4023
OLM069006
WARNING- Changing a tire
To prevent vehicle movementwhile changing a tire, always
set the parking brake fully,
and always block the wheel
diagonally opposite the wheel
being changed.
We recommend that the wheels of the vehicle be
blocked, and that no person
remain in a vehicle that is
being jacked.
Page 285 of 382
621
What to do in an emergency
When towing your vehicle in an emer-
gency without wheel dollies :
1. Set the ignition switch in the ACC posi-tion.
2. Place the transaxle shift lever in N (Neutral).
3. Release the parking brake.
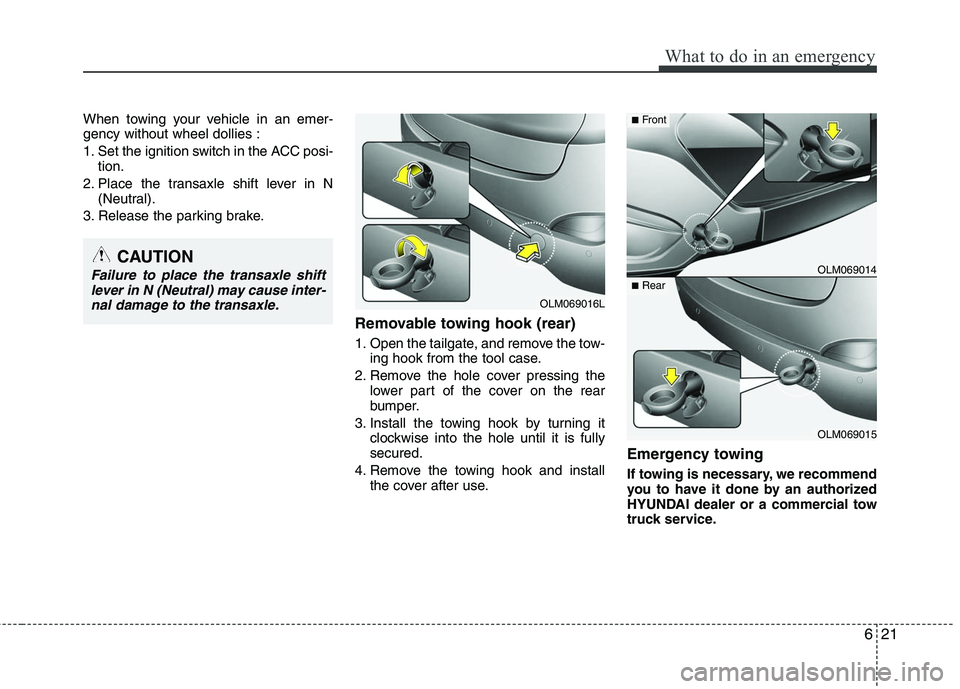
Removable towing hook (rear)
1. Open the tailgate, and remove the tow- ing hook from the tool case.
2. Remove the hole cover pressing the lower part of the cover on the rear
bumper.
3. Install the towing hook by turning it clockwise into the hole until it is fully
secured.
4. Remove the towing hook and install the cover after use.
Emergency towing
If towing is necessary, we recommend
you to have it done by an authorized
HYUNDAI dealer or a commercial tow
truck service.
CAUTION
Failure to place the transaxle shiftlever in N (Neutral) may cause inter-nal damage to the transaxle.
OLM069016L
OLM069014
OLM069015
■Front
■Rear
Page 324 of 382
Maintenance
36
7
Reset items
Items should be reset after the battery
has been discharged or the battery has
been disconnected.
Auto up/down window (See section 4)
Sunroof (See section 4)
Trip computer (See section 4)
Climate control system
(See section 4)
Clock (See section 4)
Audio (See section 4)(Continued)
Wear eye protection when check- ing the battery during charging.
Disconnect the battery charger in the following order.
1. Turn off the battery charger main switch.
2. Unhook the negative clamp from the negative battery terminal.
3. Unhook the positive clamp from the positive battery terminal.
WARNING
Before performing maintenanceor recharging the battery, turn off
all accessories and stop the
engine.
The negative battery cable must be removed first and installed
last when the battery is discon-
nected.