2010 Hyundai Sonata wheel
[x] Cancel search: wheelPage 69 of 285
1FEATURES OF YOUR HYUNDAI56
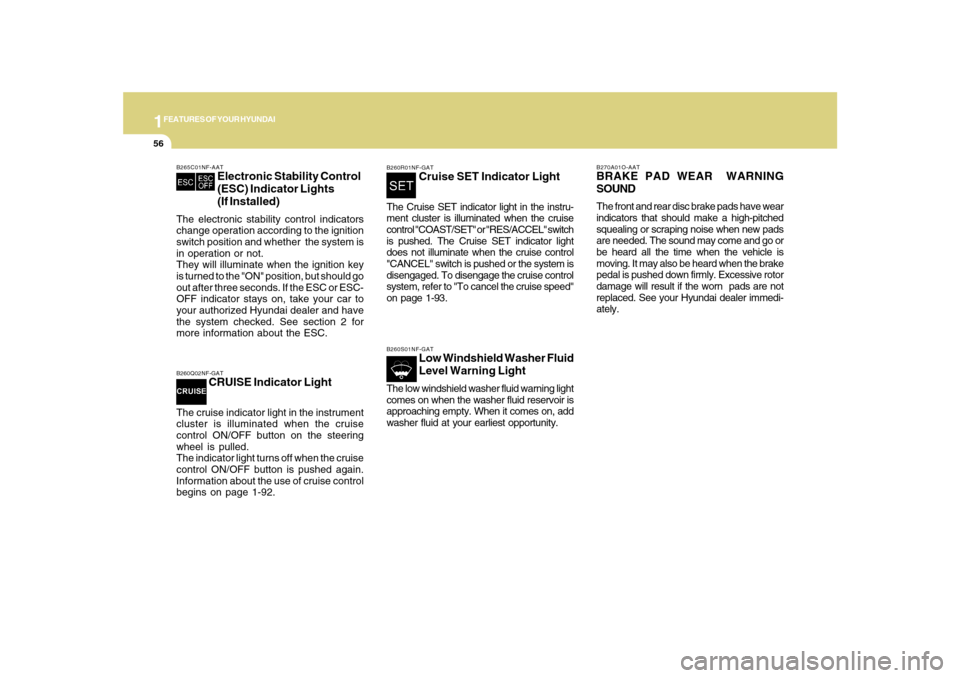
B265C01NF-AAT
Electronic Stability Control
(ESC) Indicator Lights
(If Installed)
The electronic stability control indicators
change operation according to the ignition
switch position and whether the system is
in operation or not.
They will illuminate when the ignition key
is turned to the "ON" position, but should go
out after three seconds. If the ESC or ESC-
OFF indicator stays on, take your car to
your authorized Hyundai dealer and have
the system checked. See section 2 for
more information about the ESC.B260Q02NF-GAT
CRUISE Indicator Light
The cruise indicator light in the instrument
cluster is illuminated when the cruise
control ON/OFF button on the steering
wheel is pulled.
The indicator light turns off when the cruise
control ON/OFF button is pushed again.
Information about the use of cruise control
begins on page 1-92.
B260R01NF-GAT
Cruise SET Indicator Light
The Cruise SET indicator light in the instru-
ment cluster is illuminated when the cruise
control "COAST/SET" or "RES/ACCEL" switch
is pushed. The Cruise SET indicator light
does not illuminate when the cruise control
"CANCEL" switch is pushed or the system is
disengaged. To disengage the cruise control
system, refer to "To cancel the cruise speed"
on page 1-93.B260S01NF-GAT
Low Windshield Washer Fluid
Level Warning Light
The low windshield washer fluid warning light
comes on when the washer fluid reservoir is
approaching empty. When it comes on, add
washer fluid at your earliest opportunity.
B270A01O-AATBRAKE PAD WEAR WARNING
SOUNDThe front and rear disc brake pads have wear
indicators that should make a high-pitched
squealing or scraping noise when new pads
are needed. The sound may come and go or
be heard all the time when the vehicle is
moving. It may also be heard when the brake
pedal is pushed down firmly. Excessive rotor
damage will result if the worn pads are not
replaced. See your Hyundai dealer immedi-
ately.
Page 70 of 285

1
FEATURES OF YOUR HYUNDAI
57
!
!
WARNING:
Significantly low tire pressure makes
the vehicle unstable and can contribute
to loss of vehicle control and increased
braking distances.
Continued driving on low pressure tires
will cause the tires to overheat and fail.
B260W02JM-GAT
Low tire pressure telltale
The low tire pressure telltale comes on for
3 seconds after the ignition key is turned to
the "ON" position.
If the warning light does not come on, the
Tire Pressure Monitoring System is not
working properly. If this occurs, have your
vehicle checked by an authorized Hyundai
dealer as soon as possible.
This warning light will also illuminate if one
or more of your tires are significantly under-
inflated. You should stop and check your
tires as soon as possible. If the warning
light illuminates while driving, reduce
vehicle speed immediately and stop the
vehicle. Avoid hard braking and overcor-
recting at the steering wheel. Inflate the
tires to the proper pressure as indicated on
the vehicle’s tire information placard.
After adjusting the tire pressure of each
wheel correctly, if the low pressure telltale
light stays “ON” continuously, the Tire
Pressure Monitoring System is not working
properly. If this occurs, have your vehicle
checked by an authorized Hyundai dealer
as soon as possible.
B265W02JM-GAT
TPMS (Tire Pressure Moni-
toring System) malfunction
indicator
TPMS malfunction indicator comes on for
3 seconds after the ignition key is turned to
the "ON" position. If the warning light does
not come on, or continuously remains on
after coming on for about 3 seconds when
you turned the ignition key to the "ON"
position, the Tire Pressure Monitoring
System is not working properly. If this
occurs, have your vehicle checked by an
authorized Hyundai dealer as soon as
possible.
The warning light also comes on and stays
on when there is a problem with the Tire
Pressure Monitoring System.
If this happens, the system may not monitor
the tire pressure. Have the system checked
by an authorized Hyundai dealer as soon
as possible.
WARNING:
o The TPMS cannot alert you to severe
and sudden tire damage caused by
external factors.
o If you feel any vehicle instability, im-
mediately take your foot off the
accelerator and slowly move to a safe
position off the road.
Page 73 of 285

1FEATURES OF YOUR HYUNDAI60
ONF048048N
ONF048050
To shift from TRIP A to TRIP B, press the
TRIP switch.
TRIP A:Distance you have traveled from
your origination point to a first
destination.
TRIP B:Distance from the first destina-
tion to the final destination.When the RESET switch is pressed for 1
second, the trip odometer will reset to 0.
Pushing in the TRIP switch behind the left
side of the steering wheel when the igni-
tion switch is turned "ON" will display two
trip odometers in miles.
ONF048049
2. Trip Odometer
(Without Trip Computer)
Page 80 of 285
1
FEATURES OF YOUR HYUNDAI
67
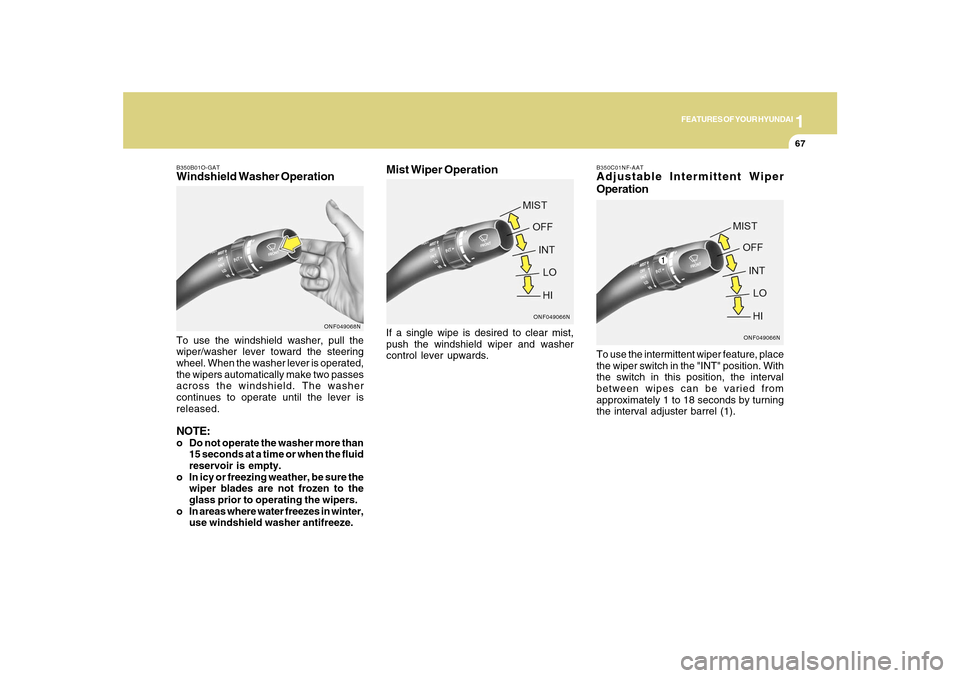
B350C01NF-AATAdjustable Intermittent Wiper
OperationTo use the intermittent wiper feature, place
the wiper switch in the "INT" position. With
the switch in this position, the interval
between wipes can be varied from
approximately 1 to 18 seconds by turning
the interval adjuster barrel (1).
ONF049066N
Mist Wiper OperationIf a single wipe is desired to clear mist,
push the windshield wiper and washer
control lever upwards.
B350B01O-GATWindshield Washer OperationTo use the windshield washer, pull the
wiper/washer lever toward the steering
wheel. When the washer lever is operated,
the wipers automatically make two passes
across the windshield. The washer
continues to operate until the lever is
released.NOTE:o Do not operate the washer more than
15 seconds at a time or when the fluid
reservoir is empty.
o In icy or freezing weather, be sure the
wiper blades are not frozen to the
glass prior to operating the wipers.
o In areas where water freezes in winter,
use windshield washer antifreeze.
ONF049068N
ONF049066N
Page 103 of 285
1FEATURES OF YOUR HYUNDAI90
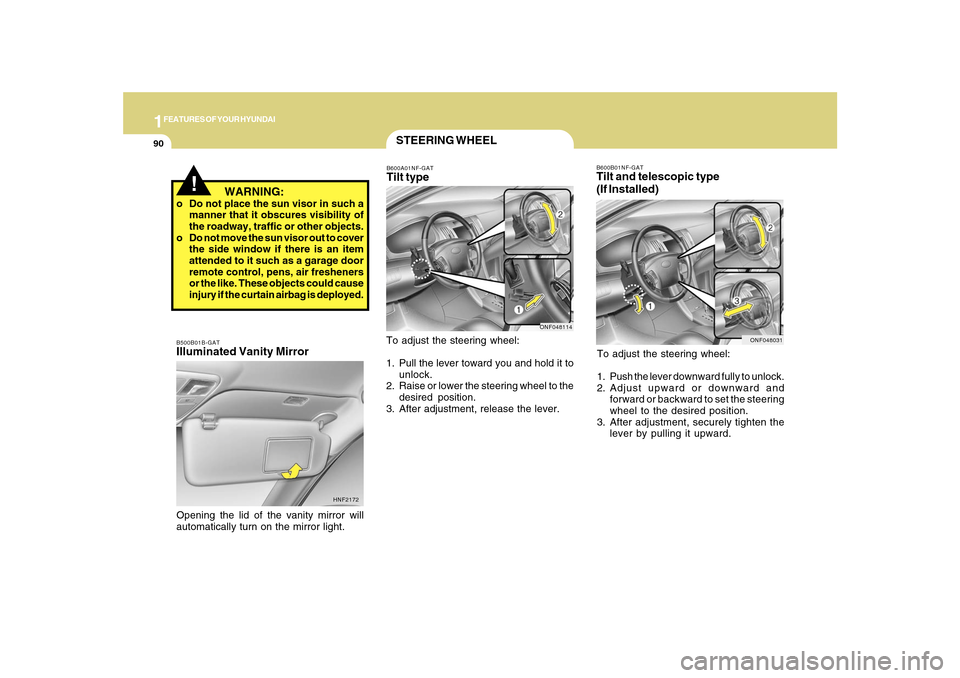
B600B01NF-GATTilt and telescopic type
(If Installed)To adjust the steering wheel:
1. Push the lever downward fully to unlock.
2. Adjust upward or downward and
forward or backward to set the steering
wheel to the desired position.
3. After adjustment, securely tighten the
lever by pulling it upward.
ONF048031
STEERING WHEELB600A01NF-GATTilt typeTo adjust the steering wheel:
1. Pull the lever toward you and hold it to
unlock.
2. Raise or lower the steering wheel to the
desired position.
3. After adjustment, release the lever.
ONF048114
B500B01B-GATIlluminated Vanity MirrorOpening the lid of the vanity mirror will
automatically turn on the mirror light.
HNF2172
!
WARNING:
o Do not place the sun visor in such a
manner that it obscures visibility of
the roadway, traffic or other objects.
o Do not move the sun visor out to cover
the side window if there is an item
attended to it such as a garage door
remote control, pens, air fresheners
or the like. These objects could cause
injury if the curtain airbag is deployed.
Page 104 of 285
1
FEATURES OF YOUR HYUNDAI
91
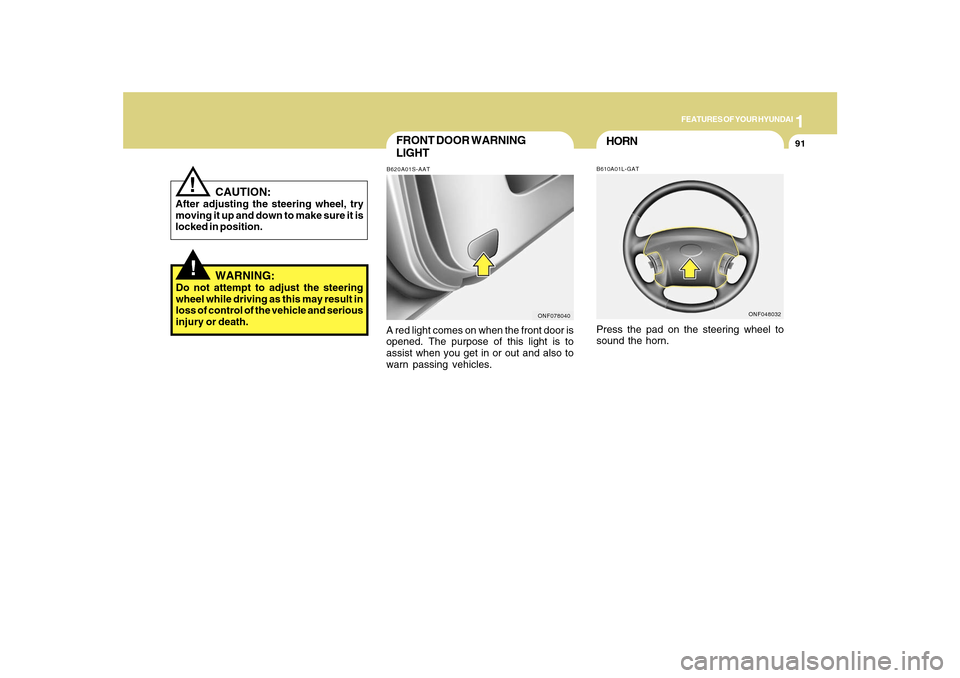
FRONT DOOR WARNING
LIGHTB620A01S-AATA red light comes on when the front door is
opened. The purpose of this light is to
assist when you get in or out and also to
warn passing vehicles.
ONF078040
!
CAUTION:
After adjusting the steering wheel, try
moving it up and down to make sure it is
locked in position.
!
WARNING:
Do not attempt to adjust the steering
wheel while driving as this may result in
loss of control of the vehicle and serious
injury or death.
HORNB610A01L-GATPress the pad on the steering wheel to
sound the horn.
ONF048032
Page 157 of 285
2
DRIVING YOUR HYUNDAI
4
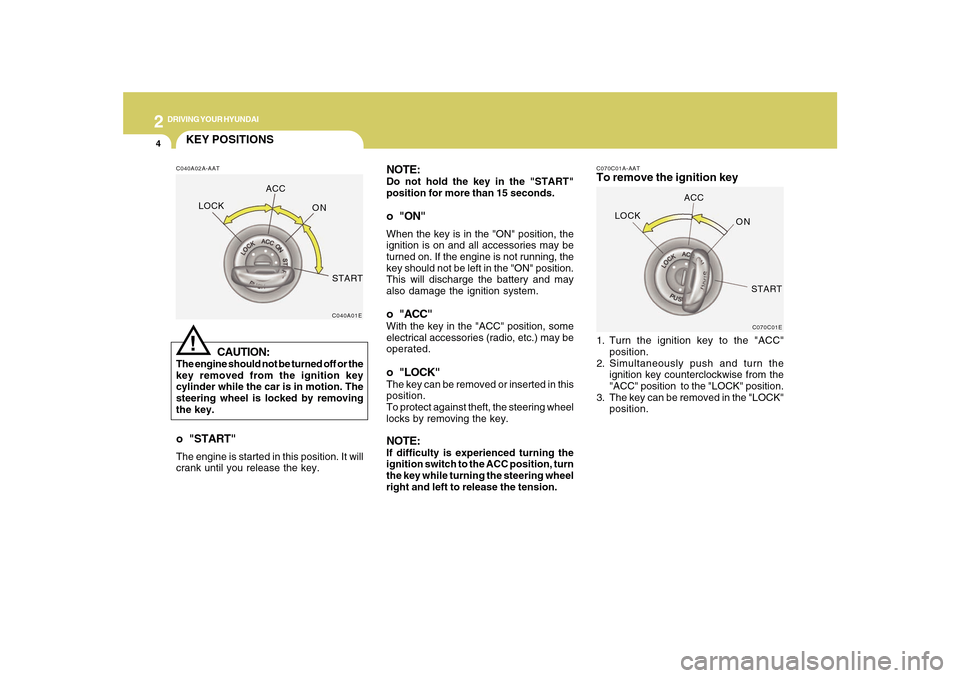
NOTE:Do not hold the key in the "START"
position for more than 15 seconds.o "ON"When the key is in the "ON" position, the
ignition is on and all accessories may be
turned on. If the engine is not running, the
key should not be left in the "ON" position.
This will discharge the battery and may
also damage the ignition system.o "ACC"With the key in the "ACC" position, some
electrical accessories (radio, etc.) may be
operated.o "LOCK"The key can be removed or inserted in this
position.
To protect against theft, the steering wheel
locks by removing the key.NOTE:If difficulty is experienced turning the
ignition switch to the ACC position, turn
the key while turning the steering wheel
right and left to release the tension.
C070C01A-AATTo remove the ignition key1. Turn the ignition key to the "ACC"
position.
2. Simultaneously push and turn the
ignition key counterclockwise from the
"ACC" position to the "LOCK" position.
3. The key can be removed in the "LOCK"
position.
C070C01E
LOCKACC
ON
START
KEY POSITIONSC040A02A-AAT
CAUTION:
The engine should not be turned off or the
key removed from the ignition key
cylinder while the car is in motion. The
steering wheel is locked by removing
the key.
C040A01E
LOCKACC
ON
START!
o "START"The engine is started in this position. It will
crank until you release the key.
Page 160 of 285
2
DRIVING YOUR HYUNDAI
7
!
C070B02A-AATUsing the ClutchThe clutch should be pressed all the way
to the floor before shifting, then released
slowly. The clutch pedal should always be
fully released while driving. Do not rest
your foot on the clutch pedal while driving.
This can cause unnecessary wear. Do not
partially engage the clutch to hold the car
on an incline. This causes unnecessary
wear. Use the foot brake or parking brake
to hold the car on an incline. Do not operate
the clutch pedal rapidly and repeatedly.
WARNING:
o Always buckle-up! In a collision, an
unbelted occupant is significantly
more likely to be seriously injured or
killed than a properly belted occupant.
o Avoid high speeds when cornering or
turning.
o Do not make quick steering wheel
movements, such as sharp lane
changes or fast, sharp turns.
o The risk of rollover is greatly
increased if you lose control of your
vehicle at highway speeds.
o Loss of control often occurs if two or
more wheels drop off the roadway
and the driver oversteers to reenter
the roadway.
o In the event your vehicle leaves the
roadway, do not steer sharply. Instead,
slow down before pulling back into the
travel lanes.
o Never exceed posted speed limits.
C070D03O-AATGood Driving Practiceso Never take the car out of gear and coast
down a hill. This is extremely hazardous.
Always leave the car in gear.
o Don't "ride" the brakes. This can cause
them to overheat and malfunction.
Instead, when you are driving down a
long hill, slow down and shift to a lower
gear. When you do this, engine braking
will help slow the car.
o Slow down before shifting to a lower
gear. This will help avoid over-revving
the engine, which can cause damage.
o Slow down when you encounter cross
winds. This gives you much better control
of your car.
o Be sure the car is completely stopped
before you attempt to shift into reverse.
The transaxle can be damaged if you do
not. To shift into reverse, depress the
clutch, move the shift lever to neutral,
wait three seconds, then shift to the
reverse position.
o Exercise extreme caution when driving
on a slippery surface. Be especially
careful when braking, accelerating or
shifting gears. On a slippery surface, an
abrupt change in vehicle speed can
cause the drive wheels to lose traction
and the vehicle to go out of control.
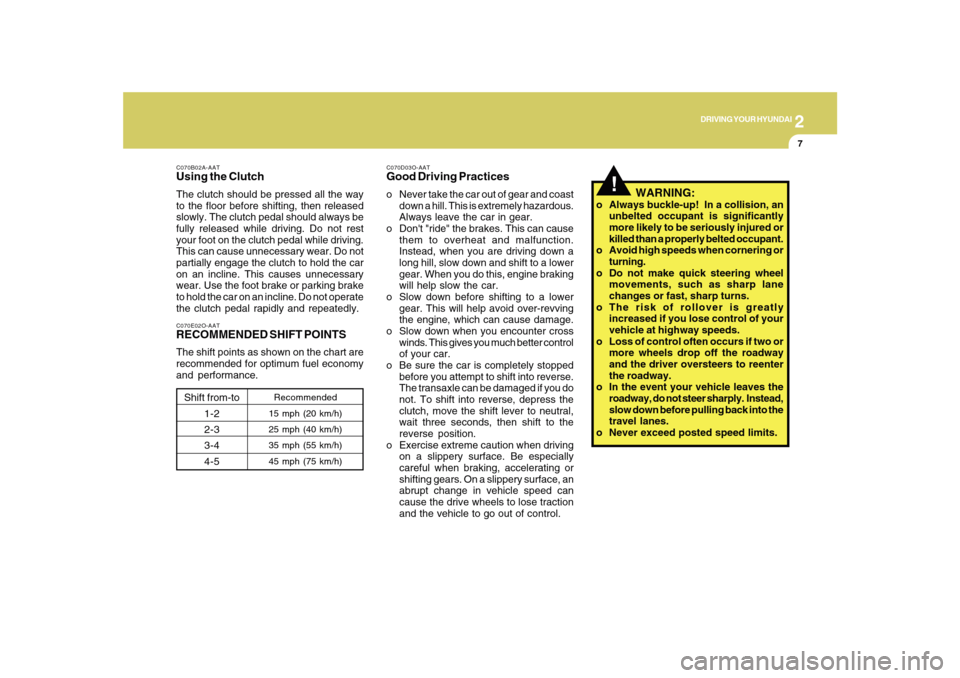
C070E02O-AATRECOMMENDED SHIFT POINTSThe shift points as shown on the chart are
recommended for optimum fuel economy
and performance.
Shift from-to
1-2
2-3
3-4
4-5
Recommended
15 mph (20 km/h)
25 mph (40 km/h)
35 mph (55 km/h)
45 mph (75 km/h)