2010 Hyundai Sonata sensor
[x] Cancel search: sensorPage 93 of 285

1FEATURES OF YOUR HYUNDAI80
Automatic-Dimming Night Vision
Safety™ (NVS
®) Mirror
The NVS
® Mirror in your vehicle is the most
advanced way to reduce annoying glare in
the rearview mirror during any driving
situation. For more information regarding
NVS
® mirrors and other applications,
please refer to the Gentex website:
www.gentex.com. CAUTION:
The NVS
® Mirror automatically reduces
glare during driving conditions based
upon light levels monitored in front of the
vehicle and from the rear of the vehicle.
These light sensors are visible through
openings in the front and rear of the
mirror case. Any object that would
obstruct either light sensor will degrade
the automatic dimming control feature.
!
Automatic-Dimming Function
Your mirror will automatically dim upon
detecting glare from the vehicles traveling
behind you. The auto-dimming function
can be controlled by the Dimming ON/OFF
Button:
1. Pressing the
button turns the auto-
dimming function OFF which is
indicated by the green Status Indicator
LED turning off.
2. Pressing the button again turns the
auto-dimming function ON which is
indicated by the green Status Indicator
LED turning on.
NOTE:The mirror defaults to the "ON" position
each time the vehicle is started.Compass Function
The Compass can be turned ON and OFF
and will remember the last state when the
ignition is cycled. To turn the display
feature ON/OFF:
1. Press and release the
button to turn
the display feature OFF.
2. Press and release the button again
to turn the display back ON.
Additional options can be set with press
and hold sequences of the button and
are detailed below.
There is a difference between magnetic
north and true north. The compass in the
mirror can compensate for this difference
when it knows the Magnetic Zone in which
it is operating. This is set either by the dealer
or by the user. The operating Zone Numbers
for North America are shown in the figure on
the following section.
Z-Nav™ Compass DisplayThe NVS™ Mirror in your vehicle is also
equipped with a Z-Nav™ Compass that
shows the vehicle Compass heading in
the Display Window using the 8 basic
cardinal headings (N, NE, E, SE, etc.).
Page 119 of 285

1FEATURES OF YOUR HYUNDAI
106
B980A01Y-AATMANUAL OPERATIONThe heating and cooling system can be
controlled manually as well by pushing
buttons other than the "AUTO" button. In
this state, the system sequentially works
according to the order of buttons selected.
The function of the buttons which are not
selected will be controlled automatically.
Press the "AUTO" button in order to convert
to automatic control of the system.
ONF048115
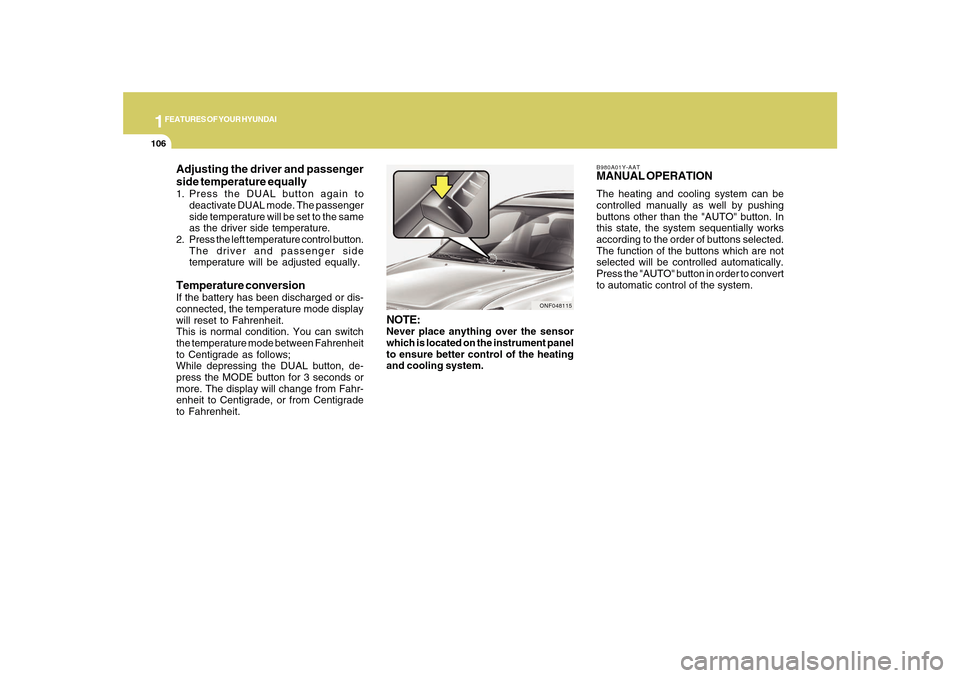
NOTE:Never place anything over the sensor
which is located on the instrument panel
to ensure better control of the heating
and cooling system.
Adjusting the driver and passenger
side temperature equally1. Press the DUAL button again to
deactivate DUAL mode. The passenger
side temperature will be set to the same
as the driver side temperature.
2. Press the left temperature control button.
The driver and passenger side
temperature will be adjusted equally.Temperature conversionIf the battery has been discharged or dis-
connected, the temperature mode display
will reset to Fahrenheit.
This is normal condition. You can switch
the temperature mode between Fahrenheit
to Centigrade as follows;
While depressing the DUAL button, de-
press the MODE button for 3 seconds or
more. The display will change from Fahr-
enheit to Centigrade, or from Centigrade
to Fahrenheit.
Page 187 of 285

36WHAT TO DO IN AN EMERGENCY
!
Low tire pressure telltale
When the tire pressure monitoring sys-
tem warning telltale is illuminated, one
or more of your tires is significantly
under-inflated.
Immediately reduce your speed, avoid
hard cornering and anticipate increased
stopping distances. You should stop
and check your tires as soon as pos-
sible. Inflate the tires to the proper
pressure as indicated on the vehicle’s
placard or tire inflation pressure label
located on the driver’s side center pillar
outer panel. If you cannot reach a ser-
vice station or if the tire cannot hold the
newly added air, replace the low pres-
sure tire with the temporary spare tire.
Then the TPMS malfunction indicator
or the Low Tire Pressure telltale may
turn on after restarting and about 20
minutes of continuous driving before
you have the low-pressure tire repaired
and reinstalled on the vehicle. CAUTION:
In winter or cold weather, the low tire
pressure telltale may be illuminated
if the tire pressure was adjusted to
the recommended tire inflation pres-
sure in warm weather. It does not
mean your TPMS is malfunctioning
because the decreased temperature
leads to a proportional lowering of
tire pressure.
When you drive your vehicle from a
warm area to a cold area or from a
cold area to a warm area, or the
outside temperature is greatly higher
or lower, you should check the tire
inflation pressure and adjust the tires
to the recommended tire inflation
pressure.
Always check your tire inflation pres-
sures when the tires are cold, before
you have driven on them.WARNING - Low pressure
Significantly low tire pressure makes
the vehicle unstable and can contrib-
ute to loss of vehicle control and
increased braking distances. Contin-
ued driving on low pressure tires will
cause the tires to overheat and fail.
TPMS (Tire pressure moni-
toring system) malfunction
indicator
The TPMS malfunction indicator turns
on and stays on when there is a problem
with the Tire Pressure Monitoring Sys-
tem. If the system is able to correctly
detect an under-inflation warning at the
same time as system failure then it will
illuminate both the TPMS malfunction
and the low tire pressure telltale, e.g. if
the Front Left sensor fails, the TPMS
malfunction indicator turns on, but if the
Front Right, Rear Left, or Rear Right tire
is under-inflated, the low tire pressure
telltale may turn on at the same time as
the TPMS malfunction indicator.
!
Page 188 of 285

3
WHAT TO DO IN AN EMERGENCY
7
Have the system checked by an autho-
rized Hyundai dealer as soon as pos-
sible to determine the cause of the
problem.
NOTE:
o The TPMS malfunction indicator
may be illuminated if the vehicle
is operated in areas close to elec-
tric power supply cables or radio
transmitters such as near police
stations, government and public
offices, broadcasting stations,
military installations, airports, or
transmitting towers, etc. which can
interfere with normal operation of
the Tire Pressure Monitoring Sys-
tem (TPMS).
o The TPMS malfunction indicator
may be illuminated if snow chains
or some electronic devices, such
as notebook computers, are used
in the vehicle. This can interfere
with normal operation of the Tire
Pressure Monitoring System
(TPMS).o If there is a failed tire sensor, it is
possible for the TPMS to tempo-
rarily learn a replacement sensor
if closely driven to another vehicle
that is also equipped with TPMS.
In rare cases, this may tempo-
rarily delay the TPMS malfunction
indicator from turning on.
Changing a tire with TPMS
If you have a flat tire, the Low Tire
Pressure telltale will turn on. Have the
flat tire repaired by an authorized Hyundai
dealer as soon as possible or replace
the flat tire with the temporary spare
tire. NEVER use a puncture-repairing
agent to repair and/or inflate a low
pressure tire. If used, you will have to
replace the tire pressure sensor.
Each wheel is equipped with a tire
pressure sensor mounted inside the tire
behind the valve stem. You must use
TPMS specific wheels. It is recom-
mended that you always have your tires
serviced by an authorized Hyundai
dealer.After you replace the low pressure tire
with the spare tire, the TPMS malfunc-
tion indicator or the Low Tire Pressure
telltale may illuminate after restarting
and driving for about 20 minutes.
Once the low pressure tire is re-inflated
to the recommended pressure and in-
stalled on the vehicle, the TPMS mal-
function indicator and the low tire pres-
sure telltale will extinguish. If the low
pressure and TPMS malfunction indi-
cators are not extinguished after about
20 minutes of continuous driving, please
visit an authorized Hyundai dealer.
You may not be able to identify a low tire
by simply looking at it. Always use a
good quality tire pressure gauge to
measure the tire's inflation pressure.
Please note that a tire that is hot (from
being driven) will have a higher pres-
sure measurement than a tire that is
cold (from sitting stationary for at least
3 hours and driven less than 1 mile
during that 3 hour period). Allow the tire
to cool before measuring the inflation
pressure.
Page 189 of 285

38WHAT TO DO IN AN EMERGENCY
!
!!
Always be sure the tire is cold before
inflating to the recommended pressure.
A cold tire means the vehicle has been
sitting for 3 hours and driven for less
than 1 mile in that 3 hour period.
NOTE:
o Do not use any tire sealant if your
vehicle is equipped with a Tire
Pressure Monitoring System. The
liquid sealant can damage the tire
pressure sensors.
o In order for the system to correctly
monitor tires for under-inflation,
there should be a total of 4 sen-
sors, one fitted to each of the four
wheel positions. There should be
no other sensors in the vehicle
including for the spare tire. This
could cause the system to moni-
tor the wrong sensor. WARNING - TPMS
o The TPMS cannot alert you to se-
vere and sudden tire damage
caused by external factors.
o If you feel any vehicle instability,
take your foot off the accelerator
and slowly move to a safe position
off the road.
WARNING:
Tampering with, modifying, or dis-
abling the Tire Pressure Monitoring
System (TPMS) components may
interfere with the system's ability to
warn the driver of low tire pressure
conditions and/or TPMS malfunc-
tions. Tampering with, modifying,
or disabling the Tire Pressure Moni-
toring System (TPMS) components
may void the warranty for that por-
tion of the vehicle.This device complies with Part 15 of
the FCC rules.
Operation is subject to the following two
conditions:
1. This device may not cause harmful
interference, and
2. This device must accept any inter-
ference received, including interfer-
ence that may cause undesired op-
eration.
WARNING:
Changes or modifications not ex-
pressly approved by the party re-
sponsible for compliance could void
the user’s authority to operate the
equipment.
Page 252 of 285

6
DO-IT-YOURSELF MAINTENANCE
38
1
2
3
4
5
6
7
8
9
10
11
12
13
14
15
16
17
18
19
20
21
22
23
24
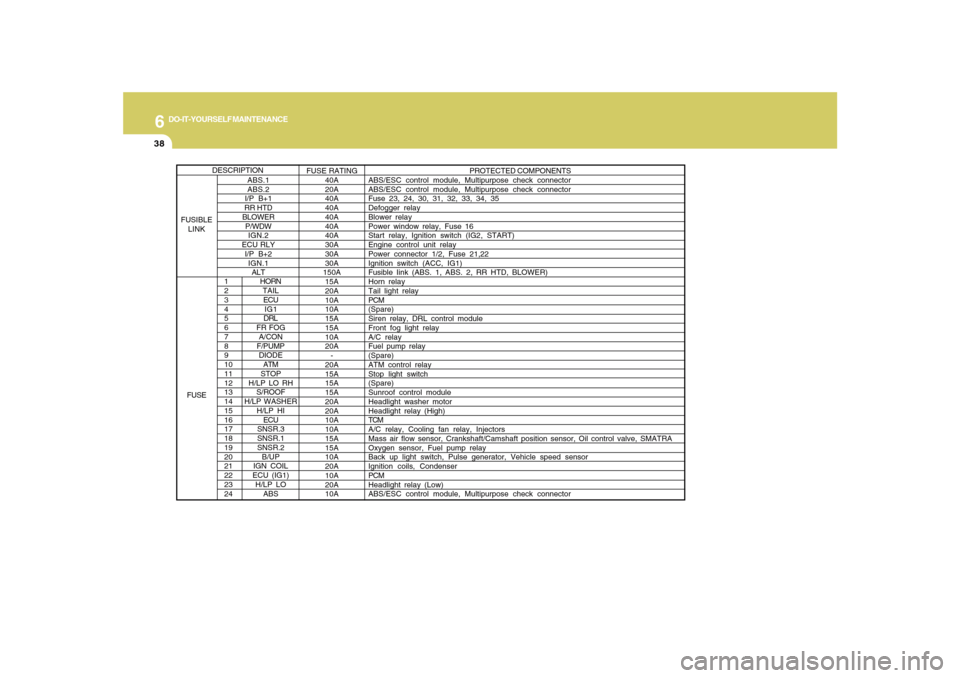
HORN
TAIL
ECU
IG1
DRL
FR FOG
A/CON
F/PUMP
DIODE
ATM
STOP
H/LP LO RH
S/ROOF
H/LP WASHER
H/LP HI
ECU
SNSR.3
SNSR.1
SNSR.2
B/UP
IGN COIL
ECU (IG1)
H/LP LO
ABS
PROTECTED COMPONENTS
ABS/ESC control module, Multipurpose check connector
ABS/ESC control module, Multipurpose check connector
Fuse 23, 24, 30, 31, 32, 33, 34, 35
Defogger relay
Blower relay
Power window relay, Fuse 16
Start relay, Ignition switch (IG2, START)
Engine control unit relay
Power connector 1/2, Fuse 21,22
Ignition switch (ACC, IG1)
Fusible Iink (ABS. 1, ABS. 2, RR HTD, BLOWER)
Horn relay
Tail light relay
PCM
(Spare)
Siren relay, DRL control module
Front fog light relay
A/C relay
Fuel pump relay
(Spare)
ATM control relay
Stop light switch
(Spare)
Sunroof control module
Headlight washer motor
Headlight relay (High)
TCM
A/C relay, Cooling fan relay, Injectors
Mass air flow sensor, Crankshaft/Camshaft position sensor, Oil control valve, SMATRA
Oxygen sensor, Fuel pump relay
Back up light switch, Pulse generator, Vehicle speed sensor
Ignition coils, Condenser
PCM
Headlight relay (Low)
ABS/ESC control module, Multipurpose check connector
ABS.1
ABS.2
I/P B+1
RR HTD
BLOWER
P/WDW
IGN.2
ECU RLY
I/P B+2
IGN.1
ALTFUSE RATING
40A
20A
40A
40A
40A
40A
40A
30A
30A
30A
150A
15A
20A
10A
10A
15A
15A
10A
20A
-
20A
15A
15A
15A
20A
20A
10A
10A
15A
15A
10A
20A
10A
20A
10A
DESCRIPTION
FUSIBLE
LINK
FUSE
Page 253 of 285

6
DO-IT-YOURSELF MAINTENANCE
39
PROTECTED COMPONENTS
FUSE RATING FUSE
SPARE 15A(Spare)
SPARE 15A(Spare)
ETACS 10ABCM(Body Control Module), Sunroof control module, Electronic chrome mirror, Rheostat
ESC 10A ESC module, Blower relay
C/LIGHTER 20ACigarette lighter
SPARE 15A(Spare)
TAIL RH 10AIllumination lights, Right : License light (LH, RH), Rear combination light, Headlight, Glove box light
TAIL LH 10A Front fog light relay, Left : Rear combination light, Headlight
IONIZER 10A (Spare)
H/LP 10ADRL control module, Headlight relay, AQS and ambient sensor
WIPER 25A Wiper and washer
A/CON 10AA/C control module
A/BAG 15A SRS control module, Passenger's Airbag switch
P/OUTLET 20AFront accessory socket, Rear power outlet
D/CLOCK 10ADigital clock, Audio, A/T shift lock control module, Power outside mirror and mirror folding, BCM
SAFETY PWR 25A Safety window module
ECS 15A (Spare)
ATM KEY LOCK 10A A/T shift lock control module
P/WDW RR LH 25A Power window main switch, Left rear power window switch
P/WDW RH 30A Power window main switch, Right power window switch
Inner Panel
Page 254 of 285

6
DO-IT-YOURSELF MAINTENANCE
40
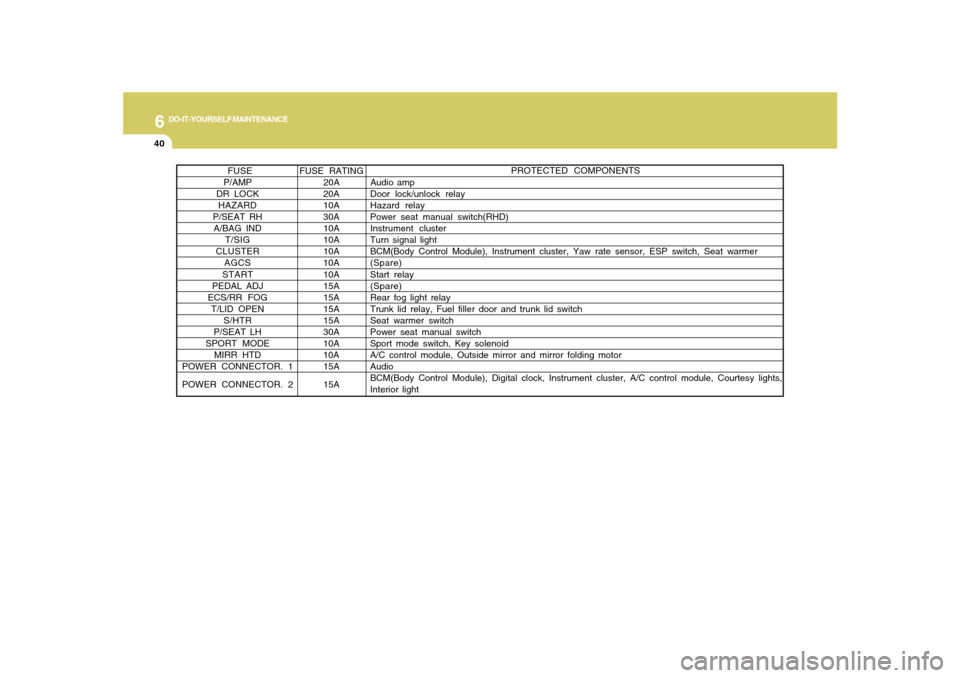
PROTECTED COMPONENTS
FUSE RATING FUSE
P/AMP 20A Audio amp
DR LOCK 20A Door lock/unlock relay
HAZARD 10AHazard relay
P/SEAT RH 30A Power seat manual switch(RHD)
A/BAG IND 10A Instrument cluster
T/SIG 10A Turn signal light
CLUSTER 10ABCM(Body Control Module), Instrument cluster, Yaw rate sensor, ESP switch, Seat warmer
AGCS 10A (Spare)
START 10A Start relay
PEDAL ADJ 15A(Spare)
ECS/RR FOG 15A Rear fog light relay
T/LID OPEN 15A Trunk lid relay, Fuel filler door and trunk lid switch
S/HTR 15A Seat warmer switch
P/SEAT LH 30A Power seat manual switch
SPORT MODE 10A Sport mode switch, Key solenoid
MIRR HTD 10A A/C control module, Outside mirror and mirror folding motor
POWER CONNECTOR. 115A Audio
POWER CONNECTOR. 2 15ABCM(Body Control Module), Digital clock, Instrument cluster, A/C control module, Courtesy lights,
Interior light