Page 241 of 285

6
DO-IT-YOURSELF MAINTENANCE
27
FOR MORE INFORMATION
ABOUT YOUR HYUNDAIG250A01A-AATIf you desire additional information about
maintaining and servicing your Hyundai,
you may purchase a factory Shop Manual
at your Hyundai dealer's parts department.
This is the same manual used by
dealership technicians and while it is highly
technical it can be useful in obtaining a
better understanding of your car and how
it works.
HEADLIGHT AIMING ADJUST-
MENTG290A03O-AATBefore performing aiming adjustment,
make sure of the following.
1. Keep all tires inflated to the correct
pressure.
2. Place the vehicle on level ground and
press the front bumper & rear bumper
down several times.
Place vehicle at a distance of 118 in.
(3m) from the test wall.
3. See that the vehicle is unloaded (except
for full levels of coolant, engine oil and
fuel, and spare tire, jack, and tools).
Have the driver or equivalent weight
placed in driver's seat.
4. Clean the headlight lenses and turn on
the headlights (Low beam).
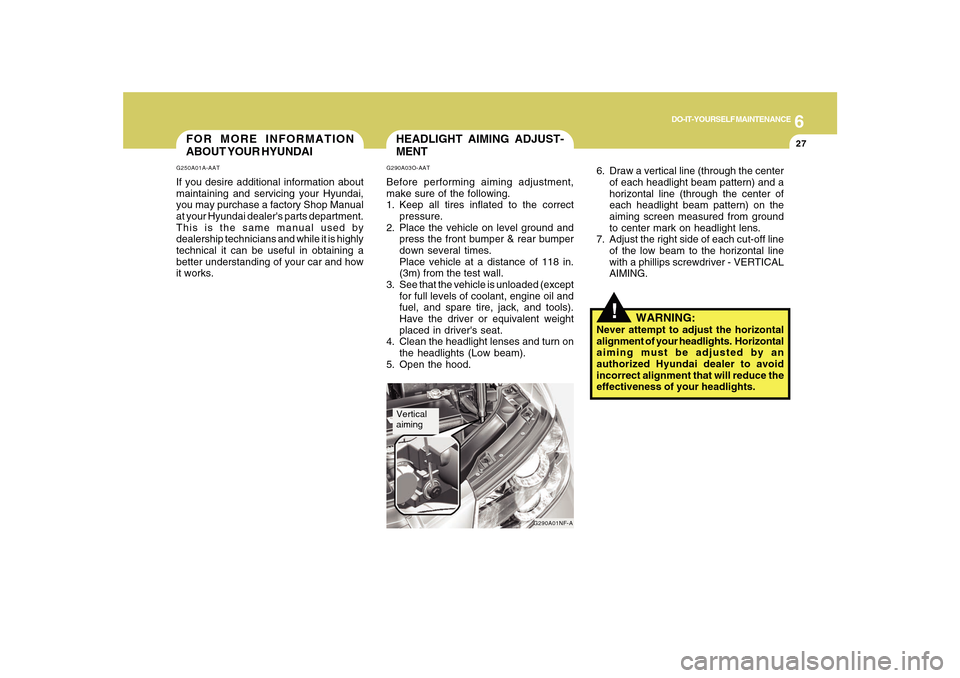
5. Open the hood.
G290A01NF-A
Vertical
aiming
!
6. Draw a vertical line (through the center
of each headlight beam pattern) and a
horizontal line (through the center of
each headlight beam pattern) on the
aiming screen measured from ground
to center mark on headlight lens.
7. Adjust the right side of each cut-off line
of the low beam to the horizontal line
with a phillips screwdriver - VERTICAL
AIMING.
WARNING:
Never attempt to adjust the horizontal
alignment of your headlights. Horizontal
aiming must be adjusted by an
authorized Hyundai dealer to avoid
incorrect alignment that will reduce the
effectiveness of your headlights.
Page 242 of 285

6
DO-IT-YOURSELF MAINTENANCE
28
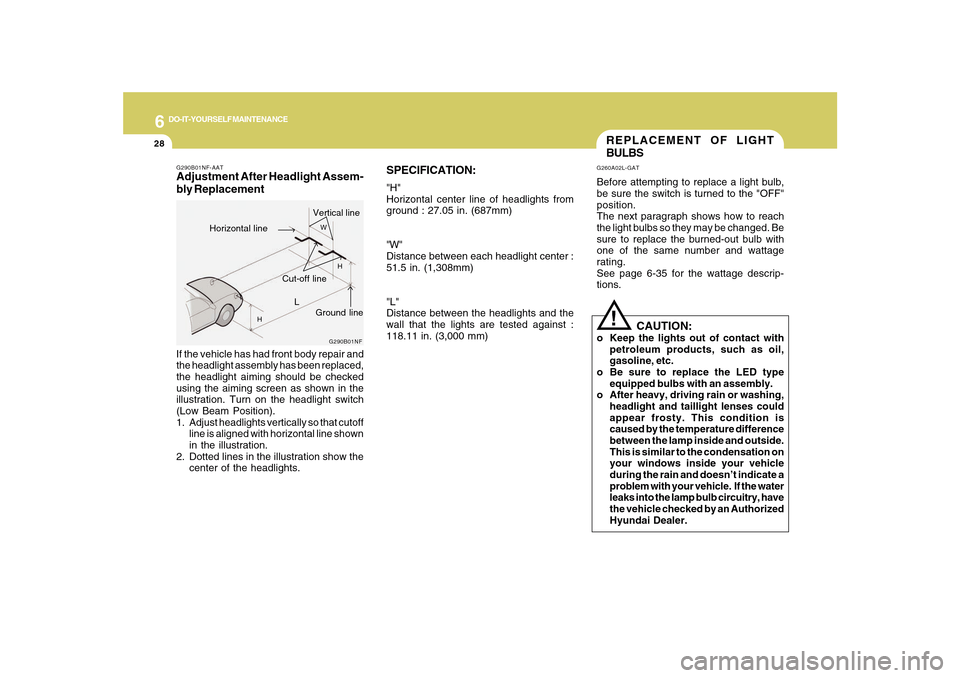
SPECIFICATION:"H"
Horizontal center line of headlights from
ground : 27.05 in. (687mm)
"W"
Distance between each headlight center :
51.5 in. (1,308mm)
"L"
Distance between the headlights and the
wall that the lights are tested against :
118.11 in. (3,000 mm)
REPLACEMENT OF LIGHT
BULBSG260A02L-GATBefore attempting to replace a light bulb,
be sure the switch is turned to the "OFF"
position.
The next paragraph shows how to reach
the light bulbs so they may be changed. Be
sure to replace the burned-out bulb with
one of the same number and wattage
rating.
See page 6-35 for the wattage descrip-
tions.
!
CAUTION:
o Keep the lights out of contact with
petroleum products, such as oil,
gasoline, etc.
o Be sure to replace the LED type
equipped bulbs with an assembly.
o After heavy, driving rain or washing,
headlight and taillight lenses could
appear frosty. This condition is
caused by the temperature difference
between the lamp inside and outside.
This is similar to the condensation on
your windows inside your vehicle
during the rain and doesn’t indicate a
problem with your vehicle. If the water
leaks into the lamp bulb circuitry, have
the vehicle checked by an Authorized
Hyundai Dealer.
G290B01NF-AATAdjustment After Headlight Assem-
bly Replacement
G290B01NF
L
W
H
H
Cut-off line
Ground line
Horizontal lineVertical line
If the vehicle has had front body repair and
the headlight assembly has been replaced,
the headlight aiming should be checked
using the aiming screen as shown in the
illustration. Turn on the headlight switch
(Low Beam Position).
1. Adjust headlights vertically so that cutoff
line is aligned with horizontal line shown
in the illustration.
2. Dotted lines in the illustration show the
center of the headlights.
Page 243 of 285
6
DO-IT-YOURSELF MAINTENANCE
29
Replacement instructions:
1. Allow the bulb to cool. Wear eye
protection.
2. Open the engine hood.
3. Always grasp the bulb by its base, avoid
touching the glass.G270A01NF-AATHEADLIGHT, FRONT TURN SIGNAL
LIGHT AND FRONT FOG LIGHT
Headlight and Front Turn Signal
Light
ONF078024
Headlight (Low beam)
Turn signal light
Front position light
Front Fog LightHeadlight
(High beam)
ONF078023N
4. Using a socket wrench of the correct
size, remove the headlight assembly
mounting bolts and bumper mounting
bolt.
HNF5024
5. Disconnect the power cord from the
back of the headlight.
Page 244 of 285
6
DO-IT-YOURSELF MAINTENANCE
30
HNF5027
9. Remove the protective cap from the
replacement bulb and install the new
bulb by matching the plastic base with
the headlight hole.Low Beam
OMG075038N
HNF5025
6. Turn the plastic cover counterclock-
wise and remove it.
ONF078026N
7. Disconnect the connector from the bulb
base in the back of the headlight.
8. Rotate the bulb counterclockwise to
remove the headlight bulb.
Page 245 of 285
6
DO-IT-YOURSELF MAINTENANCE
31
12. To replace the front turn signal light
bulb remove it from the bulb holder
and install the new bulb.
!
WARNING:
This halogen bulb contains gas under
pressure and if impacted could shatter,
resulting in flying fragments. Always
wear eye protection when servicing the
bulb. Protect the bulb against abrasions
or scratches and against liquids when
lighted. Turn the bulb on only when in-
stalling in a headlight. Replace the head-
light if damaged or cracked. Keep the
bulb out of the reach of children and
dispose of the used bulb with care.
HNF5028-1G270A03O
10. Use the protective cap and carton to
promptly dispose of the old bulb.
11. Check for proper headlight aim.
Front Fog Light (If installed)
NOTE:
It is recommended that the front fog light
bulb should be replaced by an authorized
Hyundai dealer.
Page 250 of 285
6
DO-IT-YOURSELF MAINTENANCE
36
Socket Type
BAY 15d
w2.1 x 9.5d
BAY 15d
sv6-7, 6
BAY 15d
BAY 15s
w2.1 x 9.5d
w2.1 x 9.5d No.
1
2
3
4
5
6
7Socket Type
P x 26d
P14,5s
BAY15d
w2.1 x 9.5d
sv6-7,6
PGJ13
w2.1 x 9.2d
w2.1 x 4.6d
BULB WATTAGESG280A01NF-AAT
G280A01NF-D
Part Name
Stop / Tail Light
High Mounted Rear Stop Light
Tail Light
Luggage Compartment Light
Rear Side Marker Light
Rear Turn Signal Light
Back-up Light
License Plate Light Part Name
Headlight
Front Turn Signal Light
Map Light
Interior Light
Front Fog Light
Front Position Side Marker Light
Front Door Edge Warning LightNo.
8
9
10
11
12
13
14
15 Wattage
55
55
28
10
10
27
5
8
Low beam
High beamWattage
28/8
16
28/8
5
5
27
16
5
Page 252 of 285

6
DO-IT-YOURSELF MAINTENANCE
38
1
2
3
4
5
6
7
8
9
10
11
12
13
14
15
16
17
18
19
20
21
22
23
24
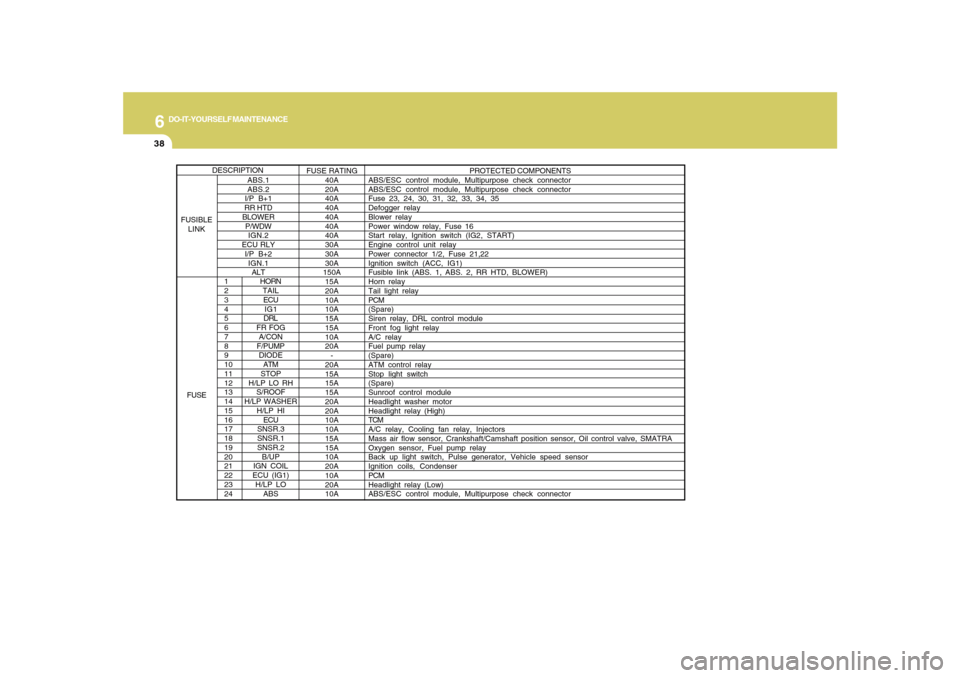
HORN
TAIL
ECU
IG1
DRL
FR FOG
A/CON
F/PUMP
DIODE
ATM
STOP
H/LP LO RH
S/ROOF
H/LP WASHER
H/LP HI
ECU
SNSR.3
SNSR.1
SNSR.2
B/UP
IGN COIL
ECU (IG1)
H/LP LO
ABS
PROTECTED COMPONENTS
ABS/ESC control module, Multipurpose check connector
ABS/ESC control module, Multipurpose check connector
Fuse 23, 24, 30, 31, 32, 33, 34, 35
Defogger relay
Blower relay
Power window relay, Fuse 16
Start relay, Ignition switch (IG2, START)
Engine control unit relay
Power connector 1/2, Fuse 21,22
Ignition switch (ACC, IG1)
Fusible Iink (ABS. 1, ABS. 2, RR HTD, BLOWER)
Horn relay
Tail light relay
PCM
(Spare)
Siren relay, DRL control module
Front fog light relay
A/C relay
Fuel pump relay
(Spare)
ATM control relay
Stop light switch
(Spare)
Sunroof control module
Headlight washer motor
Headlight relay (High)
TCM
A/C relay, Cooling fan relay, Injectors
Mass air flow sensor, Crankshaft/Camshaft position sensor, Oil control valve, SMATRA
Oxygen sensor, Fuel pump relay
Back up light switch, Pulse generator, Vehicle speed sensor
Ignition coils, Condenser
PCM
Headlight relay (Low)
ABS/ESC control module, Multipurpose check connector
ABS.1
ABS.2
I/P B+1
RR HTD
BLOWER
P/WDW
IGN.2
ECU RLY
I/P B+2
IGN.1
ALTFUSE RATING
40A
20A
40A
40A
40A
40A
40A
30A
30A
30A
150A
15A
20A
10A
10A
15A
15A
10A
20A
-
20A
15A
15A
15A
20A
20A
10A
10A
15A
15A
10A
20A
10A
20A
10A
DESCRIPTION
FUSIBLE
LINK
FUSE
Page 253 of 285

6
DO-IT-YOURSELF MAINTENANCE
39
PROTECTED COMPONENTS
FUSE RATING FUSE
SPARE 15A(Spare)
SPARE 15A(Spare)
ETACS 10ABCM(Body Control Module), Sunroof control module, Electronic chrome mirror, Rheostat
ESC 10A ESC module, Blower relay
C/LIGHTER 20ACigarette lighter
SPARE 15A(Spare)
TAIL RH 10AIllumination lights, Right : License light (LH, RH), Rear combination light, Headlight, Glove box light
TAIL LH 10A Front fog light relay, Left : Rear combination light, Headlight
IONIZER 10A (Spare)
H/LP 10ADRL control module, Headlight relay, AQS and ambient sensor
WIPER 25A Wiper and washer
A/CON 10AA/C control module
A/BAG 15A SRS control module, Passenger's Airbag switch
P/OUTLET 20AFront accessory socket, Rear power outlet
D/CLOCK 10ADigital clock, Audio, A/T shift lock control module, Power outside mirror and mirror folding, BCM
SAFETY PWR 25A Safety window module
ECS 15A (Spare)
ATM KEY LOCK 10A A/T shift lock control module
P/WDW RR LH 25A Power window main switch, Left rear power window switch
P/WDW RH 30A Power window main switch, Right power window switch
Inner Panel