2010 Hyundai Sonata light
[x] Cancel search: lightPage 184 of 285
3
WHAT TO DO IN AN EMERGENCY
3
JUMP STARTING!
o If you should accidentally get acid on
your skin or in your eyes, immediately
remove any contaminated clothing and
flush the area with clean water for at
least 15 minutes. Then promptly obtain
medical attention. If you must be trans-
ported to an emergency facility, continue
to apply water to the affected area with
a sponge or cloth.
o The gas produced by the battery during
the jump-start operation is highly
explosive. Do not smoke or allow a
spark or an open flame in the vicinity.
o The battery being used to provide the
jump start must be 12-volt. If you cannot
determine that it is a 12-volt battery, do
not attempt to use it for the jump start.
o To jump start a car with a discharged
battery, follow this procedure exactly:
1. If the booster battery is installed in
another vehicle, be sure the two vehicles
are not touching.
2. Turn off all unnecessary lights and
acces-sories in both vehicles.
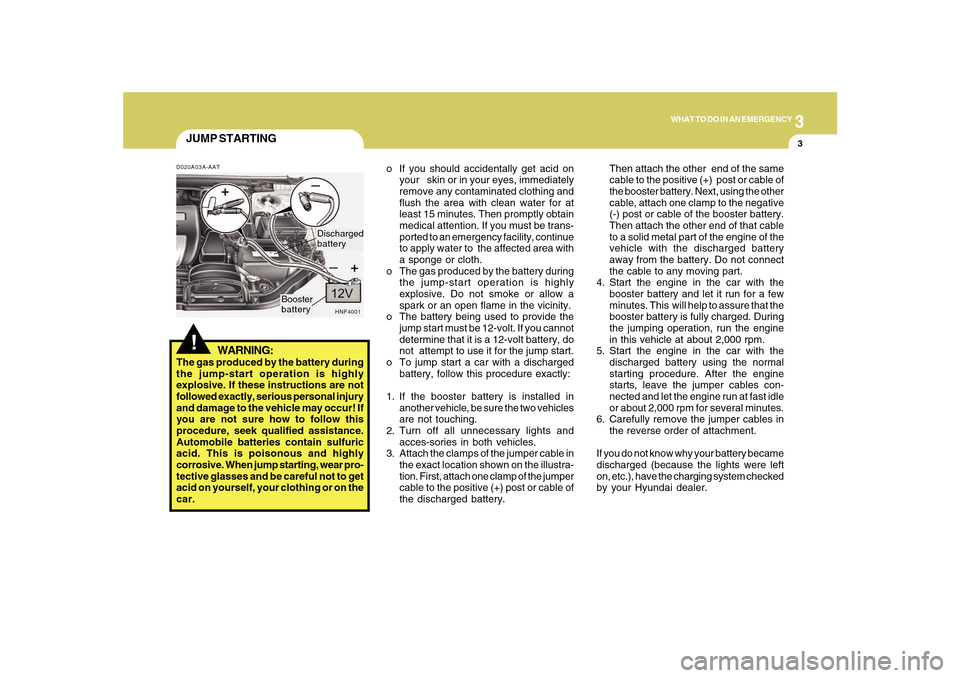
3. Attach the clamps of the jumper cable in
the exact location shown on the illustra-
tion. First, attach one clamp of the jumper
cable to the positive (+) post or cable of
the discharged battery.Then attach the other end of the same
cable to the positive (+) post or cable of
the booster battery. Next, using the other
cable, attach one clamp to the negative
(-) post or cable of the booster battery.
Then attach the other end of that cable
to a solid metal part of the engine of the
vehicle with the discharged battery
away from the battery. Do not connect
the cable to any moving part.
4. Start the engine in the car with the
booster battery and let it run for a few
minutes. This will help to assure that the
booster battery is fully charged. During
the jumping operation, run the engine
in this vehicle at about 2,000 rpm.
5. Start the engine in the car with the
discharged battery using the normal
starting procedure. After the engine
starts, leave the jumper cables con-
nected and let the engine run at fast idle
or about 2,000 rpm for several minutes.
6. Carefully remove the jumper cables in
the reverse order of attachment.
If you do not know why your battery became
discharged (because the lights were left
on, etc.), have the charging system checked
by your Hyundai dealer.
D020A03A-AAT
WARNING:
The gas produced by the battery during
the jump-start operation is highly
explosive. If these instructions are not
followed exactly, serious personal injury
and damage to the vehicle may occur! If
you are not sure how to follow this
procedure, seek qualified assistance.
Automobile batteries contain sulfuric
acid. This is poisonous and highly
corrosive. When jump starting, wear pro-
tective glasses and be careful not to get
acid on yourself, your clothing or on the
car.
HNF4001
Booster
batteryDischarged
battery
Page 192 of 285
3
WHAT TO DO IN AN EMERGENCY
11
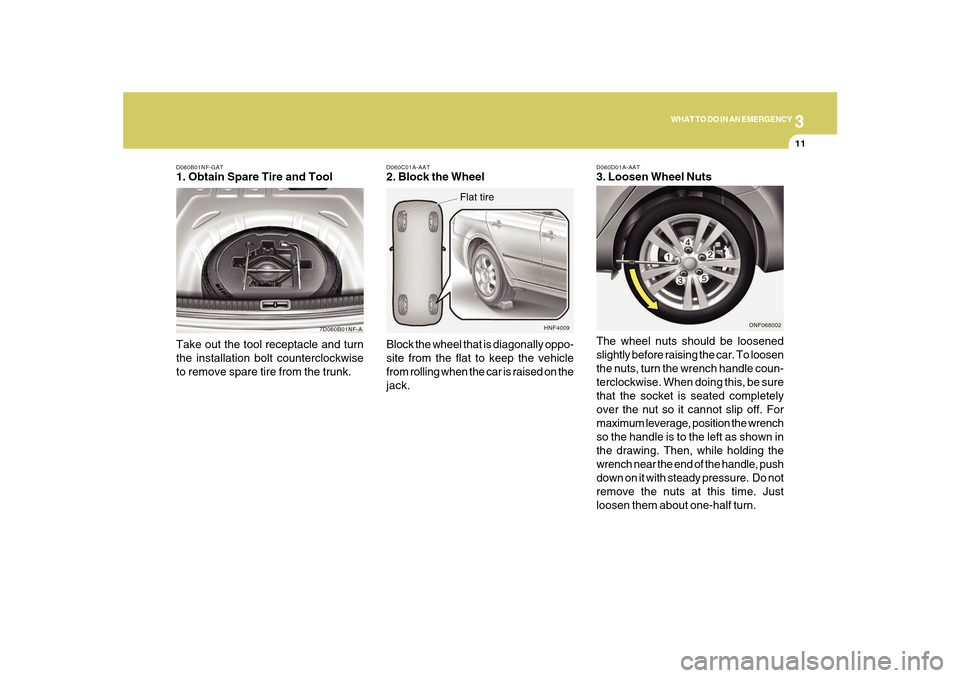
D060B01NF-GAT1. Obtain Spare Tire and Tool
7D060B01NF-A
Take out the tool receptacle and turn
the installation bolt counterclockwise
to remove spare tire from the trunk.
D060C01A-AAT2. Block the Wheel
Block the wheel that is diagonally oppo-
site from the flat to keep the vehicle
from rolling when the car is raised on the
jack.
HNF4009
Flat tire
D060D01A-AAT3. Loosen Wheel Nuts
The wheel nuts should be loosened
slightly before raising the car. To loosen
the nuts, turn the wrench handle coun-
terclockwise. When doing this, be sure
that the socket is seated completely
over the nut so it cannot slip off. For
maximum leverage, position the wrench
so the handle is to the left as shown in
the drawing. Then, while holding the
wrench near the end of the handle, push
down on it with steady pressure. Do not
remove the nuts at this time. Just
loosen them about one-half turn.
ONF068002
Page 194 of 285
3
WHAT TO DO IN AN EMERGENCY
13
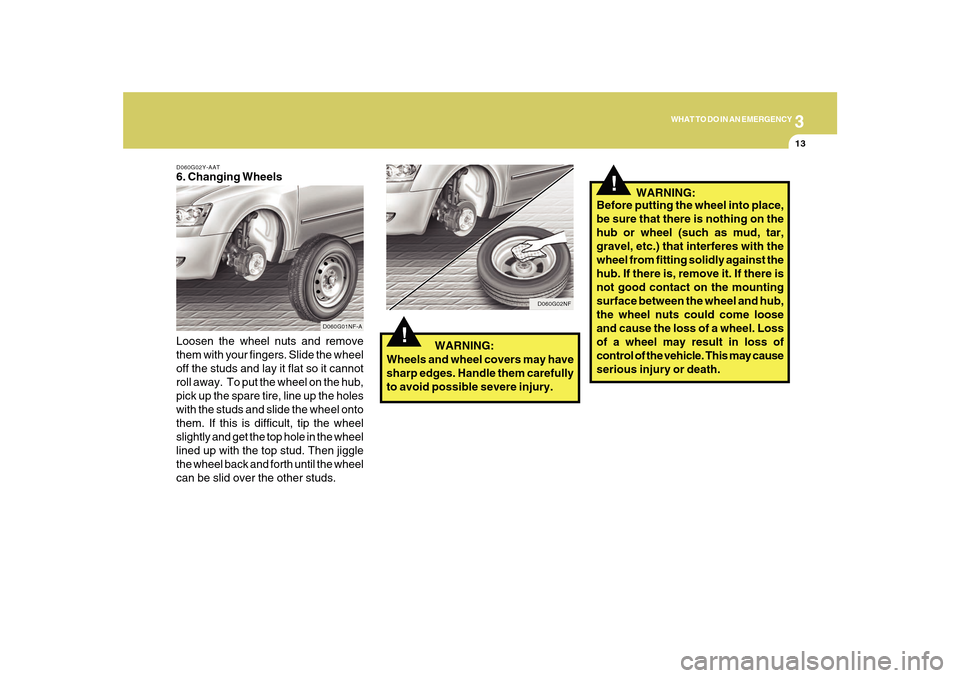
D060G02Y-AAT6. Changing Wheels
Loosen the wheel nuts and remove
them with your fingers. Slide the wheel
off the studs and lay it flat so it cannot
roll away. To put the wheel on the hub,
pick up the spare tire, line up the holes
with the studs and slide the wheel onto
them. If this is difficult, tip the wheel
slightly and get the top hole in the wheel
lined up with the top stud. Then jiggle
the wheel back and forth until the wheel
can be slid over the other studs.
D060G01NF-A
!
WARNING:
Wheels and wheel covers may have
sharp edges. Handle them carefully
to avoid possible severe injury.
D060G02NF
!
Before putting the wheel into place,
be sure that there is nothing on the
hub or wheel (such as mud, tar,
gravel, etc.) that interferes with the
wheel from fitting solidly against the
hub. If there is, remove it. If there is
not good contact on the mounting
surface between the wheel and hub,
the wheel nuts could come loose
and cause the loss of a wheel. Loss
of a wheel may result in loss of
control of the vehicle. This may cause
serious injury or death. WARNING:
Page 204 of 285
4
CORROSION PREVENTION AND APPEARANCE CARE6
ANY QUESTIONS?
E040D01A-AATCleaning the Seat BeltsTo clean the seat belts, use a cloth or
sponge with mild soap or detergent and
warm water. Do not use strong detergents,
dye, bleach or abrasive materials on the
seat belts as this may weaken the fabric.
While cleaning the belts, inspect them for
excessive wear, cuts, fraying or other signs
of damage and replace them if necessary.E040C01A-AATCleaning the CarpetsUse a foam-type carpet cleaner. Cleaners
of this type are available in aerosol cans in
liquid form or powder. Read the instructions
and follow them exactly. Using a vacuum
cleaner with the appropriate attachment,
remove as much dirt from the carpets as
possible. Apply the foam following the
manufacturer's directions, then rub in
overlapping circles. Do not add water.
These cleaners work best when the carpet
is kept as dry as possible.
E050A01A-AATIf you have any questions about the care of
your car, consult your Hyundai dealer.
E040E01A-AATCleaning the WindowsYou may use any household window
cleaner on the windows. However, when
cleaning the inside of the rear window be
careful not to damage the rear window
defroster wiring.
E040B01A-AATTo Clean the Leather Upholstery
(If Installed)In the normal course of use, leather
upholstered surfaces will, like any material,
pick-up dust and dirt. This dust and dirt
must be cleaned off or it may work into the
surface of the leather, causing damage.
Fine leather needs care, and should be
cleaned when necessary. Washing leather
thoroughly with soap and water will keep
your leather lustrous, beautiful and ensure
you have many years of wear.
Take a piece of cheese cloth and using any
mild soap and lukewarm water, work up a
good lather. Thoroughly wash the leather.
Wipe clean with a slightly damp cloth and
dry with soft cloth. Do this as often as the
leather becomes soiled.
During tanning operations, sufficient oils
are incorporated through processing that
none need be applied during the life of the
leather. Oil applied to the finished surface
will in no way help the leather and may do
more harm than good. Varnishes and
furniture polishes should never be used
under any conditions.
Page 215 of 285

6
Engine Compartment .................................................... 6-2
General Checks ............................................................ 6-4
Checking the Engine Oil ............................................... 6-4
Changing the Engine Oil and Filter ................................ 6-6
Checking and Changing the Engine Coolant ................ 6-8
Changing the Air Cleaner Filter ...................................6-11
Checking the Transaxle Oil (Manual) ......................... 6-14
Checking the Transaxle Fluid (Automatic) ..................6-15
Checking the Brakes..................................................6-17
Air Conditioning Care..................................................6-18
Changing the Climate Control Air Filter.......................6-19
Checking Drive Belts..................................................6-22
Checking and Replacing Fuses ..................................6-22
Checking the Battery..................................................6-24
Power Steering Fluid Level .........................................6-26
Headlight Aiming Adjustment......................................6-27
Replacement of Light Bulbs ........................................6-28
Bulb Wattages.............................................................6-36
Fuse Panel Description...............................................6-37
DO-IT-YOURSELF MAINTENANCE
6
Page 218 of 285
6
DO-IT-YOURSELF MAINTENANCE
4
G020C01A-AATVehicle InteriorThe following should be checked each
time when the vehicle is driven:
o Lights operation
o Windshield wiper operation
o Horn operation
o Defroster, heating system operation
(and air conditioning, if installed)
o Steering operation and condition
o Mirror condition and operation
o Turn signal operation
o Accelerator pedal operation
o Brake operation, including parking
brake
o Manual transaxle operation, including
clutch operation
o Automatic transaxle operation,
including "Park" mechanism operation
o Seat control condition and operation
o Seat belt condition and operation
o Sun visor operation
If you notice anything that does not operate
correctly or appears to be functioning
correctly, inspect it carefully and seek
assistance from your Hyundai dealer if
service is needed.
G020B01A-AATVehicle ExteriorThe following should be checked monthly:
o Overall appearance and condition
o Wheel condition and wheel nut torque
o Exhaust system condition
o Light condition and operation
o Windshield glass condition
o Wiper blade condition
o Paint condition and body corrosion
o Fluid leaks
o Door and hood lock condition
o Tire pressure and condition
(including spare tire)GENERAL CHECKSG020A01NF-AATEngine CompartmentThe following should be checked regu-
larly:
o Engine oil level and condition
o Transaxle fluid level and condition
o Brake fluid level
o Engine coolant level
o Windshield washer fluid level
o Accessory drive belt condition
o Engine coolant hose condition
o Fluid leaks (on or below components)
o Power steering fluid level
o Battery condition
o Air filter condition
o Engine vibration
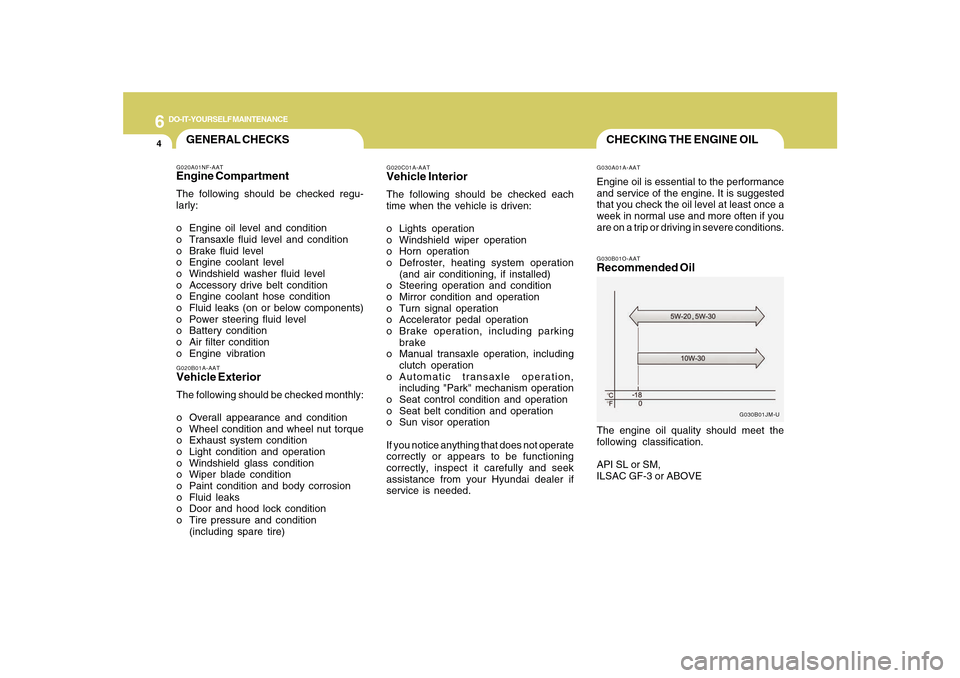
CHECKING THE ENGINE OILG030B01O-AATRecommended OilThe engine oil quality should meet the
following classification.
API SL or SM,
ILSAC GF-3 or ABOVE
G030B01JM-U G030A01A-AAT
Engine oil is essential to the performance
and service of the engine. It is suggested
that you check the oil level at least once a
week in normal use and more often if you
are on a trip or driving in severe conditions.
Page 226 of 285
6
DO-IT-YOURSELF MAINTENANCE
12
HHR5048
(1)
WINDSHIELD WIPER BLADESG080A02A-AATThe wiper blades should be carefully
inspected from time to time and cleaned to
remove accumulations of road film or other
debris. To clean the wiper blades and
arms, use a clean sponge or cloth with a
mild soap or detergent and water. If the
wipers continue to streak or smear the
glass, replace them with genuine Hyundai
replacement parts or their equivalent.
!
CAUTION:
o Do not operate the wipers on dry glass.
This can result in more rapid wear of
the wiper blades and may scratch the
glass.
o Keep the blade rubber out of contact
with petroleum products such as
engine oil, gasoline, etc.
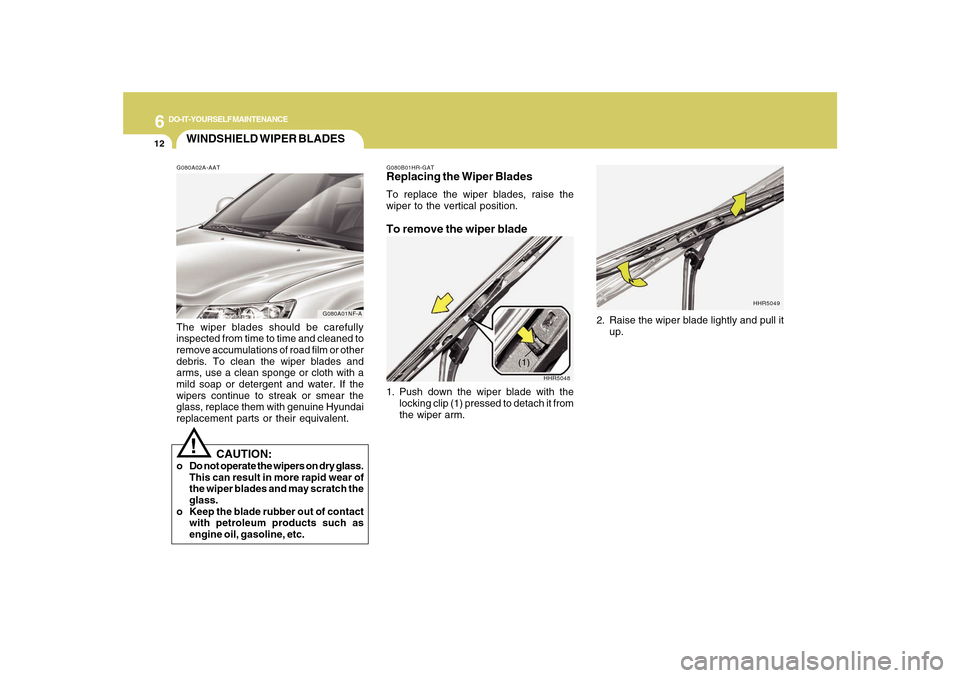
G080B01HR-GATReplacing the Wiper BladesTo replace the wiper blades, raise the
wiper to the vertical position.To remove the wiper blade1. Push down the wiper blade with the
locking clip (1) pressed to detach it from
the wiper arm.
G080A01NF-A
2. Raise the wiper blade lightly and pull it
up.
HHR5049
Page 234 of 285
6
DO-IT-YOURSELF MAINTENANCE
20
1.18 in.
(30 mm)
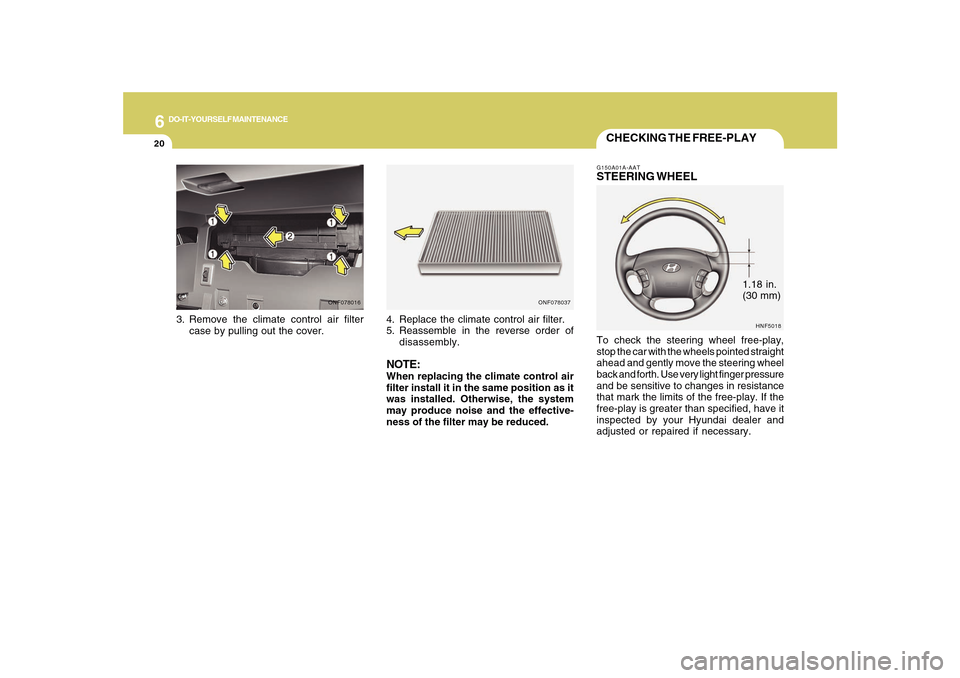
CHECKING THE FREE-PLAYG150A01A-AATSTEERING WHEELTo check the steering wheel free-play,
stop the car with the wheels pointed straight
ahead and gently move the steering wheel
back and forth. Use very light finger pressure
and be sensitive to changes in resistance
that mark the limits of the free-play. If the
free-play is greater than specified, have it
inspected by your Hyundai dealer and
adjusted or repaired if necessary.
ONF078016
3. Remove the climate control air filter
case by pulling out the cover.
HNF5018
4. Replace the climate control air filter.
5. Reassemble in the reverse order of
disassembly.NOTE:When replacing the climate control air
filter install it in the same position as it
was installed. Otherwise, the system
may produce noise and the effective-
ness of the filter may be reduced.
ONF078037