Page 79 of 408
C041400AUN
Adding equipment to or modify-
ing your air bag-equipped vehicle
If you modify your vehicle by changing
your vehicle's frame, bumper system,
front door, front end or side sheet metal
or ride height, this may affect the opera-
tion of your vehicle's air bag system.
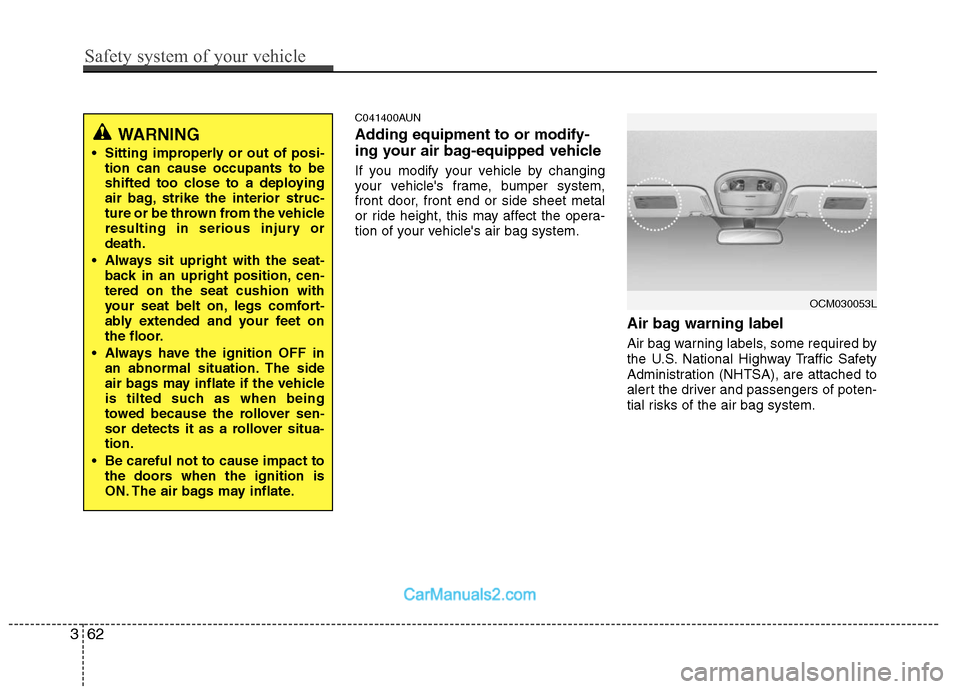
Air bag warning label
Air bag warning labels, some required by
the U.S. National Highway Traffic Safety
Administration (NHTSA), are attached to
alert the driver and passengers of poten-
tial risks of the air bag system.
362
Safety system of your vehicle
WARNING
Sitting improperly or out of posi-tion can cause occupants to be
shifted too close to a deploying
air bag, strike the interior struc-
ture or be thrown from the vehicle
resulting in serious injury or
death.
Always sit upright with the seat- back in an upright position, cen-
tered on the seat cushion with
your seat belt on, legs comfort-
ably extended and your feet on
the floor.
Always have the ignition OFF in an abnormal situation. The side
air bags may inflate if the vehicle
is tilted such as when being
towed because the rollover sen-
sor detects it as a rollover situa-
tion.
Be careful not to cause impact to the doors when the ignition is
ON. The air bags may inflate.
OCM030053L
Page 86 of 408
47
Features of your vehicle
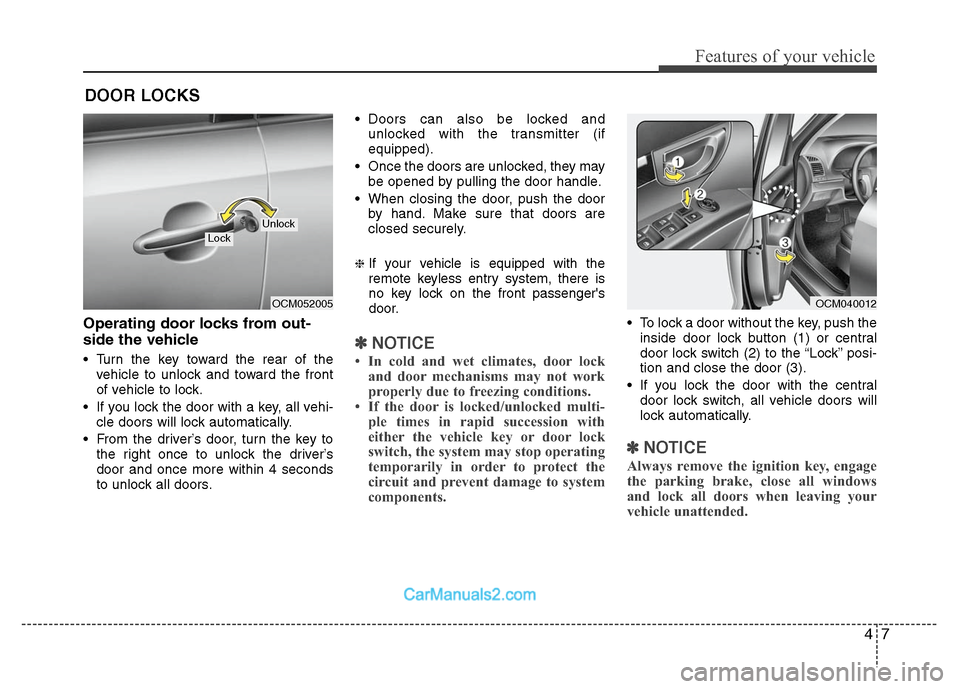
Operating door locks from out-
side the vehicle
Turn the key toward the rear of thevehicle to unlock and toward the front
of vehicle to lock.
If you lock the door with a key, all vehi- cle doors will lock automatically.
From the driver’s door, turn the key to the right once to unlock the driver’s
door and once more within 4 seconds
to unlock all doors. Doors can also be locked and
unlocked with the transmitter (if
equipped).
Once the doors are unlocked, they may be opened by pulling the door handle.
When closing the door, push the door by hand. Make sure that doors are
closed securely.
❈If your vehicle is equipped with the
remote keyless entry system, there is
no key lock on the front passenger's
door.
✽ ✽ NOTICE
• In cold and wet climates, door lock
and door mechanisms may not work
properly due to freezing conditions.
• If the door is locked/unlocked multi- ple times in rapid succession with
either the vehicle key or door lock
switch, the system may stop operating
temporarily in order to protect the
circuit and prevent damage to system
components.
To lock a door without the key, push the
inside door lock button (1) or central
door lock switch (2 )to the “Lock” posi-
tion and close the door (3).
If you lock the door with the central door lock switch, all vehicle doors will
lock automatically.
✽ ✽ NOTICE
Always remove the ignition key, engage
the parking brake, close all windows
and lock all doors when leaving your
vehicle unattended.
DOOR LOCKS
OCM052005
LockUnlock
OCM040012
Page 101 of 408
Features of your vehicle
22
4
D110000AUN
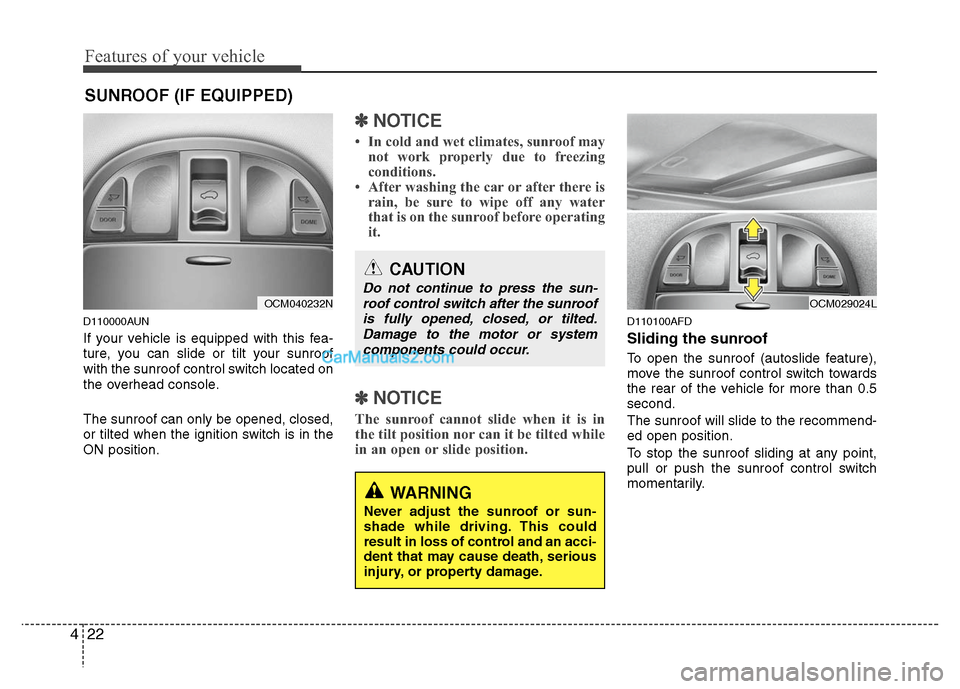
If your vehicle is equipped with this fea-
ture, you can slide or tilt your sunroof
with the sunroof control switch located on
the overhead console.
The sunroof can only be opened, closed,
or tilted when the ignition switch is in the
ON position.
✽ ✽
NOTICE
• In cold and wet climates, sunroof may
not work properly due to freezing
conditions.
• After washing the car or after there is rain, be sure to wipe off any water
that is on the sunroof before operating
it.
✽ ✽ NOTICE
The sunroof cannot slide when it is in
the tilt position nor can it be tilted while
in an open or slide position.
D110100AFD
Sliding the sunroof
To open the sunroof (autoslide feature),
move the sunroof control switch towards
the rear of the vehicle for more than 0.5
second.
The sunroof will slide to the recommend-
ed open position.
To stop the sunroof sliding at any point,
pull or push the sunroof control switch
momentarily.
SUNROOF (IF EQUIPPED)
OCM040232N
CAUTION
Do not continue to press the sun-
roof control switch after the sunroofis fully opened, closed, or tilted.Damage to the motor or systemcomponents could occur.
WARNING
Never adjust the sunroof or sun-
shade while driving. This could
result in loss of control and an acci-
dent that may cause death, serious
injury, or property damage.
OCM029024L
Page 102 of 408
423
Features of your vehicle
✽
✽NOTICE
To reduce wind noise while driving, we
recommend you to drive at the recom-
mended position.
To close the sunroof (autoslide feature),
move the sunroof control switch towards
the front of the vehicle for more than 0.5
second.
The sunroof will close all the way. To stop
the sunroof sliding at any point, pull or
push the sunroof control switch momen-
tarily.
D110101AUN
Automatic reversal
If an object or part of the body is detect-
ed while the sunroof is closing automati-
cally, it will reverse the direction, and then
stop.
The auto reverse function does not work
if a tiny obstacle is between the sliding
glass and the sunroof sash. You should
always check that all passengers and
objects are away from the sunroof before
closing it.
D110200AUN
Tilting the sunroof
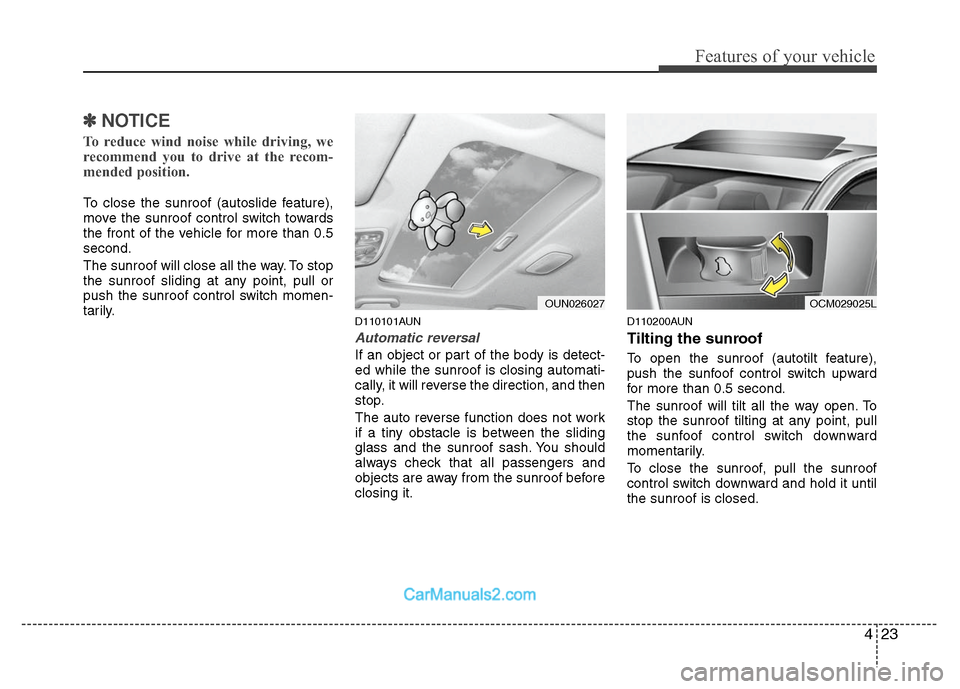
To open the sunroof (autotilt feature),
push the sunfoof control switch upward
for more than 0.5 second.
The sunroof will tilt all the way open. To
stop the sunroof tilting at any point, pull
the sunfoof control switch downward
momentarily.
To close the sunroof, pull the sunroof
control switch downward and hold it until
the sunroof is closed.
OCM029025L
OUN026027
Page 107 of 408
Features of your vehicle
28
4
Inside rearview mirror
Adjust the rearview mirror so that the
center view through the rear window is
seen. Make this adjustment before you
start driving.
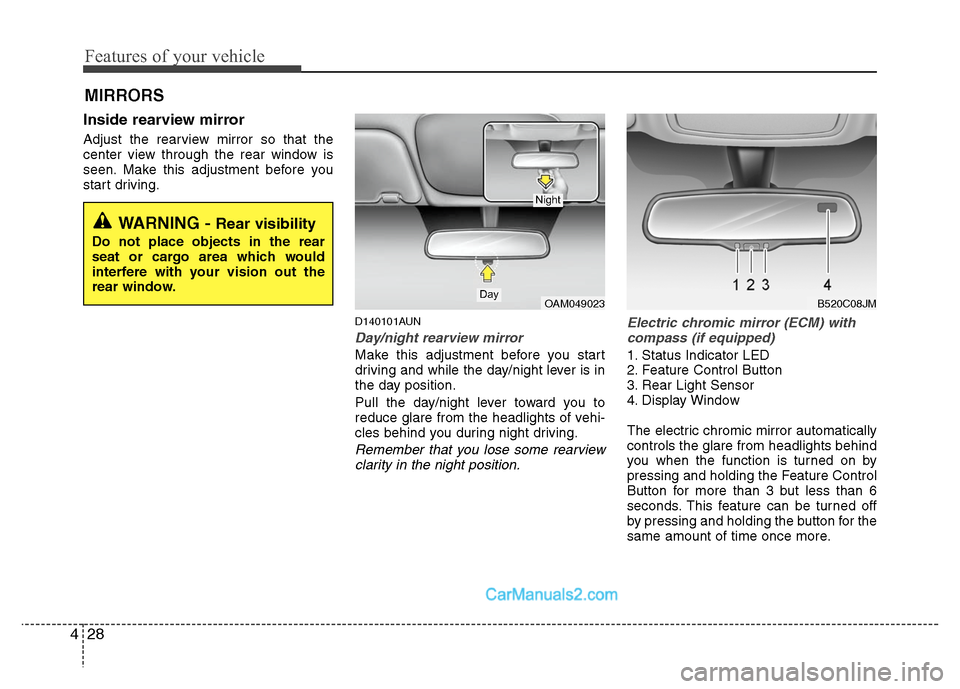
D140101AUN
Day/night rearview mirror
Make this adjustment before you start
driving and while the day/night lever is in
the day position.
Pull the day/night lever toward you to
reduce glare from the headlights of vehi-
cles behind you during night driving.
Remember that you lose some rearview
clarity in the night position. Electric chromic mirror (ECM) with
compass (if equipped)
1. Status Indicator LED
2. Feature Control Button
3. Rear Light Sensor
4. Display Window
The electric chromic mirror automatically
controls the glare from headlights behind
you when the function is turned on by
pressing and holding the Feature Control
Button for more than 3 but less than 6
seconds. This feature can be turned off
by pressing and holding the button for the
same amount of time once more.
MIRRORS
WARNING - Rear visibility
Do not place objects in the rear
seat or cargo area which would
interfere with your vision out the
rear window.
OAM049023Day
Night
B520C08JM
Page 110 of 408
431
Features of your vehicle
D140105AEN
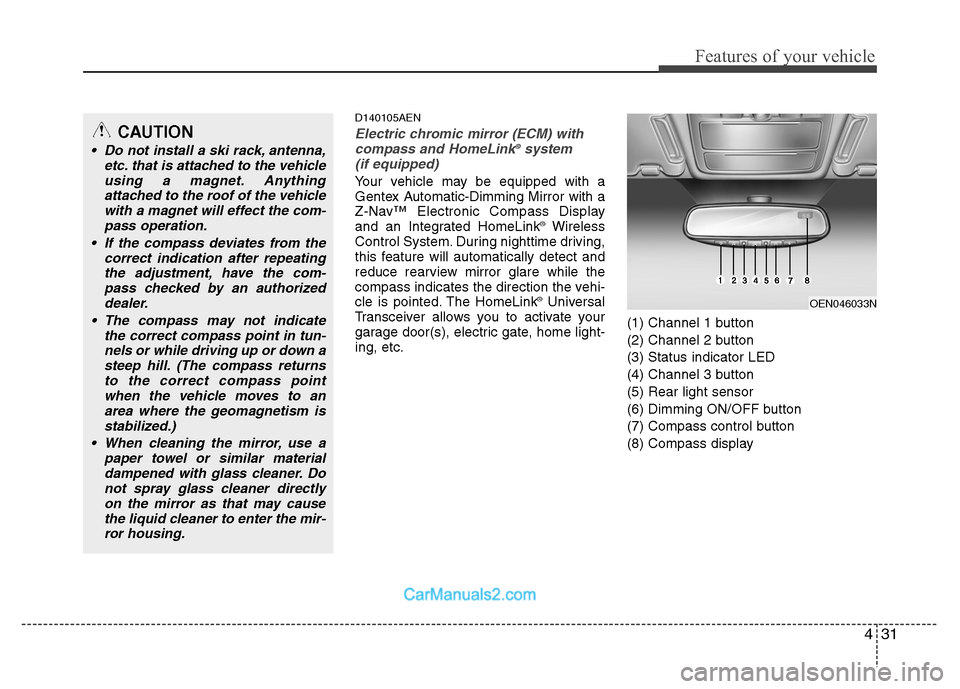
Electric chromic mirror (ECM) withcompass and HomeLink®system
(if equipped)
Your vehicle may be equipped with a
Gentex Automatic-Dimming Mirror with a
Z-Nav™ Electronic Compass Display
and an Integrated HomeLink
®Wireless
Control System. During nighttime driving,
this feature will automatically detect and
reduce rearview mirror glare while the
compass indicates the direction the vehi-
cle is pointed. The HomeLink
®Universal
Transceiver allows you to activate your
garage door(s), electric gate, home light-
ing, etc. (1) Channel 1 button
(2) Channel 2 button
(3) Status indicator LED
(4) Channel 3 button
(5) Rear light sensor
(6) Dimming ON/OFF button
(7) Compass control button
(8) Compass display
OEN046033N
CAUTION
Do not install a ski rack, antenna,
etc. that is attached to the vehicleusing a magnet. Anythingattached to the roof of the vehiclewith a magnet will effect the com- pass operation.
If the compass deviates from the correct indication after repeatingthe adjustment, have the com-pass checked by an authorizeddealer.
The compass may not indicate the correct compass point in tun-nels or while driving up or down asteep hill. (The compass returnsto the correct compass pointwhen the vehicle moves to anarea where the geomagnetism isstabilized.)
When cleaning the mirror, use a paper towel or similar materialdampened with glass cleaner. Donot spray glass cleaner directlyon the mirror as that may causethe liquid cleaner to enter the mir-ror housing.
Page 118 of 408
439
Features of your vehicle
D140202AFD
Folding the outside rearview mirror
To fold outside rearview mirror, grasp the
housing of mirror and then fold it toward
the rear of the vehicle.
B510E01E
CAUTION
The mirrors stop moving whenthey reach the maximum adjust-ing angles, but the motor contin-ues to operate while the switch ispressed. Do not press the switch longer than necessary, the motormay be damaged.
Do not attempt to adjust the out- side rearview mirror by hand.Doing so may damage the parts.
Page 121 of 408
Features of your vehicle
42
4
WARNING
Never remove the radiator cap
when the engine is hot. The engine
coolant is under pressure and
could cause severe burns. Wait
until the engine is cool before
adding coolant to the reservoir.
D150203AUN
Engine coolant temperature gauge
This gauge shows the temperature of the
engine coolant when the ignition switch
is ON.
Do not continue driving with an overheat-
ed engine. If your vehicle overheats, refer
to “If the engine overheats” in section 6.
CAUTION
If the gauge pointer moves beyond
the normal range area toward the “H” position, it indicates overheat-ing that may damage the engine.
CAUTION
Do not operate the engine withinthe tachometer's RED ZONE. Thismay cause severe engine damage.
OCM040057