2010 HYUNDAI I10 ESP
[x] Cancel search: ESPPage 109 of 354

Features of your vehicle
30
4
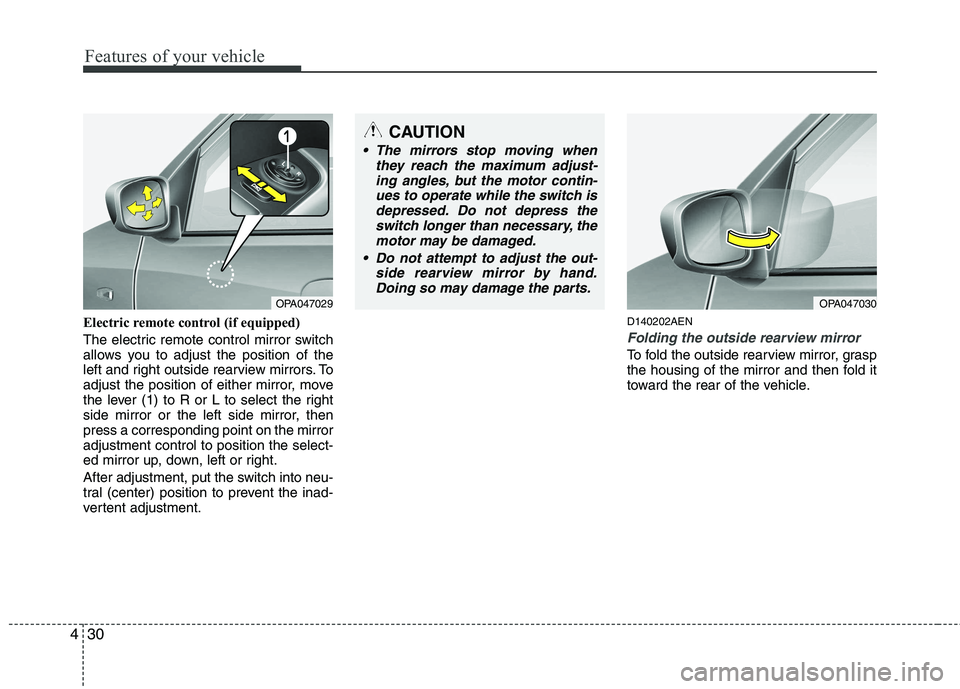
Electric remote control (if equipped)
The electric remote control mirror switch
allows you to adjust the position of the
left and right outside rearview mirrors. To
adjust the position of either mirror, move
the lever (1) to R or L to select the right
side mirror or the left side mirror, thenpress a corresponding point on the mirroradjustment control to position the select-
ed mirror up, down, left or right.
After adjustment, put the switch into neu-
tral (center) position to prevent the inad-
vertent adjustment. D140202AEN
Folding the outside rearview mirror
To fold the outside rearview mirror, grasp
the housing of the mirror and then fold it
toward the rear of the vehicle.
OPA047029
CAUTION
The mirrors stop moving when
they reach the maximum adjust-
ing angles, but the motor contin- ues to operate while the switch isdepressed. Do not depress the switch longer than necessary, the
motor may be damaged.
Do not attempt to adjust the out- side rearview mirror by hand.Doing so may damage the parts.
OPA047030
Page 121 of 354

Features of your vehicle
42
4
AUTO STOP indicator
(if equipped)
This indicator will illuminate when the engine enters the Idle Stop mode of theISG (Idle Stop and Go) system.
When the automatic starting occurs, the
" " indicator on the cluster will blink for
5 seconds.
For more details, refer to section 5, “ISG (Idle Stop and Go) system”.
✽✽ NOTICE
When the engine automatically starts by
the ISG system, some warning lights
(ABS, ESP, ESP OFF or Parking brake
warning light) may turn on for a few
seconds. This happens because of the
low battery voltage. It does not mean the
system is malfunctioning.
ESP (Electronic Stability Program) indicator(if equipped)
The ESP indicator will illuminate when
the ignition switch is turned ON, but
should go off after approximately 3 sec-
onds. When the ESP is on, it monitors the
driving conditions. Under normal driving
conditions, the ESP indicator will remain
off. When a slippery or low traction con-dition is encountered, the ESP will oper-
ate, and the ESP indicator will blink to
indicate the ESP is operating. But, if the ESP system malfunctions the
indicator illuminates and stays on. Take
your vehicle to an authorized HYUNDAI
dealer and have the system checked.
ESP OFF indicator (if equipped)
The ESP OFF indicator will illuminate
when the ignition switch is turned ON,
but should go off after approximately 3
seconds. To switch to ESP OFF mode,
press the ESP OFF button. The ESPOFF indicator will illuminate indicating
the ESP is deactivated. D150334APA
Electronic power steering
(EPS) system warning light
(if equipped)
This light comes on when the ignition
switch is turned to the ON position and
then it will go out with the engine started. This light also comes on if the EPS has a
malfunction. If it comes on while driving,
have your vehicle inspected by an
authorized HYUNDAI dealer.
EPS
Page 123 of 354

Features of your vehicle
44
4
D170000AEN
The rear parking assist system assists
the driver during backward movement of
the vehicle by chiming if any object issensed within a distance of 120 cm (47
in.) behind the vehicle. This system is asupplemental system and it is not intend-
ed to nor does it replace the need for
extreme care and attention of the driver.
The sensing range and objects
detectable by the back sensors are limit-
ed. Whenever backing-up, pay as much
attention to what is behind you as you
would in a vehicle without a rear parkingassist system. Operation of the rear parking assist system
D170101ACM
Operating condition
This system will activate when backing
up with the ignition switch ON.
If the vehicle is moving at a speed over
10 km/h (6 mph), the system may not
be activated correctly.
The sensing distance while the rear parking assist system is in operation is
approximately 120 cm (47 in.).
When more than two objects are sensed at the same time, the closest
one will be recognized first.
D170102AEN
Types of warning sound
When an object is 120 cm to 81 cm (47 in. to 32 in.) from the rear bumper:
Buzzer beeps intermittently.
When an object is 80 cm to 41 cm (31 in. to 16 in.) from the rear bumper:
Buzzer beeps more frequently.
When an object is within 40 cm (15 in.) of the rear bumper:
Buzzer sounds continuously.
REAR PARKING ASSIST SYSTEM (IF EQUIPPED)
OPA041141
WARNING
The rear parking assist system is a
supplementary function only. Theoperation of the rear parking assist
system can be affected by several
factors (including environmental
conditions). It is the responsibility
of the driver to always check the
area behind the vehicle before and
while backing up.
Sensors
Page 125 of 354

Features of your vehicle
46
4
✽✽
NOTICE
This system can only sense objects with-
in the range and location of the sensors;
It can not detect objects in other areas
where sensors are not installed. Also,
small or slim objects, such as poles or
objects located between sensors may not
be detected by the sensors.
Always visually check behind the vehi-
cle when backing up.
Be sure to inform any drivers of the
vehicle that may be unfamiliar with the
system regarding the systems capabili-
ties and limitations.D170400AFD
Self-diagnosis
If you don’t hear an audible warning
sound or if the buzzer sounds intermit-tently when shifting the gear to the R
(Reverse) position, this may indicate a
malfunction in the rear parking assist sys-
tem. If this occurs, have your vehicle
checked by an authorized HYUNDAI
dealer as soon as possible.
WARNING
Pay close attention when the vehi-
cle is driven close to objects on the
road, particularly pedestrians, and
especially children. Be aware that
some objects may not be detected
by the sensors, due to the object’s
distance, size or material, all of
which can limit the effectiveness of
the sensor. Always perform a visu-al inspection to make sure the vehi-
cle is clear of all obstructions
before moving the vehicle in anydirection.
WARNING
Your new vehicle warranty does not
cover any accidents or damage to
the vehicle or injuries to its occu-pants due to a rear parking assist
system malfunction. Always drive
safely and cautiously.
Page 130 of 354

451
Features of your vehicle
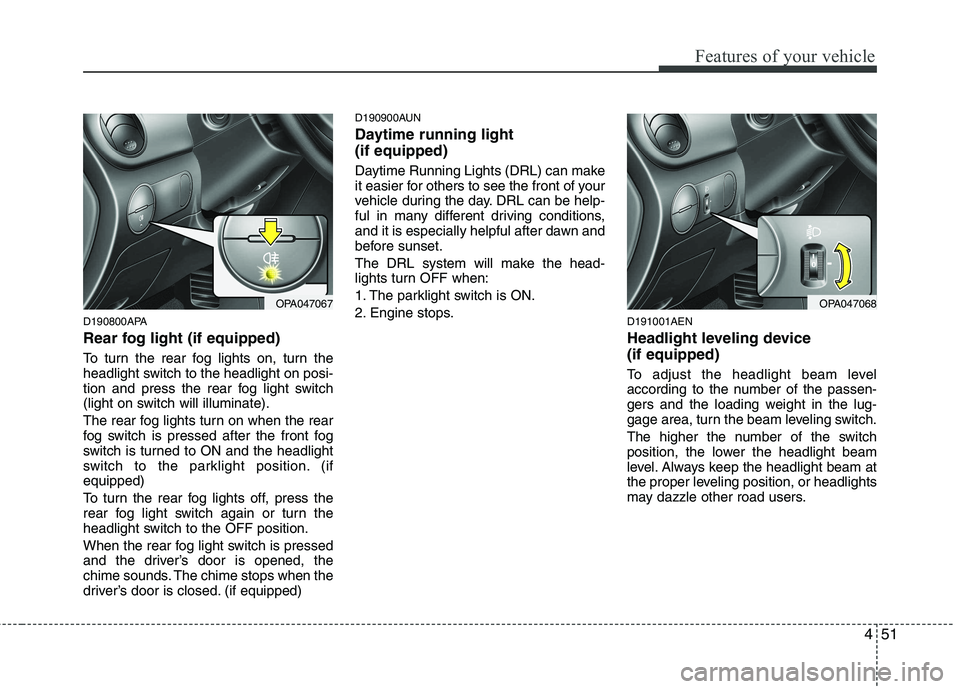
D190800APA
Rear fog light (if equipped)
To turn the rear fog lights on, turn the
headlight switch to the headlight on posi-
tion and press the rear fog light switch
(light on switch will illuminate).
The rear fog lights turn on when the rear
fog switch is pressed after the front fog
switch is turned to ON and the headlight
switch to the parklight position. (ifequipped)
To turn the rear fog lights off, press the
rear fog light switch again or turn the
headlight switch to the OFF position.
When the rear fog light switch is pressed
and the driver’s door is opened, the
chime sounds. The chime stops when the
driver’s door is closed. (if equipped)D190900AUN
Daytime running light (if equipped)
Daytime Running Lights (DRL) can make
it easier for others to see the front of your
vehicle during the day. DRL can be help-
ful in many different driving conditions,
and it is especially helpful after dawn and
before sunset.
The DRL system will make the head-
lights turn OFF when:
1. The parklight switch is ON.
2. Engine stops.
D191001AEN
Headlight leveling device (if equipped)
To adjust the headlight beam level
according to the number of the passen-
gers and the loading weight in the lug-
gage area, turn the beam leveling switch.
The higher the number of the switch
position, the lower the headlight beam
level. Always keep the headlight beam at
the proper leveling position, or headlights
may dazzle other road users.
OPA047067OPA047068
Page 162 of 354

483
Features of your vehicle
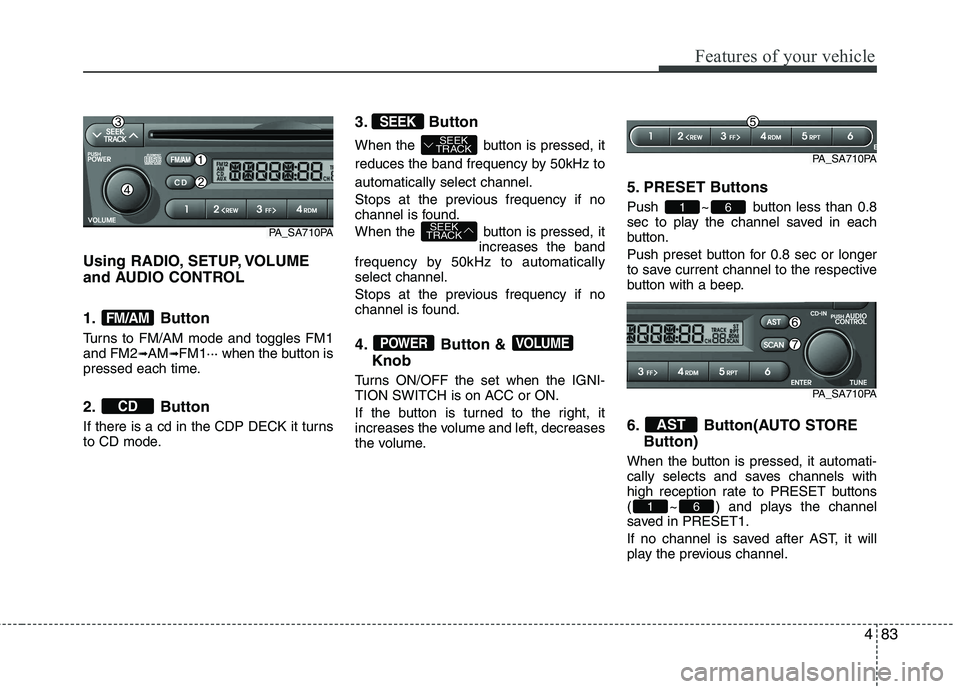
Using RADIO, SETUP, VOLUME
and AUDIO CONTROL
1. Button
Turns to FM/AM mode and toggles FM1 and FM2➟AM ➟FM1··· when the button is
pressed each time.
2. Button
If there is a cd in the CDP DECK it turns
to CD mode. 3. Button
When the button is pressed, it
reduces the band frequency by 50kHz toautomatically select channel.
Stops at the previous frequency if no
channel is found.
When the button is pressed, it
increases the band
frequency by 50kHz to automatically select channel.
Stops at the previous frequency if no
channel is found.
4. Button &
Knob
Turns ON/OFF the set when the IGNI-
TION SWITCH is on ACC or ON.
If the button is turned to the right, it
increases the volume and left, decreases
the volume. 5. PRESET Buttons
Push ~ button less than 0.8
sec to play the channel saved in each
button.
Push preset button for 0.8 sec or longer
to save current channel to the respective
button with a beep.
6. Button(AUTO STORE
Button)
When the button is pressed, it automati-
cally selects and saves channels with
high reception rate to PRESET buttons
( ~ ) and plays the channel
saved in PRESET1.
If no channel is saved after AST, it will
play the previous channel.
61
AST
61
VOLUMEPOWER
SEEK
TRACK
SEEK
TRACK
SEEK
CD
FM/AM
PA_SA710PA
PA_SA710PA
PA_SA710PA
Page 169 of 354

Features of your vehicle
90
4
- REGION (REGION MENU indication is
possible with RDS MENU)
Selects whether REGION code is used
(ON) or not (OFF) once the radio deter-
mines the AF jump condition. If AUTO isselected, AF jump condition is deter-mined automatically via PI reception sta-
tus.
- TA VOL (TA VOL MENU indication is possible with RDS MENU)
Adjusts the TA (Traffic Announcement)
volume level according to normal audio
volume level. - Time
Select this item to enter “Automatic Time
setting” mode (Auto, manual). ❋ Auto is Automatic RDS Time.
Select this item to enter Clock setup
mode. (12/24Hr., Auto, Time)
- 12/24 Hr.
Select “12/24 Hr.” button to enter Time
Format menu. - Time
Select “Time” button to enter Time set- ting. Adjust the hour and press the
button to set. Adjust the minute and
press the button to complete
and exit from clock adjustment mode.
Pressing the button while in
power off, screen will allow the user to
make immediately adjustments to the
clock.
8. Button & Knob
Turns on/off the set when the IGNITION
SWITCH is on ACC or ON. If the knob is
turned to the right, it increases the vol-
ume and left, decreases the volume.9. Button
When the button is pressed, it
reduces the band frequency by 50kHz
to automatically select channel. Stops
at the previous frequency if no channel
is found.
When the button is pressed, it increases the band frequency by50kHz to automatically select channel.
Stops at the previous frequency if no
channel is found.
10. PRESET Buttons
Push ~ buttons less than 0.8
sec to play the channel saved in each
button.
Push PRESET button for 0.8 sec or
longer to save current channel to the
respective button with a beep.
61
SEEKTRACK
SEEKTRACK
SEEK
VOLPOWER
SETUP
ENTER
ENTER
PA_PA710PAE
PA_PA710PAG
Page 183 of 354

Features of your vehicle
104
4
■
Bluetooth ®
Language Setting
The system language can be changed by
the following steps:
1. Power on the audio system with the volume set to an audible level.
2. Press and hold button on the steering wheel until the audio displays
“Please Wait”.
- The Bluetooth ®
system will reply in
currently selected language that it is
changing to the next language.
- System language cycles between FRENCH/GERMAN/UK ENGLISH
SPANISH/DUTCH/ITALIAN/DANISH/
RUSSIAN/POLISH/SWEDISH.
3. When completed, the audio display returns to normal.
4. Repeat steps 2 and 3 for the next lan- guage selection.
NOTE:
The phone needs to be paired again
after changing system language.
- Avoid resting your thumb or finger on the button as the language
could unintentionally change. ■
Voice Recognition Activation
in the Bluetooth ®
System can be acti-
vated in the following conditions:
- Button Activation
The voice recognition system will be
active when the button is pressed
and after the sound of a Beep.
- Active Listening The voice recognition system will be
active for a period of time when the
Voice Recognition system has asked
for a customer response.
from zero to nine while number greater
than ten will not be recognized.
system will announce "Pardon" or No
input voice signal from microphone. (Noresponse)
tion mode in following cases : When
pressing the button and saying
cancel following the beep. When notmaking a call and pressing the
button. When voice recognition has
failed 3 consecutive times.
will announce what commands are
available.
■ Menu tree
The menu tree identifies available voice recognition Bluetooth ®
functions.
Pair phone
Select phone
Change priority
Delete phone
Bluetooth off
Setup
Add entryPhonebook
Change
Delete name
By Phone
By voice
CallBy name
By number