Page 38 of 332
Safety features of your vehicle
28
3
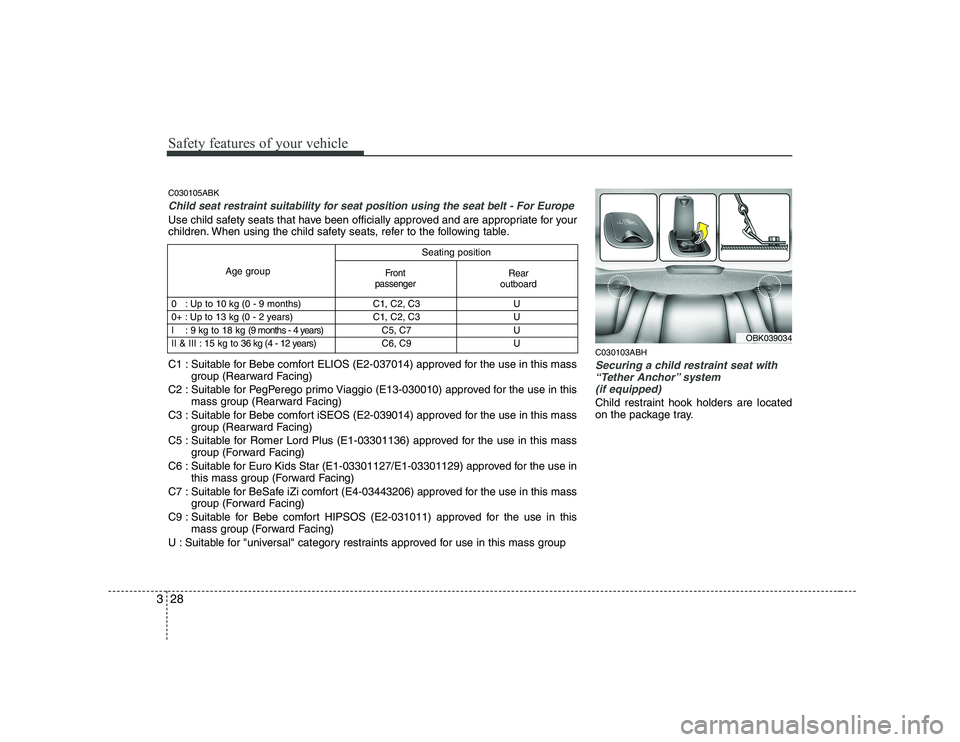
C030103ABH
Securing a child restraint seat with
“Tether Anchor” system (if equipped)
Child restraint hook holders are located
on the package tray.
Seating position
Age group
0 : Up to 10 kg (0 - 9 months) C1, C2, C3 U
0+ : Up to 13 kg (0 - 2 years) C1, C2, C3 U
I : 9 k g to 1 8 k g (9 months - 4 years) C5, C7
U
II & III : 15 kg to 36 kg (4 - 12 years) C6, C9 U
Front
passengerRear
outboard
C030105ABK
Child seat restraint suitability for seat position using the seat belt - For Europe
Use child safety seats that have been officially approved and are appropriate for your
children. When using the child safety seats, refer to the following table.
C1 : Suitable for Bebe comfort ELIOS (E2-037014) approved for the use in this mass group (Rearward Facing)
C2 : Suitable for PegPerego primo Viaggio (E13-030010) approved for the use in this mass group (Rearward Facing)
C3 : Suitable for Bebe comfort iSEOS (E2-039014) approved for the use in this mass group (Rearward Facing)
C5 : Suitable for Romer Lord Plus (E1-03301136) approved for the use in this mass group (Forward Facing)
C6 : Suitable for Euro Kids Star (E1-03301127/E1-03301129) approved for the use in this mass group (Forward Facing)
C7 : Suitable for BeSafe iZi comfort (E4-03443206) approved for the use in this mass group (Forward Facing)
C9 : Suitable for Bebe comfort HIPSOS (E2-031011) approved for the use in this mass group (Forward Facing)
U : Suitable for "universal" category restraints approved for use in this mass group
OBK039034
Page 39 of 332
329
Safety features of your vehicle
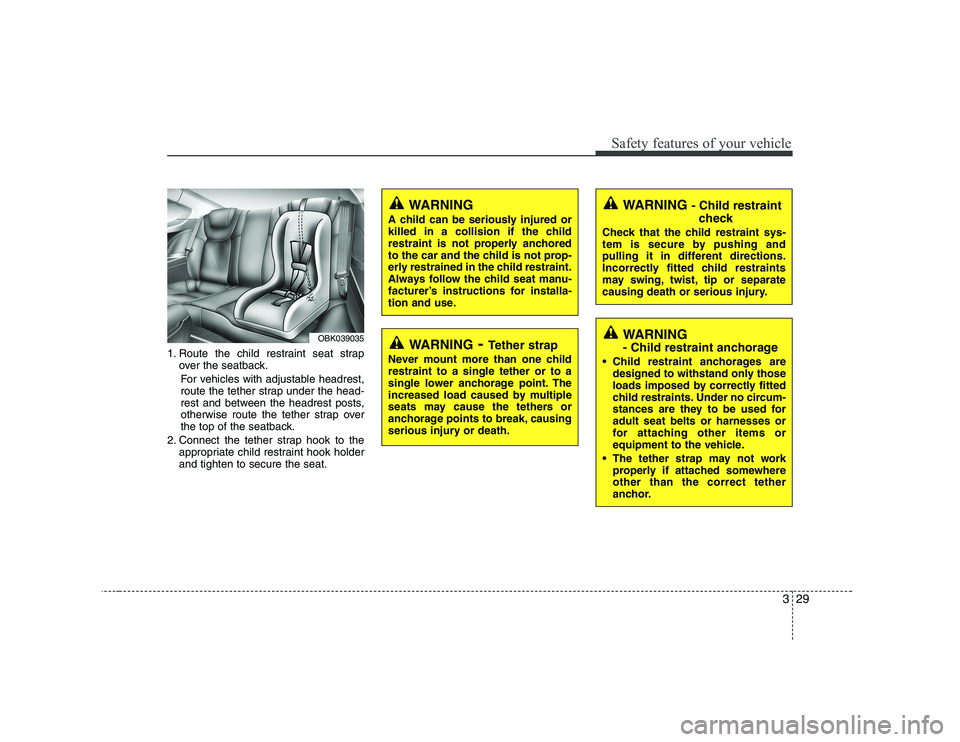
1. Route the child restraint seat strapover the seatback.
For vehicles with adjustable headrest,
route the tether strap under the head-
rest and between the headrest posts,
otherwise route the tether strap over
the top of the seatback.
2. Connect the tether strap hook to the appropriate child restraint hook holderand tighten to secure the seat.
WARNING - Child restraint
check
Check that the child restraint sys-
tem is secure by pushing and
pulling it in different directions.
Incorrectly fitted child restraints
may swing, twist, tip or separate
causing death or serious injury.
OBK039035WARNING
- Child restraint anchorage
Child restraint anchorages are designed to withstand only those
loads imposed by correctly fitted
child restraints. Under no circum-
stances are they to be used foradult seat belts or harnesses or
for attaching other items or
equipment to the vehicle.
The tether strap may not work properly if attached somewhereother than the correct tether
anchor.WARNING - Tether strap
Never mount more than one child restraint to a single tether or to a
single lower anchorage point. The
increased load caused by multiple
seats may cause the tethers or
anchorage points to break, causing
serious injury or death.
WARNING
A child can be seriously injured or
killed in a collision if the child
restraint is not properly anchored
to the car and the child is not prop-
erly restrained in the child restraint.
Always follow the child seat manu-
facturer’s instructions for installa-
tion and use.
Page 40 of 332
Safety features of your vehicle
30
3
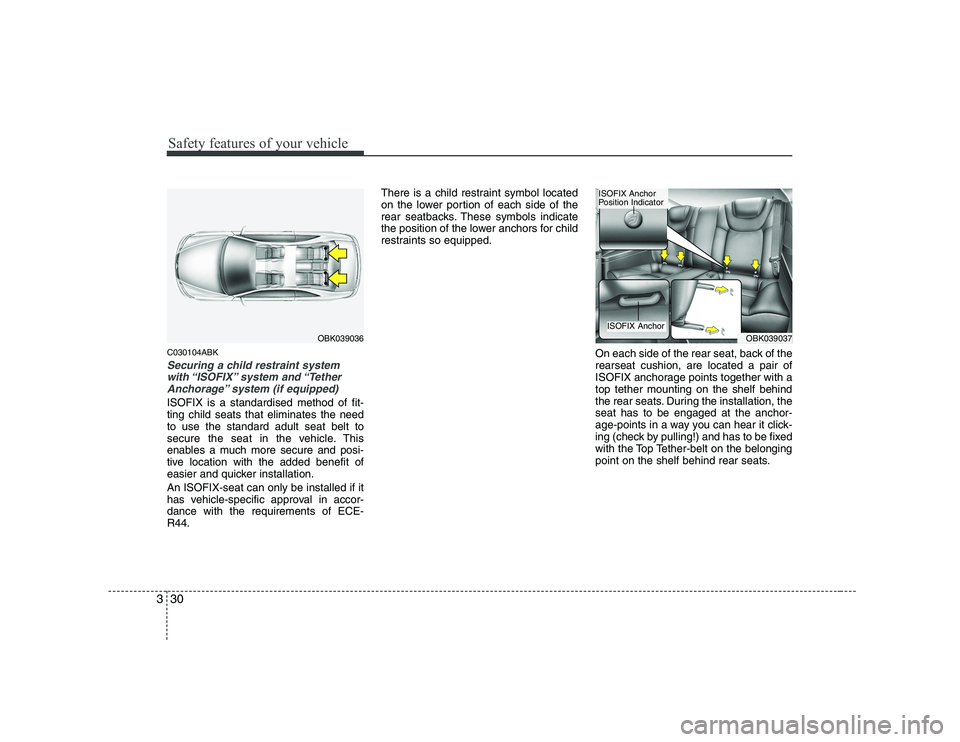
C030104ABK
Securing a child restraint system
with “ISOFIX” system and “Tether
Anchorage” system (if equipped)
ISOFIX is a standardised method of fit- ting child seats that eliminates the needto use the standard adult seat belt to
secure the seat in the vehicle. This
enables a much more secure and posi-
tive location with the added benefit of
easier and quicker installation. An ISOFIX-seat can only be installed if it
has vehicle-specific approval in accor-dance with the requirements of ECE-R44. There is a child restraint symbol located
on the lower portion of each side of the
rear seatbacks. These symbols indicate
the position of the lower anchors for child
restraints so equipped.
On each side of the rear seat, back of therearseat cushion, are located a pair of
ISOFIX anchorage points together with atop tether mounting on the shelf behind
the rear seats. During the installation, theseat has to be engaged at the anchor-
age-points in a way you can hear it click-
ing (check by pulling!) and has to be fixed
with the Top Tether-belt on the belonging
point on the shelf behind rear seats.
OBK039036OBK039037
ISOFIX Anchor
ISOFIX Anchor
Position Indicator
Page 41 of 332
331
Safety features of your vehicle
The installing and the use of a child-seat has to be done according to the
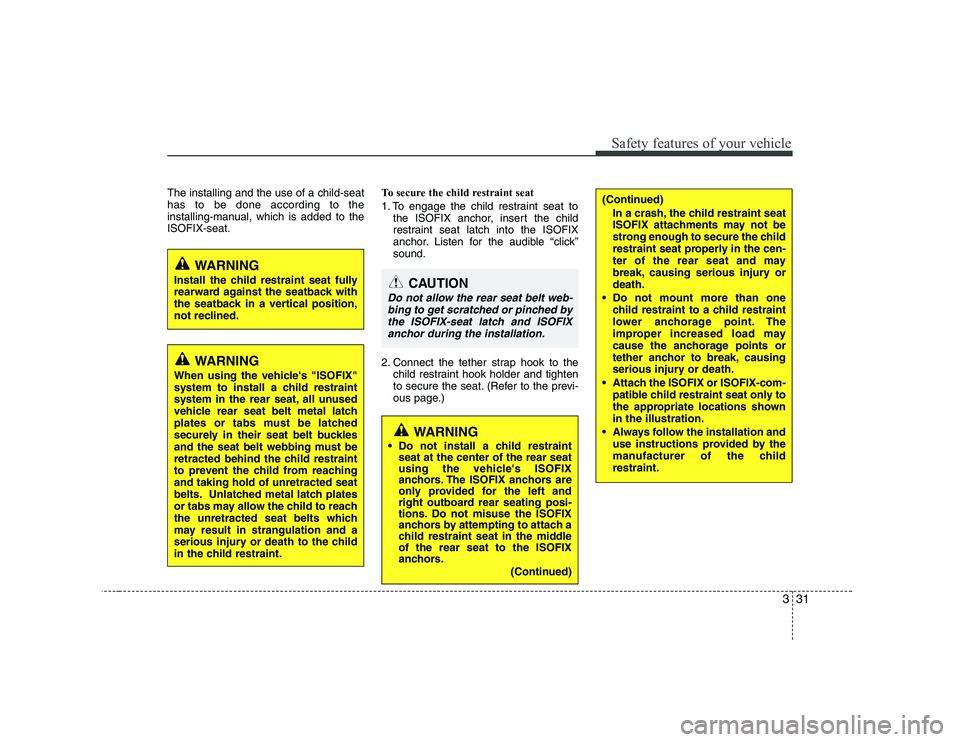
installing-manual, which is added to theISOFIX-seat.To secure the child restraint seat
1. To engage the child restraint seat to
the ISOFIX anchor, insert the child
restraint seat latch into the ISOFIX
anchor. Listen for the audible “click”sound.
2. Connect the tether strap hook to the child restraint hook holder and tighten
to secure the seat. (Refer to the previ-
ous page.)
WARNING
Install the child restraint seat fully
rearward against the seatback with
the seatback in a vertical position,
not reclined.
WARNING
When using the vehicle's "ISOFIX"
system to install a child restraint
system in the rear seat, all unused
vehicle rear seat belt metal latch
plates or tabs must be latched
securely in their seat belt buckles
and the seat belt webbing must be
retracted behind the child restraint
to prevent the child from reachingand taking hold of unretracted seat
belts. Unlatched metal latch plates
or tabs may allow the child to reach
the unretracted seat belts which
may result in strangulation and a
serious injury or death to the child
in the child restraint.
CAUTION
Do not allow the rear seat belt web- bing to get scratched or pinched bythe ISOFIX-seat latch and ISOFIXanchor during the installation.
WARNING
Do not install a child restraint seat at the center of the rear seat
using the vehicle's ISOFIX
anchors. The ISOFIX anchors are
only provided for the left and
right outboard rear seating posi-
tions. Do not misuse the ISOFIX
anchors by attempting to attach a
child restraint seat in the middleof the rear seat to the ISOFIX
anchors.
(Continued)
(Continued)
In a crash, the child restraint seat
ISOFIX attachments may not be
strong enough to secure the child
restraint seat properly in the cen-
ter of the rear seat and may
break, causing serious injury ordeath.
Do not mount more than one child restraint to a child restraint
lower anchorage point. The
improper increased load may
cause the anchorage points or
tether anchor to break, causing
serious injury or death.
Attach the ISOFIX or ISOFIX-com- patible child restraint seat only to
the appropriate locations shownin the illustration.
Always follow the installation and use instructions provided by the
manufacturer of the childrestraint.
Page 73 of 332
Features of your vehicle
12
4
D050100ABK
Operating door locks from out-
side the vehicle
Turn the key toward the rear of the
vehicle to unlock and toward the front
of the vehicle to lock.
If you lock/unlock any door with a key, all vehicle doors will lock/unlock auto-
matically. If the smart key does not operate nor-
mally, you can lock or unlock the door
by using the mechanical key. Depress
and hold the release button(1) and
remove the mechanical key(2).
Doors can also be locked and unlocked with the transmitter (or smart
key). (if equipped)
Once the doors are unlocked, they may be opened by pulling the door handle.
When closing the door, push the door by hand. Make sure that doors are
closed securely.
✽✽ NOTICE
Page 77 of 332

Features of your vehicle
16
4
D070200ABH Closing the trunk
To close, lower the trunk lid, then press
down on it until it locks. To be sure the
trunk lid is securely fastened, always
check by trying to pull it up again.
D070300ABK
Emergency trunk safety release
Your vehicle is equipped with an emer-
gency trunk safety release lever located
inside the trunk. If someone is inadver-
tently locked in the trunk, moving the
lever in the direction of the arrow will
release the trunk latch mechanism and
open the trunk.
OBK049008
WARNING
The trunk lid should be always kept
completely closed while the vehicle
is in motion. If it is left open or ajar,
poisonous exhaust gases mayenter the car and serious illness or
death may result.
WARNING
For emergencies, be fully aware of the location of the emergency
trunk safety release lever in this
vehicle and how to open the
trunk if you are accidentally
locked in the trunk.
No one should be allowed to occupy the trunk at any time. The
trunk is a very dangerous loca-
tion in the event of a crash.
Use the release lever for emer- gencies only. Use extreme cau-
tion, especially while the vehicleis in motion.
Page 82 of 332
421
Features of your vehicle
D090100AEN Opening the hood
1. Pull the release lever to unlatch thehood. The hood should pop open
slightly. 2. Go to the front of the vehicle, raise the
hood slightly, pull the secondary latch(1) inside of the hood center and liftthe hood (2).
3. Raise the hood. It will raise completely by itself after it has been raised about
halfway. D090200AEN Closing the hood
1. Before closing the hood, check the fol-
lowing:
must be correctly installed.
bustible material must be removed
from the engine compartment.
2. Lower the hood halfway and push down to securely lock in place.
HOOD
OBK049010OBK049011
Page 84 of 332
423
Features of your vehicle
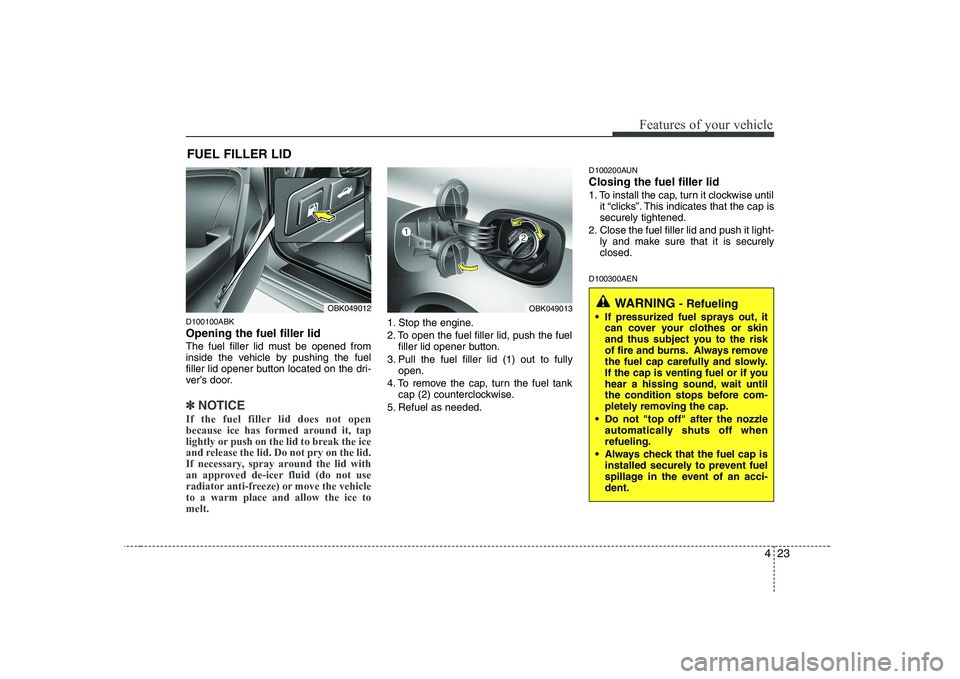
D100100ABK Opening the fuel filler lid
The fuel filler lid must be opened from
inside the vehicle by pushing the fuel
filler lid opener button located on the dri-
ver’s door.
✽✽NOTICE
If the fuel filler lid does not open
because ice has formed around it, tap
lightly or push on the lid to break the ice
and release the lid. Do not pry on the lid.
If necessary, spray around the lid with
an approved de-icer fluid (do not use
radiator anti-freeze) or move the vehicleto a warm place and allow the ice tomelt.
1. Stop the engine.
2. To open the fuel filler lid, push the fuel filler lid opener button.
3. Pull the fuel filler lid (1) out to fully open.
4. To remove the cap, turn the fuel tank cap (2) counterclockwise.
5. Refuel as needed. D100200AUN Closing the fuel filler lid
1. To install the cap, turn it clockwise until
it “clicks”. This indicates that the cap is securely tightened.
2. Close the fuel filler lid and push it light- ly and make sure that it is securelyclosed.
D100300AEN
FUEL FILLER LID
OBK049012OBK049013WARNING
- Refueling
If pressurized fuel sprays out, it can cover your clothes or skin
and thus subject you to the risk
of fire and burns. Always remove
the fuel cap carefully and slowly.
If the cap is venting fuel or if you
hear a hissing sound, wait until
the condition stops before com-
pletely removing the cap.
Do not "top off" after the nozzle automatically shuts off whenrefueling.
Always check that the fuel cap is installed securely to prevent fuel
spillage in the event of an acci-dent.