Page 235 of 322

611
What to do in an emergency
10. To reinstall the wheel, hold it onthe studs, put the wheel nuts on the studs and tighten them finger
tight. The nuts should be installedwith their tapered small diameter
ends directed inward. Jiggle thetire to be sure it is completely
seated, then tighten the nuts as
much as possible with your fin-gers again.
11. Insert the jack handle into the jack and turn it counterclockwise
to lower the vehicle to the
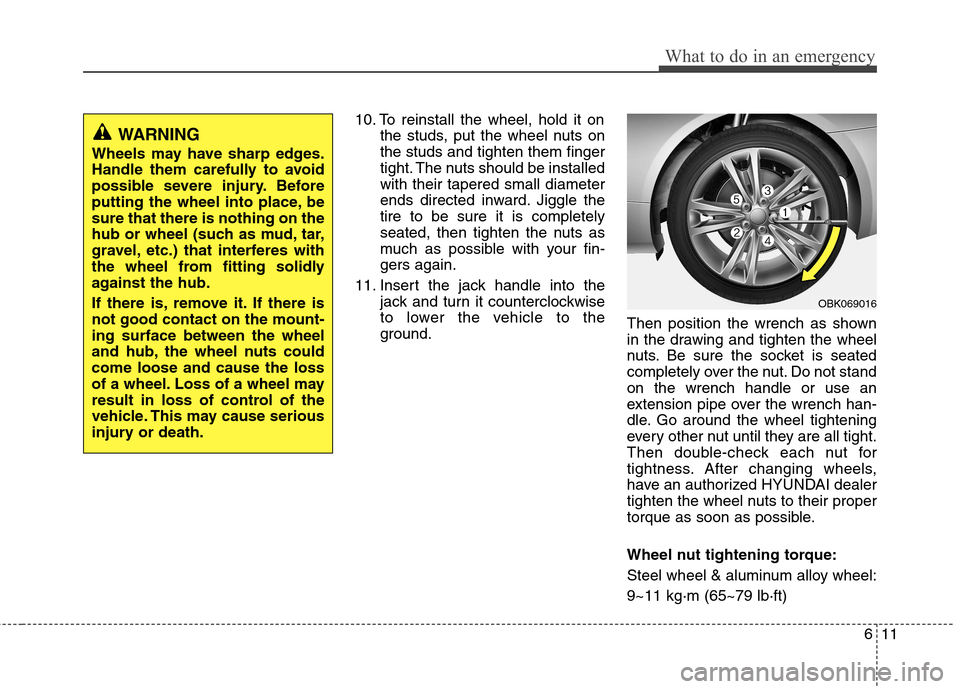
ground. Then position the wrench as shown
in the drawing and tighten the wheel
nuts. Be sure the socket is seated
completely over the nut. Do not standon the wrench handle or use an
extension pipe over the wrench han-
dle. Go around the wheel tightening
every other nut until they are all tight.
Then double-check each nut for
tightness. After changing wheels,
have an authorized HYUNDAI dealer
tighten the wheel nuts to their proper
torque as soon as possible.
Wheel nut tightening torque:
Steel wheel & aluminum alloy wheel:9~11 kg·m (65~79 lb·ft)
WARNING
Wheels may have sharp edges.
Handle them carefully to avoid
possible severe injury. Before
putting the wheel into place, besure that there is nothing on the
hub or wheel (such as mud, tar,
gravel, etc.) that interferes with
the wheel from fitting solidly
against the hub.
If there is, remove it. If there is not good contact on the mount-ing surface between the wheel
and hub, the wheel nuts couldcome loose and cause the loss
of a wheel. Loss of a wheel may
result in loss of control of the
vehicle. This may cause serious
injury or death.
OBK069016
Page 240 of 322
What to do in an emergency
16
6
When towing your vehicle in an emer- gency without wheel dollies :
1. Set the ignition switch in the ACC posi-
tion.
2. Place the shift lever in N (Neutral).
3. Release the parking brake.
F080200ABH
Removable towing hook (if equipped)
1. Open the trunk, and remove the tow-ing hook from the tool case.
2. Remove the hole cover pressing the lower part of the cover on the front or
rear bumper. 3. Install the towing hook by turning it
clockwise into the hole until it is fullysecured.
4. Remove the towing hook and install the cover after use.
CAUTION
Failure to place the shift lever in N
(Neutral) may cause internal dam-age to the transmission.
OBK069010
OBK069011
Front
Rear
Page 261 of 322

Maintenance
18
7
G060200AEN Changing the engine oil and filter
Have engine oil and filter changed by an
authorized HYUNDAI dealer according tothe Maintenance Schedule at the begin-ning of this section. G070000AUN The high-pressure cooling system has a
reservoir filled with year-round antifreeze
coolant. The reservoir is filled at the fac-
tory.
Check the antifreeze protection and
coolant level at least once a year, at thebeginning of the winter season, and
before traveling to a colder climate. G070100AEN
Checking the coolant level
WARNING
Used engine oil may cause irrita- tion or cancer of the skin if left in
contact with the skin for prolonged
periods of time. Used engine oil
contains chemicals that have
caused cancer in laboratory ani-
mals. Always protect your skin by
washing your hands thoroughlywith soap and warm water as soon
as possible after handling used oil.
ENGINE COOLANT
WARNING - Removing
radiator cap
Never attempt to remove the radi- ator cap while the engine is oper-
ating or hot. Doing so might leadto cooling system and engine
damage and could result in seri-
ous personal injury from escap-ing hot coolant or steam.
(Continued)
(Continued)
Turn the engine off and wait untilit cools down. Use extreme care
when removing the radiator cap.
Wrap a thick towel around it, and
turn it counterclockwise slowly to
the first stop. Step back while the
pressure is released from the
cooling system. When you aresure all the pressure has been
released, press down on the cap,
using a thick towel, and continue
turning counterclockwise to
remove it.
Even if the engine is not operat- ing, do not remove the radiatorcap or the drain plug while the
engine and radiator are hot. Hot
coolant and steam may still blow
out under pressure, causing seri-
ous injury.
Page 276 of 322
733
Maintenance
G190300ABK Reset items
Items should be reset after the battery
has been discharged or the battery hasbeen disconnected.
Sunroof (See section 4)
Trip computer (See section 4)
Climate control system (See section 4)
Clock (See section 4)
Audio (See section 4)
WARNING
Before performing maintenance or recharging the battery, turn off all accessories and stop the
engine.
The negative battery cable must be removed first and installed
last when the battery is discon-nected.
Operation related to the battery should be done in an authorized
HYUNDAI dealer.
CAUTION
Keep the battery away from water
or any liquid.
For your safety, use the authentic- ity by approved authorized
HYUNDAI dealer, when youreplace the battery.
Page 289 of 322
Maintenance
46
7
G210101AUN
Memory fuse
Your vehicle is equipped with a memory
fuse to prevent battery discharge if your
vehicle is parked without being operated
for prolonged periods. Use the following
procedures before parking the vehicle for
prolonged periods.
1. Turn off the engine.
2. Turn off the headlights and tail lights.
3. Open the driver’s side panel cover and
pull up the memory fuse.
✽✽ NOTICE
If the memory fuse is pulled up from the fuse panel, the warning chime,
audio, clock and interior lamps, etc.,
will not operate. Some items must be
reset after replacement. Refer to
“Battery” in this section.
Even though the memory fuse is
pulled up, the battery can still be dis-
charged by operation of the head-
lights or other electrical devices.
G210200AEN
Engine compartment fuse replacement
1. Turn the ignition switch and all other switches off.
2. Remove the fuse panel cover by pressing the tab and pulling up.
OBK079020
OBK079021
OBK079048
Page 298 of 322
755
Maintenance
6. Remove the headlight bulb cover byturning it counter clockwise.
7. Disconnect the headlight bulb socket connector.
8. Unsnap the headlight bulb retaining wire by depressing the end and push-
ing it upward.
9. Remove the bulb from the headlight assembly. 10. Install a new headlight bulb and snap
the headlight bulb retaining wire into
position by aligning the wire with the
groove on the bulb.
11. Connect the headlight bulb socket connector.
12. Install the headlight bulb cover by turning it clockwise.
13. Connect the power connector(s) to the back of the headlight assembly.
14. Reinstall the headlight assembly to the body of the vehicle.
(Continued)
If a bulb becomes damaged orcracked, replace it immediately
and carefully dispose of it.
Wear eye protection when chang- ing a bulb. Allow the bulb to cool
down before handling it.
OBK079045
Page 299 of 322

Maintenance
56
7
Turn signal light bulb replacement
6. Remove the socket from the assembly
by turning the socket counter clock-
wise until the tabs on the socket align
with the slots on the assembly.
7. Remove the bulb from the socket by pressing it in and rotating it until the
tabs on the bulb align with the slots in
the socket. Pull the bulb out of the
socket.
8. Insert a new bulb by inserting it into the socket and rotating it until it locks
into place.
9. Install the socket into the assembly by aligning the tabs on the socket with the
slots in the assembly. Push the socket
into the assembly and turn the socket
clockwise. G220103AENFront fog light bulb replacement
1. Remove the front bumper under cover
and reach your hand into the back of
the front bumper.
2. Disconnect the power connector from the socket.
3. Remove the bulb-socket from the housing by turning the socket counter
clockwise until the tabs on the socketalign with the slots on the housing.
4. Install the new bulb-socket into the housing by aligning the tabs on the
socket with the slots in the housing.
Push the socket into the housing and
turn the socket clockwise.
5. Connect the power connector to the socket.
6. Reinstall the front bumper under cover. G220102BEN
Headlight (HID type) bulb replace-
ment
If the light bulb is not operating, have the
vehicle checked by an authorized
HYUNDAI dealer.
OBK079046OBK079052N
WARNING - HID Headlight
low beam (if equipped)
Do not attempt to replace or
inspect the low beam (XENON bulb)
due to electric shock danger. If the
low beam (XENON bulb) is not
working, have your vehicle checked
by an authorized HYUNDAI Dealer
Page 301 of 322

Maintenance
58
7
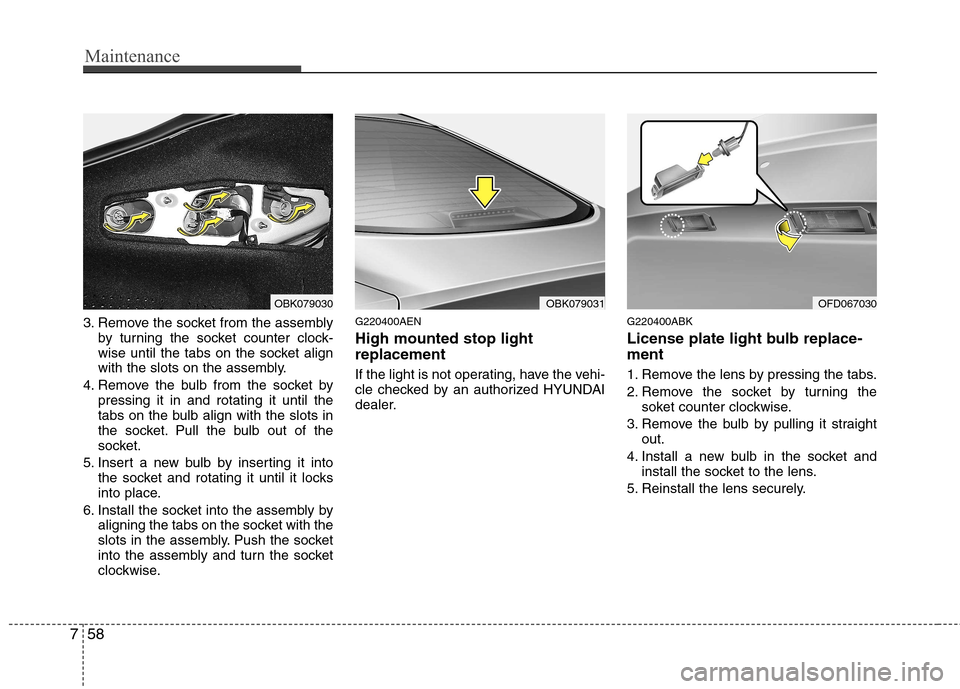
3. Remove the socket from the assembly
by turning the socket counter clock-
wise until the tabs on the socket align
with the slots on the assembly.
4. Remove the bulb from the socket by pressing it in and rotating it until the
tabs on the bulb align with the slots in
the socket. Pull the bulb out of the
socket.
5. Insert a new bulb by inserting it into the socket and rotating it until it locks
into place.
6. Install the socket into the assembly by aligning the tabs on the socket with the
slots in the assembly. Push the socket
into the assembly and turn the socket
clockwise. G220400AEN High mounted stop light replacement
If the light is not operating, have the vehi-
cle checked by an authorized HYUNDAI
dealer.
G220400ABK
License plate light bulb replace- ment
1. Remove the lens by pressing the tabs.
2. Remove the socket by turning the
soket counter clockwise.
3. Remove the bulb by pulling it straight out.
4. Install a new bulb in the socket and install the socket to the lens.
5. Reinstall the lens securely.
OBK079031OBK079030OFD067030