2010 Hyundai Accent ABS
[x] Cancel search: ABSPage 12 of 284

YOUR VEHICLE AT A GLANCE
F12B255A03MC-GAT INDICATOR SYMBOLS ON THE INSTRUMENT PANEL * More detailed explanations of these items will be found begining on page 1-60.
Turn Signal Indicator Lights
SRS (Airbag) Service Reminder Indicator (If Installed) O/D OFF Indicator Light (Automatic transaxle only) High Beam Indicator Light
Low Oil Pressure Warning Light
ABS Service Reminder Indicator (If Installed)
Door Ajar Warning Light
Parking Brake/Low Brake Fluid Level Warning Light
Charging System Warning Light Fuel Filter Warning Light (Diesel only)
Low Fuel Level Warning Light Diesel Pre-heat Indicator Light (Diesel only)
Malfunction Indicator Light (If Installed)
Immobilizer Warning Light (If Installed)
Passenger's Front Airbag OFF Indicator Light (If Installed)
Trunk Lid/Tail Gate Open Warning Light
Engine Coolant Temperature Warning Light Seat Belt Warning Light
Electronic Power Steering (EPS) System Warning Light (If Installed)
Electronic Stability Program Indicator Lights (If Installed)
120
km/hOverspeed Warning Light (If Installed)
Automatic Transaxle Position Indicator Light (If Installed)
Page 45 of 284

1
FEATURES OF YOUR HYUNDAI
33
B220D05MC
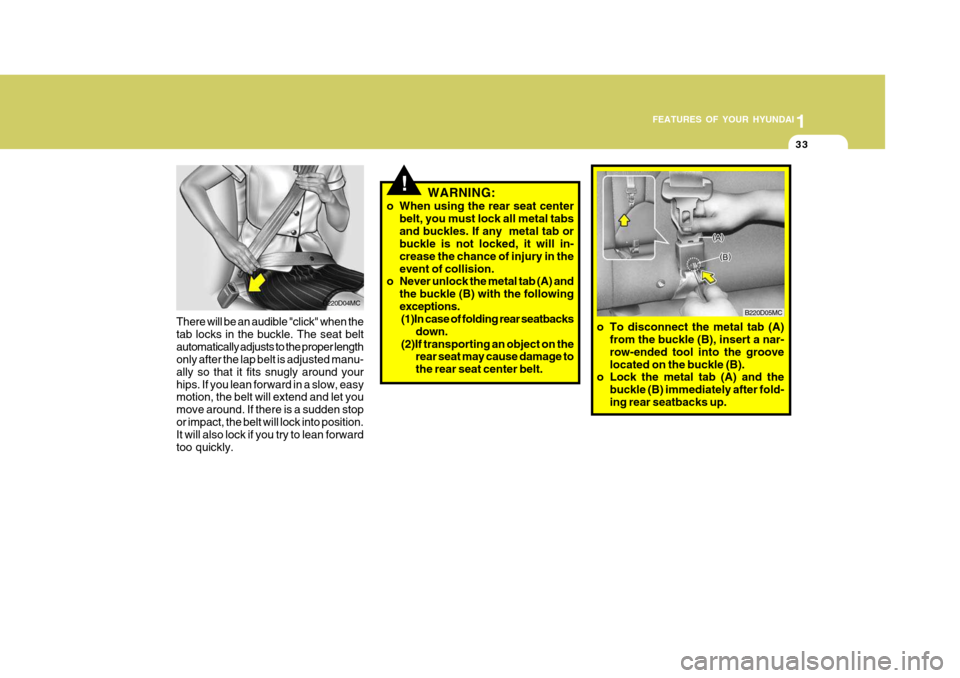
o To disconnect the metal tab (A) from the buckle (B), insert a nar- row-ended tool into the groovelocated on the buckle (B).
o Lock the metal tab (A) and the
buckle (B) immediately after fold-ing rear seatbacks up.
!WARNING:
o When using the rear seat center belt, you must lock all metal tabs and buckles. If any metal tab or buckle is not locked, it will in- crease the chance of injury in theevent of collision.
o Never unlock the metal tab (A) and
the buckle (B) with the followingexceptions.(1)In case of folding rear seatbacks
down.
(2)If transporting an object on the rear seat may cause damage tothe rear seat center belt.
B220D04MC
There will be an audible "click" when thetab locks in the buckle. The seat beltautomatically adjusts to the proper length only after the lap belt is adjusted manu- ally so that it fits snugly around yourhips. If you lean forward in a slow, easy motion, the belt will extend and let you move around. If there is a sudden stopor impact, the belt will lock into position. It will also lock if you try to lean forward too quickly.
Page 53 of 284

1
FEATURES OF YOUR HYUNDAI
41
o When using the vehicle’s "ISOFIX"
system to install a child restraint system in the rear seat, all unusedvehicle rear seat belt metal latch plates or tabs must be latched securely in their seat belt bucklesand the seat belt webbing must be retracted behind the child restraint to prevent the child from reachingand taking hold of unretracted seat
belts. Unlatched metal latch plates or tabs may allow the child toreach the unretracted seat belts which may result in strangulation and a serious injury or death to thechild in the child restraint.
o Do not mount more than one child
restraint to a child restraint loweranchorage point. The improper increased load may cause the an- chorage points or tether anchor tobreak, causing serious injury or death.
o Attach the ISOFIX or ISOFIX-com- patible child restraint seat only tothe appropriate locations shown in the illustration.
o Always follow the installation and use instructions provided by themanufacturer of the child restraint.
WARNING:
o Do not install a child restraint seat at the center of the rear seat using the vehicle's ISOFIX anchors. The ISOFIX anchors are only provided for the left and right outboard rear seating positions. Do not misusethe ISOFIX anchors by attempting to attach a child restraint seat in the middle of the rear seat to theISOFIX anchors. In a crash, the child restraint seat ISOFIX attach- ments may not be strong enoughto secure the child restraint seat properly in the center of the rear seat and may break, causing seri-ous injury or death.
B230D03MC
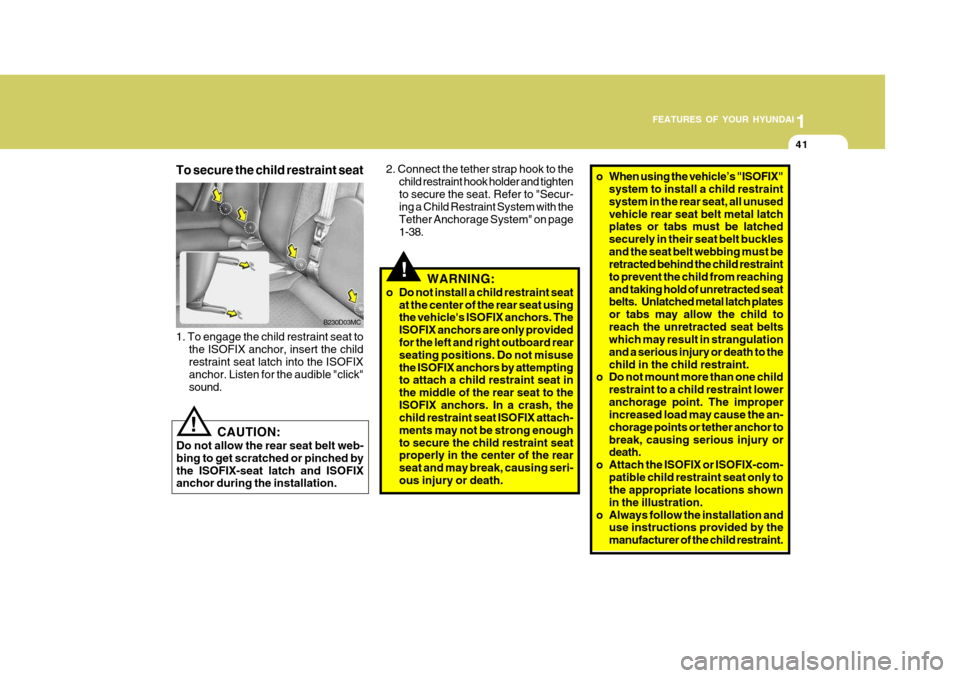
1. To engage the child restraint seat to the ISOFIX anchor, insert the childrestraint seat latch into the ISOFIX anchor. Listen for the audible "click" sound.
To secure the child restraint seat!
2. Connect the tether strap hook to the
child restraint hook holder and tighten to secure the seat. Refer to "Secur- ing a Child Restraint System with the Tether Anchorage System" on page1-38.
! CAUTION:
Do not allow the rear seat belt web- bing to get scratched or pinched bythe ISOFIX-seat latch and ISOFIX anchor during the installation.
Page 69 of 284

1
FEATURES OF YOUR HYUNDAI
57
1. Tachometer
2. Turn Signal Indicator Lights
3. High Beam Indicator Light
4. Automatic Transaxle Position Indicator Light (If Installed)
5. Odometer/Trip Odometer/Trip Computer (If Installed)
6. Overdrive Off Indicator Light (Automatic Transaxle only)
7. Speedometer
8. Fuel Filter Warning Light (Diesel only)
9. Diesel Pre-heat Indicator Light (Diesel only)
10. Passenger's Front Airbag OFF Indicator Light (If Installed)
11. Over Speed Warning Light (If Installed)
12. Door Ajar Warning Light
13. Charging System Warning Light 14. Parking Brake/Low Brake Fluid Level Warning Light
15. SRS (Airbag) Warning Light (If Installed)
16. Seat Belt Warning Light
17. Fuel Gauge
18. Engine Coolant Temperature Warning Light
19. Low Oil Pressure Warning Light
20. Low Fuel Warning Light
21. Immobilizer Warning Light (If Installed)
22. Trunk Lid/Tail Gate Open Warning Light
23. Malfunction Indicator Light (MIL) (If Installed)
24. Electronic Power Steering Warning Light (If Installed)
25. ABS Service Reminder Indicator Light (If Installed)
26. Electronic Stability Program (ESP) Indicator Lights
(If Installed)
Page 71 of 284

1
FEATURES OF YOUR HYUNDAI
59
1. Tachometer
2. Turn Signal Indicator Lights
3. Low Oil Pressure Warning Light
4. Automatic Transaxle Position Indicator Light (If Installed)
5. Odometer/Trip Odometer
6. SRS (Airbag) Warning Light (If Installed)
7. Malfunction Indicator Light (MIL) (If Installed)
8. Speedometer
9. Fuel Filter Warning Light (Diesel only)
10. Diesel Pre-heat Indicator Light (Diesel only)
11. Passenger's Front Airbag OFF Indicator Light (If Installed)
12. Over Speed Warning Light (If Installed)
13. Door Ajar Warning Light 14. Charging System Warning Light
15. Parking Brake/Low Brake Fluid Level Warning Light
16. Seat Belt Warning Light
17. High Beam Indicator Light
18. Fuel Gauge
19. Engine Coolant Temperature Warning Light
20. Overdrive Off Indicator Light (Automatic Transaxle only)
21. Low Fuel Warning Light
22. Immobilizer Warning Light (If Installed)
23. Trunk Lid/Tail Gate Open Warning Light
24. Electronic Power Steering Warning Light (If Installed)
25. ABS Service Reminder Indicator Light (If Installed)
26. Electronic Stability Program (ESP) Indicator Lights
(If Installed)
Page 73 of 284

1
FEATURES OF YOUR HYUNDAI
61
B260D01A-AAT Turn Signal Indicator Lights
The blinking green arrows on the instru- ment panel show the direction indicatedby the turn signals. If the arrow comes on but does not blink, blinks more rapidly than normal, or does not illumi-nate at all, a malfunction in the turn signal system is indicated. Your dealer should be consulted for repairs.
!
B260P02Y-GAT ABS Service Reminder Indicator (SRI) Light(If Installed)
When the key is turned to the "ON" position, the Anti-Lock Brake System SRI will come on and then go off in a fewseconds. If the ABS SRI remains on, comes on while driving, or does not come on when the key is turned to the"ON" position, this indicates that there may be a problem with the ABS. If this occurs, have your vehiclechecked by your Hyundai dealer as soon as possible. The normal braking system will still be operational, butwithout the assistance of the anti-lock brake system. B260C01A-AAT
O/D OFF Indicator (Automatic transaxleonly)
When the overdrive switch is turned on, the overdrive off indicator will go out. This amber indicator will be illuminated when the overdrive switch is turned off.
WARNING:
If both ABS SRI and Parking Brake/Brake fluid level warning lights re- main "ON" or come on while driving, there may be a problem with E.B.D(Electronic Brake Force Distribution). If this occurs, avoid sudden stops and have your vehicle checked byyour Hyundai dealer as soon as pos- sible.
Page 163 of 284

2
Engine Exhaust can be Dangerous! ............................. 2-2
Before Starting the Engine ............................................ 2-3
Key Position ................................................................. 2-4Starting ......................................................................... 2-5
Operating the Manual Transaxle .................................. 2-7
Automatic Transaxle ..................................................... 2-9Anti-lock Brake System (ABS) .................................... 2-13
Electronic Stability Program (ESP) ..............................2-14
Vehicle Stability Management (VSM) ..........................2-15
Rear Parking Assist System ....................................... 2-16
Good Braking Practices .............................................. 2-18
Driving for Economy .................................................... 2-19
Smooth Cornering ........................................................ 2-21
Winter Driving .............................................................. 2-21
Trailer or Vehicle Towing ............................................. 2-24
DRIVING YOUR HYUNDAI
2
Page 175 of 284

2
DRIVING YOUR HYUNDAI
13
2
DRIVING YOUR HYUNDAI
13
!WARNING:
ABS (ESP) will not prevent accidents due to improper or dangerous driv- ing maneuvers. Even though vehiclecontrol is improved during emer- gency braking, always maintain a safe distance between you and ob-jects ahead. Vehicle speeds should always be reduced during extreme road conditions. The braking distance for cars equipped with an anti-lock braking system (Electronic Stability Program)may be longer than for those without it in the following road conditions. During these conditions, the ve-hicle should be driven at reduced speeds.
o Rough, gravel or snow-covered roads.
o With tire chains installed.
o On roads where the road surface
is pitted or has different surface height. The safety features of an ABS (ESP) equipped vehicle should not be testedby high speed driving or cornering. This could endanger the safety of yourself or others.
ANTI-LOCK BRAKE SYSTEM
C120A01FC-GAT (If Installed) The Anti-Lock Brake System (ABS) is designed to prevent wheel lock-upduring sudden braking or on hazard- ous road surfaces. The ABS control module monitors the wheel speed andcontrols the pressure applied to each brake. Thus, in emergency situations or on slick roads, ABS will increasevehicle control during braking. NOTE:
o A click sound may be heard in the engine compartment when the ve- hicle begins to move after the en- gine is started. These conditionsare normal and indicate that the anti-lock brake system (Electronic Stability Program) is functioningproperly.
o During ABS (ESP) operation, a
slight pulsation may be felt in thebrake pedal when the brakes are applied. Also, a noise may be heard in the engine compartment whilebraking. These conditions are normal and indicate that the anti- lock brake system (Electronic Sta-bility Program) is functioning prop- erly.